
The P Retro is a fantastic preamp that provides a lot of tonal variety to your P Bass. Installation is very simple with absolutely no soldering and the ability to return your instrument to the stock condition at any time! This preamp was designed for the Fender P Bass but it should fit just about any P bass clone out there (as long as the cavity route is similar size and shape). You can always email me sales@bestbassger.com if you need assistance.
Step 1: Setup For the Install
The first step in installation is to remove the strings, knobs and pickguard screws from your bass. The bass I am using is a Fender Mexican P Bass. Make sure your bass is resting on something that will not scratch the finish during the installation process.

Step 2: Cut Wiring
Now you can lift the pickguard from your bass which is now only connected to your bass with 3 wires. There is a white and black wire coming from the pickup and another black wire coming from your bridge, which acts as a bridge ground. Carefully cut these wires where they connect to your pots, preserving as much wire length as you can. Your pickguard is now completely free from your bass. You can remove your volume and tone pots from the pickguard as well as your output jack.

Step 3: Install Active Stack Pot + New Jack
With your old pots and jack removed, you are now able to start installing the P Retro. First, you should attach the active stack pot which is attached to the jack. You need to make sure the circuit board is lined up in this direction (see picture below) to make sure that it will fit in your bass correctly. You can then install the new jack.

Step 4: Install Volume/Passive Tone Stack
Next, you can add the Volume/Passive Tone stack. Keep the circuit board pointing in the direction of the other pot to make sure it will fit in your electronics cavity. The P Retro comes with the battery zip tied to the circuit board of the Volume/Passive Tone stack so it will already be in place. I took the picture below with the battery pack removed.

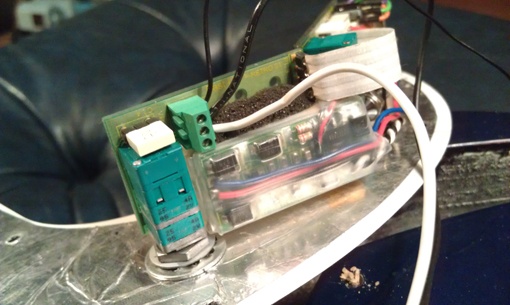
Step 5: Plug In Battery Pack + Connect Boards + Optional LED Light
Below is a picture of the P Retro with the battery pack. It comes from the factory zip tied into place. Once you have the Volume/Passive Tone pot in place you can cut the zip ties and plug the white connector coming from the battery into the terminal on the bass/treble stack pot marked on the picture with a red arrow. It can only be fully inserted in one direction.
At this point you should use the flat white ribbon cable to connect the two circuit boards together. One terminal is next to where you plugged in the battery pack and the other terminal is on the end of the other circuit board.
In this picture you can also see the white and black wires going to the LED light that I have chosen not to install. I did not wish to drill into my pickguard so I left the LED tucked away, and this is very common. If you do not mind drilling your pickguard you can install this LED which is helpful when charging. This LED turns red when the battery is in the charging phase and turns green when the battery is fully charged. The LED turns off when you are not charging. You can use a 6mm drill bit to drill a hole in your pickguard to mount the LED bezel.

Step 6: Wire Your Pickups
Now you are set to wire your pickups, which is completely solderless! Inside the installation guide you can find a diagram showing you the correct way to wire your pickup to the P Retro. You should strip off about 1/4″ of insulation from the white and black wires from your pickup as well as the ground wire from your bridge. When looking at the circuit board the white wire goes to the bottom terminal, while the black wire from your pickup goes to the middle terminal. Finally, the ground wire from your bridge goes to the top terminal. You will need a small flat screwdriver to tighten the set screws on the green wire terminal to connect each wire.
On the active stack circuit board you will see some red rectangles that house 6 DIP switches. These switches can be used to alter some parameters of the preamp, but
they come set up from the factory and it is not necessary to do anything with these. The installation guide that comes with the P Retro gives an in depth description of the
function of these DIP switches.

Step 7: Voila! Put Your Bass Back Together + Charge The Preamp
Once those three wires are connected you are ready to put your bass back together. Carefully put your pickguard in place, making sure that the circuit boards are lined up to clear the cavity. Also, make sure that you are not pinching any wires between the pots and the cavity walls. You can then reattach the pickguard with all of your screws and attach the new John East knobs that came with your P Retro. Normally, the P Retro comes with “Vintage Style” knobs that are wide and match the look of the P Bass quite nicely but I opted for the style of knob that comes with all of the other John East preamps, you can choose which you prefer. We have P Retros with “Vintage Style” knobs in chrome, black or gold, and we can even mix and match like the black bottom with chrome top combination you see here. (Matches the Babicz black bridges very nicely!)
The battery pack usually has some charge when brand new but you will want to fully charge it after installation. Plug the charger into your instrument’s jack and then plug the other end into the wall. The P Retro comes with 3 adapters for use in different countries. From fully discharged to fully charged takes about 4 hours, but you can top off the charge at any time.

Step 8: Enjoy Your New Tonal Variations!
If you have any questions or comments, feel free to email me at sales@bestbassgear.com or start a discussion on our blog.
Until Next Time!
Evan
Prewires & Tech Support (Electronics and Hardware)
BestBassGear.com
sales@bestbassgear.com
877.839.3531
[wp_bannerize]


I particularly like both of the desks and the brodeom set. I think you can click on an icon in the custom content creator—It’s either called share or package The same can be done for wallpapers and floors. But I’m not sure if that’s just for the exchange or what, cause I haven’t seen any furniture or walls on MTS3 or anywhere else
When are the john east preamps available for a precision bass again please? Thanks