
In this step we “magically” convert a vertical hole to a horizontal route so the ground wire can be snaked from the control cavity to the underside of the bridge (once installed) for a proper connection.
Below: The tools needed here are a short list. Drill, a 12-inch long bit with 1/8-inch end for bridge holes and 3/16-inch bit for pickup wire holes.

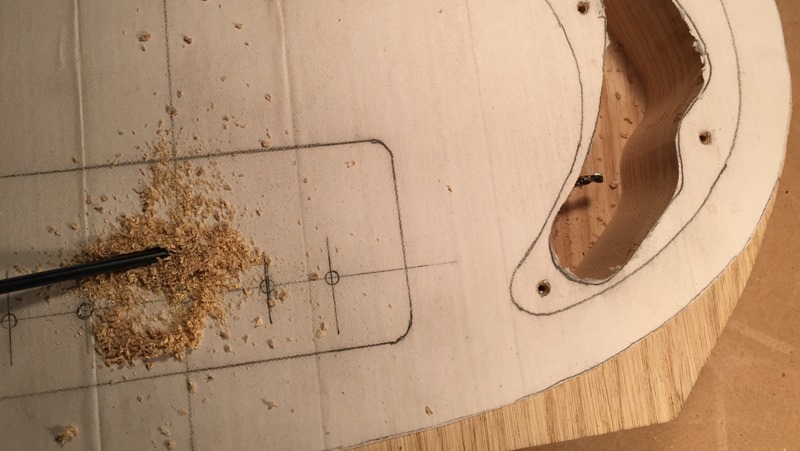
Below: Drilling the hole from the pickup cavity to control cavity


Below: The other side of the hole, control cavity side.


Below: The entire length of the hole with bit inside.

Below: Switched to 1/8-inch bit for bridge hole. This hole is specifically for the ground/earth wire to prevent mains hum (known commonly as 60 cycle hum in America.)


Below: The hole in the beginning is a straight. After that, the bit is slowly angled more (by the operator) with each pass until the angle is enough to where what once was a vertical route is now a horizontal route for the ground/earth wire to travel through.


Below: Hole is completed.


Final note: It is typical for the finalized hole to be “ugly” is fine since the bridge is going to completely cover it anyway.
Where are the rest of the build steps?
You can view them all here.


One trick that we use to keep from marring the wood while drilling holes for the pick up wires is a piece of brass tube over the drill bit. Protects the wood and allows the drill bit to spin freely. Not a much of a deal if you are installing a plastic pic guard.
Where are the exact placement for 5 screw pbass bridge holes drillef
I would recommend a thicker bit for the bridge ground. An 1/8″ bit of that length can bend very easily. With an ash body the grain might capture the bit, bending it to the path of least resistance. Don;t ask how I learned this.
exactly where I’m at. Post failure, that is. I can fix it, but I’m afraid to try again. the bit seems to just pull down and I never reach the control cavity. argh! Maybe Frankie can help.
Thank you for that advice, I have just started drilling an ash body for a ground wire and will take your tip!
The way I have minimized the marring of the wood when drilling the ground wire channel is to drill the bridge screw holes first then re-drilling the hole nearest the control cavity with a 10mm brad bit to a depth of about 3mm. Drilling into the wall of this recess allows for the drill bit to be raised to a greater angle relative to the body as the hole is being drilled from a point closer to the cavity than in your example reducing the amount of contact the bit makes with the body. My most recent drilling left only a very slight marring of about 3mm at the edge of the 10mm recess, barely noticeable. The waste from this hole tends to clog the bridge screw hole but that’s easily re-drilled.