
The feature bass this week is described as a “considerable upgrade.”
Builder Michael Jones writes:
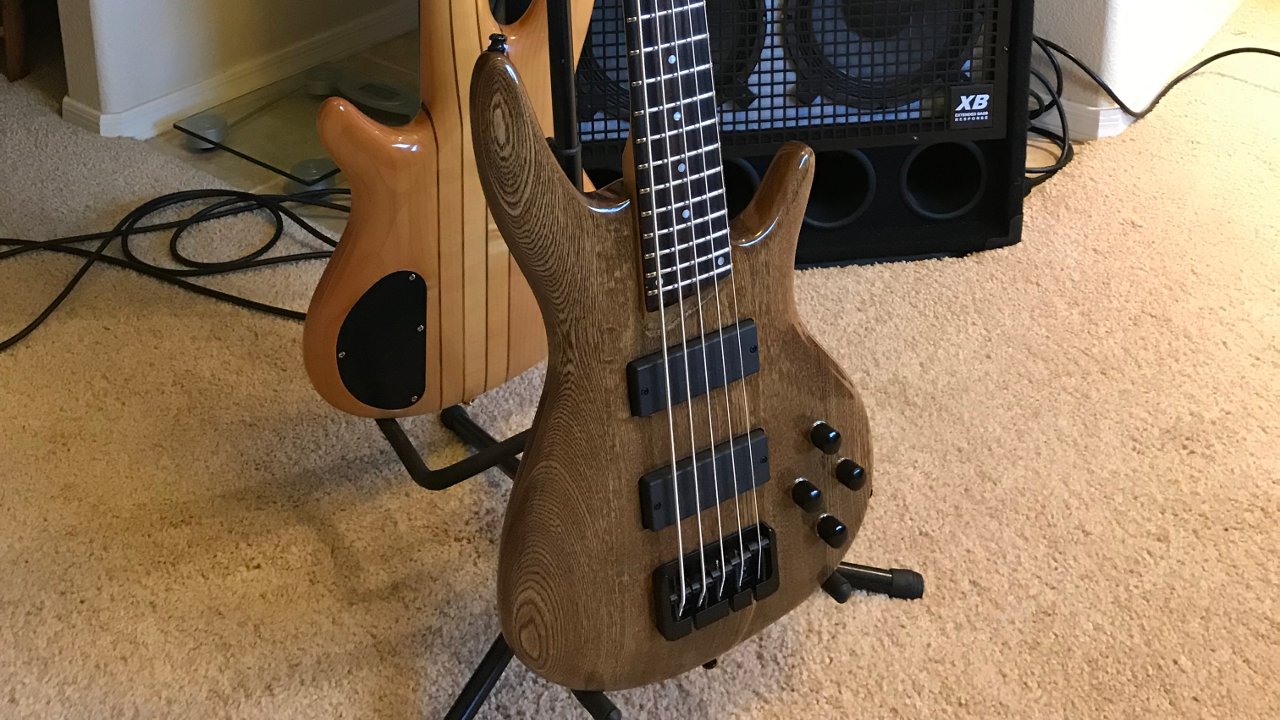
I had never attempted a guitar build before so I opted to go with a kit from ‘the Fret Wire’; they were great to work with and were willing to accommodate special requests. I started this build in April 2017 and completed it December 21st… working on it in my spare time. The basic kit would be good by itself for any beginner or novice bass player, having played for number of years I decided to upgrade… considerably. I read a number of online articles about people that have purchased kits and warned against spending a lot of money on upgrades… likened it to polishing “something” that can’t be polished. While doing my research I came across a website; www.bestbassgear.com this was a significant find to the success of my project. I ended up getting the majority of the important pieces from Best Bass Gear. I was no longer concerned that I wouldn’t be able to equip my new project with quality parts at fair prices. I made numerous upgrades; in fact I only ended up using the wood from the kit. The body is swamp ash, the neck is maple, and the fret board is rosewood. I knew what my desired result was, and did a considerable amount of research to achieve that result. Anyone reading this has many options; based on skill, budget, resources, and patience… you can create your own masterpiece or work of art.
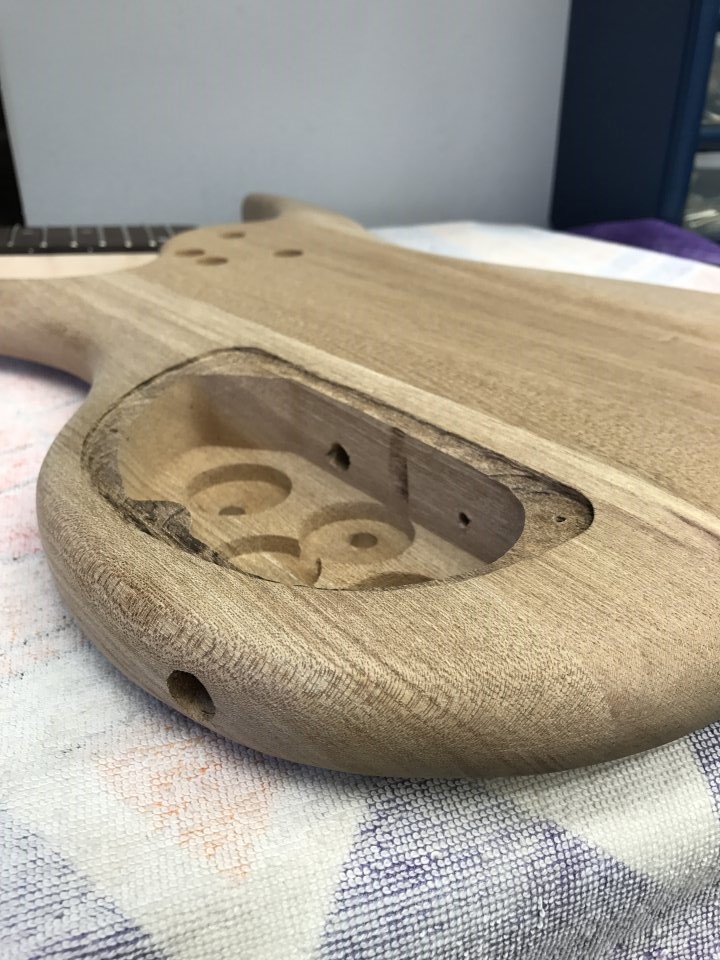
I started by recessing the edge of the electronics pocket so the cap would be flush in the back of the body
Next step was to sand the body, I worked my way from 200 up to 1500.
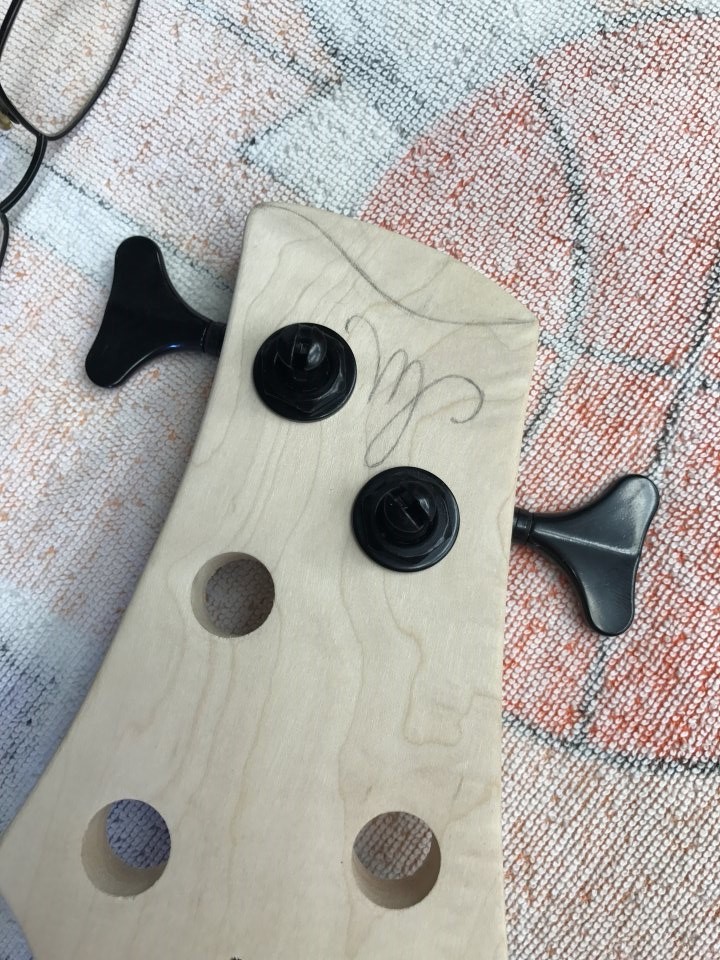
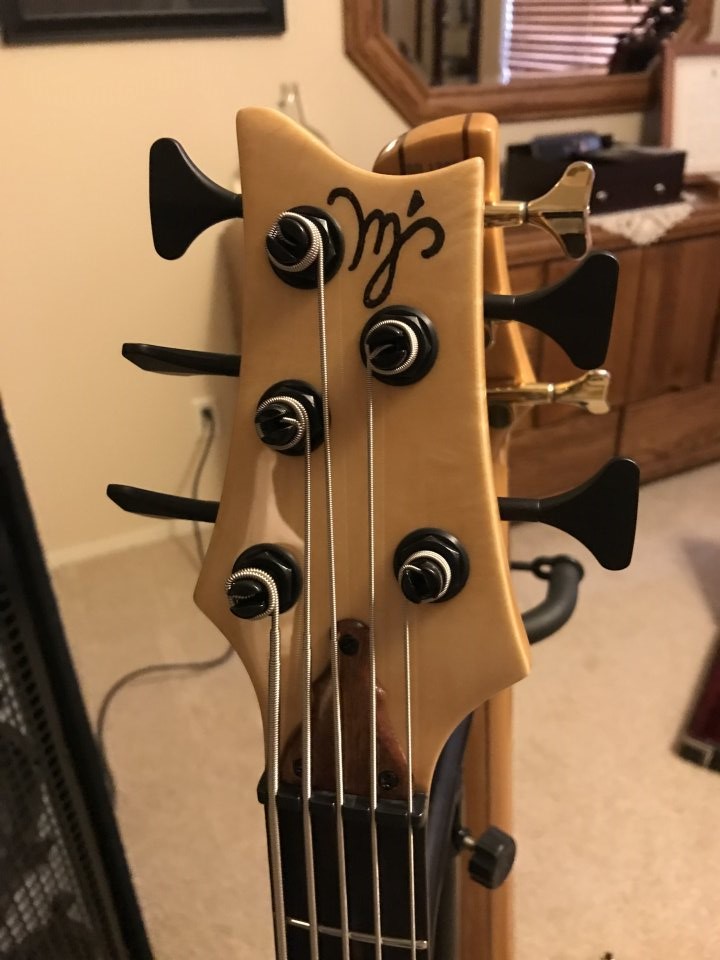
I decided to add a little extra to the head stock by trimming the top and engraving my monogram to the face.
Going a step further I created a fill out of the rosewood fretboard filings to do inlay into the engraved monogram.
The fretboard filings came from the end that connected to the body, I decided to do a wave finish to meet the body instead of a 90* jointm
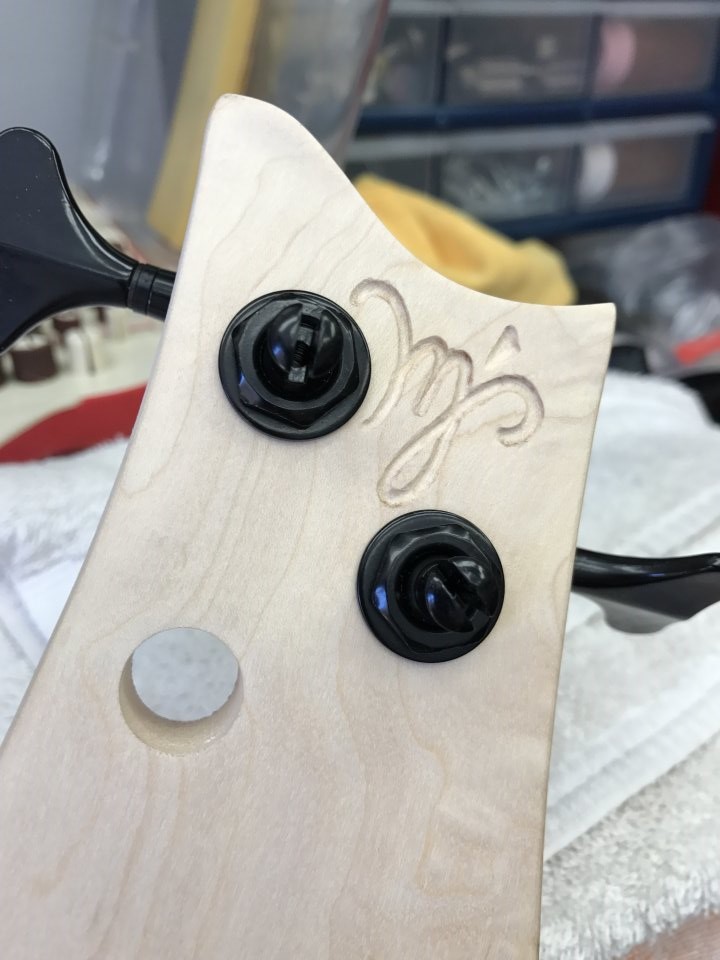
I filed down the inlay fill, and the monogram came to life… !
The neck was much easier to sand because of the maple, I worked it up to 1500 as well
After getting the finish pretty much complete I did a dry set up to see how everything would line up with the neck and the body. It did not line up well so I had to shim the neck (in the body pocket) before bolting it on.
I mounted the bridge, machine heads, strung it… and did a partial set up. A little disappointed in the neck and fretboard, it appears the fretboard was attached to the neck before the wood had a chance to cure and was not flat.
I did what I could to true up the frets… but to no avail.
Knowing I would end up with an undesired result I took the neck to Roberto Venn School of Luthiery in Phoenix, AZ. I met with their Director of Training, John R., who introduced me to Steve (a soon to be graduating student). Steve was starting his own company and eager to help solve my problem.
Steve ended up stripping out the frets and leveling the fretboard. After the fretboard was leveled he re-fretted the board. Before delivering it back to his first official customer, he polished out the frets and board… and it turned out amazing! A big thank you to Roberto Venn, John, and Steve.
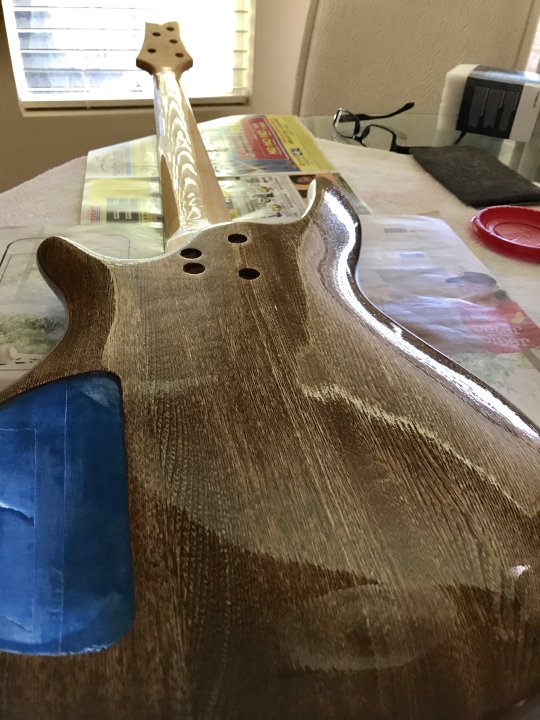
I was able to work on the body while the neck was in the shop, my choice for body finish ended up being a medium walnut stain and Tru-Oil (Birchwood Casey TM) for the finish. The body accumulated 30 coats of oil and wet sanding with 2000 between each coat.
When I got the neck back I decided to go with nitrocellulose lacquer to complete the contrast look I was going for… 25 coats.
After completing the finish I polished out the body and neck with fine and extra fine polishing compound.
The time involved, (and the re-dos) on the body and neck, was considerable. Some of that time just for the curing process… after polishing was complete the finish line was near.
“Capping” off the finish I decided to go with an African Mahogany cap for the truss rod nut, and a maple cover (to match the neck) for the wiring pocket. The black plastic didn’t seem to go with the look…
For electronics I went passive, I opted for CTS pots, and Bartolini Deep Tone Split Coil pickups. I changed the wiring diagram from two volume/two tone, to 1 volume, neck tone, bridge tone, and blend with center detent.
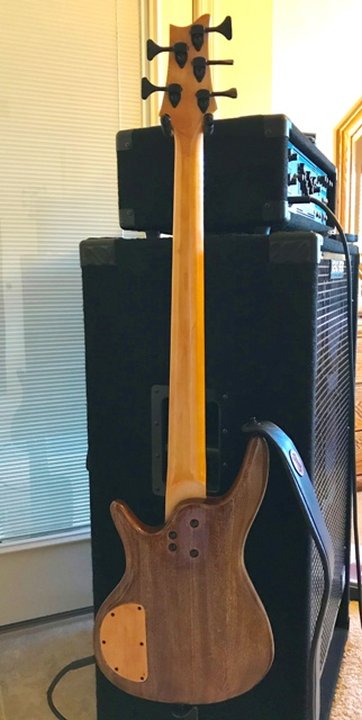
Hardware; I went with a Hipshot 5-String “B” Brass Bridge, and Hipshot Ultralite machine heads.
I went with a TUSQ nut instead of the plastic nut provided in the kit… very happy I did.
Set-up was a dream; truss rod adjusted quickly, saddle height action is nearly perfect, fitting the nut was a little work but came out very nice, and intonation perfect across the entire fretboard.
Pickup height was easy as well, the Bartolini dual coil deep tones are amazing!!!
So… there you have it, of course there are many more details in the making of any soup, and just like a good homemade soup you can certainly make it your particular flavor by adding or subtracting ingredients and spices. I really feel (for my purposes and goals) I found my special sauce. It ended up being a very nice playing weight of 7 pounds, and the feel and play-ability is effortless. It felt pretty good to receive some nice complements from my mentor, Steve E., and from my band mates at church. Special thanks to Best Bass Gear for having all of the parts I needed, and Steve for being patient and willing to share his knowledge while I continued to pester him for ‘secrets’ to building a great guitar. I love this bass.
Michael J.
Mesa, Arizona
Well done!
Want YOUR bass to be featured for Bass of the Week?
Submit yours now using our easy web form


Good work in the majority – I realise looks aren’t everything, and the testament of an instrument is how it feels and plays – even so the Logo/Monogram looks a bit “rustic”. I notice the edges are not clean, so it must have been that your tool for this was not up to the job. Some kind of rotary tool with really hard and high quality Flat milling bit would seem like a good option there. Maybe that is the look you wanted, if so – well…it’s your instrument. Also what is the String height at the nut like? I am a double bassist and we have v.small clearance there – but I can see a shadow on yours?
Would love to hear how it sounds – don’t be afraid to youtube it!!!
Again – well done, mate. And a good decision to modify a kit. Saves you a lot in tools whilst still being v. challenging.
Thanks for the comments Will… you are right, in that my first attempt to engrave/inlay was a bit primitive. That ship had already sailed and I wasn’t willing to try anything (at that point) to clean it up. The finish however atones for some of the “rustic” work underneath. Next time. 🙂
As for the string height; I spent the most time on that during my setup… it feels great up close to the nut end of the fingerboard. I played double bass as well and I understand what you are referring to. I think the shadow you are seeing is just the lighting in the room.
Thanks again for you input. Mj.
Cool bass, nice project! Every time you build, repair/replace or set-up an instrument you learn something and usually make new connections to other people in the music business.
This is the magic that helps you improve and can lead to ‘paying it forward’ by telling your story Thank you!.
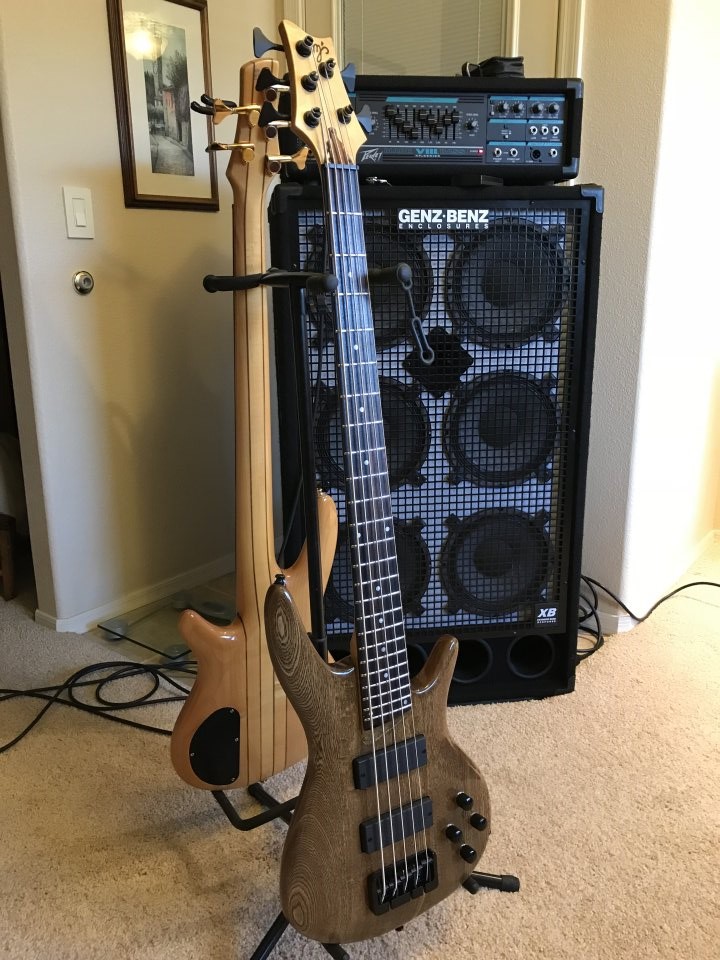
Love the Genz-Benz cabinet!
Also, is the other bass in the photo a Peavey Cirrus US Model? (It kind of looks like one)
Thanks Dave – I did learn a ton while doing this project!! Made a host of connections/friends along the way… great experience to craft an instrument that you love to play!
The blonde bass on the other side of the stand is an Ibanez SR1205 ca. 1993 active electronics, and yes neck through. Thank you to Charickter for catching that..
The other bass in an Ibanez SR1205NT, I believe.
Excellent work!
Thanks!!
you are a talented man!
Thanks so much… it was a rewarding and humbling experience, in the end I learned a lot and was happy with the results.
Looks like your persistence really paid off! Beautiful work. This one will be really part of you. Enjoy!
Thank you John… it was a great experience seeing/hearing it come to life. 🙂
Thank you John… It was a great feeling seeing/hearing it come to life!! Looking forward to my next build, 35″ fretless maybe??
I love that wood and the finish – it looks like something you would just love to run your fingers over. I go for “rustic”; however I think the overall appearance and finish is first class, particularly around the nut and truss rod access. Neat job – I like it a lot.
Thank you Anthony – It does feel good 🙂 It seemed a bit of a mystery every time I sanded down the latest coat of oil (or lacquer) but when it came time to buff it out… wow!! When the finish started to give the appearance of glass, I would just get a big grin on my face 🙂 I have a local source for interesting wood, when I picked out the the African mahogany for the truss rod cover I had a feeling it would be special.
Gorgeous!
Thank you Jim.. 🙂
Beautiful bass and cool wiring choice. I’ve never considered separate tone controls for each PU. And I dig the Genz 6 x 10. I’d get one if I could lift it. (I’m old)
Thanks Tom – I really appreciate your comments. As for the wiring… (for my playing style) I am in the camp of “less is more”. I like how the this particular set up turned out, it offers a wide range of tone and feel depending on where I position my hand. I dig the Genz as well… it really doesn’t move around too much anymore (I’m old too) 😉 I have smaller rigs for when I go on the road… Mj.