
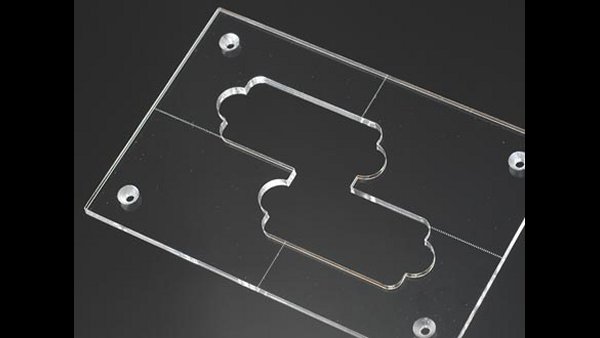
A bass guitar pickup template is nothing more than a guide so you can cut the proper sized holes in your bass guitar body to install your pickups in. While traditional luthiers prefer to draw out and cut their own templates from scratch, a pre-made template for many is easier to use (especially if you don’t know how to make your own templates), and that’s why they exist.
Are bass guitar pickup templates universally correct?
No. The first thing you should do before even thinking about making the first cut is making sure the pickup actually fits the template, because if it doesn’t, the pickups obviously won’t fit correctly after you’ve cut your holes.
The reason why templates are not universally correct is because pickup manufacturing processes differ from company to company, resulting in dimensions that can’t be seen by the naked eye.
In plain English: The plastic mold for a pickup from one company is rarely the exact same dimensions as a mold from another – even if it’s the exact same pickup model. One will typically be a few thousandths of an inch different in dimensions. This is something you can’t see at first glance, and that’s why you make sure the pickup fits the template in the first place before grabbing your router and cutting.
1/4-inch Acrylic or 1/2-inch MDF template?
Acrylic and MDF are template materials you can choose from. The visual difference between acrylic and MDF is that one is transparent and one is opaque. The thickness difference template-wise is that acrylic is 1/4-inch and MDF is 1/2-inch.
(Best Bass Gear offers these templates and are available now. You can check them out right here.)
When using an MDF template, while you cannot see through your template, you are cutting through more template material, and that extra thickness gives the bearing more material to rest against while making your cut; this is something you may feel more comfortable working with.
Another advantage of using a thicker template material is that you have more adjustability, as you have more room to adjust the router’s cutter head up and down.
IMPORTANT NOTE: Adjusting the cutter head upward so much that the bearing does not register is very bad idea, as cutting that way could instantly ruin the whole project. See examples of do’s and don’ts below.
What’s the right way to perform your cuts?
This is best shown by image example; here are a few do’s and don’ts.
Fig. 1
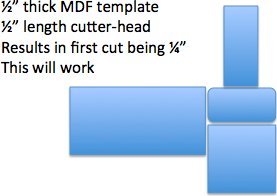
Acquiring a 1/2-inch length (and diameter) cutter head is easily available and this is most likely what you will be using. When you perform your cut as shown above, you shouldn’t have any issues.
Fig. 2
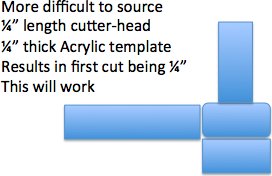
Acquiring a 1/4-inch cutter head with 1/2-inch diameter is not generally available as it is a specialty item. While the cutting method above works nicely, your only real problem will be actually finding a cutter head with the shorter 1/4-inch measurement. Again, when performing your cut as shown above, you shouldn’t have issues.
Fig. 3
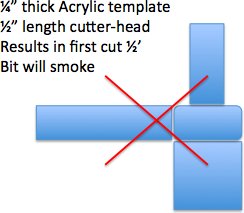
The above is an incorrect way of performing your cut, with the end result being a bit that will actually smoke.
Fig. 4
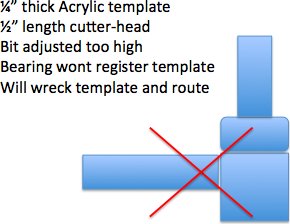
In the above incorrect example, the bit is adjusted too high to where the bearing won’t register on the template, resulting in not only a destroyed template but also a wrecked route.
What to do about the corners?
When cutting with a 1/2-inch cutter head with 1/2-inch diameter, this will result in corners with a 1/4-inch radius. For most pickup installations, this is too round of a corner.
One solution is to use a straight 1/4-inch bit that has no bearing, where you can adjust the 1/4-inch bit so the shaft goes against the template, resulting in a 1/8th radius in each corner.
How much reveal around the pickup should you have?
The hole must be cut larger than the actual pickup so the pickup fits correctly, but how much larger should the hole be?
Ultimately it is up to your discretion as to how much space you want around the pickup, but if you’re not sure, a 1mm reveal works for most pickups.
This is what’s meant by reveal:
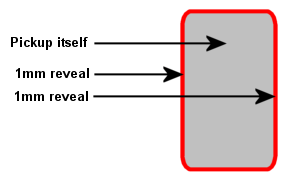
The red border is the reveal, and it’s the space around the pickup once installed. It’s important to note you don’t have to have a 1mm reveal. You could have a 0.7mm per side reveal or even tighter if you want to hide as much of the cavity as possible, but bear in mind that for pickup leaning adjustment, a 1mm reveal works well.
Important notes about the the consquences of a fit that’s too tight
Pickups that are installed into holes where it’s a very tight fit can end up in disaster – but you won’t see it immediately. When the wood dries, it will contract; the disaster is when you take your bass out of its case one day and see wood splits where your pickups are installed. The reveal you place around your pickups actually serves two purposes. First is so you can adjust/tilt your pickups properly, and the second is to actually prevent wood splitting due to the wood contracting.
This is not to say you should have a huge reveal around your pickups, but you should provide enough space to give the wood enough room to move when it contracts.
Final notes
It cannot be stressed enough that woodwork of this type must be done slowly. You must take your time and cut using slow, steady passes. Rush the job, and you’ll not only ruin the template but probably the bass guitar body as well.
Only attempt at your own risk. Best Bass Gear is not responsible or liable should you encounter injury or damage your instrument or tools. As always, take the proper safety precautions and always wear your safety goggles. If at any point you feel uncomfortable with your project, bring your instrument to a professional luthier to finish the work. Also, it’s highly suggested that if you’re never done this kind of woodwork before to perform a test cut on a piece of scrap wood first where you can make all the mistakes you want before moving on to the real thing.
Have a question? Best Bass Gear is more than happy to help. Give us a call at 1-877-839-3531 or send us an email. We can assist in helping you choose the best template type for your project , explain template materials, why they matter, and much more.

