Seymour Duncan SRB-1 Rickenbacker Wiring Diagram
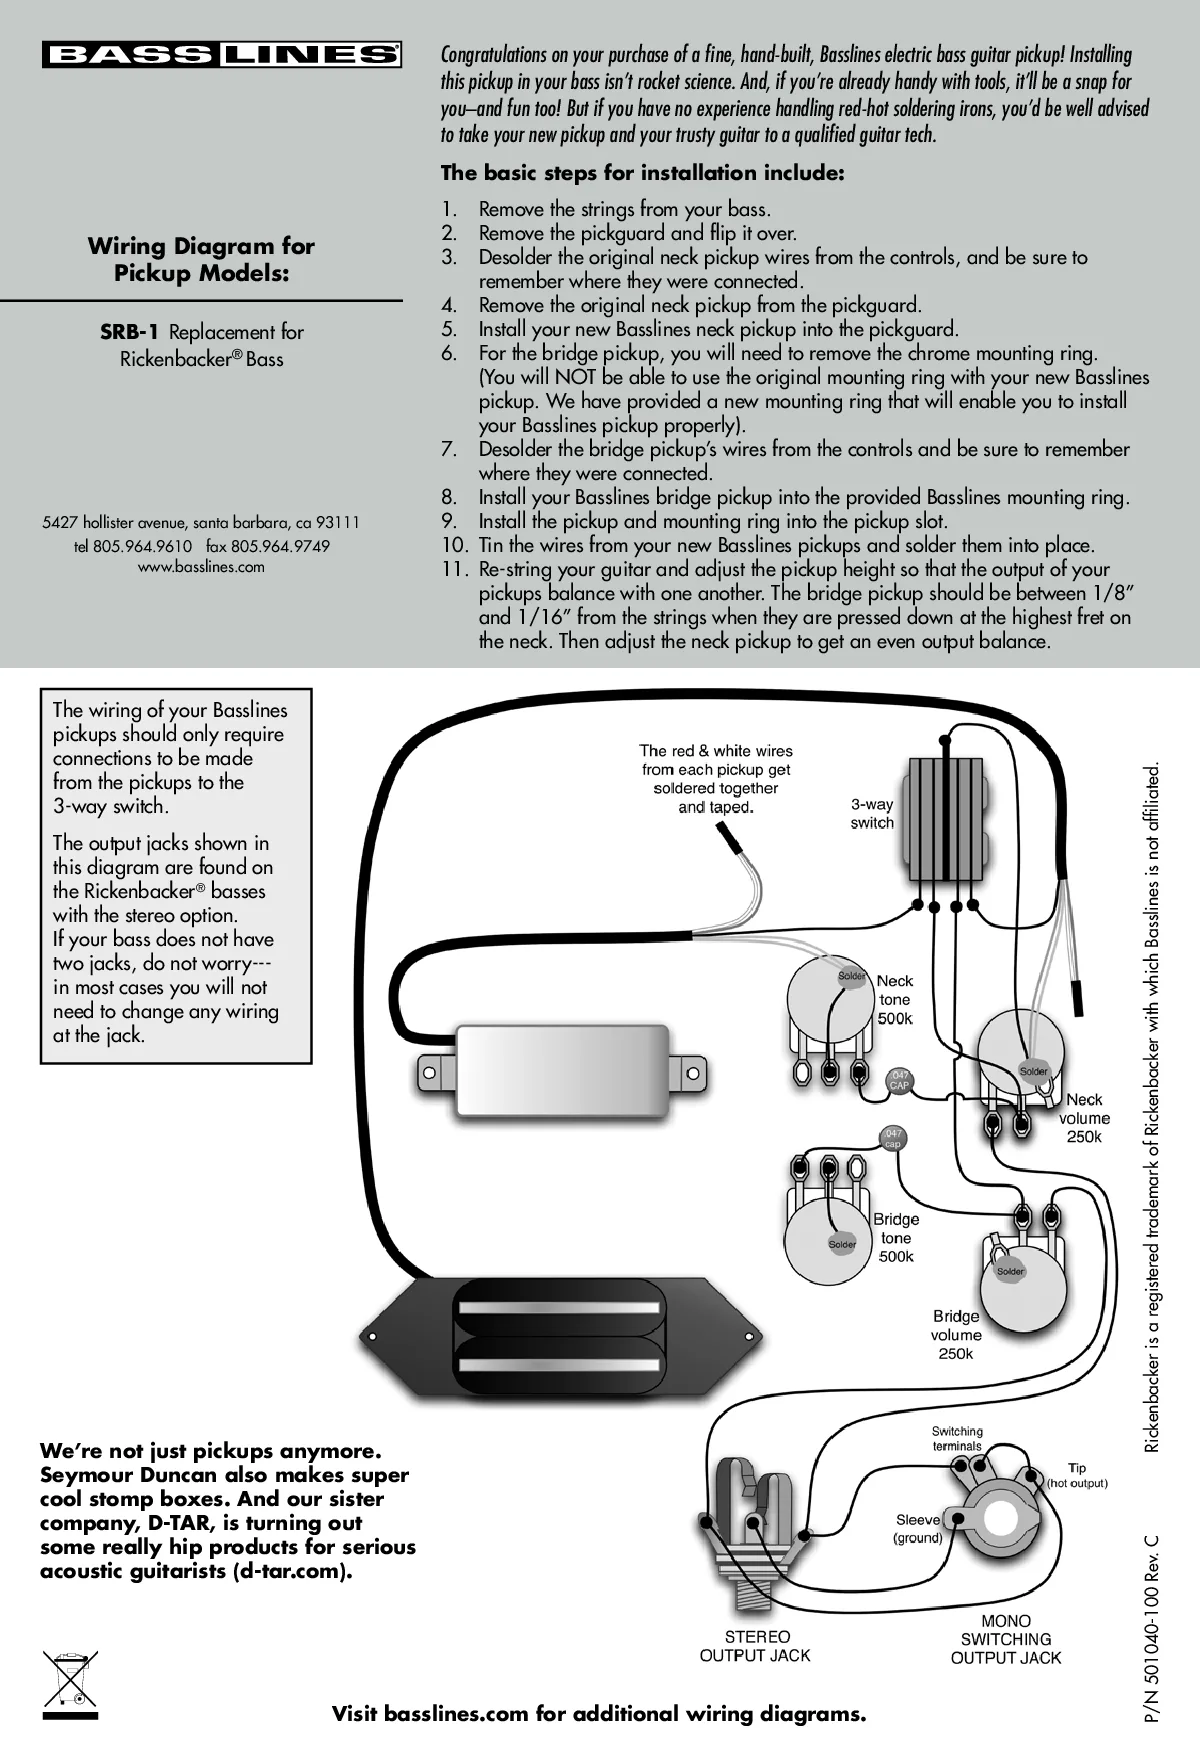
Basslines (Seymour Duncan) wiring and install steps for the SRB-1 replacement pickups in a Rickenbacker bass. The wiring should only need connections from the pickups to the 3-way switch. The bridge pickup goes in the new mounting ring that comes with it.
Before you solder
- The red and white wires from each pickup get soldered together and taped.
- Controls shown: neck and bridge volume 250K, neck and bridge tone 500K, .047 caps.
- Bridge pickup: the original chrome mounting ring won't fit. Use the Basslines ring that comes with the pickup.
- The two output jacks are for Rickenbackers with the stereo option. With one jack you usually won't need to change any jack wiring.
- Set the bridge pickup 1/16" to 1/8" from the strings with them pressed at the highest fret. Then set the neck pickup to match the output.
Every diagram, wire by wire
The SRB-1 hookup as text: what goes where on the 3-way switch.
How to read these
- Seymour Duncan pickups are usually black = hot, green and bare = ground. Check the color card that comes with your pickup.
Seymour Duncan SRB-1 in a Rickenbacker: pickups to the 3-way switch
Only the pickup leads change. Each SRB-1's red and white wires are joined and taped, and its remaining leads go where the old pickup's leads were on the 3-way switch. The Rickenbacker volumes, tones and jacks stay as they are.
You need: SRB-1 neck and bridge pickups, Basslines bridge mounting ring (included).
| # | From | To | Notes |
|---|---|---|---|
| 1 | Neck SRB-1: Hot lead | 3-way switch: Neck pickup lug | Where the old neck hot was |
| 2 | Bridge SRB-1: Hot lead | 3-way switch: Bridge pickup lug | Where the old bridge hot was |
| 3 | Neck SRB-1: Ground + shield | 3-way switch: Ground lug | |
| 4 | Bridge SRB-1: Ground + shield | 3-way switch: Ground lug |
| Pickup | What to do |
|---|---|
| Both pickups | Solder the red and white wires together and tape the joint |
Step by step
- Note the old wiring. Remove the strings and pickguard. Before unsoldering the old pickups, note exactly where each lead goes on the 3-way switch.
- Neck pickup. Remove the original neck pickup and fit the SRB-1 neck pickup in the pickguard.
- Bridge pickup. Remove the chrome mounting ring (it won't fit) and mount the SRB-1 bridge pickup in the Basslines ring that comes with it.
- Wire to the switch. Tin the leads. Join red and white and tape them. Solder the hot and ground leads where the old pickup's leads were.
- Set the height. Restring. Bridge pickup 1/16" to 1/8" from the strings pressed at the highest fret, then set the neck pickup for even output.
- The two jacks shown are for Rickenbackers with the stereo option. With one jack you usually don't need to change the jack wiring.
- Controls in the drawing: neck and bridge volume 250K, neck and bridge tone 500K, .047 µF caps.
Parts in this diagram
FAQ
Do I need to rewire the pots for SRB-1 pickups?
Usually not. The only connections should be from the pickups to the 3-way switch.
Can I reuse the Rickenbacker bridge pickup ring?
No. Use the new Basslines mounting ring that comes with the pickup.
How high should the bridge pickup be?
Between 1/16" and 1/8" from the strings, pressed at the highest fret. Then set the neck pickup for an even balance.
Related diagrams
- Seymour Duncan STC-3M3 / STC-3M4 Wiring Diagram
- All bass wiring diagrams
- Manuals and dimension drawings
Questions about your install? Email sales@bestbassgear.com.