Aguilar OBP-1 Wiring Diagrams
Aguilar's OBP-1 is a 2-band (bass and treble) 18V onboard preamp. This page has seven OBP-1 hookups: Aguilar's four (blend and volume, one volume, an on/off bypass switch, two volumes) and three drawn by Best Bass Gear with a push-pull active/passive volume and stacked volumes, with or without a passive tone. All pots are shown from the rear.
Before you solder
- Bass and treble pots are 25K. The stacked versions use one dual 25K pot.
- The OBP-1 needs 18V: two 9V batteries in series. The output must be a stereo jack: inserting a 1/4" plug powers the preamp.
- The bass pot takes two wires (VIO and ORG) and its third lug stays empty. The two orange wires are interchangeable.
- Blend (dual audio) and volume values depend on your pickups. Use the values your pickup maker recommends.
- On a standard jack, the tip lug sits across from the actual tip, and the ground lug is the center lug.
Every diagram, wire by wire
All seven OBP-1 layouts as text, with the original drawing, a connection diagram and a wire table for each hookup.
- Aguilar OBP-1 with blend and volume (2 pickups)
- Aguilar OBP-1 with one volume
- Aguilar OBP-1 with an on/off (bypass) switch
- Aguilar OBP-1 with two volume pots
- Aguilar OBP-1 with push-pull A/P volume, blend, treble and bass
- Aguilar OBP-1 with stacked volumes, treble, bass and A/P switch
- Aguilar OBP-1 with stacked volumes, passive tone, treble, bass and A/P switch
How to read these
- Pots are shown from the back with the lugs up: left, middle and right lug mean that view.
- Module wires use Aguilar's color names: VIO, ORG, WHT, GRY for the EQ, and BLU (input), GRN (output), BLK (ground), RED (+) for the rest.
- Ground means the back of a pot casing or the jack sleeve.
Aguilar OBP-1 with blend and volume (2 pickups)
Aguilar's main OBP-1 hookup: two pickups into a blend and a volume, then the OBP-1 with 25K bass and treble pots, two 9V batteries and a stereo jack.
You need: OBP-1 module, 2 pots 25K: bass, treble, dual-audio blend pot, volume pot (value to suit the pickups), 2 x 9V batteries, stereo output jack.
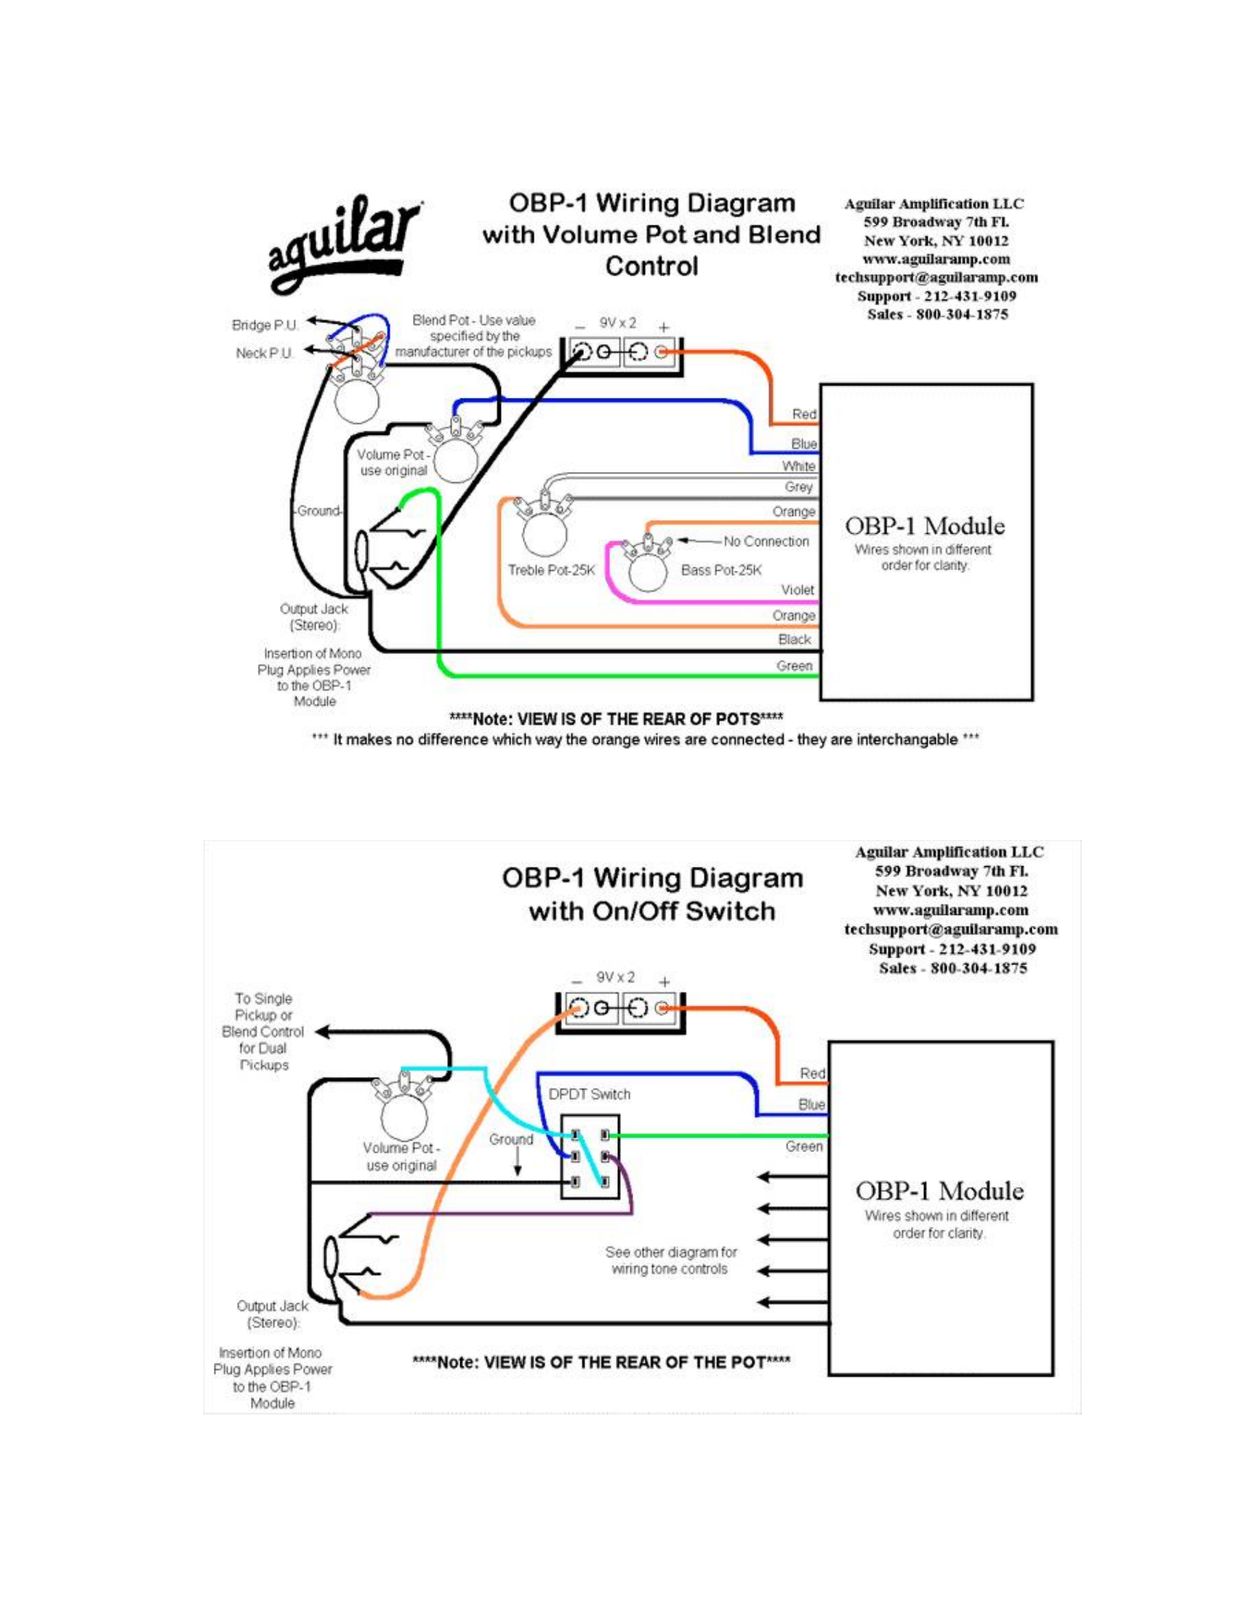
| # | From | To | Notes |
|---|---|---|---|
| 1 | Bridge pickup: Hot | Blend: middle lug of one gang | |
| 2 | Neck pickup: Hot | Blend: middle lug of the other gang | |
| 3 | Both pickups: Ground | Ground (back of the volume pot) | |
| 4 | Blend: output lugs (one outer lug per gang, joined) | Volume: Right lug | |
| 5 | Blend: ground lugs (the other outer lug per gang, joined) | Ground (back of the volume pot) | |
| 6 | Volume: Left lug | Volume casing | Jumper to ground |
| 7 | Volume: Middle lug | OBP-1 module: BLU (input) | |
| 8 | OBP-1 module: GRN (output) | Stereo jack: Tip | Preamp output |
| 9 | OBP-1 module: BLK (ground) | Stereo jack: Sleeve (ground) | |
| 10 | OBP-1 module: 5 EQ wires (VIO, ORG, ORG, WHT, GRY) | Bass and treble pots | See the EQ table |
| 11 | OBP-1 module: RED (+) | First battery + | |
| 12 | First battery − | Second battery + | Two 9V in series (18V) |
| 13 | Second battery − | Stereo jack: Ring | Plugging in powers the preamp |
| 14 | Stereo jack: Sleeve | Cavity ground / shielding |
| Pot | Left lug | Middle lug | Right lug |
|---|---|---|---|
| Bass 25K | VIO | ORG | no connection |
| Treble 25K | ORG | WHT | GRY |
Step by step
- Mount everything. Fit the pots and the stereo jack. Join the pot casings with a bare wire.
- Pickups to the blend and volume. Bridge hot to the middle lug of one blend gang, neck hot to the middle lug of the other. Join one outer lug of each gang and run it to the volume's right lug; join the other two outer lugs to ground. Volume left lug to its casing. Pickup grounds go to the back of the volume pot.
- Volume to the module. Volume middle lug to the module's BLU wire.
- EQ pots. Bass pot: VIO on the left lug, ORG on the middle lug, nothing on the right. Treble pot: ORG, WHT, GRY left to right. The two orange wires are interchangeable. Pots seen from the back, lugs up.
- Output and power. Module GRN to the jack tip. Module BLK to the jack sleeve and RED to battery +. Wire the two 9V batteries in series and run the free battery − to the jack ring, so plugging in turns the preamp on. Jack sleeve to the cavity shielding.
- Test. Plug in at low volume, tap the pickups and turn every knob end to end before closing the cavity.
- Aguilar's OBP-1 sheet is a small scan, so this section explains the layout by connection rather than lug by lug. Check your parts against the drawing.
- Aguilar: it makes no difference which way the two orange wires are connected.
- Volume and blend values depend on the pickups: use what the pickup maker recommends.
- The OBP-1 needs 18V: always use two 9V batteries.
Aguilar OBP-1 with one volume
Aguilar's single-volume OBP-1 hookup: one pickup (or a blend control) into a volume, then the OBP-1 with bass and treble.
You need: OBP-1 module, 2 pots 25K: bass, treble, volume pot (value to suit the pickup), 2 x 9V batteries, stereo output jack.
| # | From | To | Notes |
|---|---|---|---|
| 1 | Pickup: Hot | Volume: Right lug | |
| 2 | Pickup: Ground | Ground (back of the volume pot) | |
| 3 | Volume: Left lug | Volume casing | Jumper to ground |
| 4 | Volume: Middle lug | OBP-1 module: BLU (input) | |
| 5 | OBP-1 module: GRN (output) | Stereo jack: Tip | Preamp output |
| 6 | OBP-1 module: BLK (ground) | Stereo jack: Sleeve (ground) | |
| 7 | OBP-1 module: 5 EQ wires (VIO, ORG, ORG, WHT, GRY) | Bass and treble pots | See the EQ table |
| 8 | OBP-1 module: RED (+) | First battery + | |
| 9 | First battery − | Second battery + | Two 9V in series (18V) |
| 10 | Second battery − | Stereo jack: Ring | Plugging in powers the preamp |
| 11 | Stereo jack: Sleeve | Cavity ground / shielding |
| Pot | Left lug | Middle lug | Right lug |
|---|---|---|---|
| Bass 25K | VIO | ORG | no connection |
| Treble 25K | ORG | WHT | GRY |
Step by step
- Mount everything. Fit the pots and the stereo jack. Join the pot casings with a bare wire.
- Pickup to the volume. Pickup hot to the volume's right lug, pickup ground to the back of the pot, left lug jumpered to the casing. The middle lug is the output.
- Volume to the module. Volume middle lug to the module's BLU wire.
- EQ pots. Bass pot: VIO on the left lug, ORG on the middle lug, nothing on the right. Treble pot: ORG, WHT, GRY left to right. The two orange wires are interchangeable. Pots seen from the back, lugs up.
- Output and power. Module GRN to the jack tip. Module BLK to the jack sleeve and RED to battery +. Wire the two 9V batteries in series and run the free battery − to the jack ring, so plugging in turns the preamp on. Jack sleeve to the cavity shielding.
- Test. Plug in at low volume, tap the pickups and turn every knob end to end before closing the cavity.
- Aguilar's OBP-1 sheet is a small scan, so this section explains the layout by connection rather than lug by lug. Check your parts against the drawing.
- Volume and blend values depend on the pickups: use what the pickup maker recommends.
- The OBP-1 needs 18V: always use two 9V batteries.
Aguilar OBP-1 with an on/off (bypass) switch
Aguilar's OBP-1 bypass layout: a DPDT switch after the volume turns the preamp on or off.
You need: OBP-1 module, 2 pots 25K: bass, treble, volume pot (value to suit the pickup), DPDT on-on mini switch for active/passive, 2 x 9V batteries, stereo output jack.
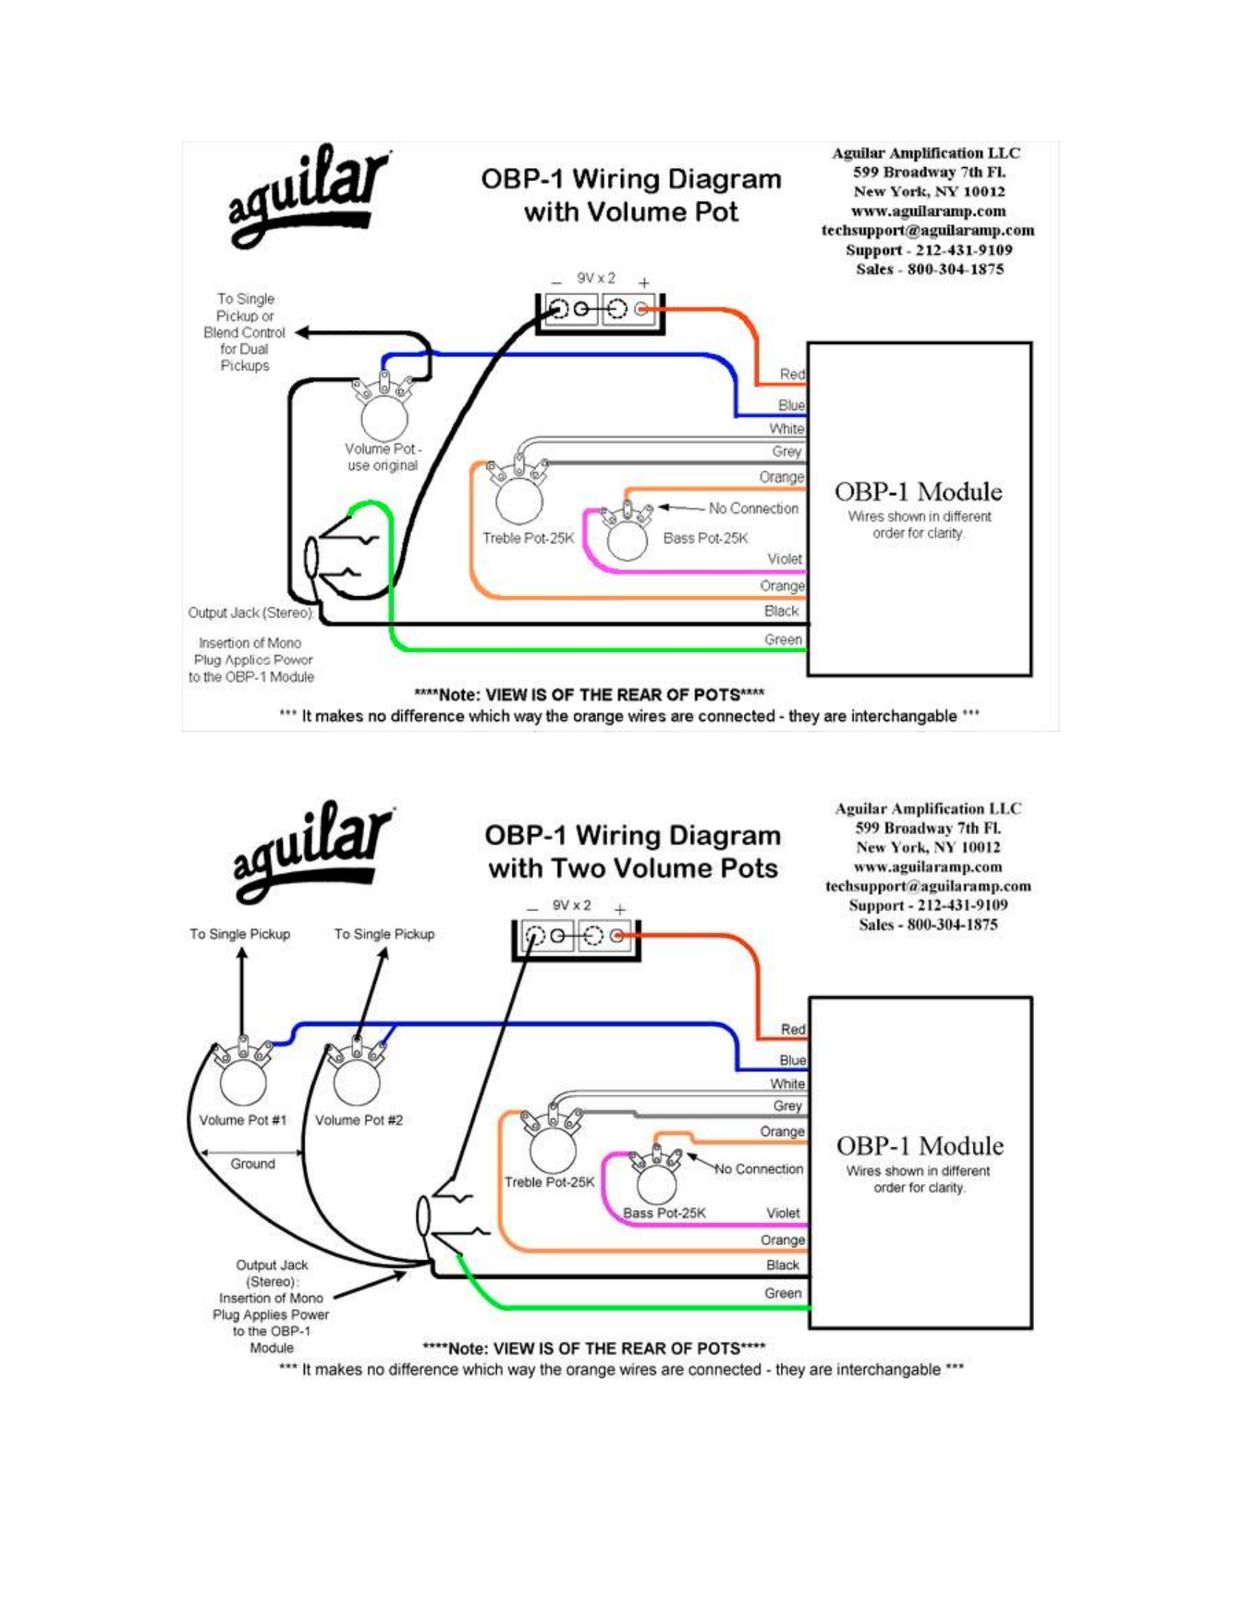
| # | From | To | Notes |
|---|---|---|---|
| 1 | Pickup: Hot | Volume: Right lug | |
| 2 | Pickup: Ground | Ground (back of the volume pot) | |
| 3 | Volume: Left lug | Volume casing | Jumper to ground |
| 4 | Volume: Middle lug | A/P switch: top-left lug | Passive signal |
| 5 | OBP-1 module: BLU (input) | A/P switch: middle-left lug | Common, pole 1 |
| 6 | A/P switch: bottom-left lug | Ground | Grounds the preamp input in passive |
| 7 | OBP-1 module: GRN (output) | A/P switch: top-right lug | |
| 8 | A/P switch: middle-right lug | Stereo jack: Tip | Common, pole 2 |
| 9 | A/P switch: bottom-right lug | A/P switch: top-left lug | Jumper: passive signal to the tip |
| 10 | OBP-1 module: BLK (ground) | Stereo jack: Sleeve (ground) | |
| 11 | OBP-1 module: 5 EQ wires (VIO, ORG, ORG, WHT, GRY) | Bass and treble pots | See the EQ table |
| 12 | OBP-1 module: RED (+) | First battery + | |
| 13 | First battery − | Second battery + | Two 9V in series (18V) |
| 14 | Second battery − | Stereo jack: Ring | Plugging in powers the preamp |
| 15 | Stereo jack: Sleeve | Cavity ground / shielding |
| Pot | Left lug | Middle lug | Right lug |
|---|---|---|---|
| Bass 25K | VIO | ORG | no connection |
| Treble 25K | ORG | WHT | GRY |
Step by step
- Mount everything. Fit the pots, the mini switch and the stereo jack. Join the pot casings with a bare wire.
- Pickup to the volume. Pickup hot to the volume's right lug, pickup ground to the back of the pot, left lug jumpered to the casing. The middle lug is the output.
- Active/passive switch. Volume output to the top-left lug, module BLU to middle-left, bottom-left to ground. Module GRN to top-right, middle-right to the jack tip, and a jumper from bottom-right to top-left. Active: the signal runs through the preamp. Passive: the preamp input is grounded and the volume output goes straight to the tip.
- EQ pots. Bass pot: VIO on the left lug, ORG on the middle lug, nothing on the right. Treble pot: ORG, WHT, GRY left to right. The two orange wires are interchangeable. Pots seen from the back, lugs up.
- Output and power. Module BLK to the jack sleeve and RED to battery +. Wire the two 9V batteries in series and run the free battery − to the jack ring, so plugging in turns the preamp on. Jack sleeve to the cavity shielding.
- Test. Plug in at low volume, tap the pickups and turn every knob end to end before closing the cavity.
- Aguilar's OBP-1 sheet is a small scan, so this section explains the layout by connection rather than lug by lug. Check your parts against the drawing.
- Aguilar draws this with the EQ wires left off: wire them as in the other OBP-1 layouts.
- The switch lug positions in the table follow our own active/passive drawings.
- Volume and blend values depend on the pickups: use what the pickup maker recommends.
- The OBP-1 needs 18V: always use two 9V batteries.
Aguilar OBP-1 with two volume pots
Aguilar's two-volume OBP-1 hookup: a volume for each pickup, outputs joined into the preamp.
You need: OBP-1 module, 2 pots 25K: bass, treble, 2 volume pots (value to suit the pickups), 2 x 9V batteries, stereo output jack.
| # | From | To | Notes |
|---|---|---|---|
| 1 | Pickup 1: Hot | Volume 1: outer (input) lug | |
| 2 | Pickup 2: Hot | Volume 2: outer (input) lug | |
| 3 | Both pickups: Ground | Ground | |
| 4 | Volume 1: Middle lug | Volume 2: Middle lug | Joined: this is the output |
| 5 | Both volumes: other outer lugs | Ground | |
| 6 | Both volumes: Middle lugs (joined) | OBP-1 module: BLU (input) | |
| 7 | OBP-1 module: GRN (output) | Stereo jack: Tip | Preamp output |
| 8 | OBP-1 module: BLK (ground) | Stereo jack: Sleeve (ground) | |
| 9 | OBP-1 module: 5 EQ wires (VIO, ORG, ORG, WHT, GRY) | Bass and treble pots | See the EQ table |
| 10 | OBP-1 module: RED (+) | First battery + | |
| 11 | First battery − | Second battery + | Two 9V in series (18V) |
| 12 | Second battery − | Stereo jack: Ring | Plugging in powers the preamp |
| 13 | Stereo jack: Sleeve | Cavity ground / shielding |
| Pot | Left lug | Middle lug | Right lug |
|---|---|---|---|
| Bass 25K | VIO | ORG | no connection |
| Treble 25K | ORG | WHT | GRY |
Step by step
- Mount everything. Fit the pots and the stereo jack. Join the pot casings with a bare wire.
- Pickups to the volumes. Each pickup hot to an outer lug of its own volume, the other outer lugs to ground. Join the two middle lugs: that is the output.
- Volume to the module. Both volumes middle lugs (joined) to the module's BLU wire.
- EQ pots. Bass pot: VIO on the left lug, ORG on the middle lug, nothing on the right. Treble pot: ORG, WHT, GRY left to right. The two orange wires are interchangeable. Pots seen from the back, lugs up.
- Output and power. Module GRN to the jack tip. Module BLK to the jack sleeve and RED to battery +. Wire the two 9V batteries in series and run the free battery − to the jack ring, so plugging in turns the preamp on. Jack sleeve to the cavity shielding.
- Test. Plug in at low volume, tap the pickups and turn every knob end to end before closing the cavity.
- Aguilar's OBP-1 sheet is a small scan, so this section explains the layout by connection rather than lug by lug. Check your parts against the drawing.
- Volume and blend values depend on the pickups: use what the pickup maker recommends.
- The OBP-1 needs 18V: always use two 9V batteries.
Aguilar OBP-1 with push-pull A/P volume, blend, treble and bass
Four knobs: a volume that pulls up for passive, a blend, and the OBP-1's treble and bass.
You need: OBP-1 module, 2 pots 25K: bass, treble, dual-audio blend pot, push-pull volume pot (DPDT) for active/passive, 2 x 9V batteries, stereo output jack.
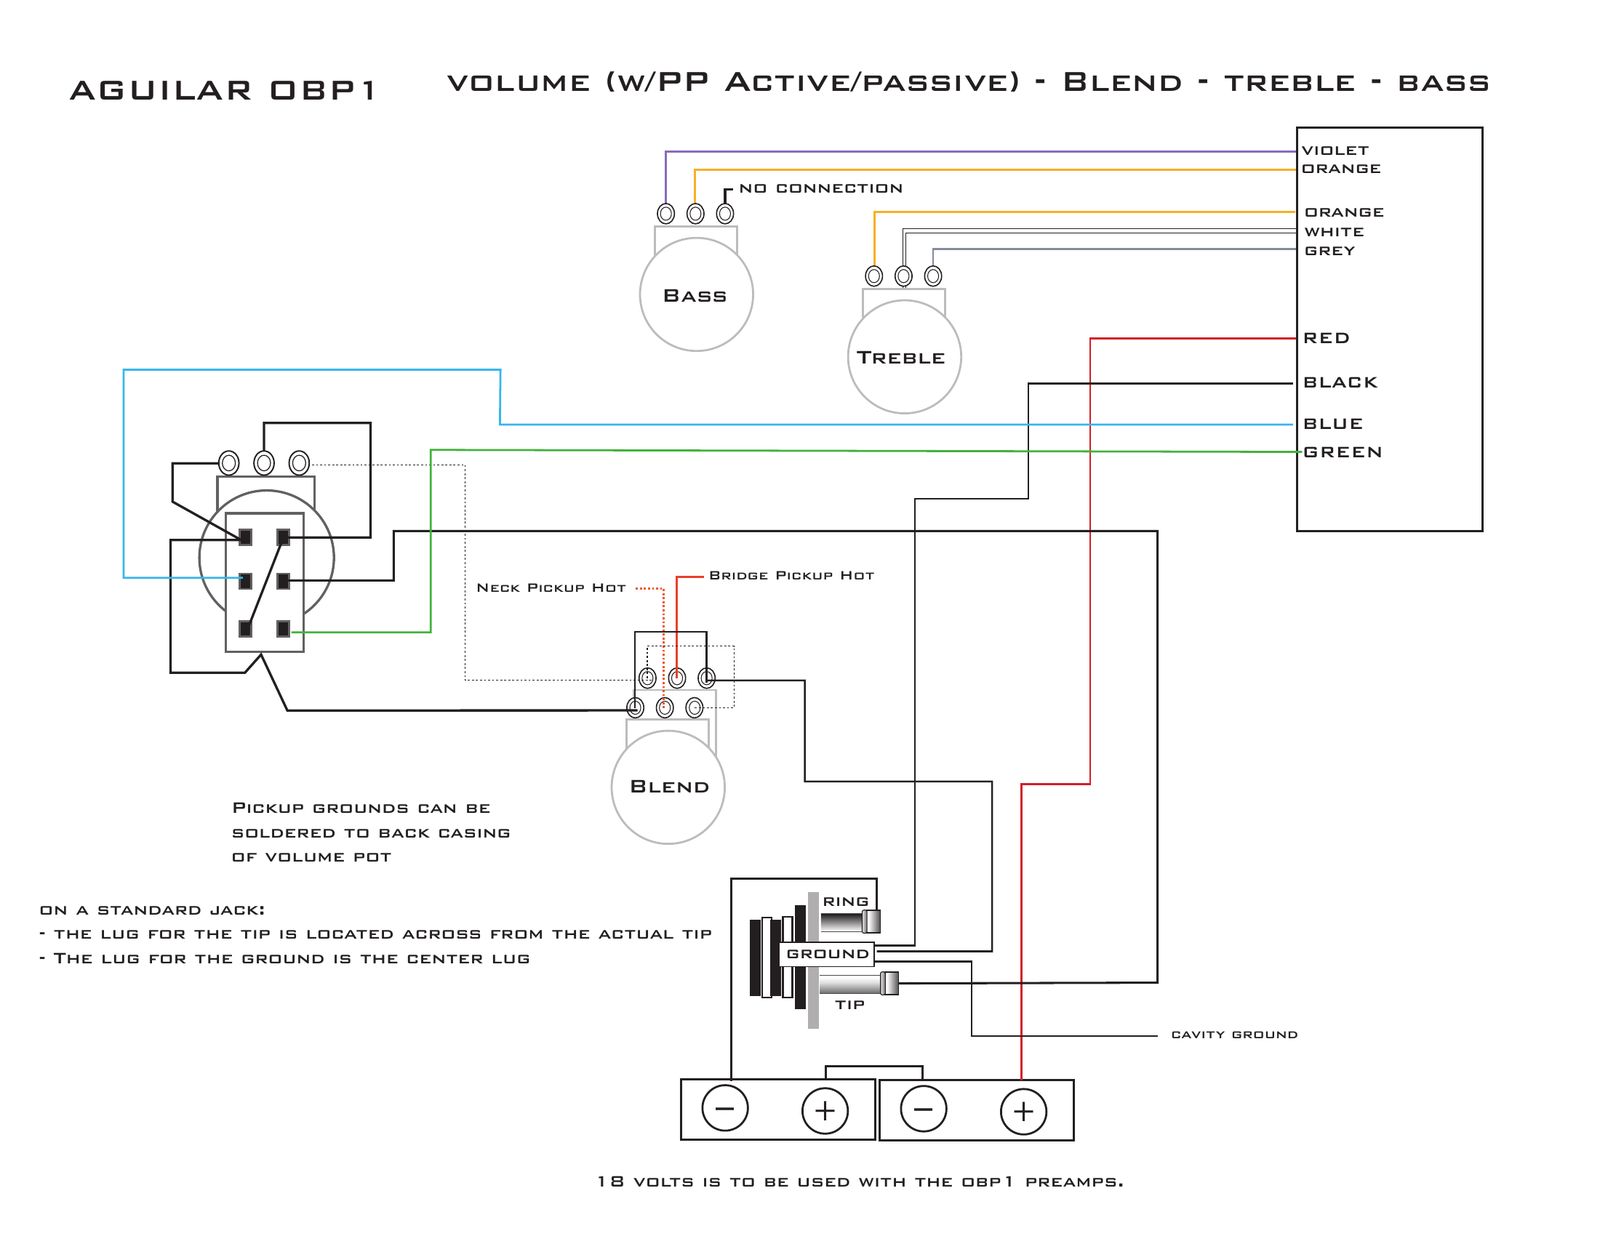
| # | From | To | Notes |
|---|---|---|---|
| 1 | Bridge pickup: Hot | Blend: middle lug of one gang | |
| 2 | Neck pickup: Hot | Blend: middle lug of the other gang | |
| 3 | Both pickups: Ground | Ground (back of the volume pot) | |
| 4 | Blend: output lugs (joined) | Volume: Right lug | |
| 5 | Blend: ground lugs (joined) | Ground (back of the volume pot) | |
| 6 | Volume: Left lug | Volume casing | Jumper to ground |
| 7 | Volume: Middle lug | Volume switch: top-right lug | Passive signal |
| 8 | OBP-1 module: BLU (input) | Volume switch: middle-left lug | Common, pole 1 |
| 9 | Volume switch: top-left lug | Ground | Grounds the preamp input in passive |
| 10 | Volume switch: bottom-left lug | Volume switch: top-right lug | Jumper |
| 11 | Volume switch: middle-right lug | Stereo jack: Tip | Common, pole 2 |
| 12 | OBP-1 module: GRN (output) | Volume switch: bottom-right lug | |
| 13 | OBP-1 module: BLK (ground) | Stereo jack: Sleeve (ground) | |
| 14 | OBP-1 module: 5 EQ wires (VIO, ORG, ORG, WHT, GRY) | Bass and treble pots | See the EQ table |
| 15 | OBP-1 module: RED (+) | First battery + | |
| 16 | First battery − | Second battery + | Two 9V in series (18V) |
| 17 | Second battery − | Stereo jack: Ring | Plugging in powers the preamp |
| 18 | Stereo jack: Sleeve | Cavity ground / shielding |
| Pot | Left lug | Middle lug | Right lug |
|---|---|---|---|
| Bass 25K | VIO | ORG | no connection |
| Treble 25K | ORG | WHT | GRY |
Step by step
- Mount everything. Fit the pots and the stereo jack. Join the pot casings with a bare wire.
- Pickups to the blend and volume. Bridge hot to the middle lug of one blend gang, neck hot to the middle lug of the other. Join one outer lug of each gang and run it to the volume's right lug; join the other two to ground. Volume left lug to the casing. Pickup grounds go to the back of the volume pot.
- Push-pull active/passive. On the volume pot's switch: volume output to top-right, module BLU to middle-left, top-left to ground, and a jumper from bottom-left to top-right. Middle-right to the jack tip, module GRN to bottom-right. Pushed down, the preamp is on; pulled up, it is bypassed. If your pot works the other way round, swap the top and bottom wires on both sides.
- EQ pots. Bass pot: VIO on the left lug, ORG on the middle lug, nothing on the right. Treble pot: ORG, WHT, GRY left to right. The two orange wires are interchangeable. Pots seen from the back, lugs up.
- Output and power. Module BLK to the jack sleeve and RED to battery +. Wire the two 9V batteries in series and run the free battery − to the jack ring, so plugging in turns the preamp on. Jack sleeve to the cavity shielding.
- Test. Plug in at low volume, tap the pickups and turn every knob end to end before closing the cavity.
- Volume and blend values depend on the pickups: use what the pickup maker recommends.
- The OBP-1 needs 18V: always use two 9V batteries.
Aguilar OBP-1 with stacked volumes, treble, bass and A/P switch
A volume/volume stack, treble and bass, and a mini switch for active/passive.
You need: OBP-1 module, 2 pots 25K: bass, treble, dual concentric volume pot (value to suit the pickups), DPDT on-on mini switch for active/passive, 2 x 9V batteries, stereo output jack.
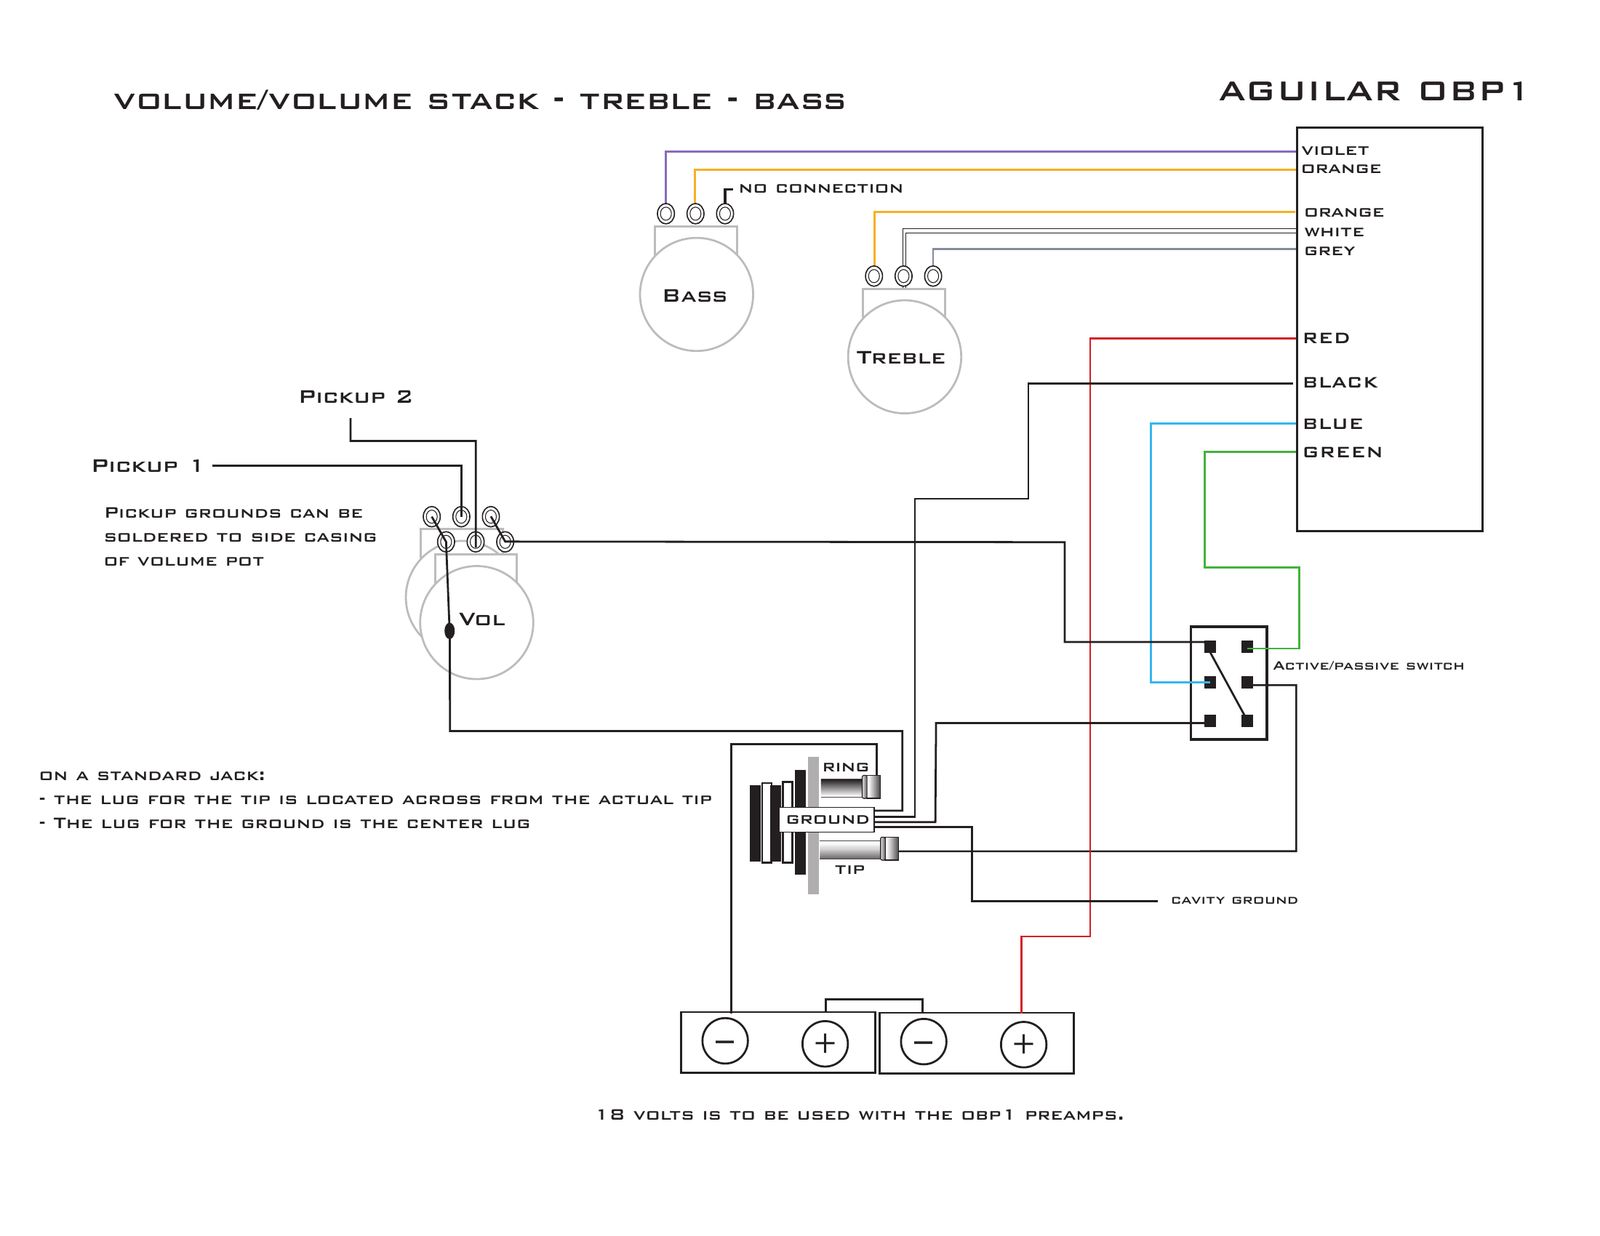
| # | From | To | Notes |
|---|---|---|---|
| 1 | Pickup 1: Hot | Volume stack, upper deck: Middle lug | |
| 2 | Pickup 2: Hot | Volume stack, lower deck: Middle lug | |
| 3 | Both pickups: Ground | Ground (back of the volume pot) | |
| 4 | Upper deck: Right lug | Lower deck: Right lug | Joined: this is the output |
| 5 | Upper and lower deck: Left lugs | Pot casing | Jumpered to ground |
| 6 | Volume stack: Right lugs (joined) | A/P switch: top-left lug | Passive signal |
| 7 | OBP-1 module: BLU (input) | A/P switch: middle-left lug | Common, pole 1 |
| 8 | A/P switch: bottom-left lug | Ground | Grounds the preamp input in passive |
| 9 | OBP-1 module: GRN (output) | A/P switch: top-right lug | |
| 10 | A/P switch: middle-right lug | Stereo jack: Tip | Common, pole 2 |
| 11 | A/P switch: bottom-right lug | A/P switch: top-left lug | Jumper: passive signal to the tip |
| 12 | OBP-1 module: BLK (ground) | Stereo jack: Sleeve (ground) | |
| 13 | OBP-1 module: 5 EQ wires (VIO, ORG, ORG, WHT, GRY) | Bass and treble pots | See the EQ table |
| 14 | OBP-1 module: RED (+) | First battery + | |
| 15 | First battery − | Second battery + | Two 9V in series (18V) |
| 16 | Second battery − | Stereo jack: Ring | Plugging in powers the preamp |
| 17 | Stereo jack: Sleeve | Cavity ground / shielding |
| Pot | Left lug | Middle lug | Right lug |
|---|---|---|---|
| Bass 25K | VIO | ORG | no connection |
| Treble 25K | ORG | WHT | GRY |
Step by step
- Mount everything. Fit the pots, the mini switch and the stereo jack. Join the pot casings with a bare wire.
- Pickups to the stacked volume. Pickup 1 hot to the middle lug of one deck, pickup 2 hot to the middle lug of the other. Join the two right lugs: that is the output. Jumper both left lugs to the casing. Pickup grounds to the back of the pot.
- Active/passive switch. Volume output to the top-left lug, module BLU to middle-left, bottom-left to ground. Module GRN to top-right, middle-right to the jack tip, and a jumper from bottom-right to top-left. Active: the signal runs through the preamp. Passive: the preamp input is grounded and the volume output goes straight to the tip.
- EQ pots. Bass pot: VIO on the left lug, ORG on the middle lug, nothing on the right. Treble pot: ORG, WHT, GRY left to right. The two orange wires are interchangeable. Pots seen from the back, lugs up.
- Output and power. Module BLK to the jack sleeve and RED to battery +. Wire the two 9V batteries in series and run the free battery − to the jack ring, so plugging in turns the preamp on. Jack sleeve to the cavity shielding.
- Test. Plug in at low volume, tap the pickups and turn every knob end to end before closing the cavity.
- Volume and blend values depend on the pickups: use what the pickup maker recommends.
- The OBP-1 needs 18V: always use two 9V batteries.
Aguilar OBP-1 with stacked volumes, passive tone, treble, bass and A/P switch
A volume/volume stack, a passive tone, treble and bass, and a mini switch for active/passive.
You need: OBP-1 module, 2 pots 25K: bass, treble, dual concentric volume pot (value to suit the pickups), tone pot, tone capacitor, DPDT on-on mini switch for active/passive, 2 x 9V batteries, stereo output jack.
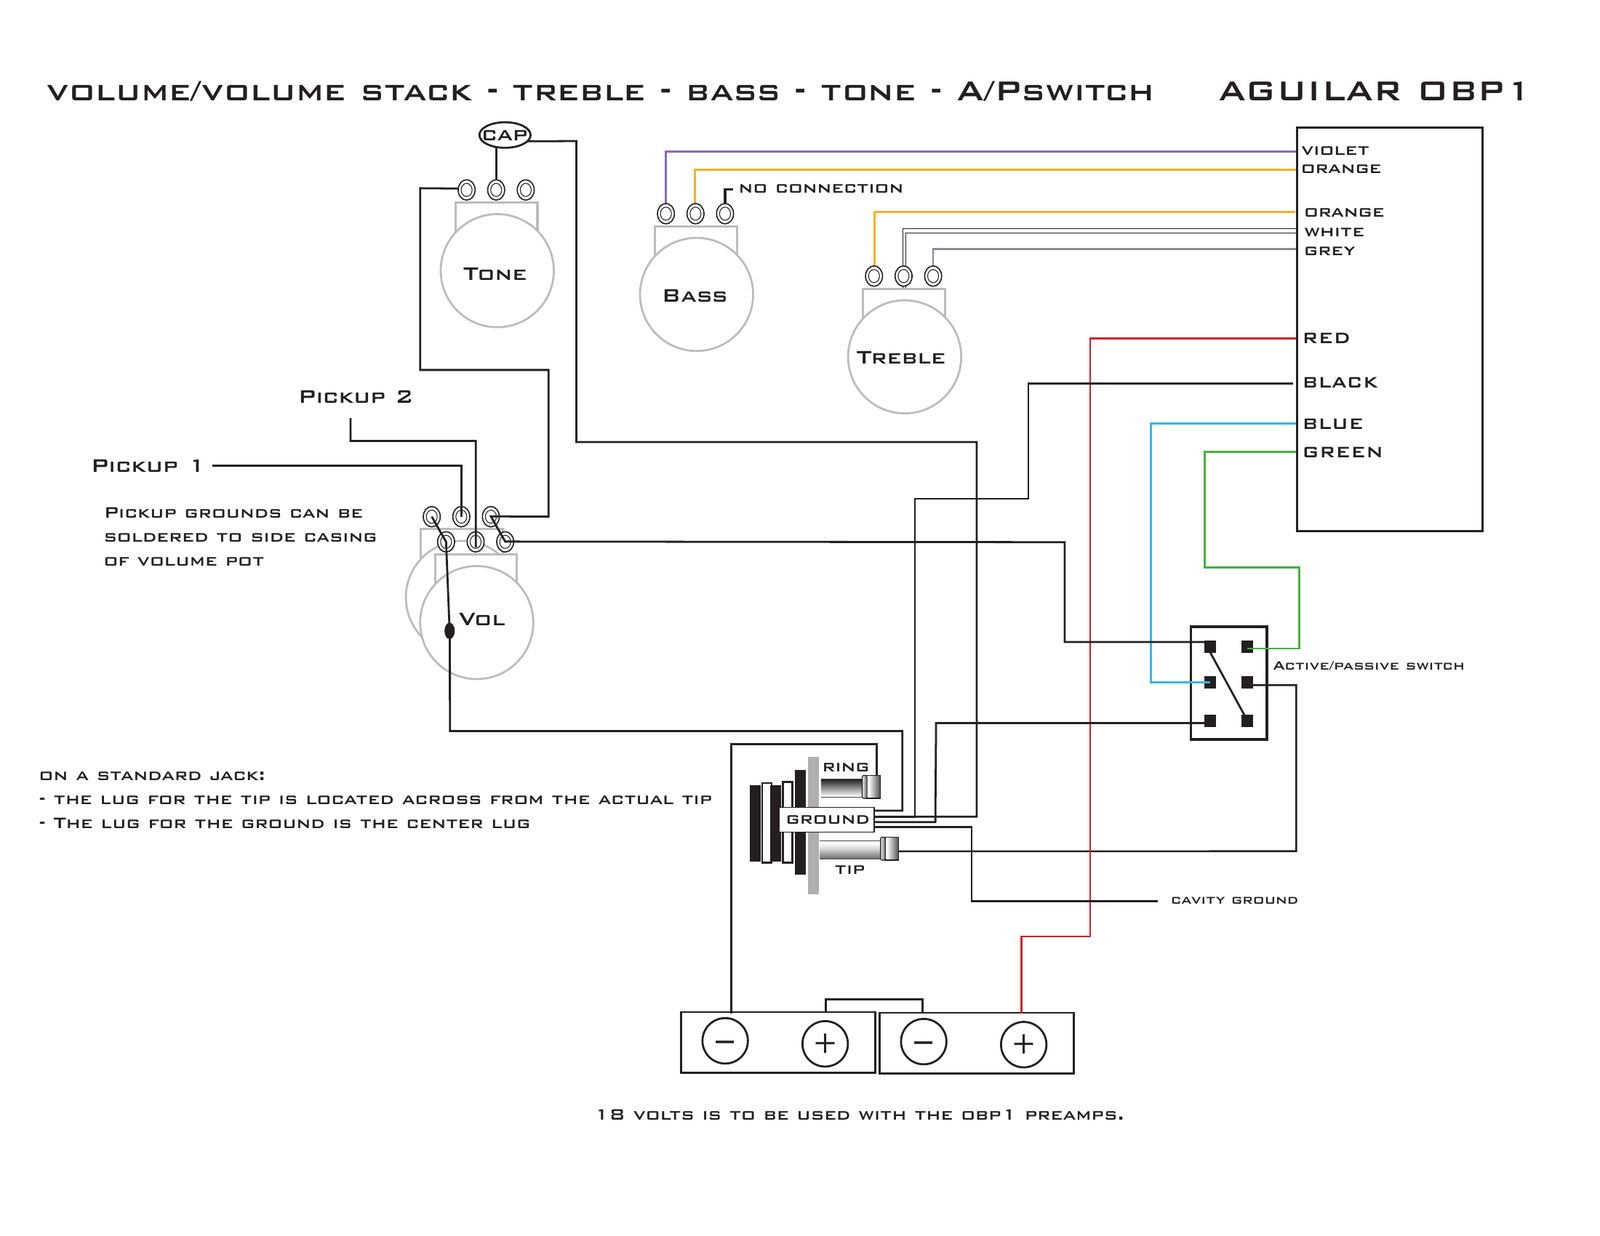
| # | From | To | Notes |
|---|---|---|---|
| 1 | Pickup 1: Hot | Volume stack, upper deck: Middle lug | |
| 2 | Pickup 2: Hot | Volume stack, lower deck: Middle lug | |
| 3 | Both pickups: Ground | Ground (back of the volume pot) | |
| 4 | Upper deck: Right lug | Lower deck: Right lug | Joined: this is the output |
| 5 | Upper and lower deck: Left lugs | Pot casing | Jumpered to ground |
| 6 | Tone pot: Outer lug | Volume stack: Right lugs (joined) | Passive tone |
| 7 | Tone: Middle lug | Capacitor | |
| 8 | Capacitor: other leg | Stereo jack: Sleeve (ground) | |
| 9 | Volume stack: Right lugs (joined) | A/P switch: top-left lug | Passive signal |
| 10 | OBP-1 module: BLU (input) | A/P switch: middle-left lug | Common, pole 1 |
| 11 | A/P switch: bottom-left lug | Ground | Grounds the preamp input in passive |
| 12 | OBP-1 module: GRN (output) | A/P switch: top-right lug | |
| 13 | A/P switch: middle-right lug | Stereo jack: Tip | Common, pole 2 |
| 14 | A/P switch: bottom-right lug | A/P switch: top-left lug | Jumper: passive signal to the tip |
| 15 | OBP-1 module: BLK (ground) | Stereo jack: Sleeve (ground) | |
| 16 | OBP-1 module: 5 EQ wires (VIO, ORG, ORG, WHT, GRY) | Bass and treble pots | See the EQ table |
| 17 | OBP-1 module: RED (+) | First battery + | |
| 18 | First battery − | Second battery + | Two 9V in series (18V) |
| 19 | Second battery − | Stereo jack: Ring | Plugging in powers the preamp |
| 20 | Stereo jack: Sleeve | Cavity ground / shielding |
| Pot | Left lug | Middle lug | Right lug |
|---|---|---|---|
| Bass 25K | VIO | ORG | no connection |
| Treble 25K | ORG | WHT | GRY |
Step by step
- Mount everything. Fit the pots, the mini switch and the stereo jack. Join the pot casings with a bare wire.
- Pickups to the stacked volume. Pickup 1 hot to the middle lug of one deck, pickup 2 hot to the middle lug of the other. Join the two right lugs: that is the output. Jumper both left lugs to the casing. Pickup grounds to the back of the pot.
- Passive tone. One outer lug of the tone pot to the volume output, the middle lug to the capacitor, and the capacitor's other leg to ground. Our drawing gives no values: most passive tone controls use a 250K audio pot and a 0.022 µF to 0.047 µF cap, but go by your pickups.
- Active/passive switch. Volume output to the top-left lug, module BLU to middle-left, bottom-left to ground. Module GRN to top-right, middle-right to the jack tip, and a jumper from bottom-right to top-left. Active: the signal runs through the preamp. Passive: the preamp input is grounded and the volume output goes straight to the tip.
- EQ pots. Bass pot: VIO on the left lug, ORG on the middle lug, nothing on the right. Treble pot: ORG, WHT, GRY left to right. The two orange wires are interchangeable. Pots seen from the back, lugs up.
- Output and power. Module BLK to the jack sleeve and RED to battery +. Wire the two 9V batteries in series and run the free battery − to the jack ring, so plugging in turns the preamp on. Jack sleeve to the cavity shielding.
- Test. Plug in at low volume, tap the pickups and turn every knob end to end before closing the cavity.
- Volume and blend values depend on the pickups: use what the pickup maker recommends.
- The OBP-1 needs 18V: always use two 9V batteries.
FAQ
What pots does the Aguilar OBP-1 use?
25K pots for bass and treble (or a dual 25K stack). Volume and blend values depend on your pickups: use what the pickup maker recommends.
Can the OBP-1 run on one 9V battery?
No. The OBP-1 is an 18V preamp: use two 9V batteries in series, with the free battery negative going to the ring of a stereo jack so plugging in turns it on.
Why is one bass pot lug left empty?
The OBP-1's bass control uses only two wires (VIO and ORG), so the third lug has no connection. The two orange wires are interchangeable.
Can I add an active/passive switch to an OBP-1?
Yes: use a mini DPDT switch or a push-pull volume. Both are shown below, and the push-pull add-on on our OBP-3 page works on any Aguilar OBP.