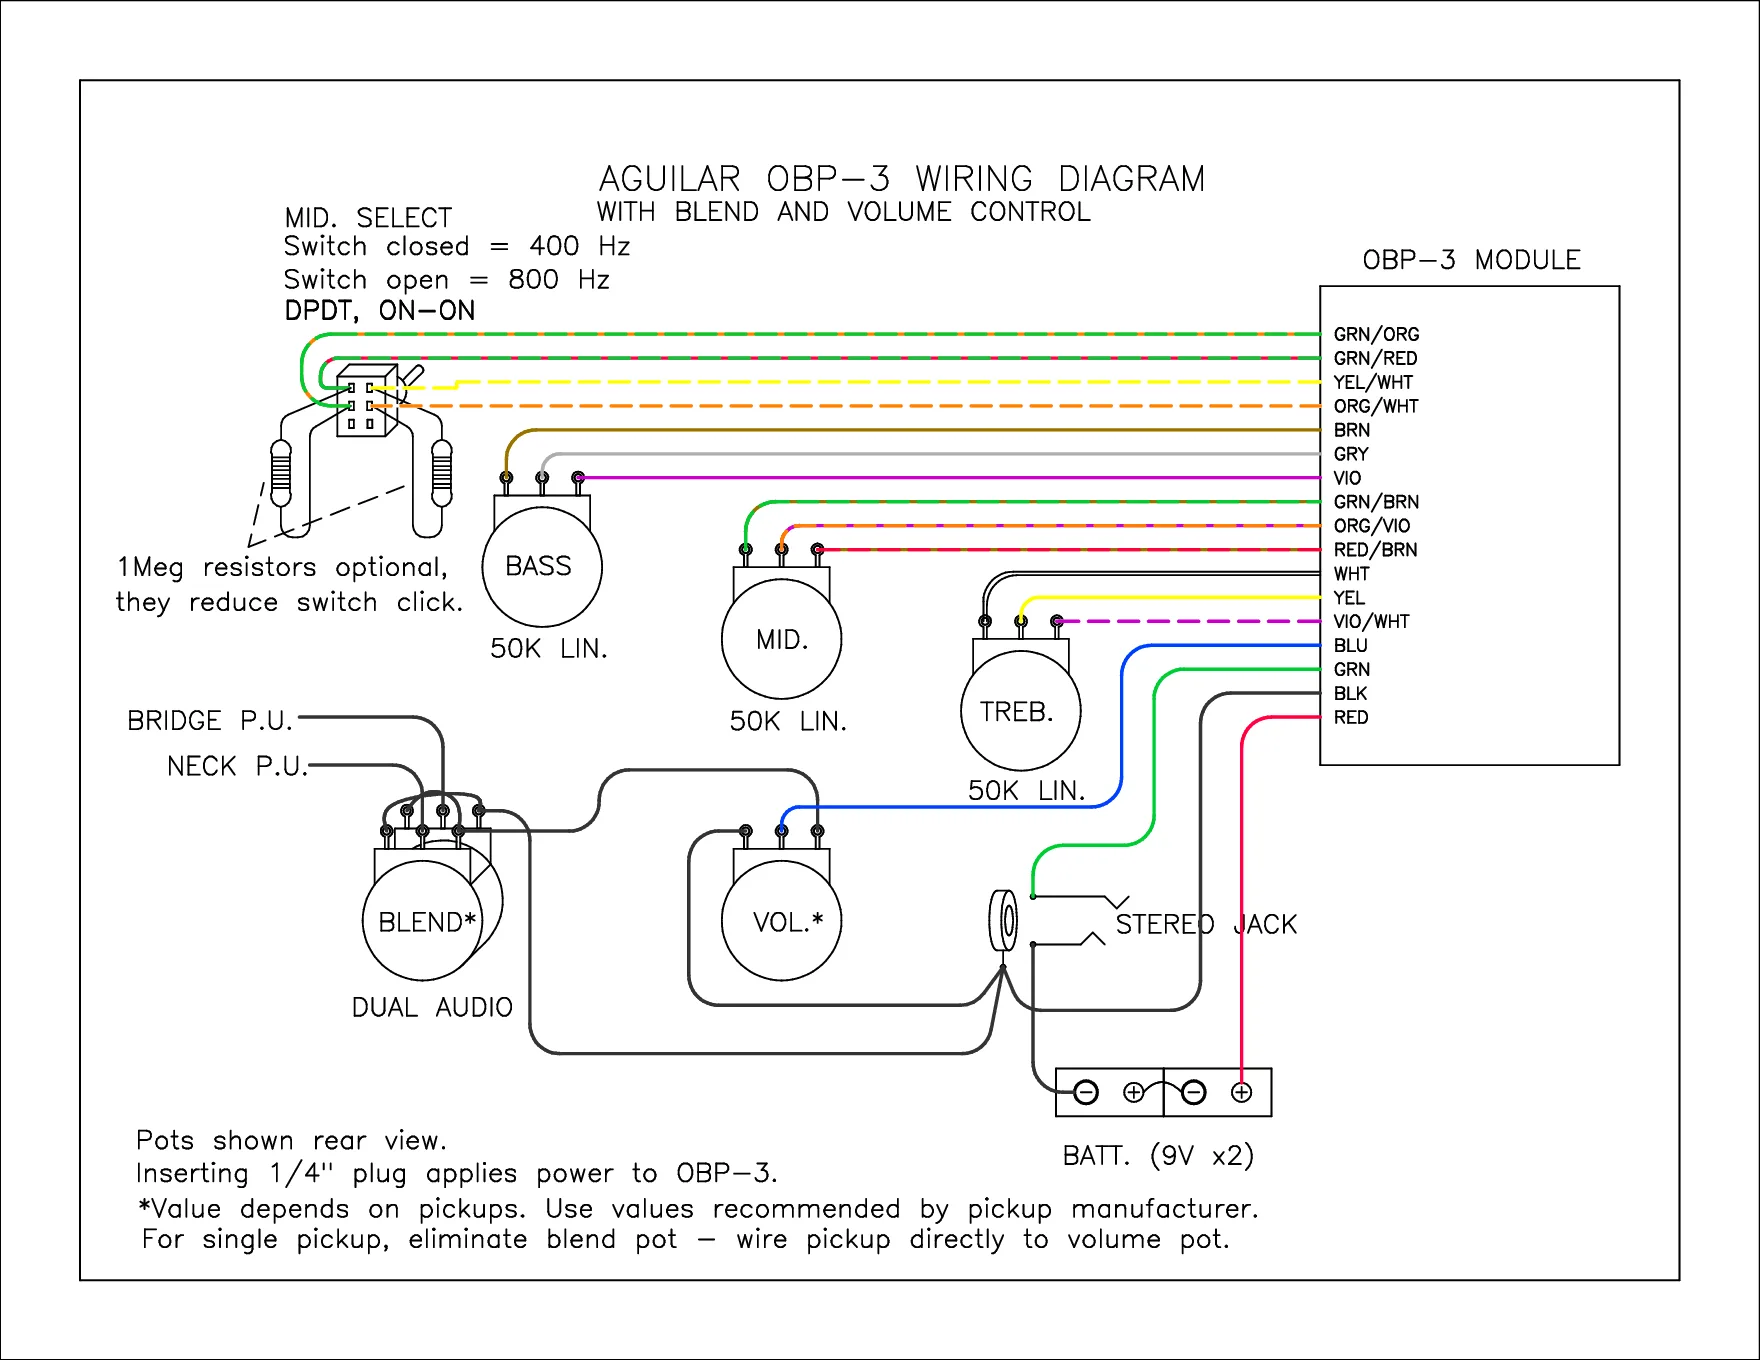
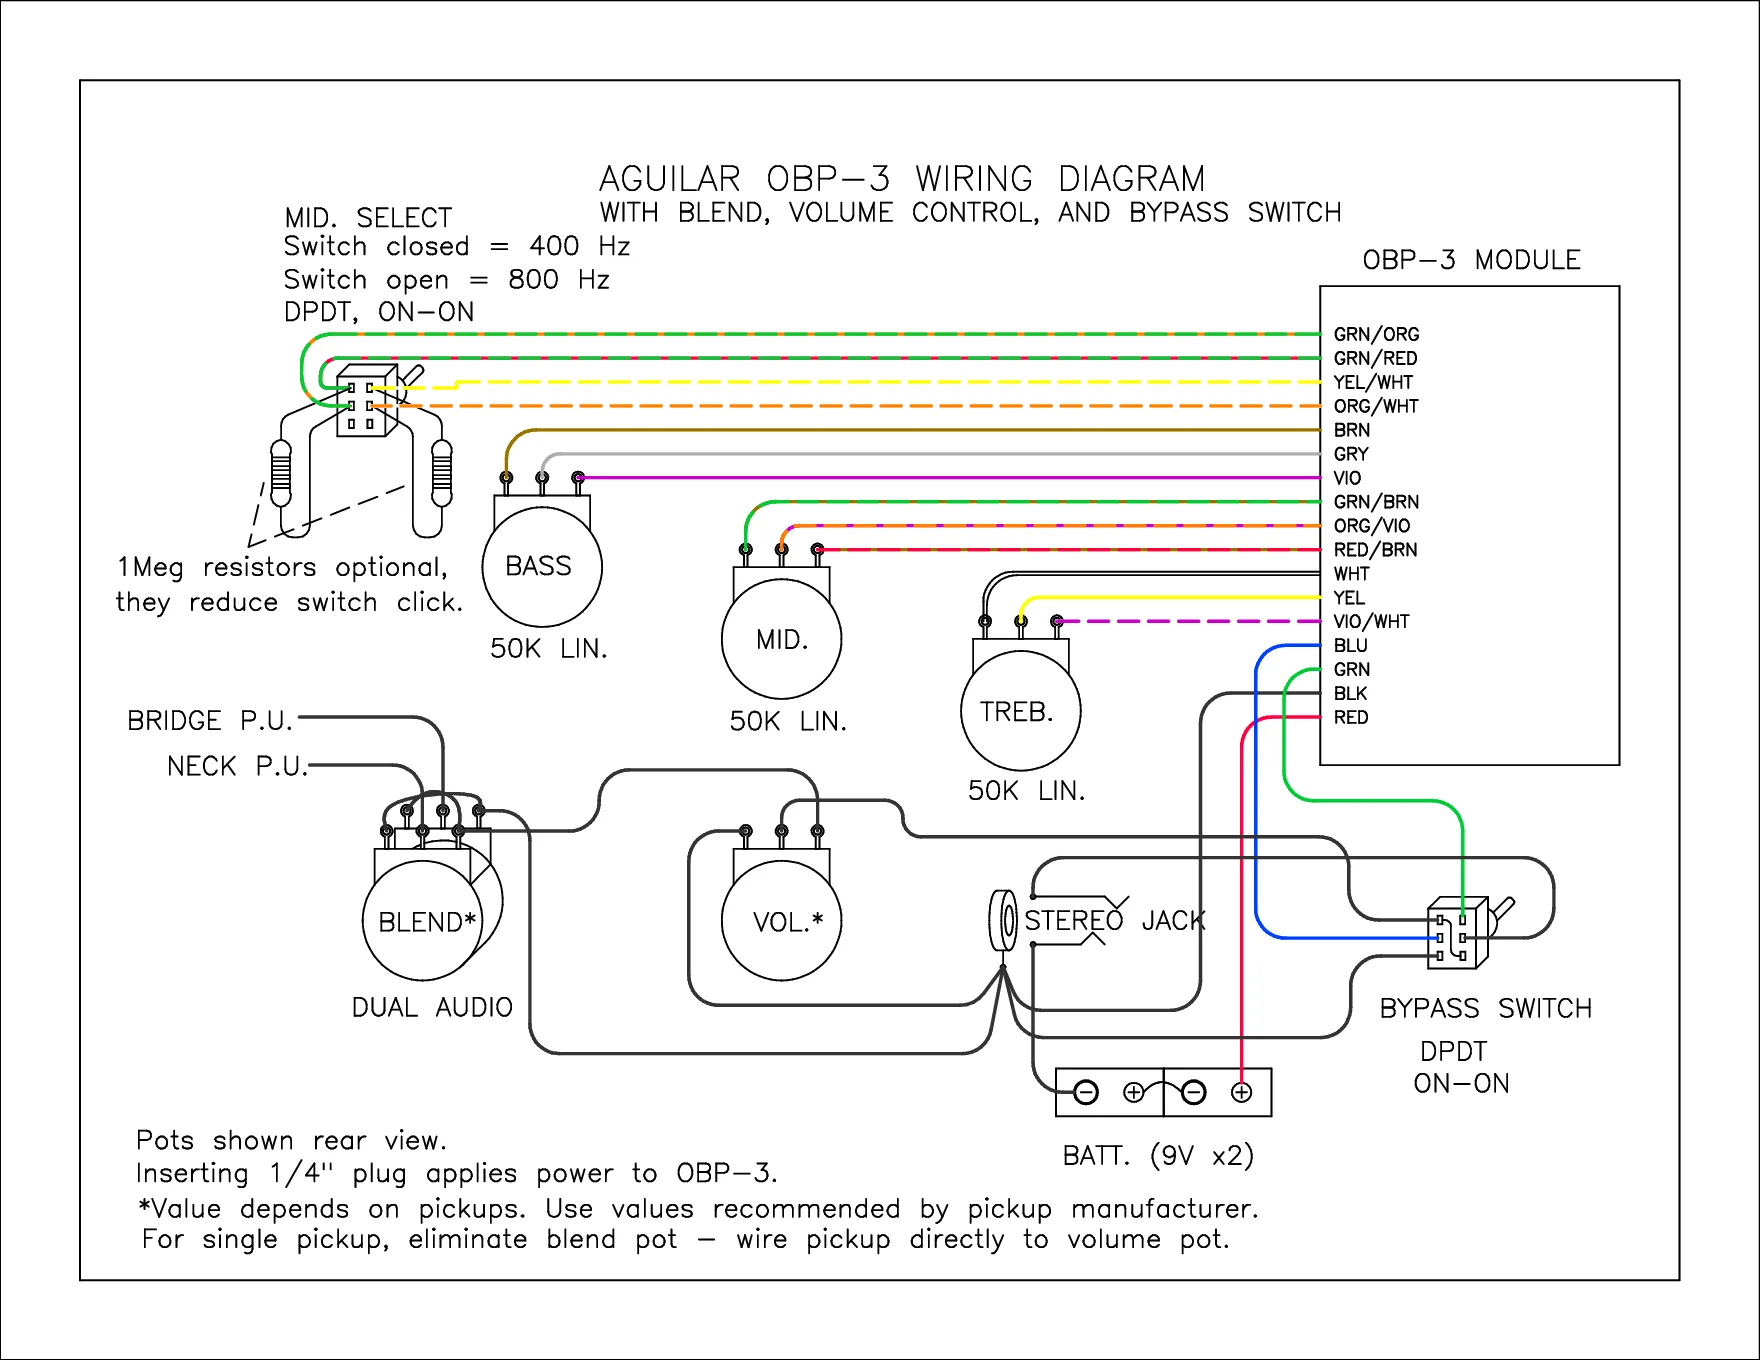
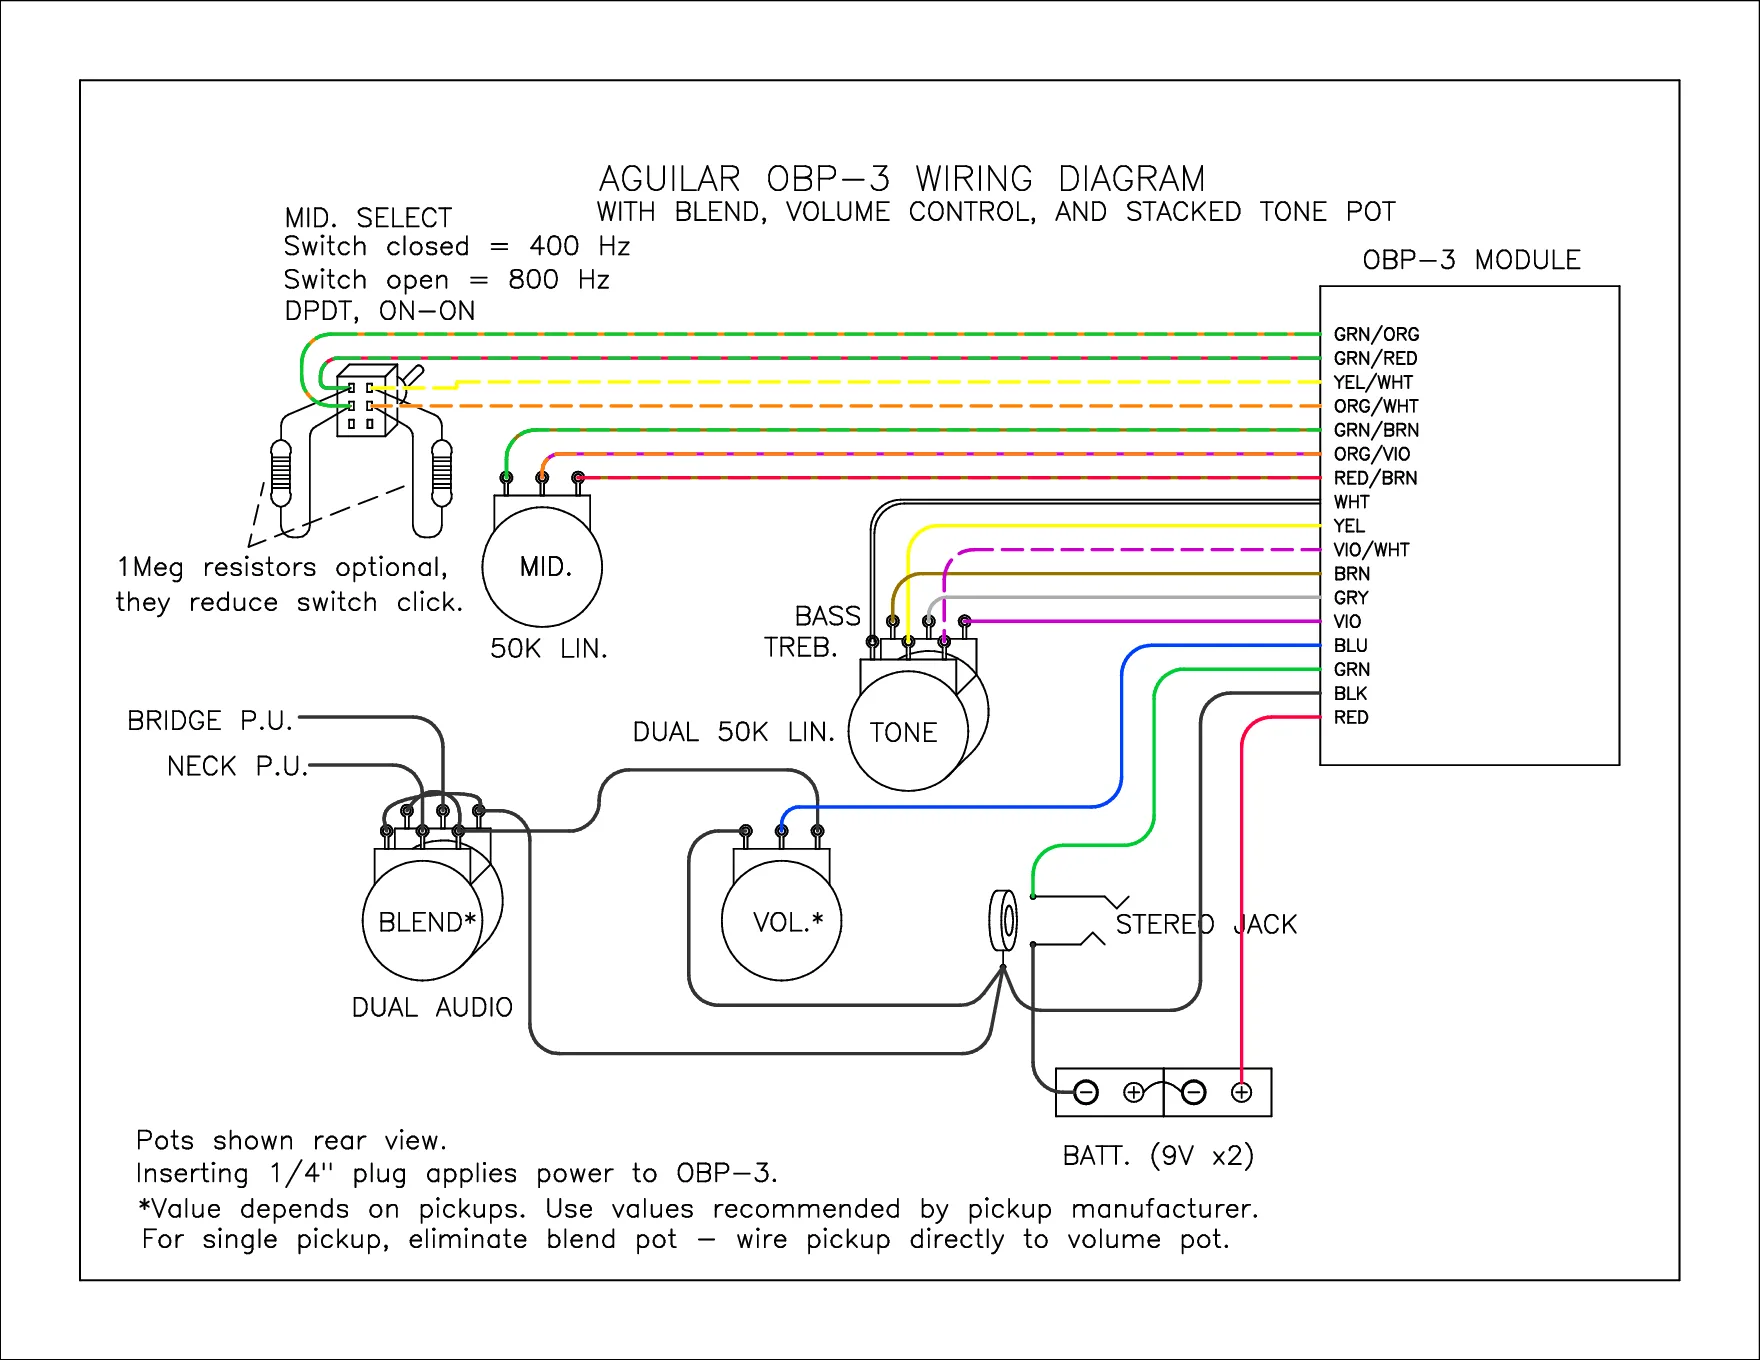
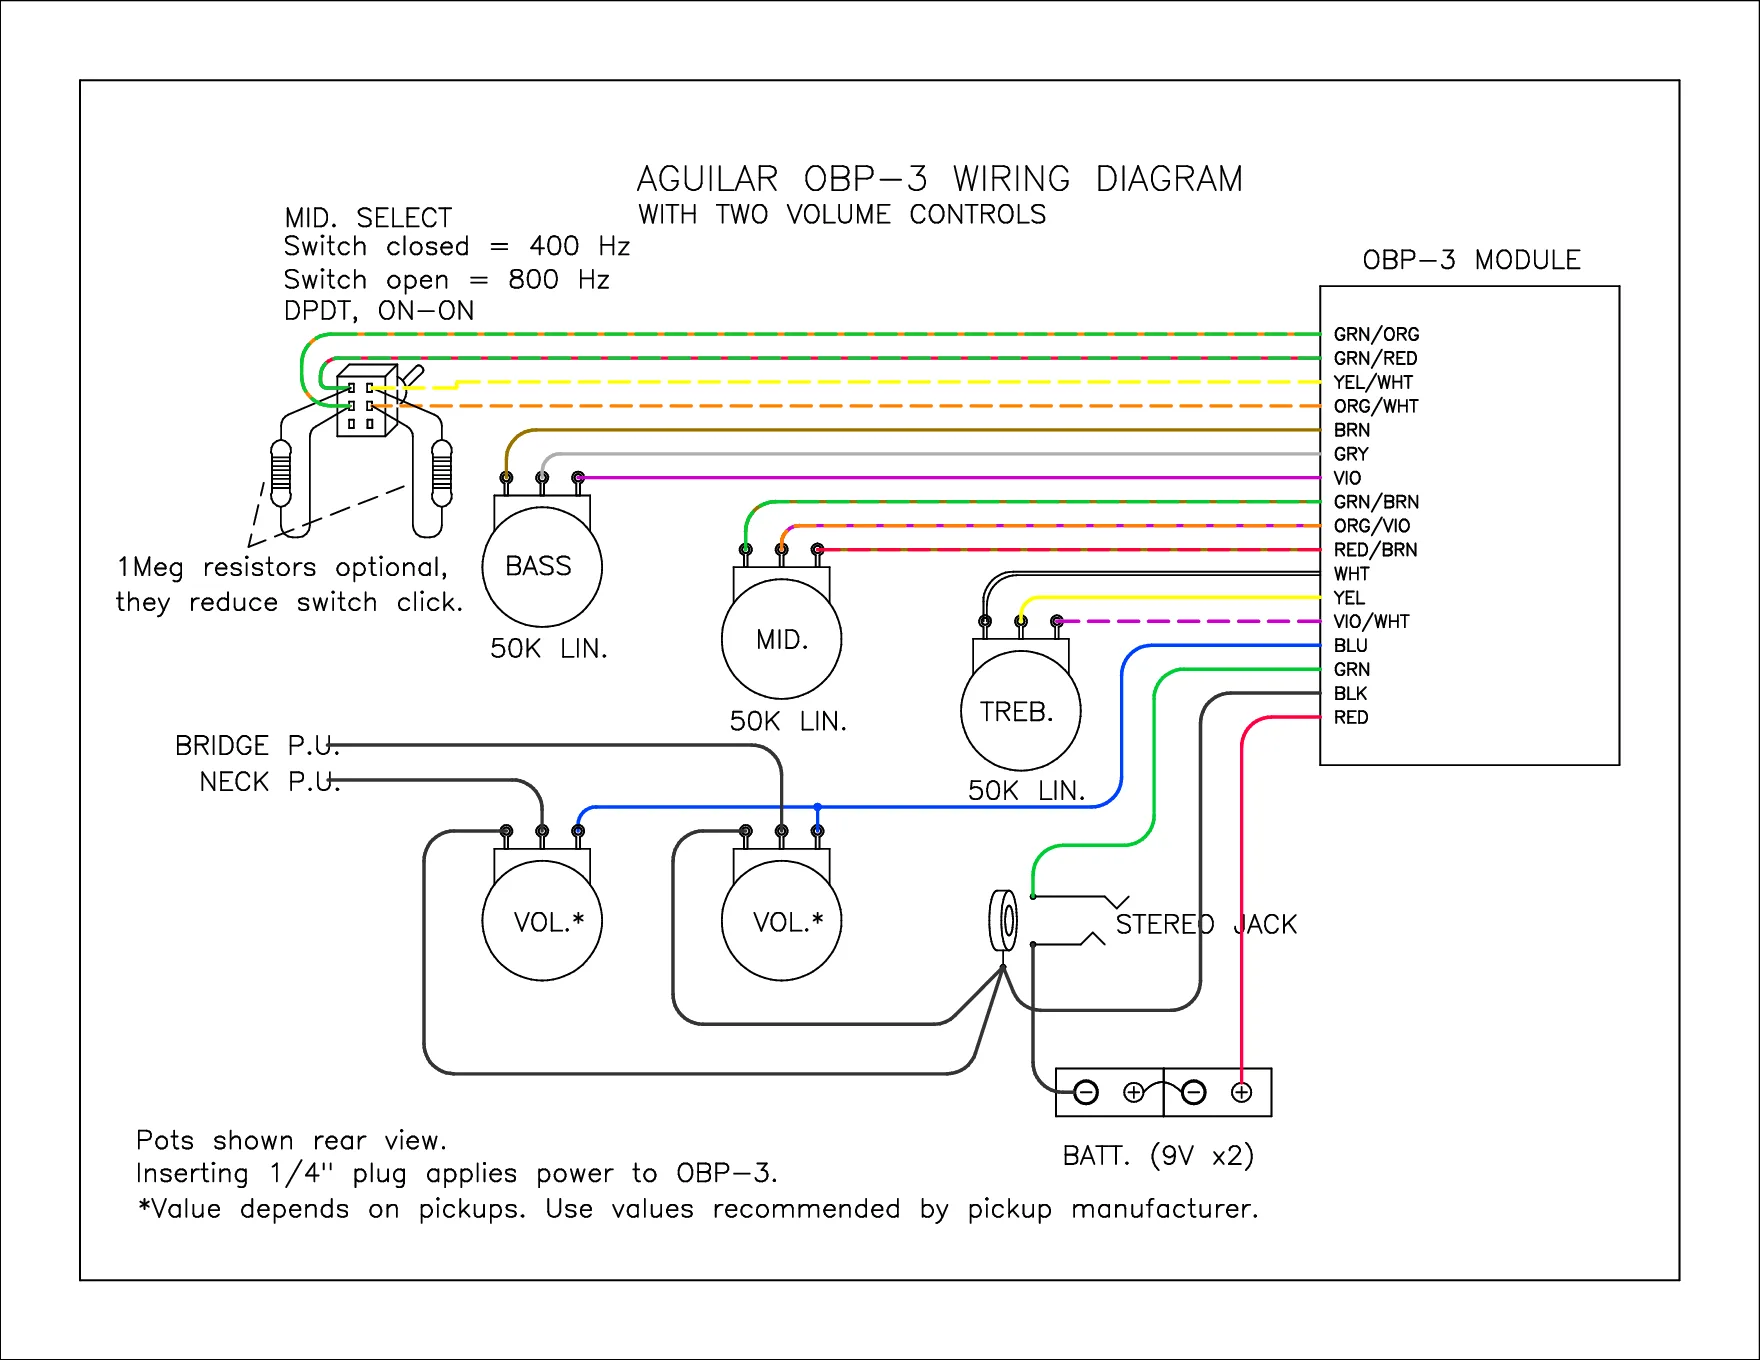
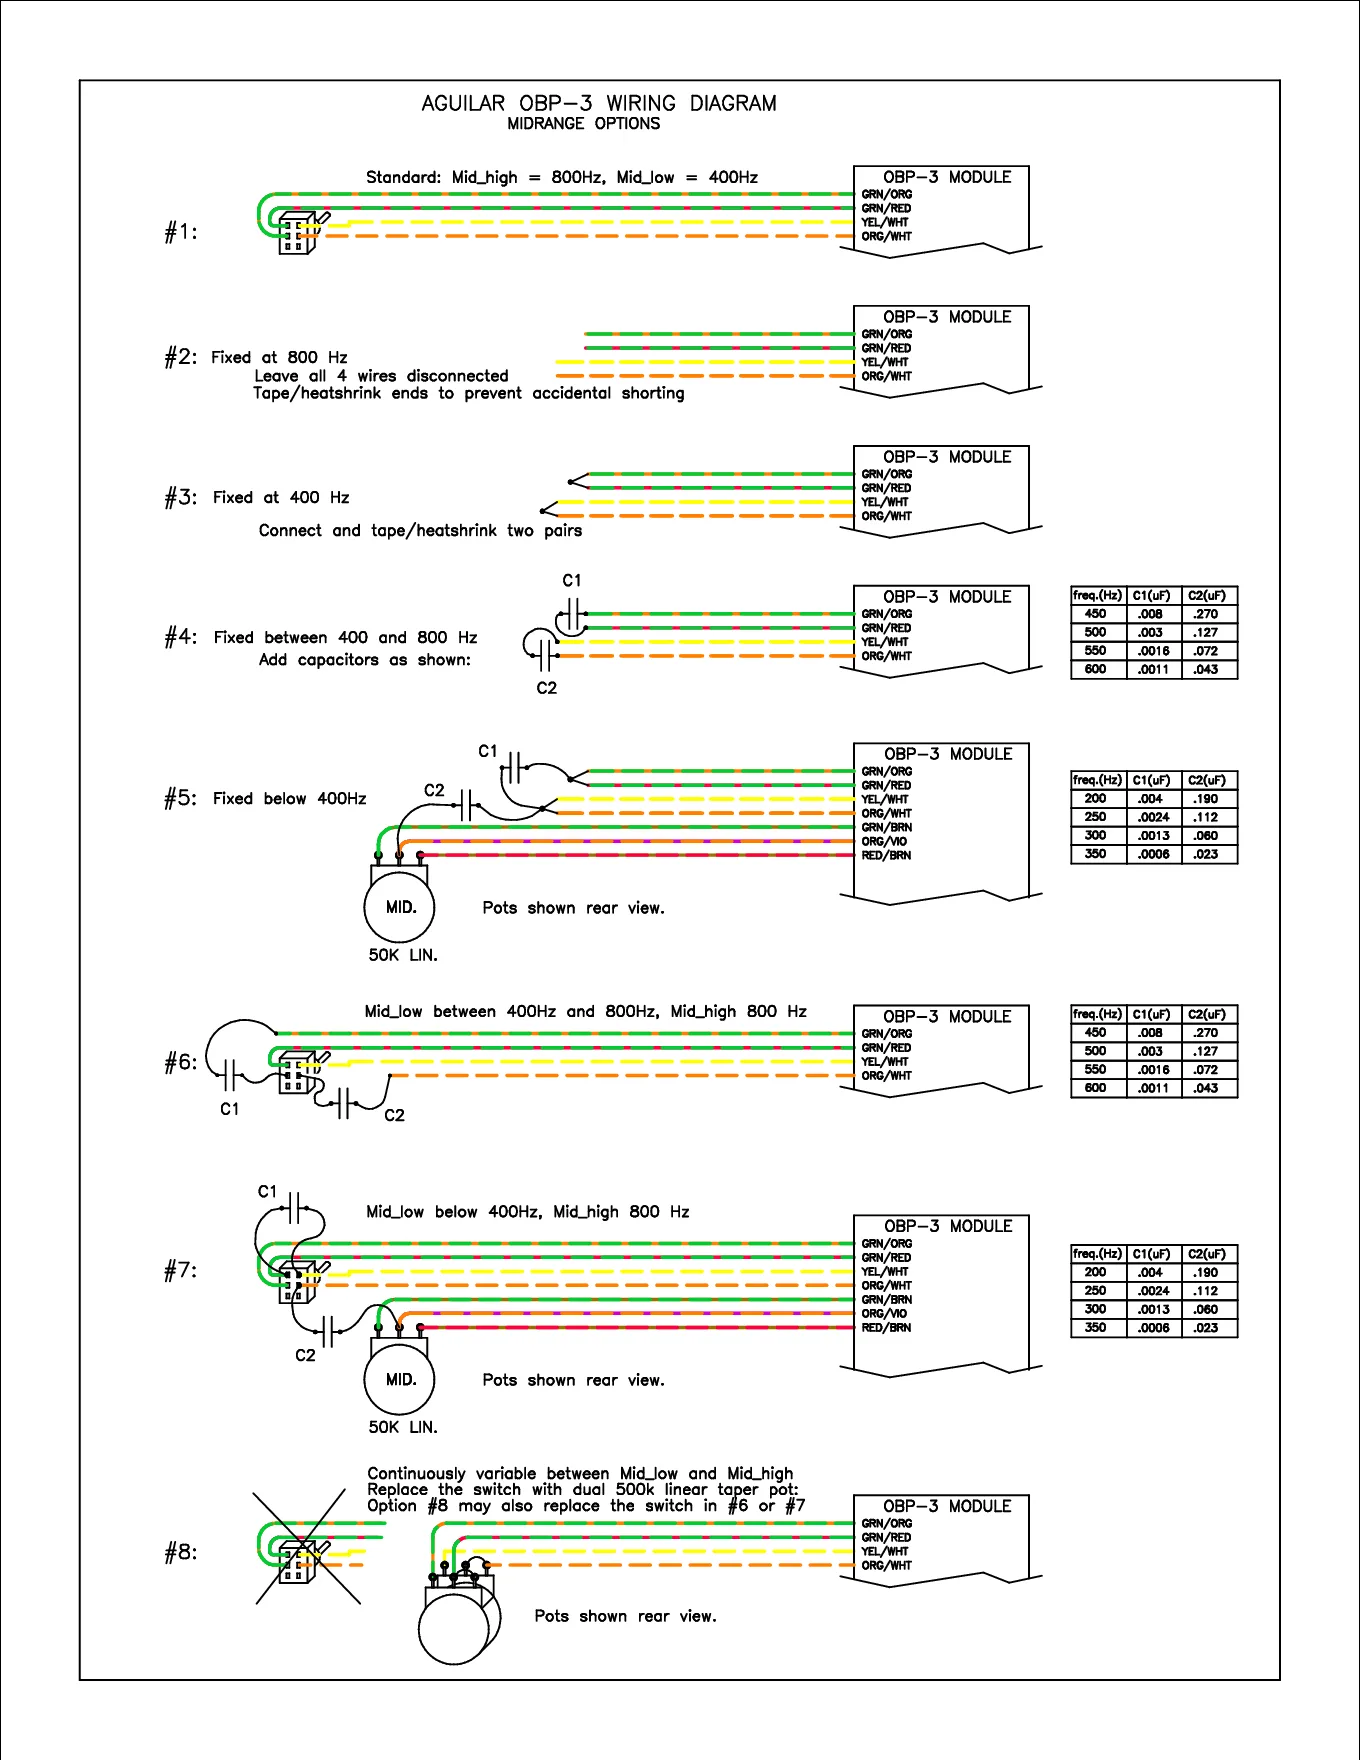
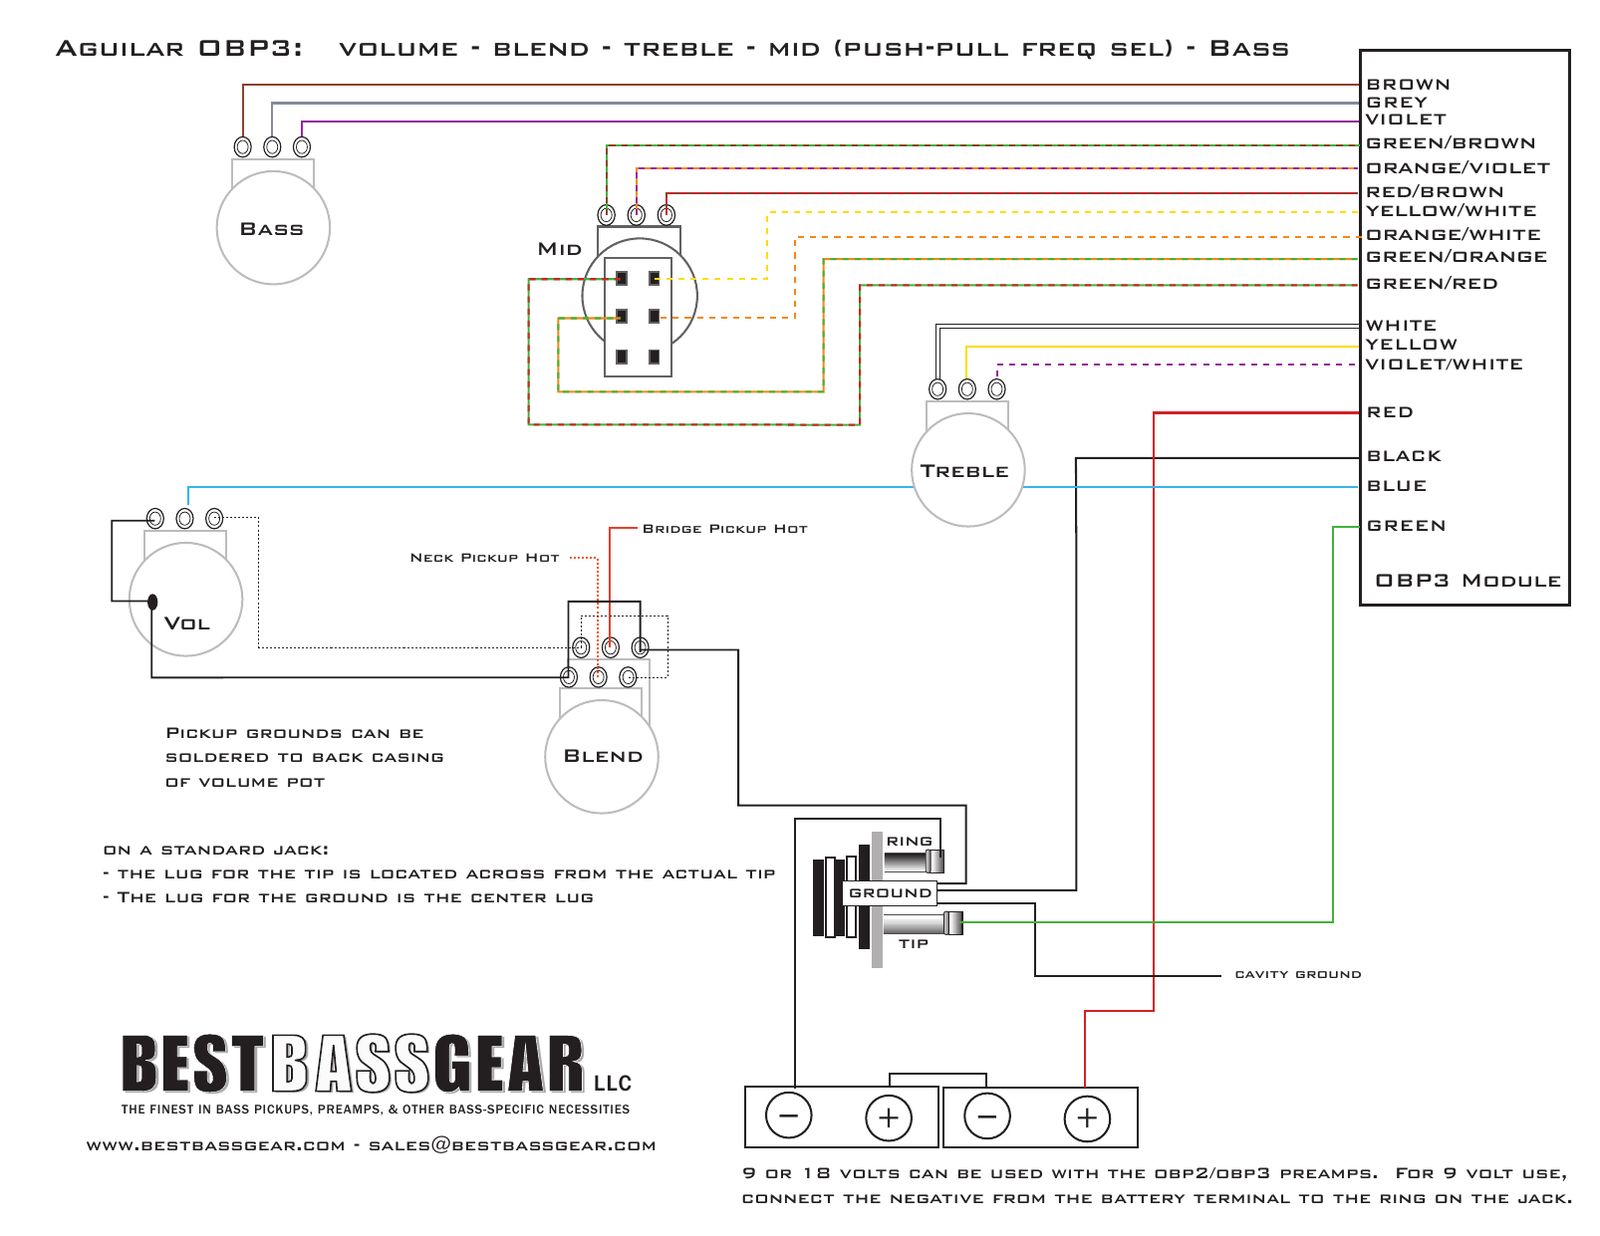
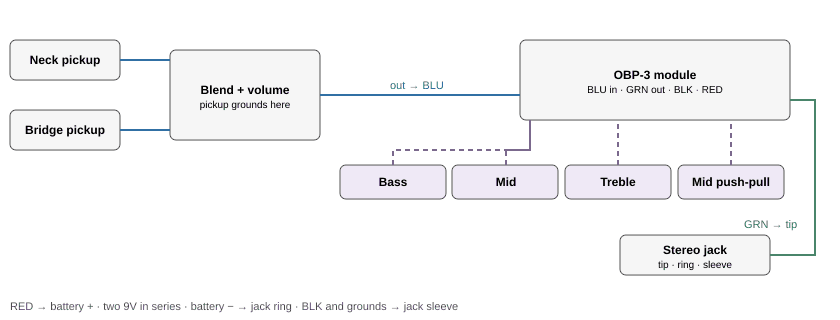
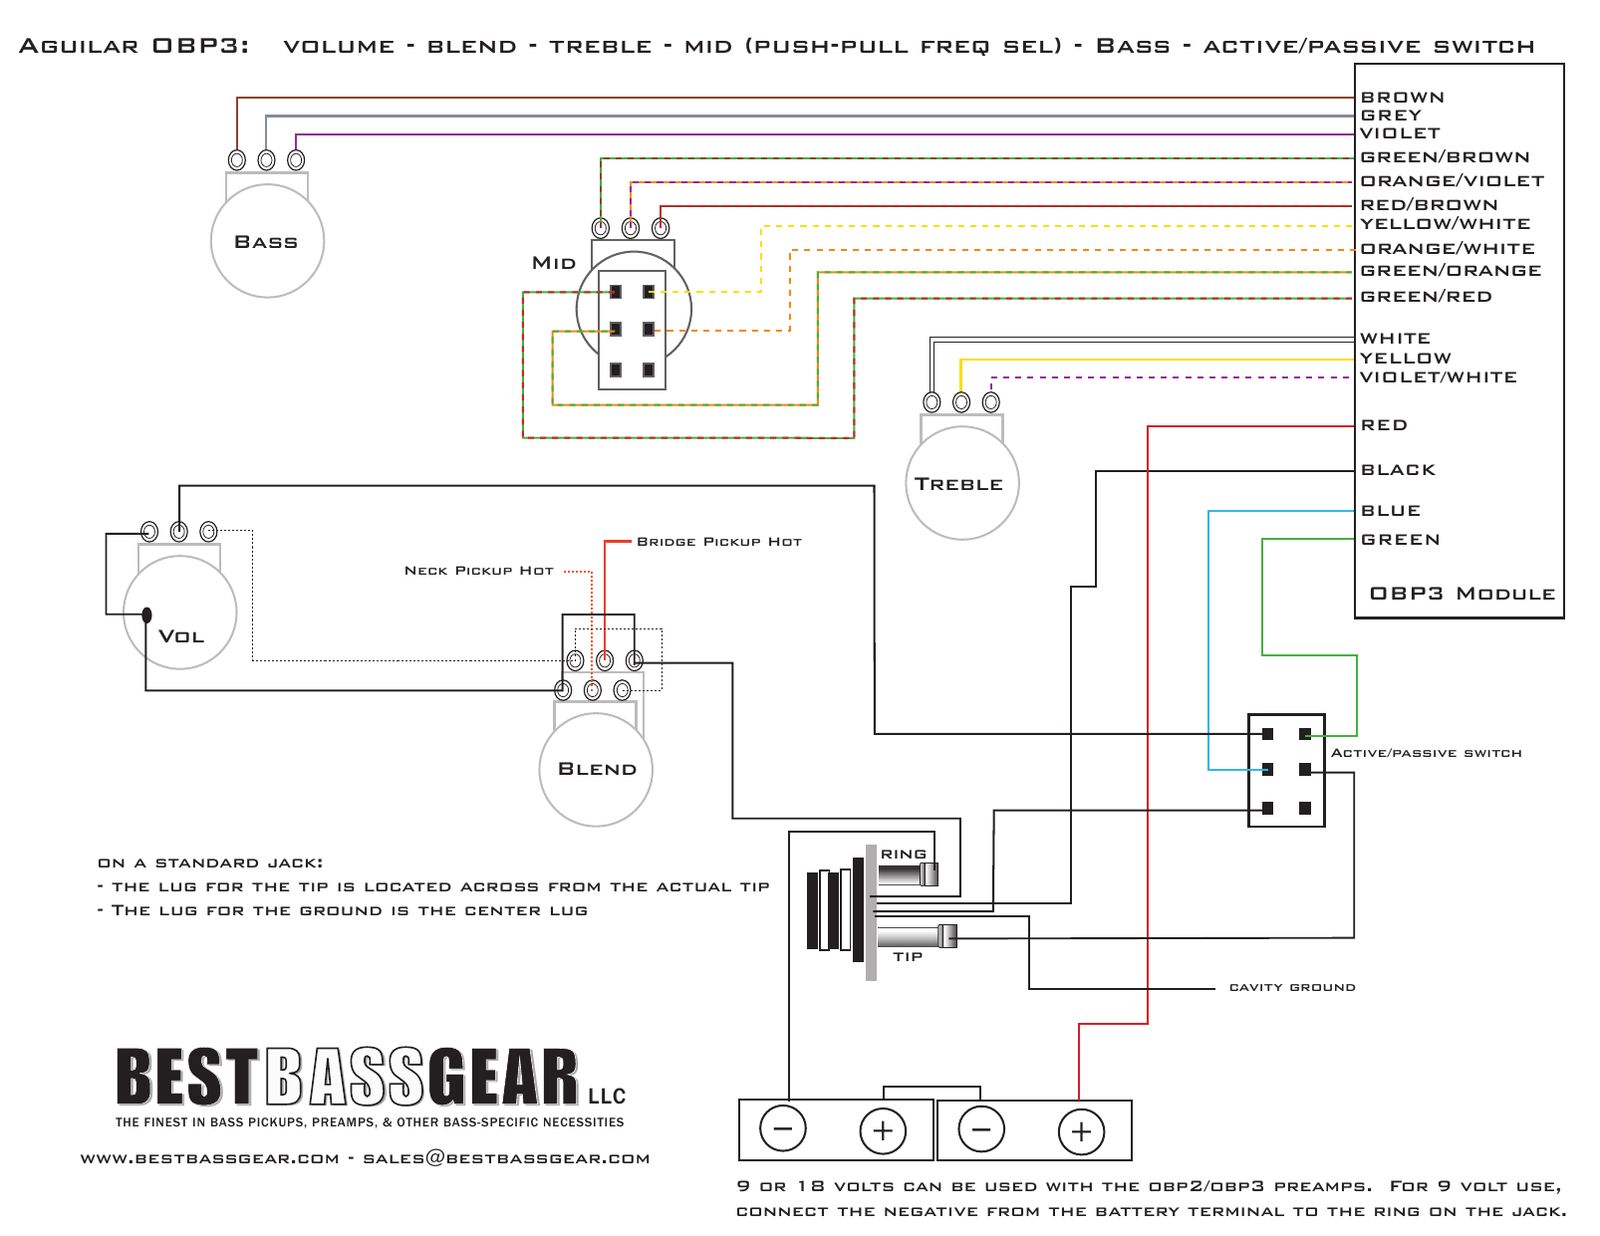
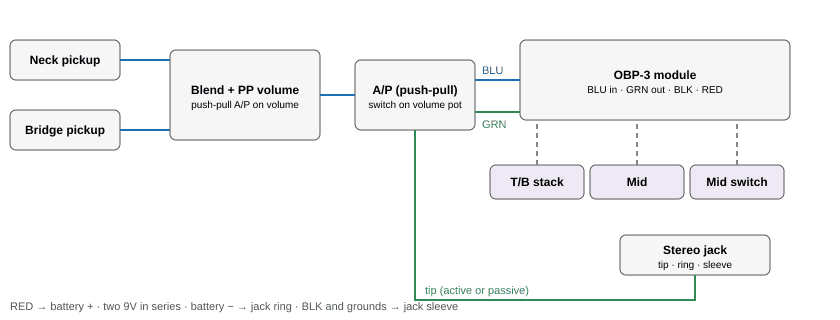
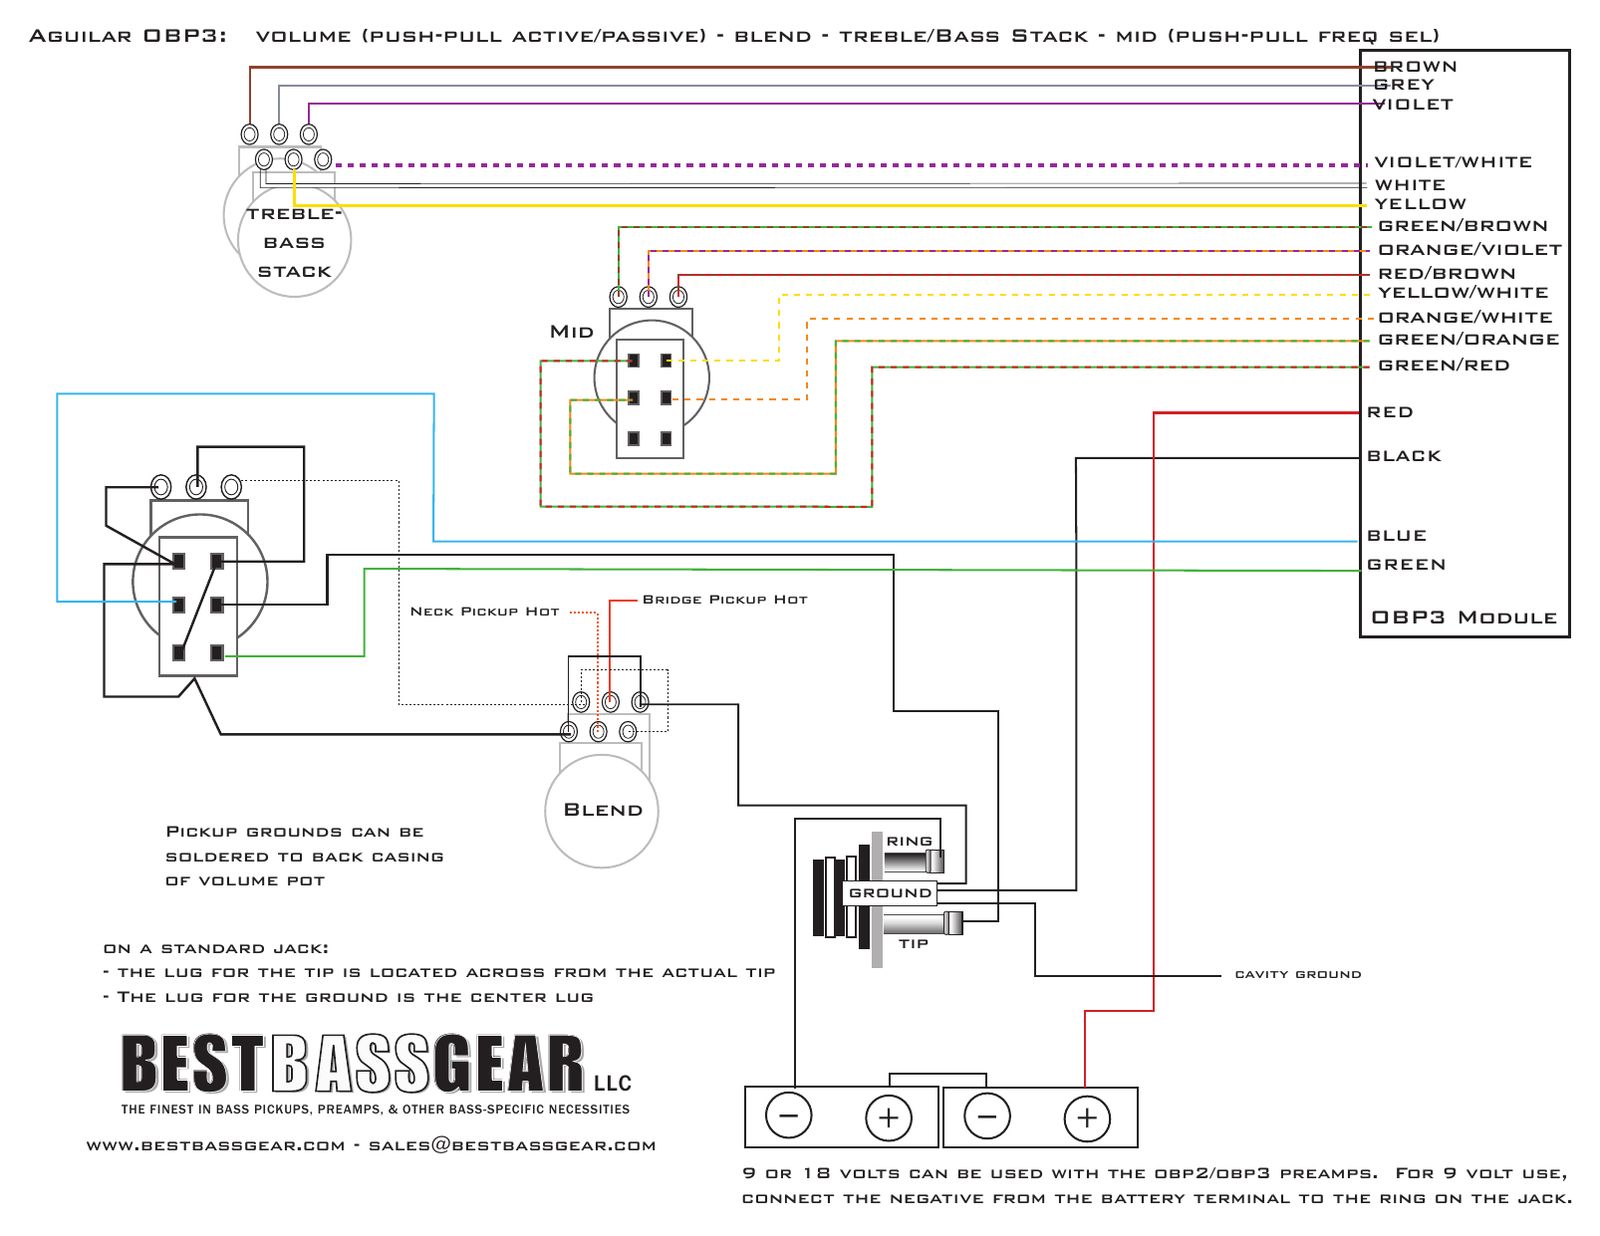
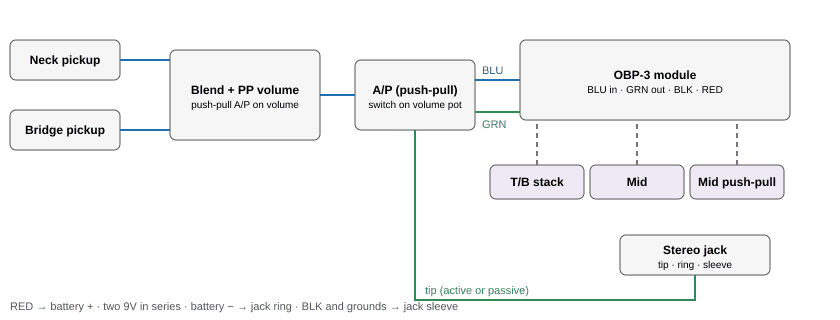
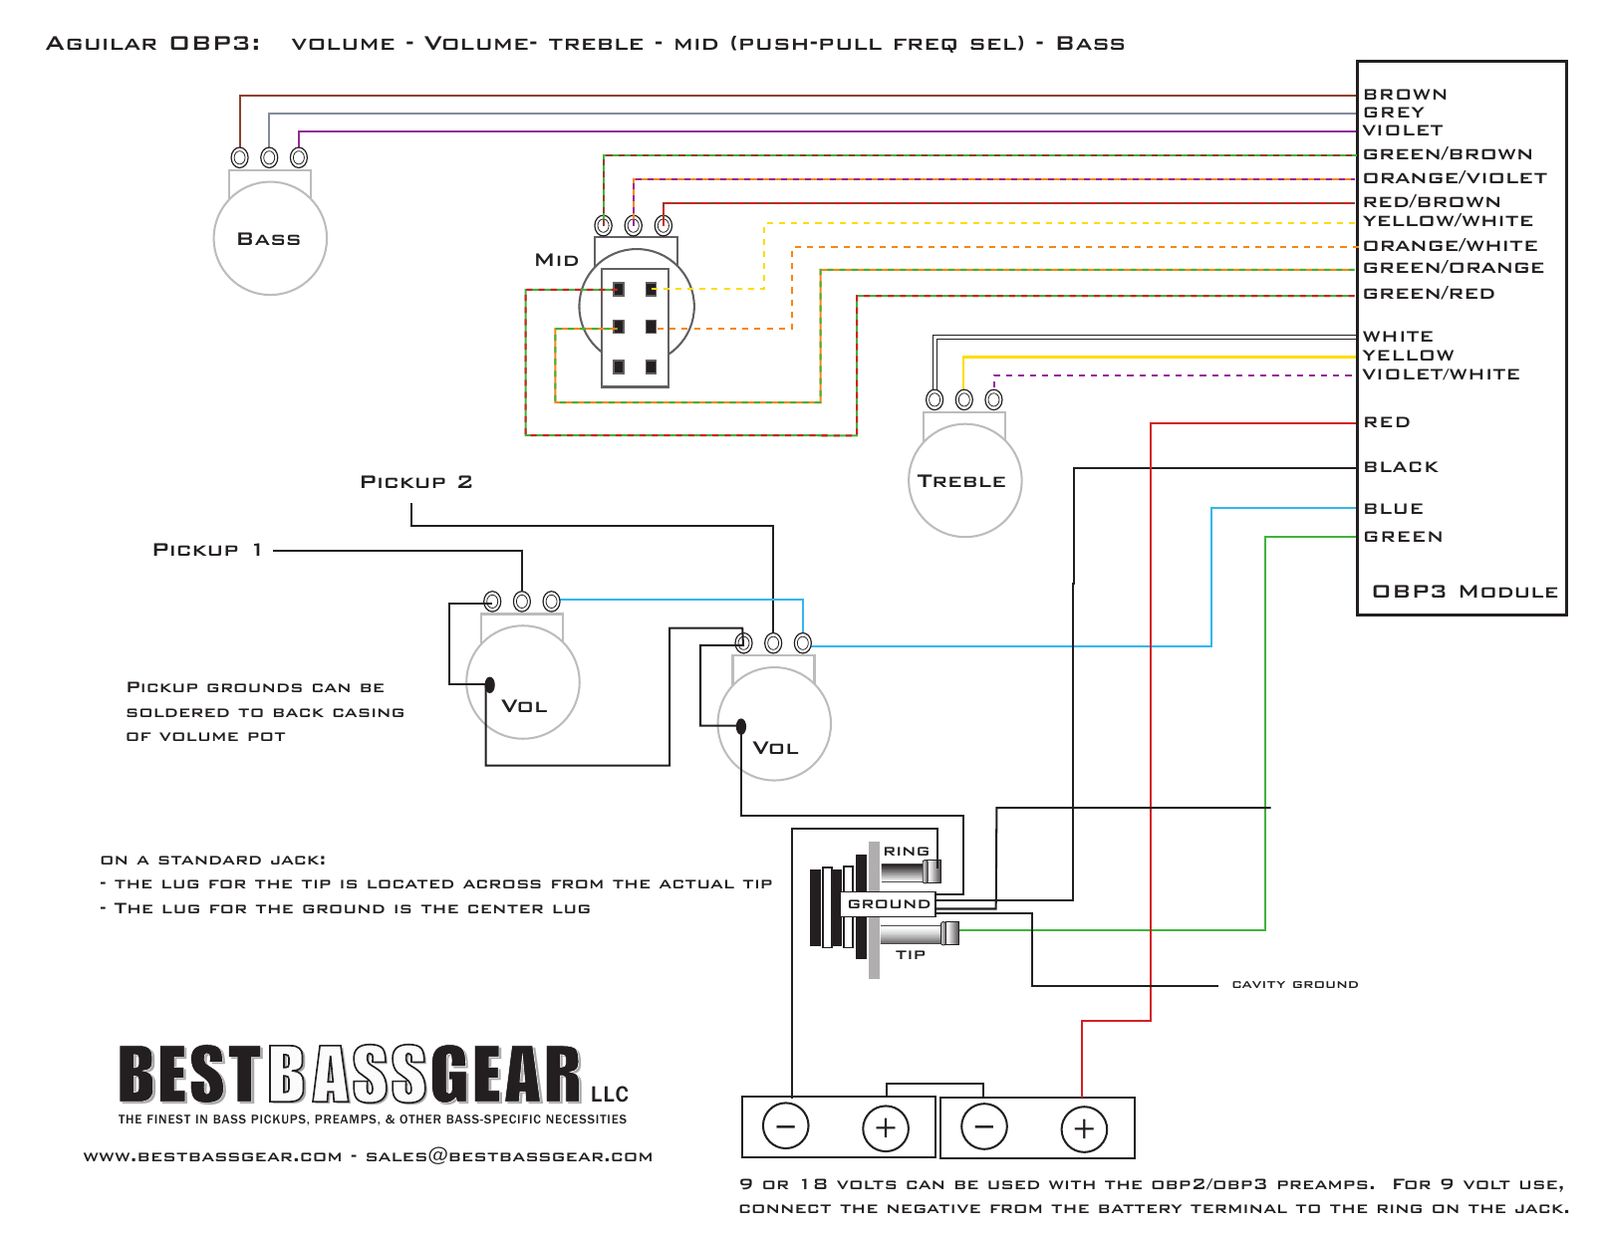
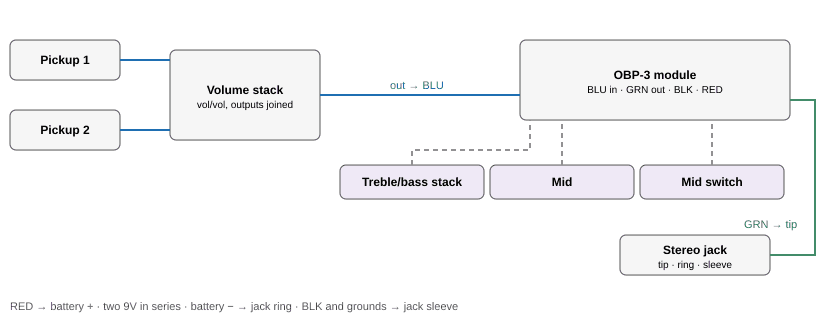
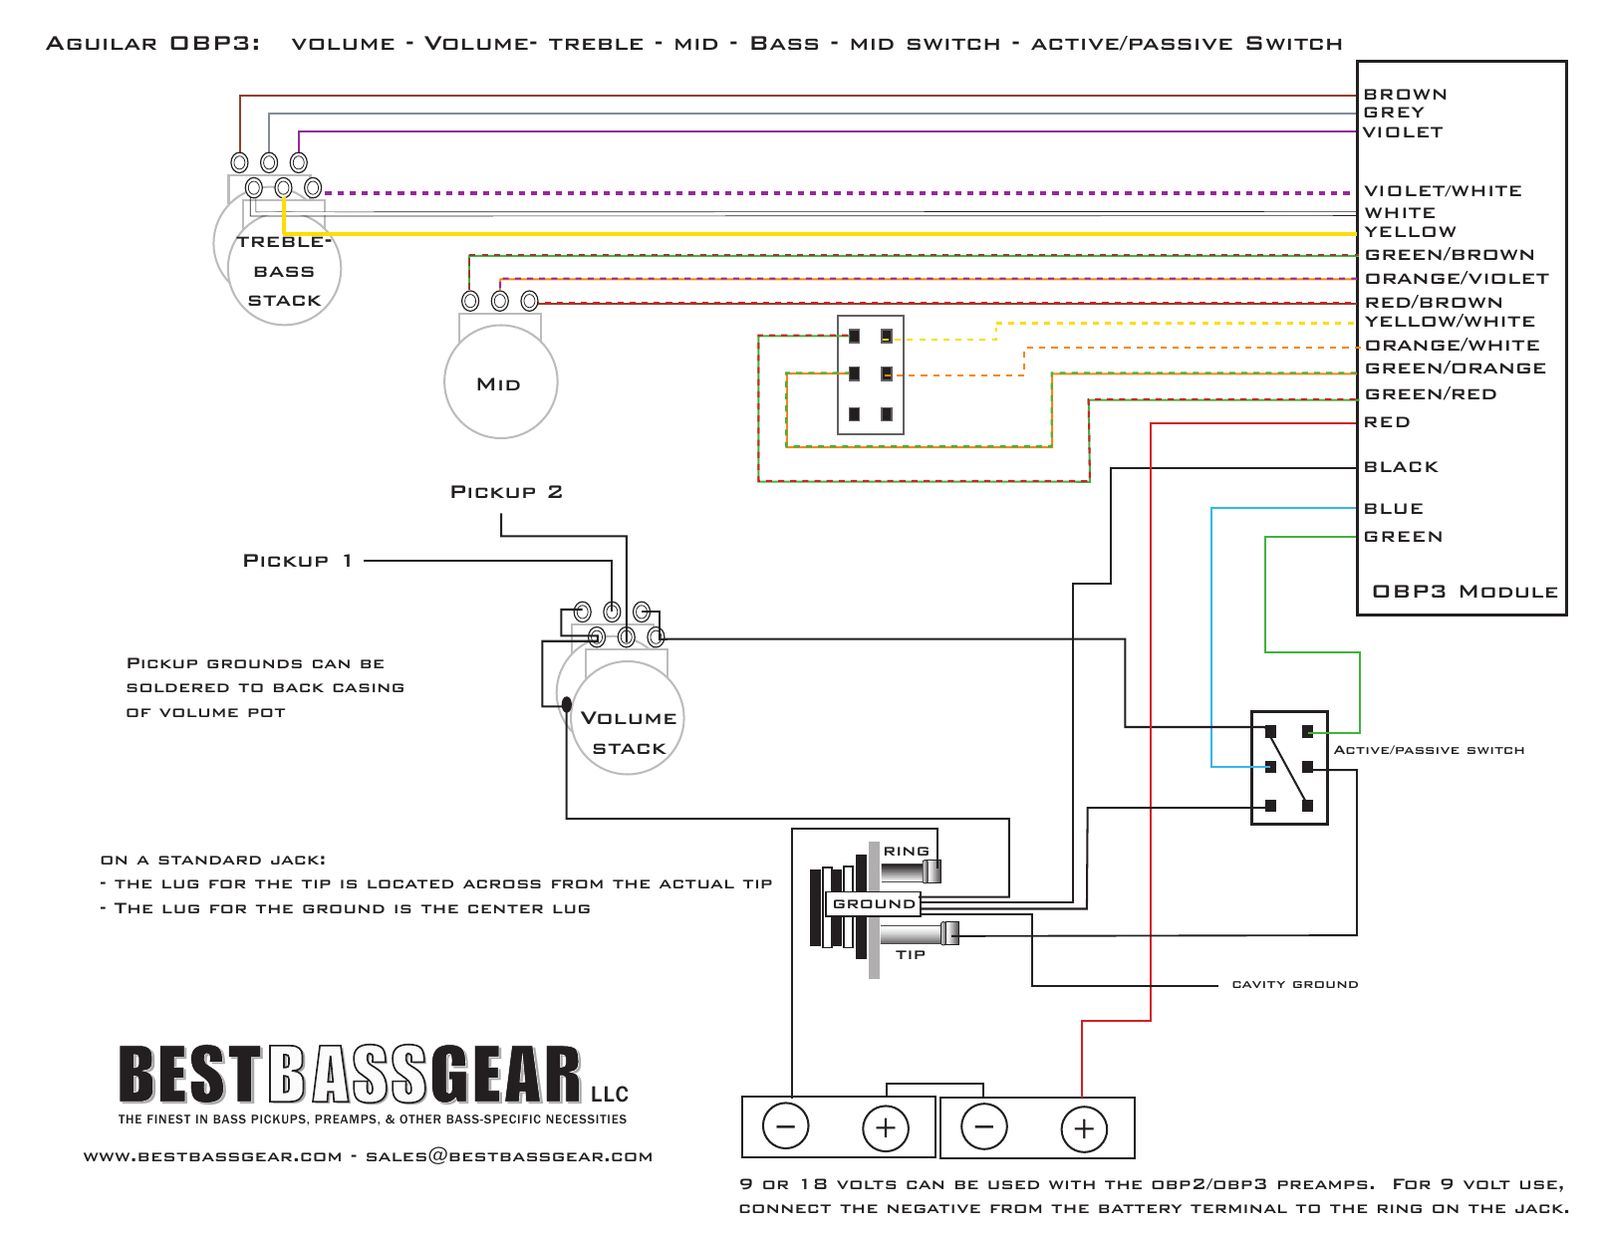
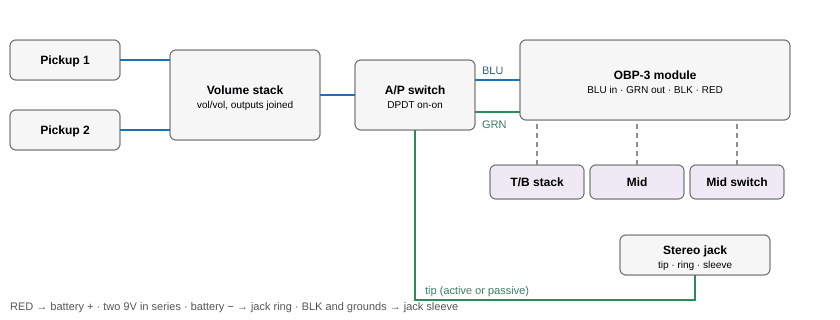
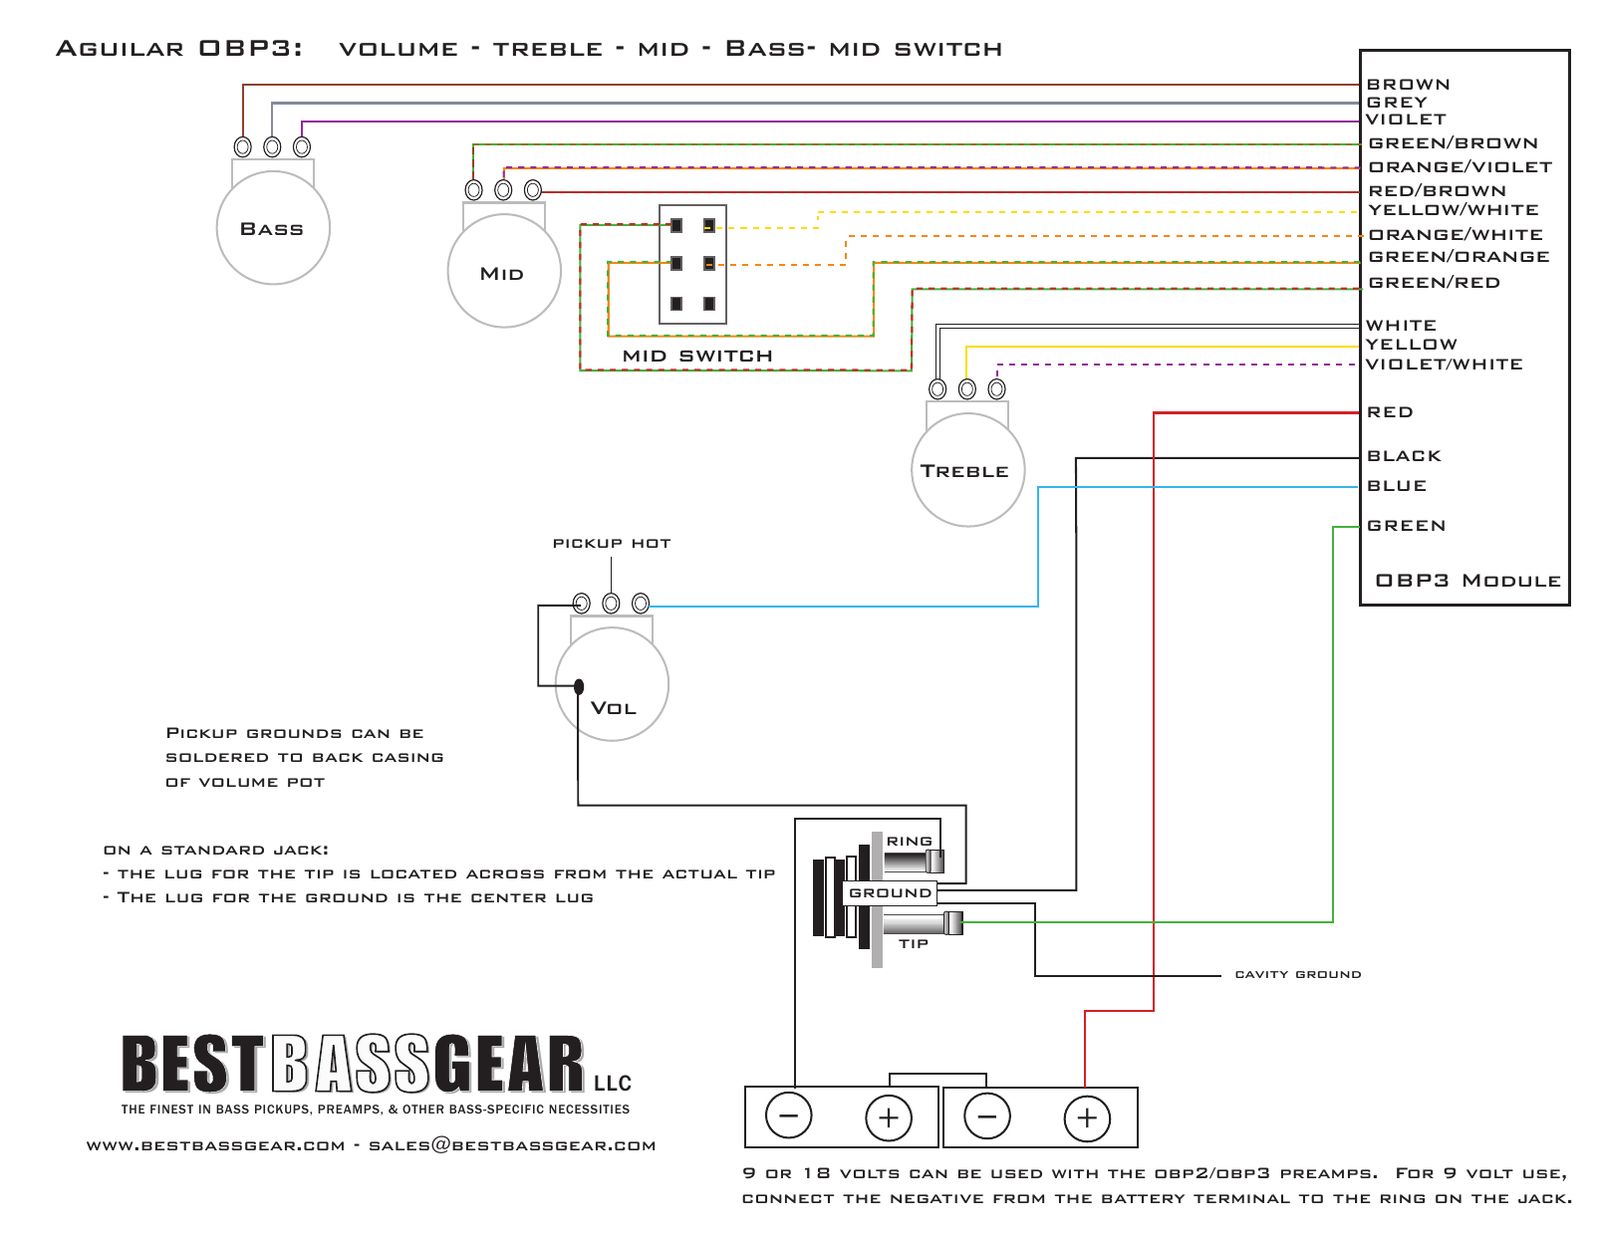
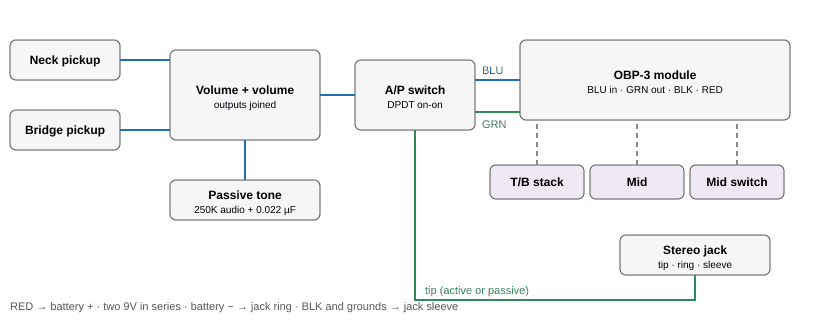
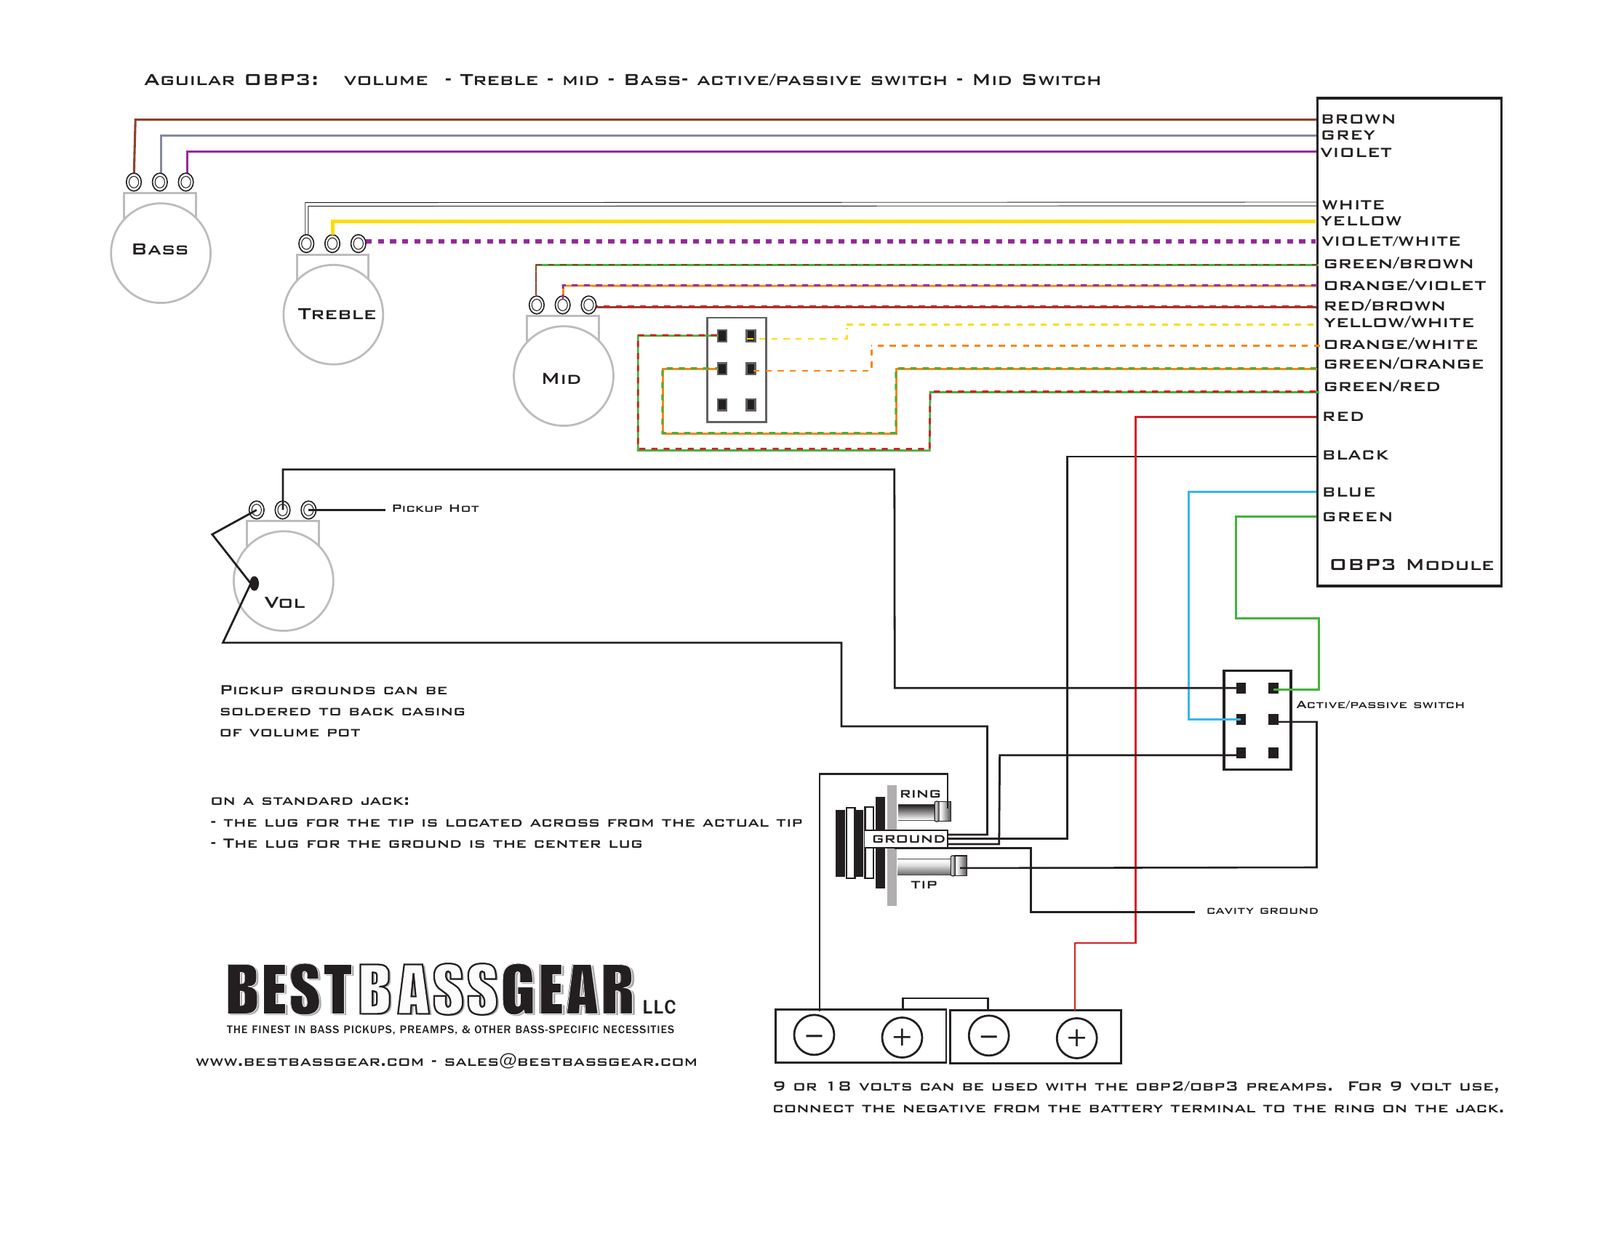
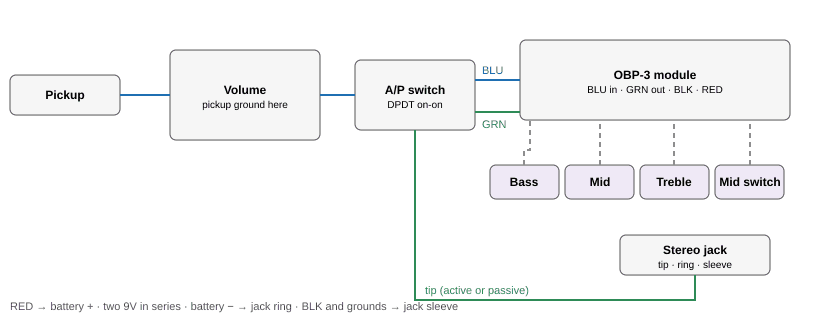
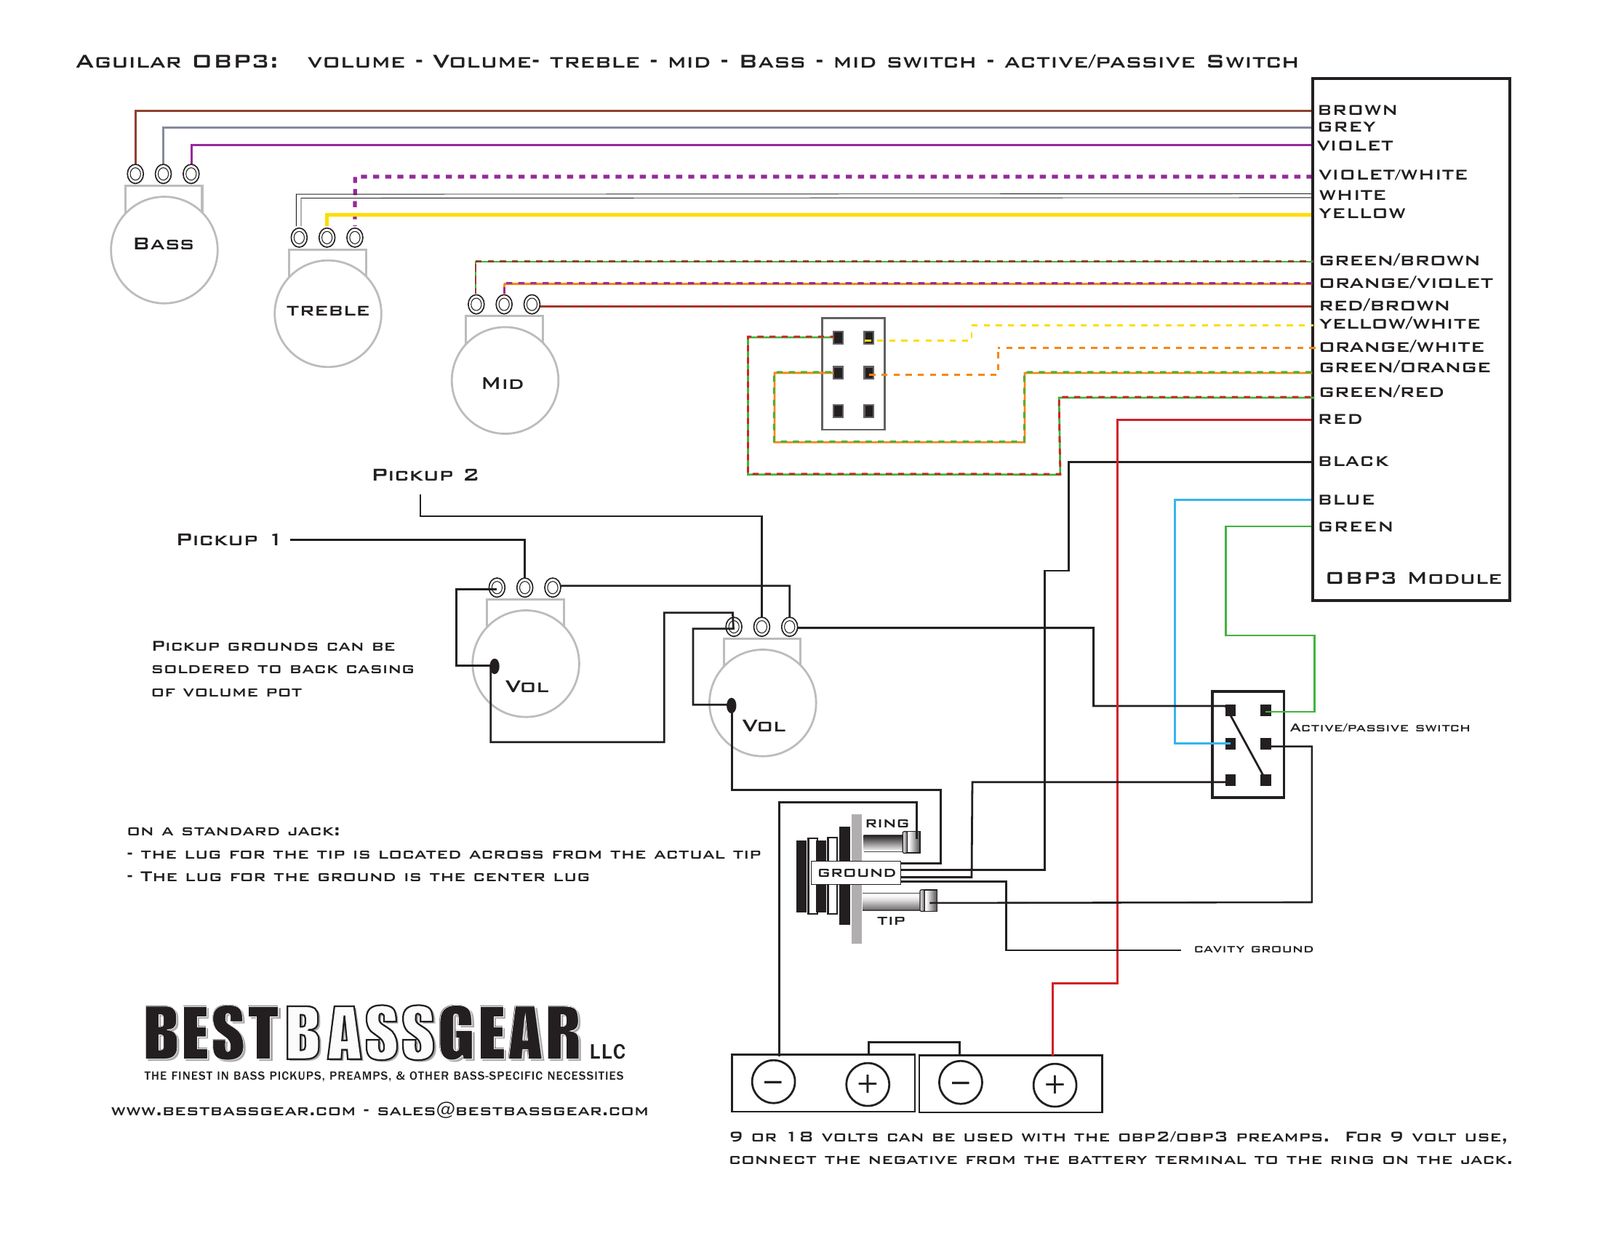
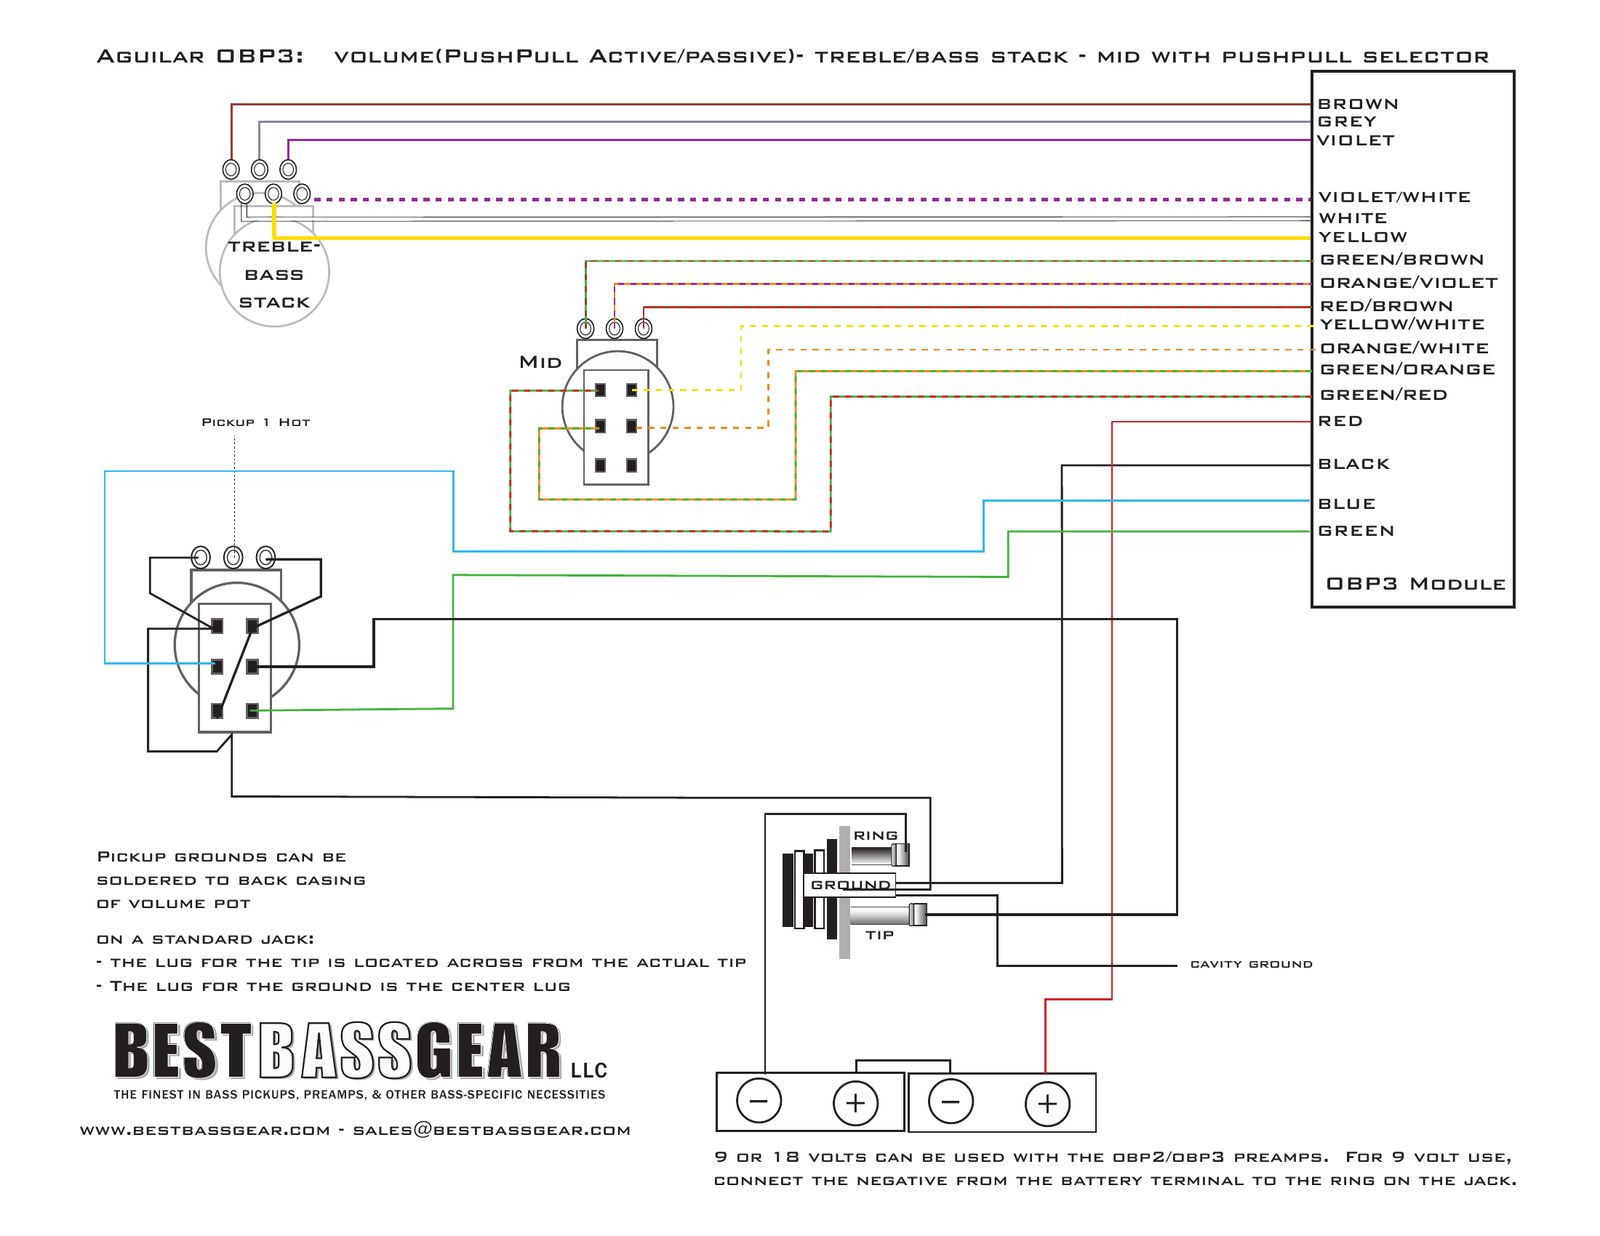
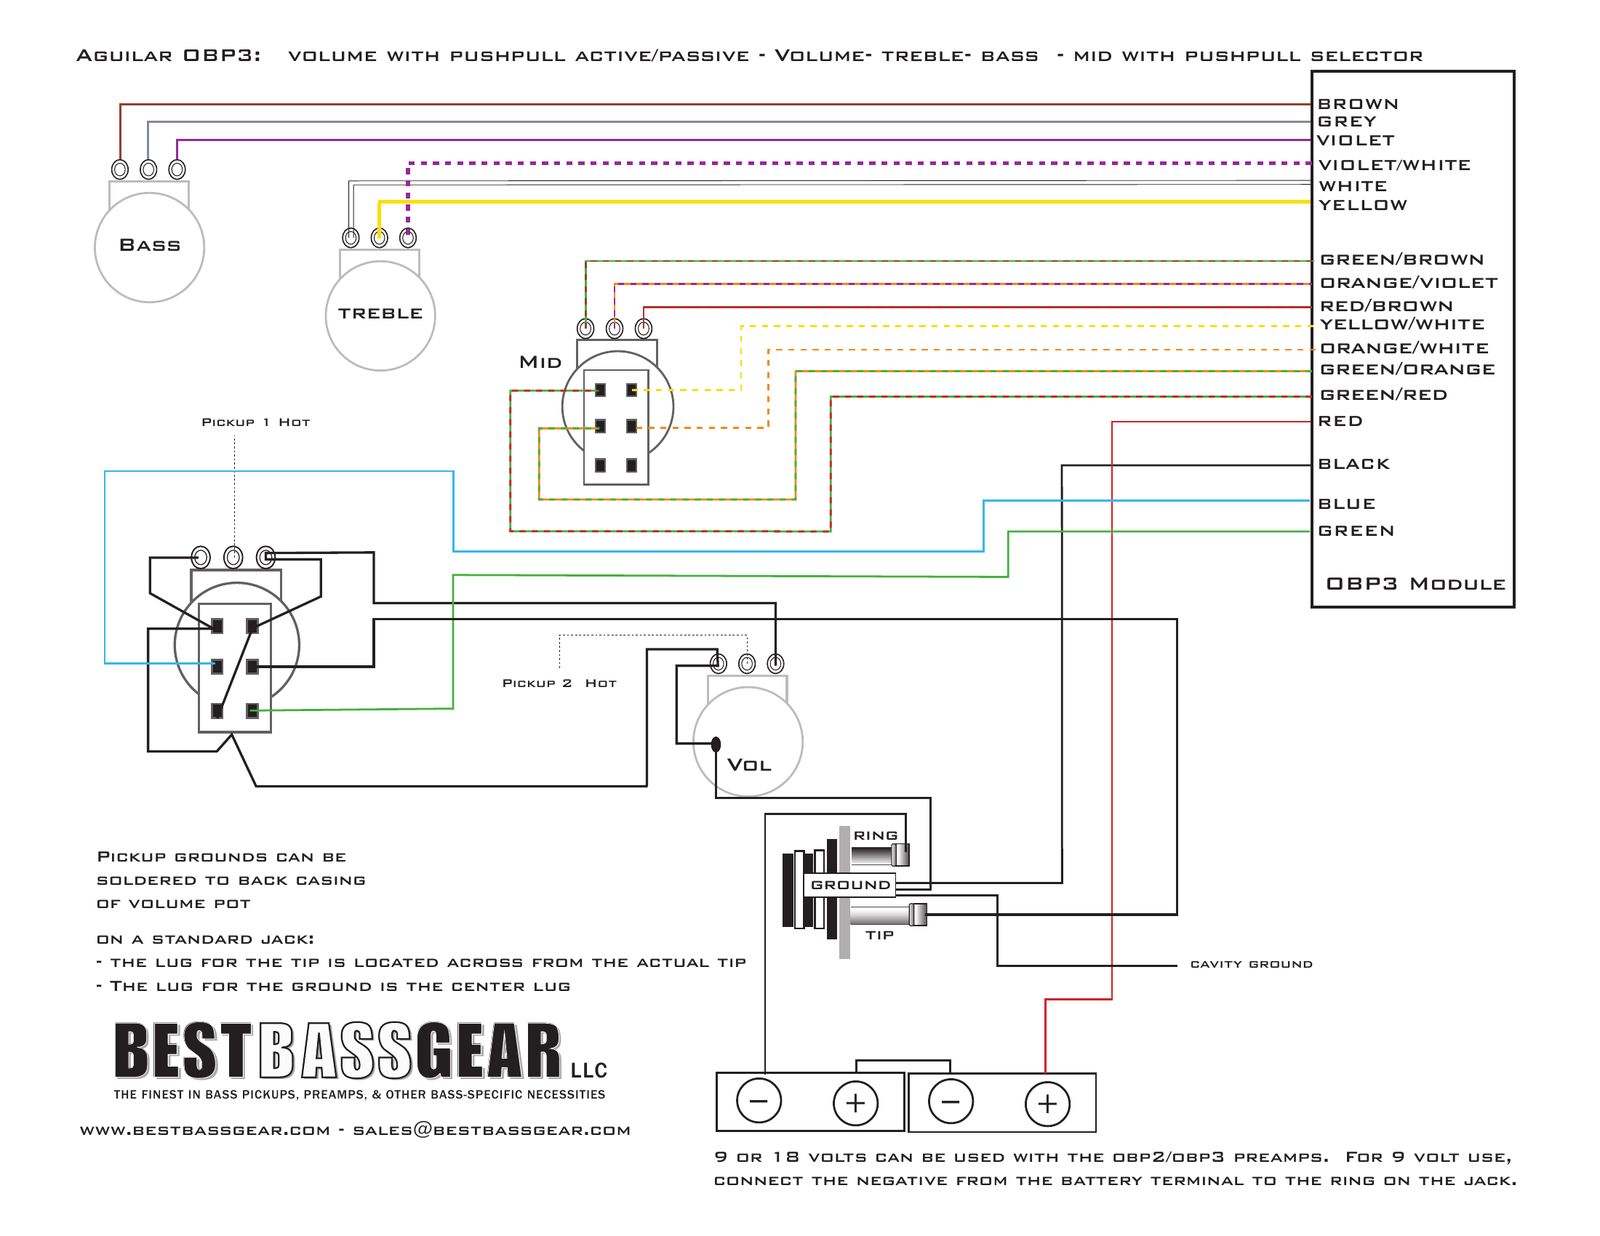
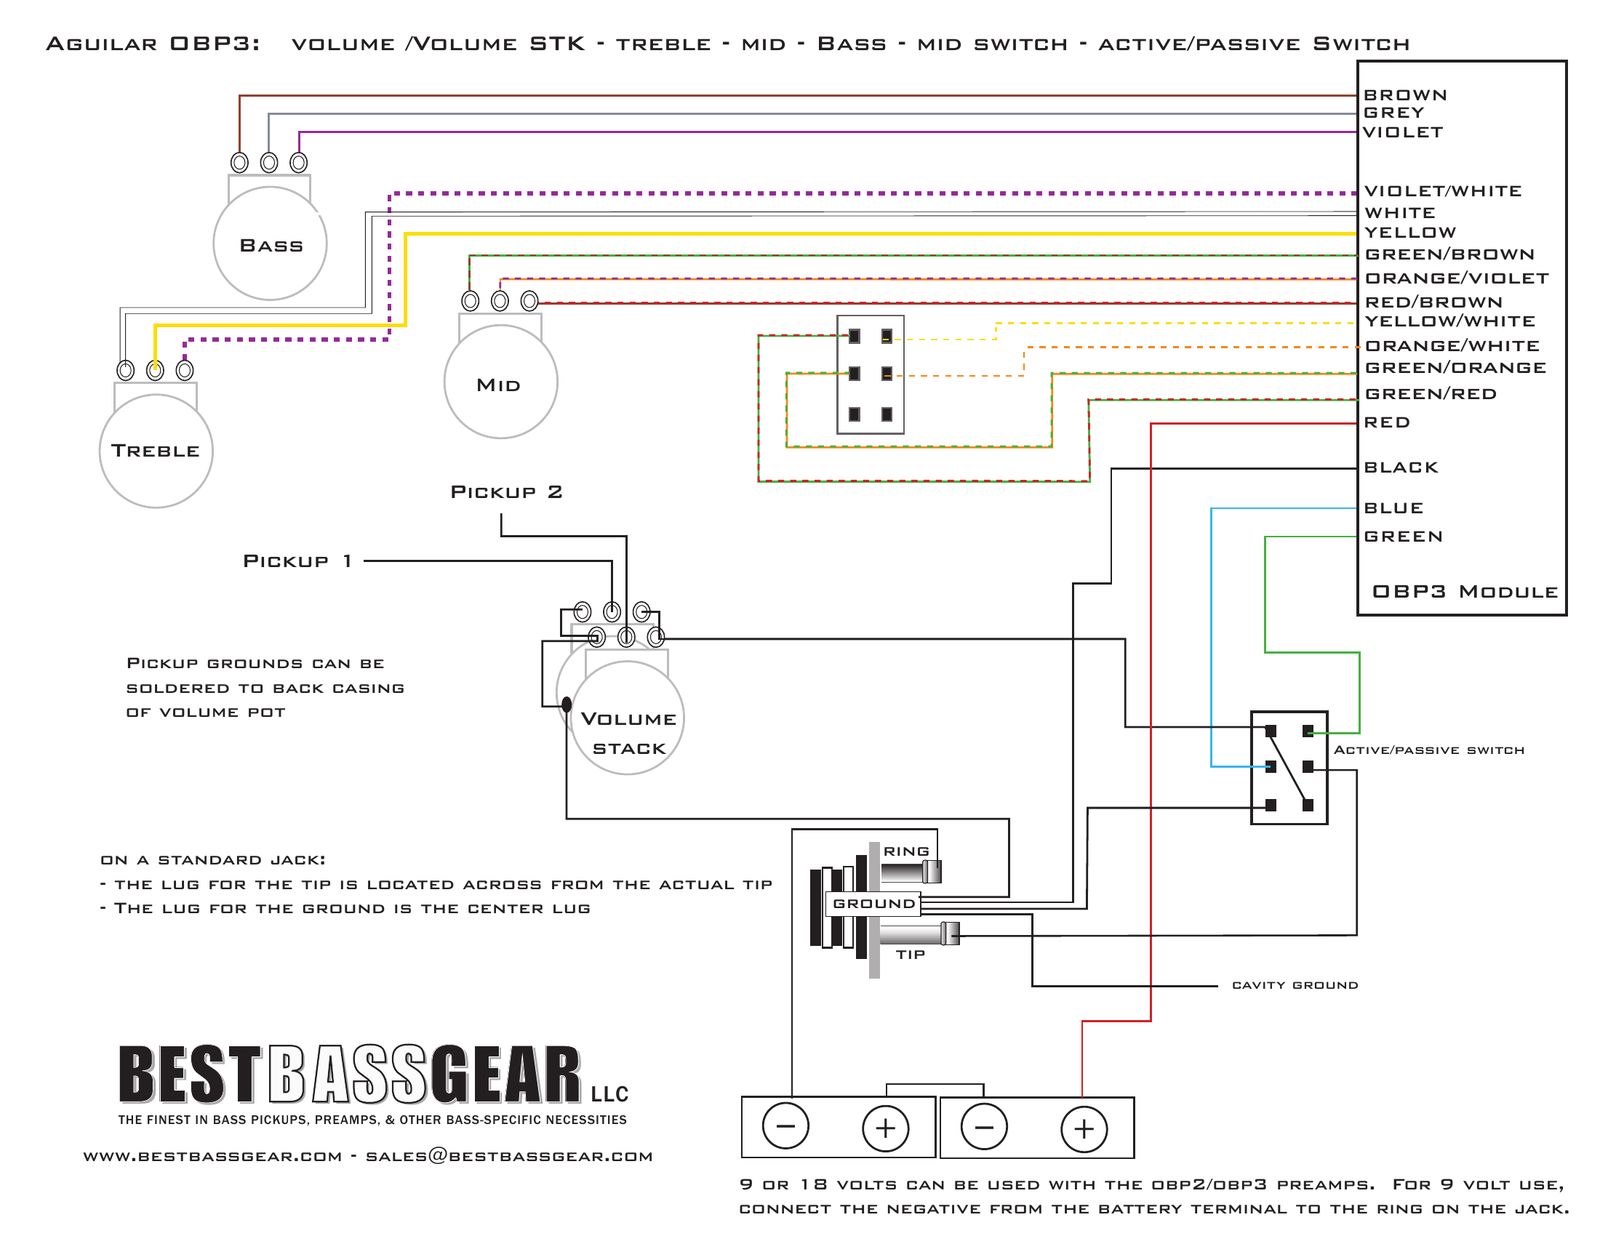
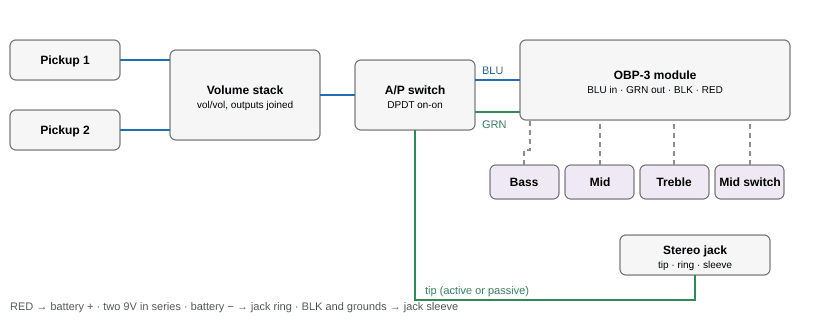
Aguilar's OBP-3 is a 3-band preamp with a switchable mid. This page has Aguilar's four hookups and midrange options sheet (blend and volume, bypass switch, stacked bass/treble pot, two volumes), plus 32 more layouts: single pickup, two volumes, stacked volumes, push-pull or mini-switch mid, push-pull or mini-switch active/passive, and passive tone. All pots are shown from the rear.
OBP-3 wiring with blend and volume controlOBP-3 wiring with blend, volume and DPDT bypass switchOBP-3 wiring with blend, volume and stacked bass/treble potOBP-3 wiring with two volume controlsOBP-3 midrange frequency options #1 to #8 with capacitor values
Bass, mid and treble pots are 50K linear. The stacked-tone version uses a dual 50K linear pot for bass/treble.
Mid select is a DPDT on-on switch: closed = 400 Hz, open = 800 Hz. The 1 Meg resistors across the switch are optional; they reduce switch click.
Power is two 9V batteries. The output must be a stereo jack: inserting a 1/4" plug powers the OBP-3.
Blend (dual audio) and volume values depend on your pickups. Use the values your pickup maker recommends.
Single pickup: leave out the blend pot and wire the pickup straight to the volume pot.
The bypass version adds a DPDT on-on switch.
Midrange sheet: #2 leaves the four mid wires disconnected (fixed 800 Hz, tape the ends). #3 joins two pairs (fixed 400 Hz). #4 to #7 add capacitors C1/C2 for 200 to 600 Hz (values in the tables). #8 replaces the switch with a dual 500K linear pot for a sweepable mid.
Every diagram, wire by wire
All of Aguilar's OBP-3 layouts as text: the main blend and volume hookup with a connection diagram and wire table, then the two-volume, bypass, stacked-pot and mid-frequency options. After those come 32 more layouts from Best Bass Gear's drawings and Aguilar's passive-tone sheet, each with the original drawing, a connection diagram, a wire table and steps, then notes on Aguilar's 2015 blend pot change, a push-pull active/passive add-on for any OBP, and our install and troubleshooting hints.
Aguilar draws the pots from the back with the lugs up. 'Left', 'middle' and 'right' lug in the tables mean that view.
Module wires are named by Aguilar's color labels (BRN, GRY, GRN/ORG and so on).
Ground means the back of a pot casing (or the jack sleeve). Join all pot casings with a bare wire so they share one ground.
The stereo jack's ring connects battery − to ground only when a plug is in, so unplug the bass when you're not playing.
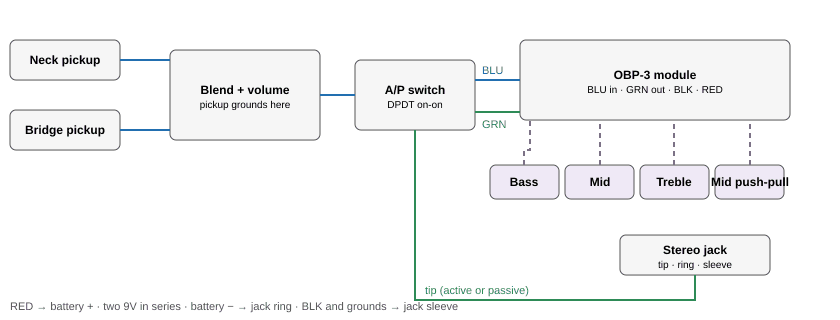
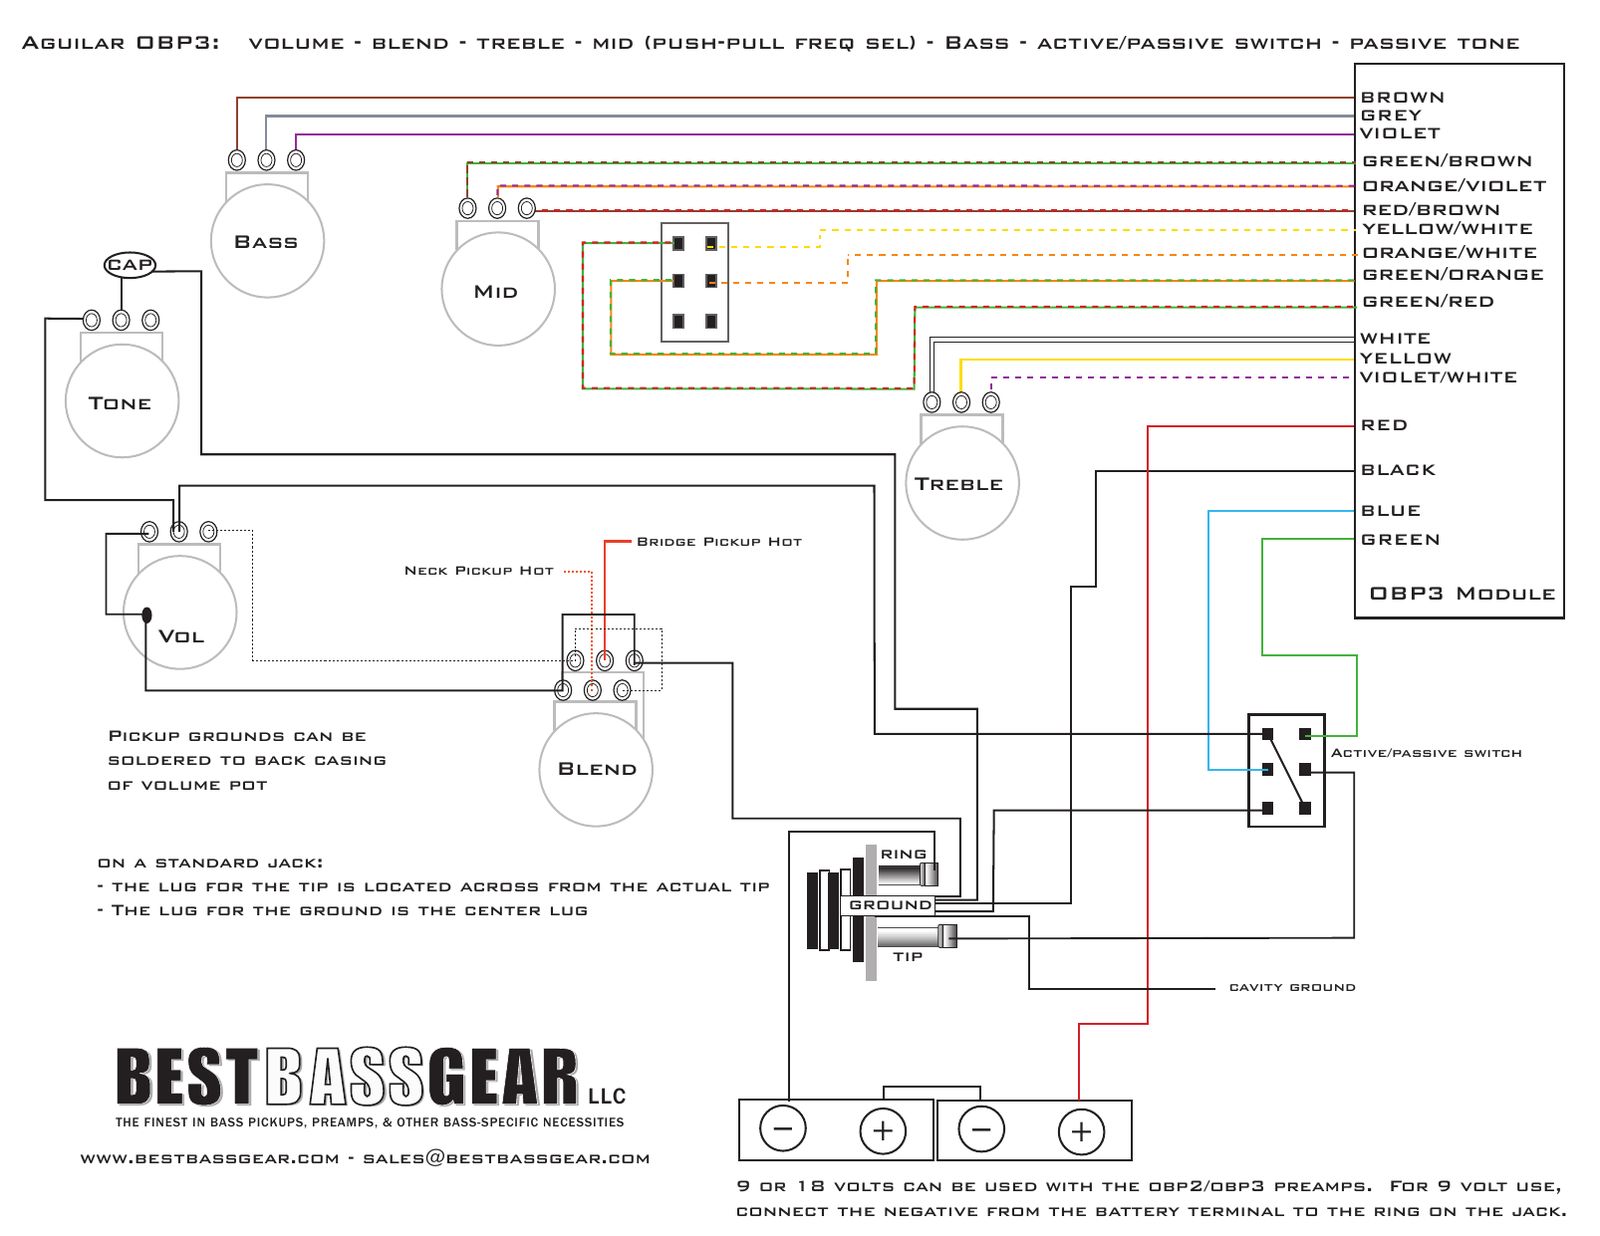
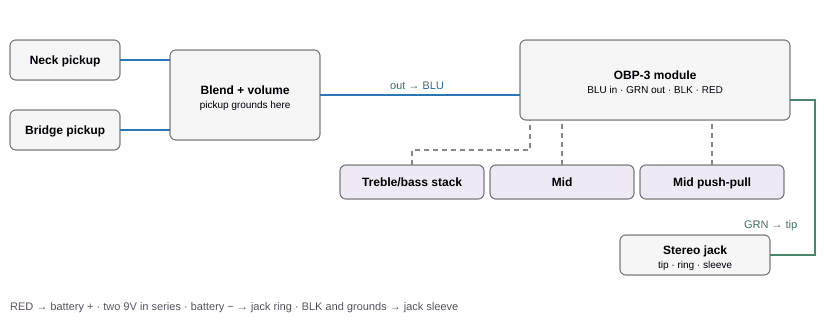
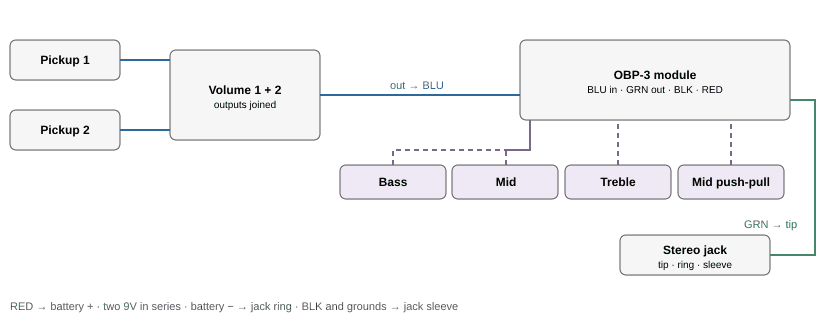
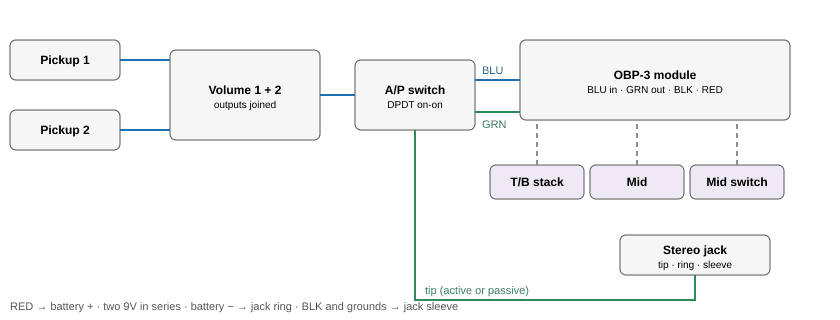
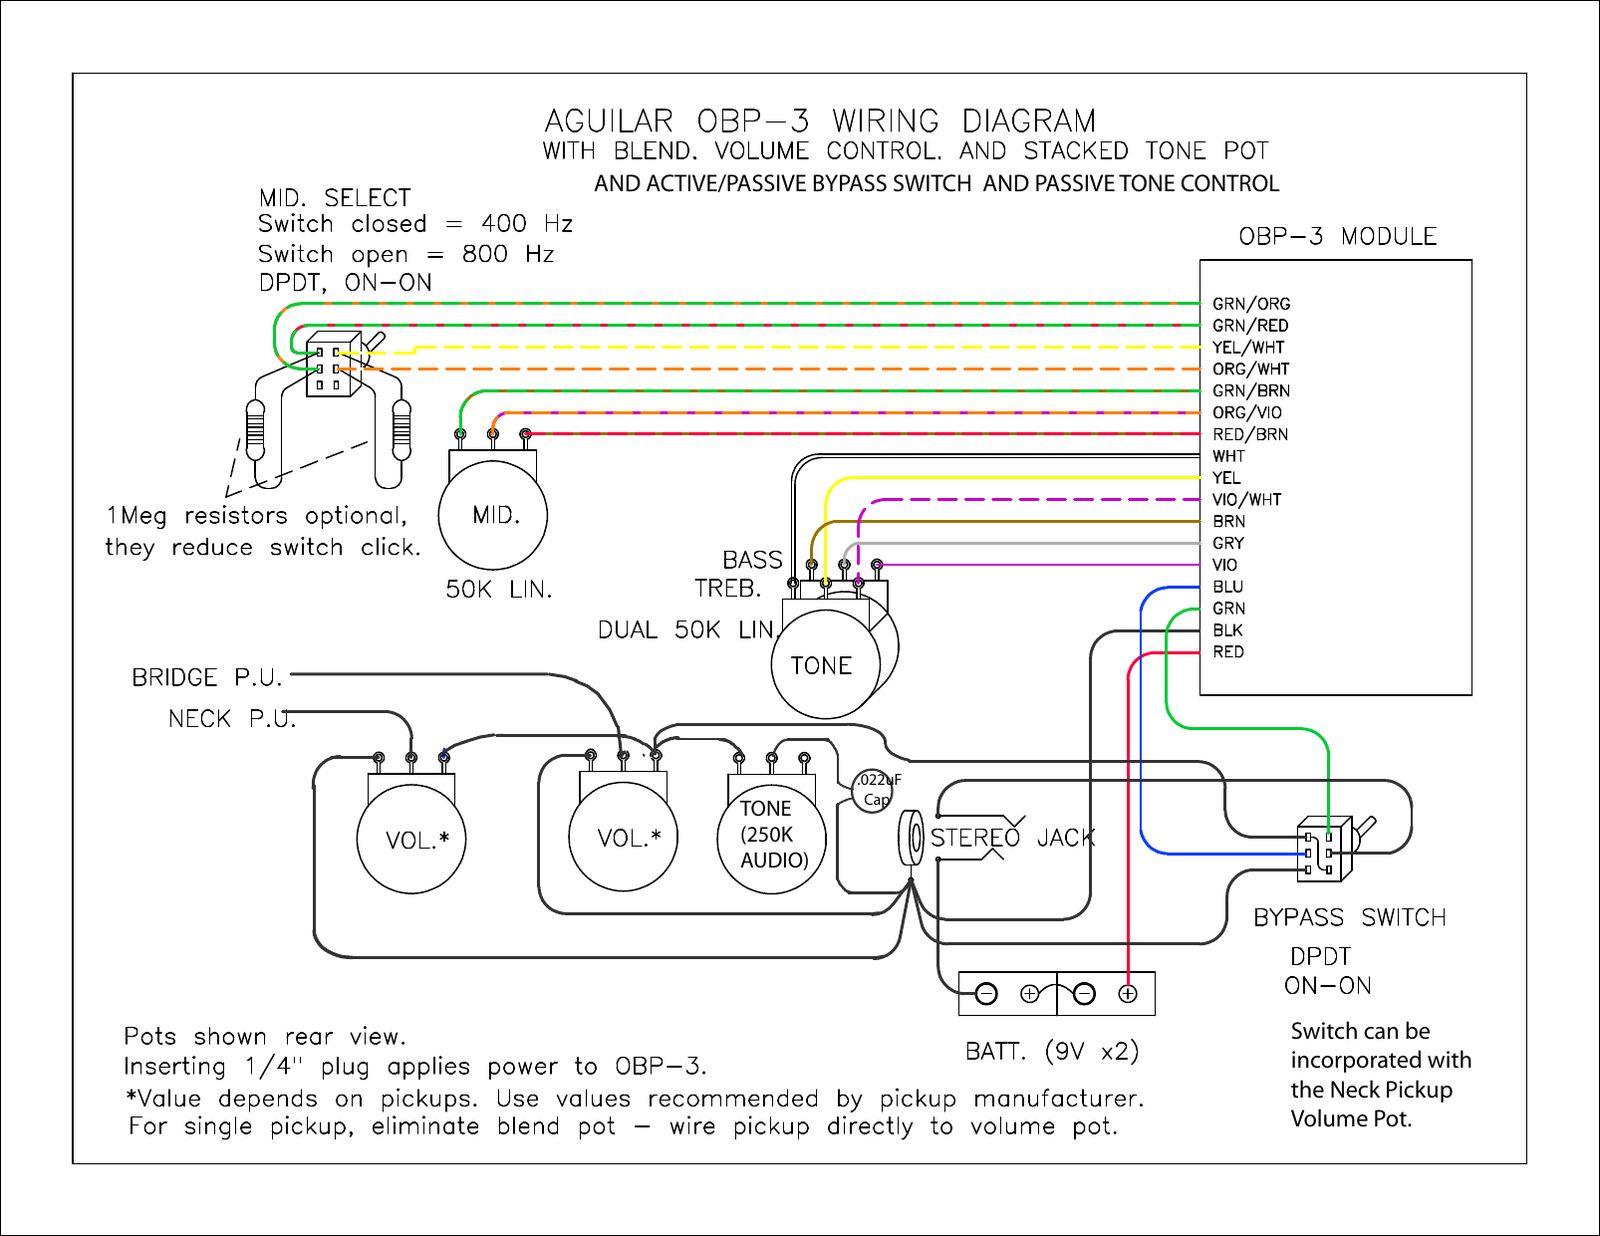
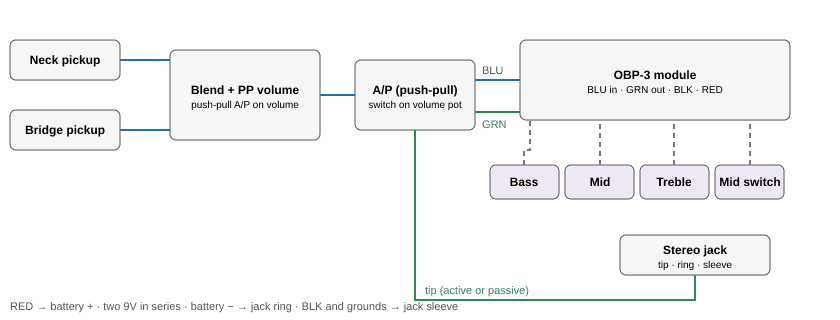
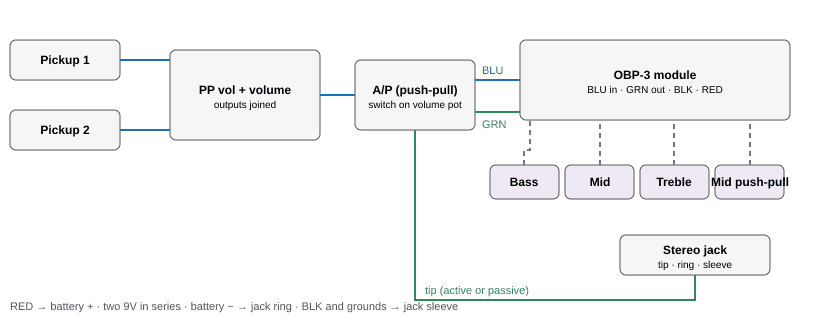
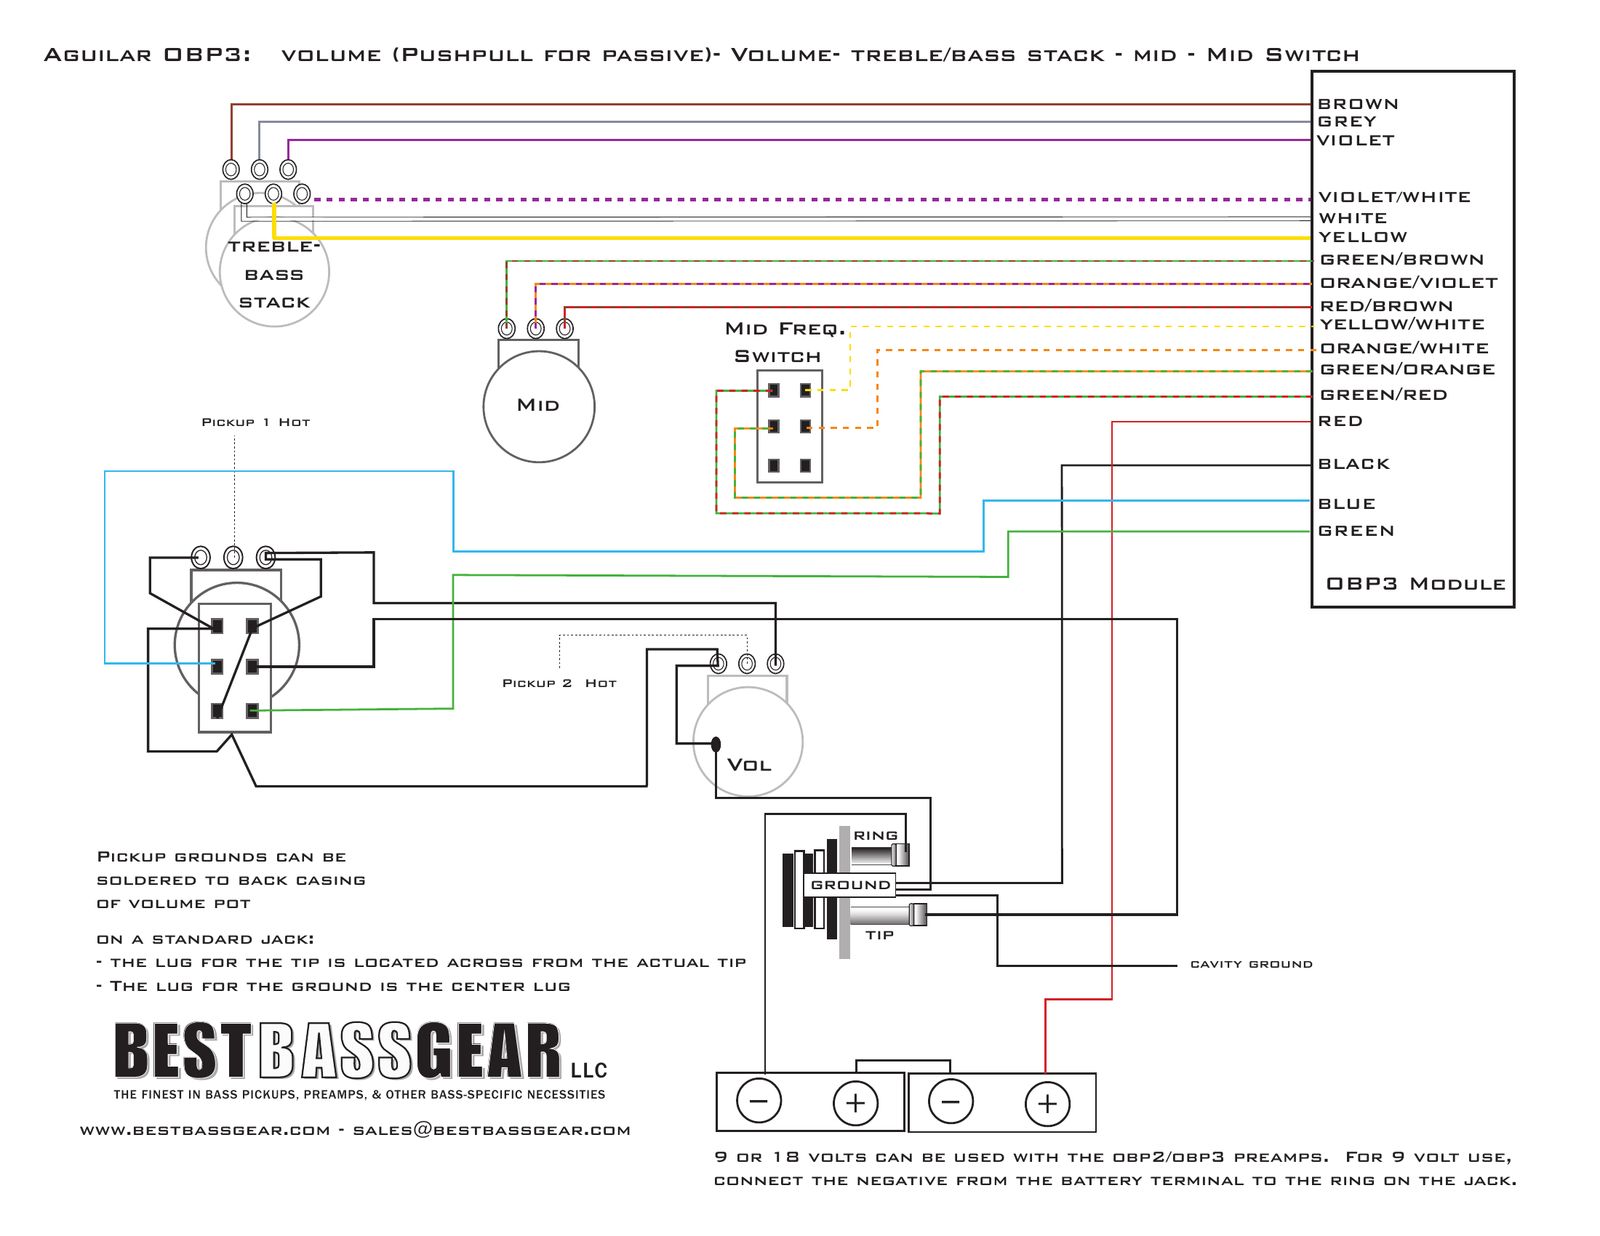
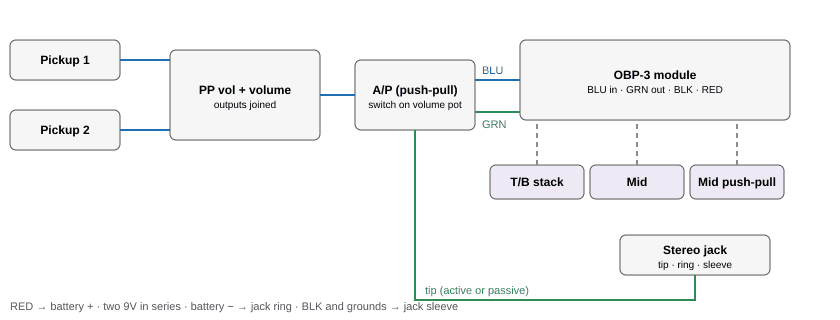
Aguilar OBP-3 with blend and volume (2 pickups)
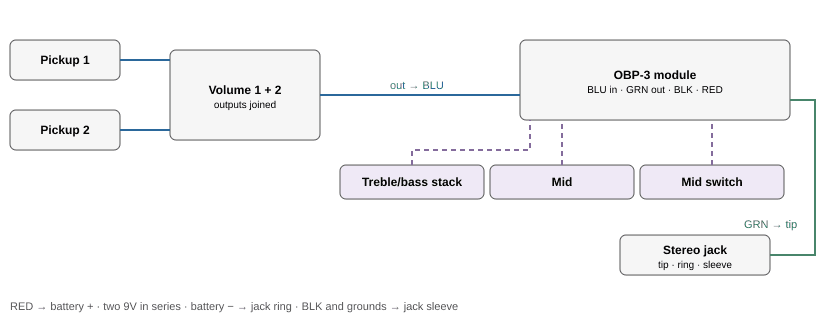
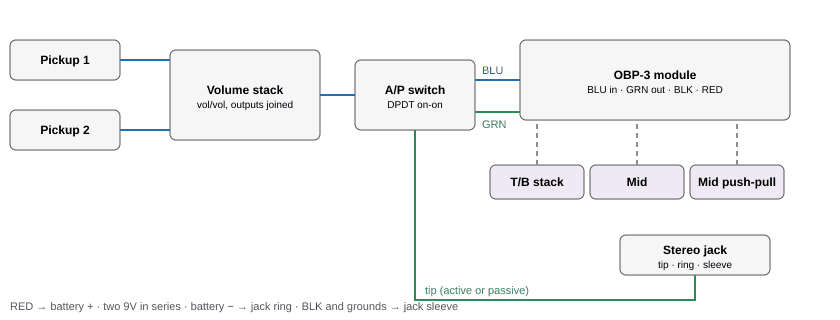
Two passive pickups into a dual-audio blend and a volume, then the OBP-3 module with bass, mid and treble pots, a 400/800 Hz mid switch, two 9V batteries in series (18V) and a stereo jack that turns the preamp on.
You need: OBP-3 module, 3 pots 50K linear: bass, mid, treble, dual-audio blend pot, volume pot (value to suit the pickups), DPDT on-on mini switch, 2 x 9V batteries, stereo output jack.
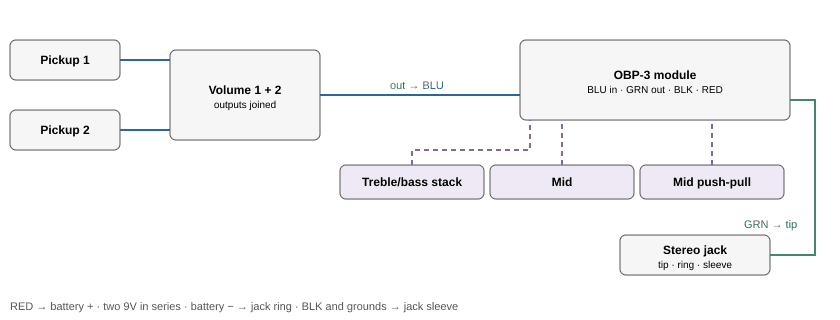
Aguilar OBP-3 with blend and volume (2 pickups), redrawn as a connection diagram. Original drawing: Aguilar OBP-3 wiring diagram, page 1.
Aguilar OBP-3 with blend and volume (2 pickups): wire by wire
#
From
To
Notes
1
Bridge pickup: Hot
Blend: Gang A middle
2
Neck pickup: Hot
Blend: Gang B middle
3
Bridge pickup: Ground
Ground (back of a pot casing)
4
Neck pickup: Ground
Ground (back of a pot casing)
5
Blend: Output lugs
Volume: Lug 3 (in)
Both gang outputs joined
6
Blend: Ground lugs
Ground (back of a pot casing)
7
Volume: Lug 1
Ground (back of a pot casing)
8
Volume: Lug 2 (out)
OBP-3 module: BLU (input)
Into the preamp
9
OBP-3 module: GRN (output)
Stereo jack: Tip
Preamp output
10
OBP-3 module: BLK (ground)
Ground (back of a pot casing)
Module ground to the jack sleeve
11
Stereo jack: Sleeve
Ground (back of a pot casing)
12
OBP-3 module: RED (+ power)
2 x 9V in series: + (18V)
13
2 x 9V in series: −
Stereo jack: Ring
Plugging in turns the preamp on
14
EQ pots (50K lin): 9 lugs (table)
OBP-3 module: 9 EQ wires
See the EQ table below
15
Mid switch: 4 lugs (table)
OBP-3 module: 4 switch wires
See the mid switch table below
OBP-3 EQ pots: which module wire goes on which lug (pots seen from the back, lugs up)
Pot
Left lug
Middle lug
Right lug
Bass 50K linear
BRN
GRY
VIO
Mid 50K linear
GRN/BRN
ORG/VIO
RED/BRN
Treble 50K linear
WHT
YEL
VIO/WHT
OBP-3 mid switch (DPDT on-on)
Switch
Wires
Result
Pole 1
GRN/ORG and GRN/RED
Joined when the switch is closed
Pole 2
YEL/WHT and ORG/WHT
Joined when the switch is closed
Closed
both pairs joined
Mid centered at 400 Hz
Open
both pairs apart
Mid centered at 800 Hz
Step by step
Mount everything. Fit the blend, volume, bass, mid and treble pots, the mid switch and the stereo jack. Join the pot casings with a bare wire.
Pickups to the blend. Solder the bridge pickup hot to the middle lug of one blend gang and the neck pickup hot to the middle lug of the other. Pickup grounds go to a pot casing.
Blend outputs. On each gang, join one outer lug to the other gang's opposite outer lug and run that to volume lug 3. The remaining outer lug of each gang goes to ground, so the two gangs fade in opposite directions.
Volume to the module. Volume lug 1 to ground. Volume lug 2 (middle) to the module's BLU wire.
EQ pots. Solder the module's nine EQ wires to the bass, mid and treble pots exactly as in the table. Aguilar shows the pots from the back with the lugs up.
Mid switch. GRN/ORG and GRN/RED go to one pole; YEL/WHT and ORG/WHT go to the other. Closed gives 400 Hz, open gives 800 Hz.
Output and power. Module GRN to the jack tip, BLK to the jack sleeve. Module RED to battery +. Wire the two 9V batteries in series, and battery − to the jack ring, so plugging in turns the preamp on.
Test. Plug in at low volume and tap each pickup's pole pieces with a screwdriver. Turn each knob end to end before closing the cavity.
Volume and blend values depend on the pickups: use what the pickup maker recommends.
One pickup: leave out the blend and wire the pickup straight to volume lug 3.
Aguilar shows optional 1 MΩ resistors on the mid switch to reduce the click when you flip it.
Aguilar OBP-3 with two volume controls
Same as the blend version, but each pickup gets its own volume. The volumes feed the module's BLU input together.
You need: OBP-3 module and parts as above, 2 volume pots in place of the blend and master volume.
Aguilar OBP-3 with two volume controls, redrawn as a connection diagram. Original drawing: Aguilar OBP-3 wiring diagram, page 4.
Aguilar OBP-3 with two volume controls: wire by wire
#
From
To
Notes
1
Bridge pickup: Hot
Bridge volume: Middle lug (in)
2
Neck pickup: Hot
Neck volume: Middle lug (in)
3
Bridge pickup: Ground
Ground (back of a pot casing)
4
Neck pickup: Ground
Ground (back of a pot casing)
5
Bridge volume: Right lug (out)
OBP-3 module: BLU (input)
6
Neck volume: Right lug (out)
OBP-3 module: BLU (input)
Both right lugs joined
7
Bridge volume: Left lug
Ground (back of a pot casing)
8
Neck volume: Left lug
Ground (back of a pot casing)
Step by step
Pickups to the volumes. Bridge pickup hot to the middle lug of the bridge volume, neck pickup hot to the middle lug of the neck volume. Pickup grounds to a pot casing.
Volume outputs. Join the right lugs of both volumes (seen from the back) and run them to the module's BLU wire. Both left lugs go to ground.
Everything else. EQ pots, mid switch, batteries and jack are wired as in the blend version above.
Test. Plug in at low volume and tap each pickup's pole pieces with a screwdriver. Turn each knob end to end before closing the cavity.
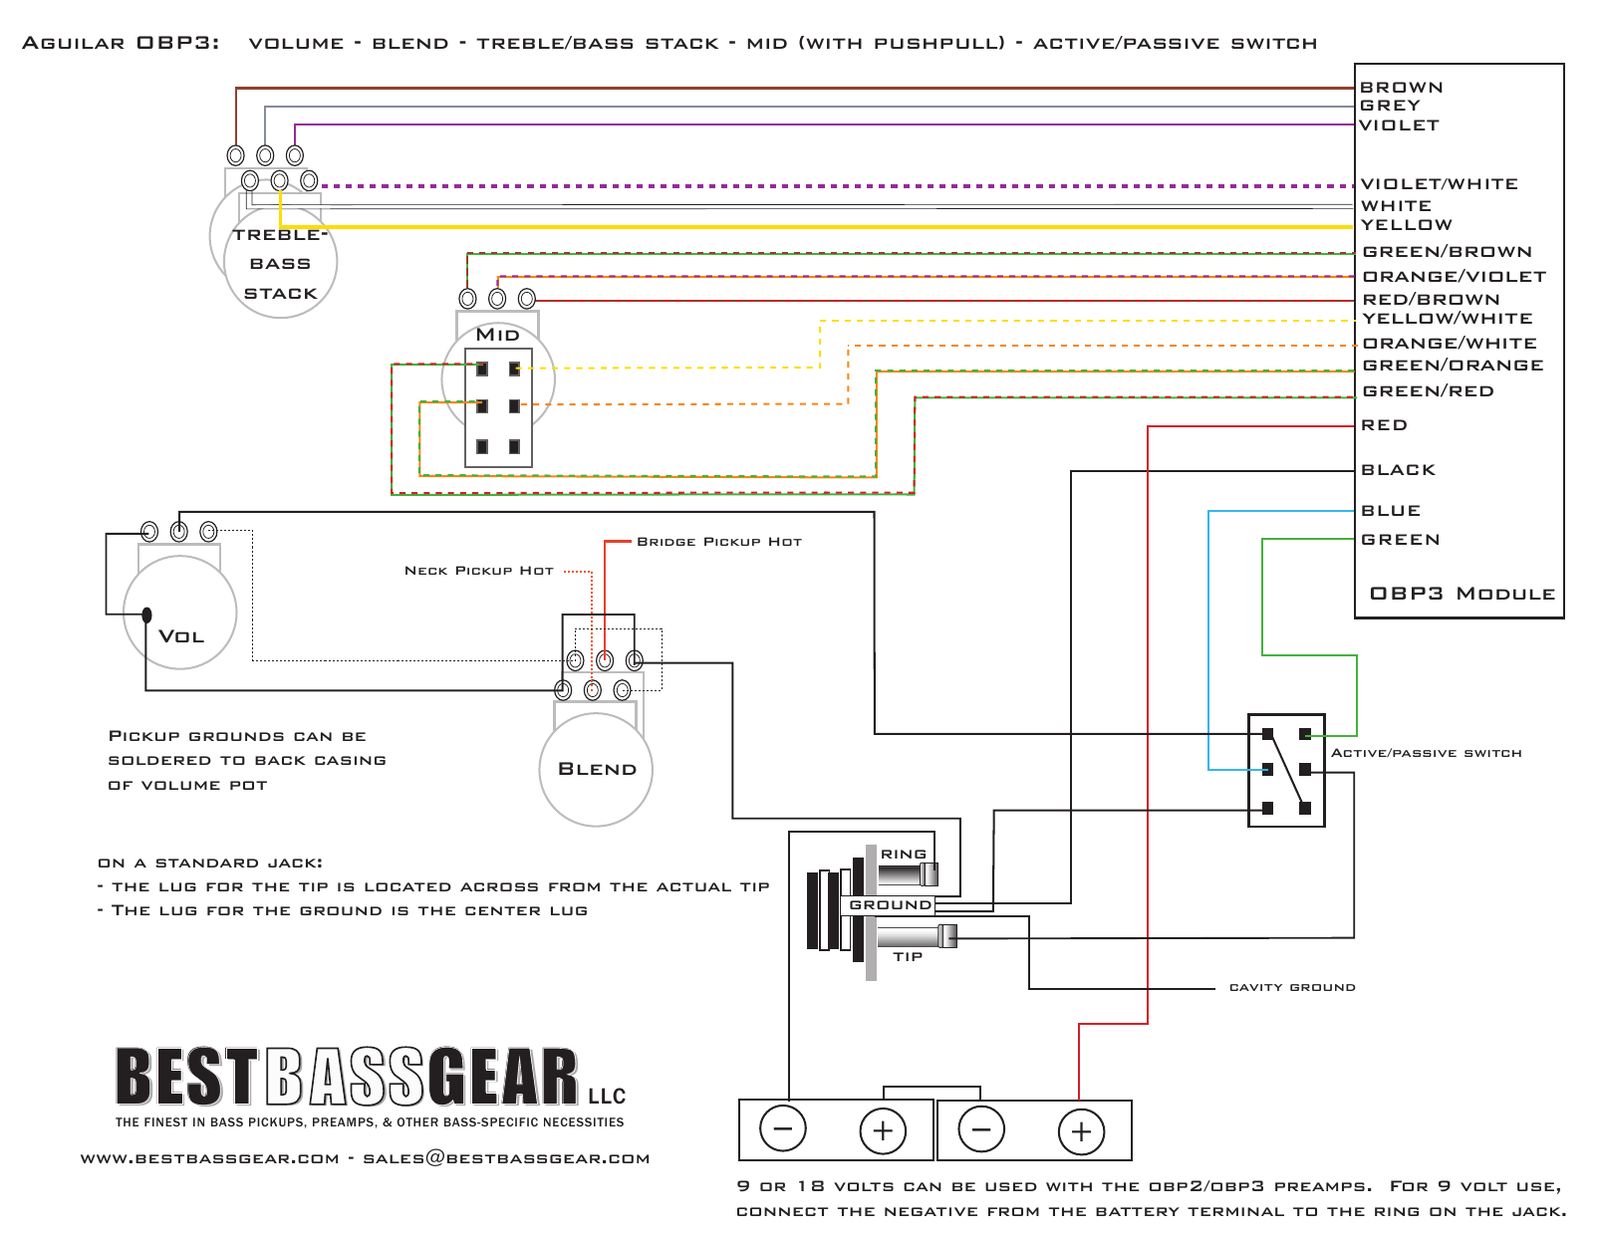
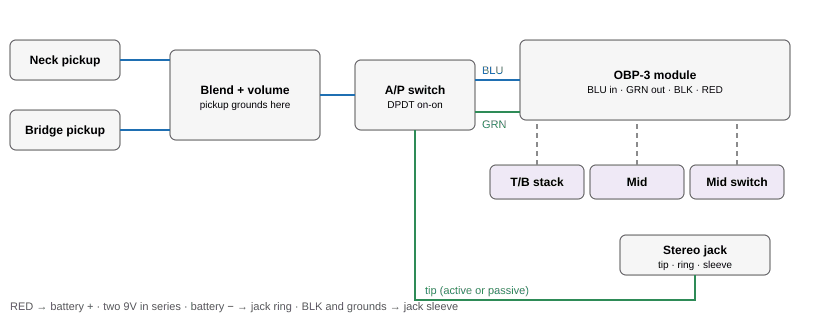
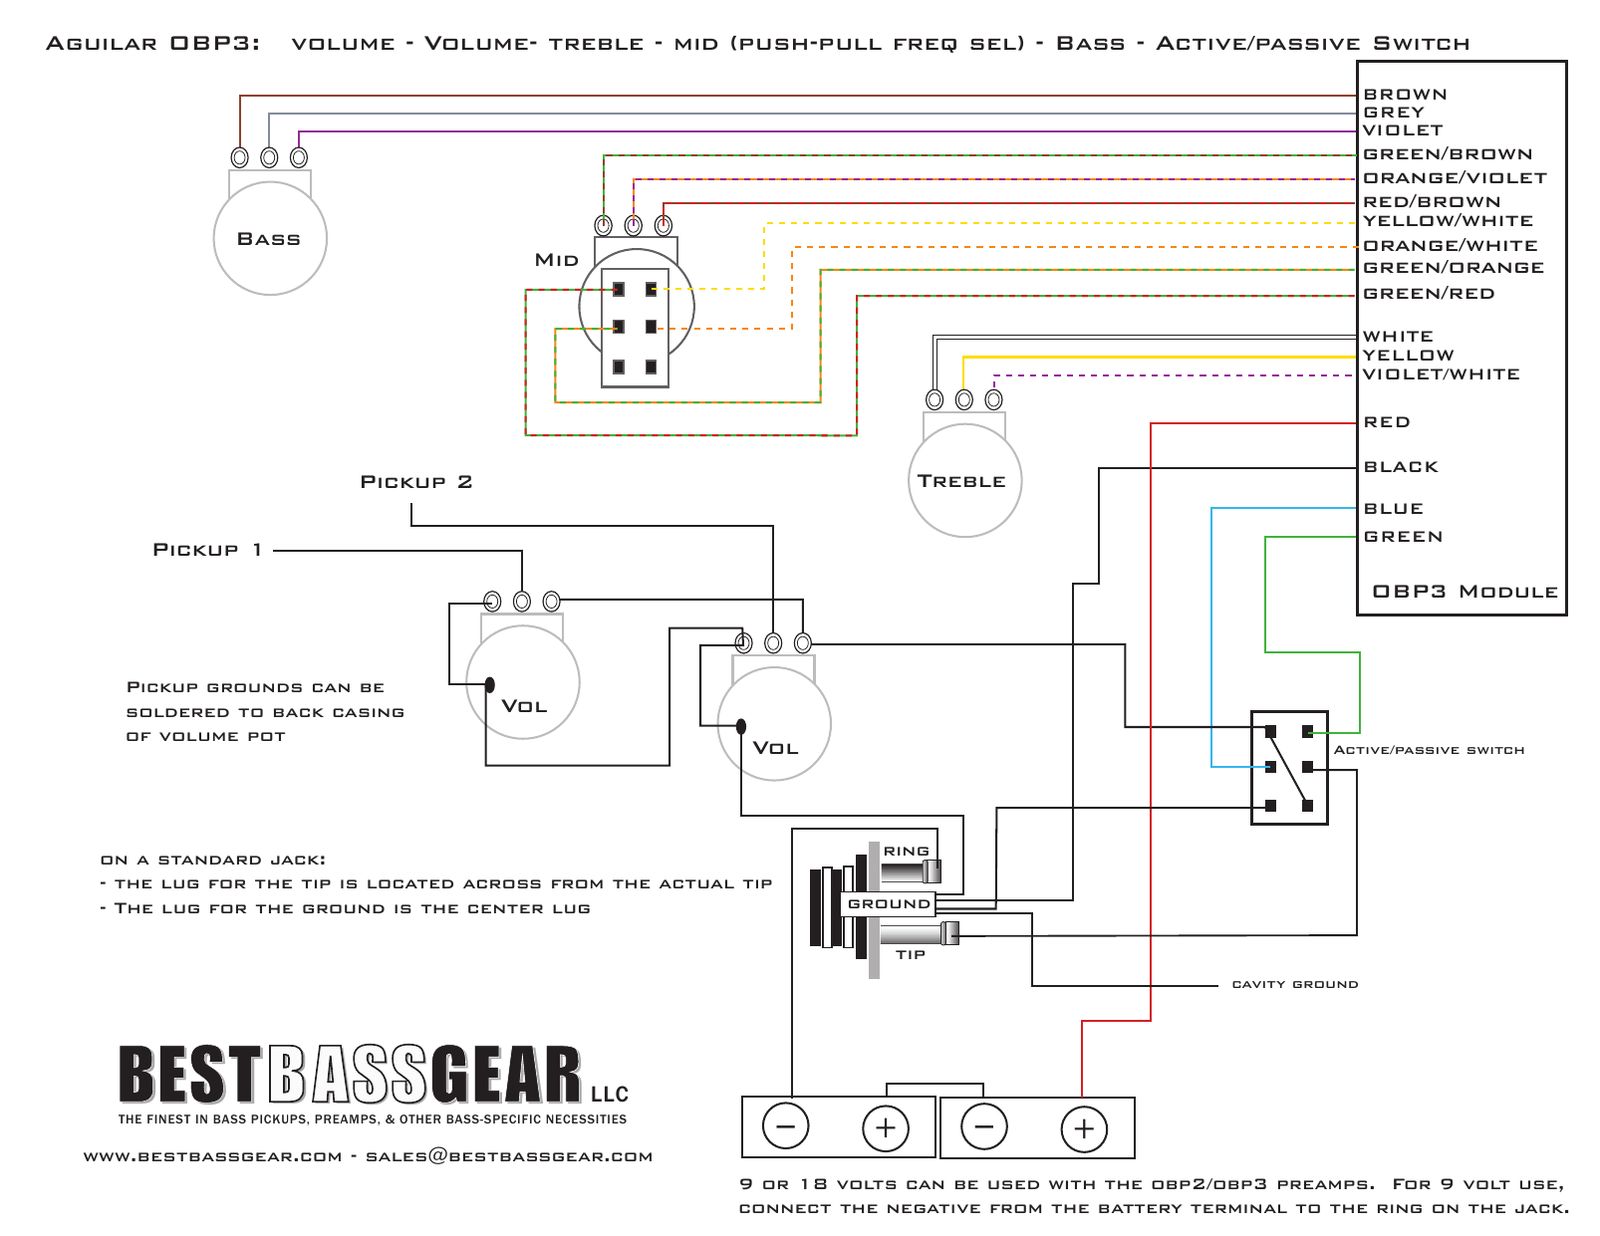
Aguilar OBP-3 with blend, volume and bypass switch
Adds a DPDT on-on switch that sends either the preamp output or the plain passive signal to the jack tip.
You need: Parts as in the blend version, DPDT on-on mini switch for bypass.
Bypass switch, by function
Switch position
What reaches the jack tip
Active
Module output (GRN)
Passive (bypass)
The volume output directly, skipping the module
Step by step
Wire the blend version. Wire everything as in the blend and volume diagram, but don't connect GRN to the jack tip.
Add the bypass switch. Run the module output (GRN), the volume output and the jack tip to the DPDT bypass switch as Aguilar draws it on page 2, so the switch picks which one feeds the tip.
Test. Plug in at low volume and tap each pickup's pole pieces with a screwdriver. Turn each knob end to end before closing the cavity.
Follow Aguilar's page 2 drawing for the switch lugs. This text gives the function only.
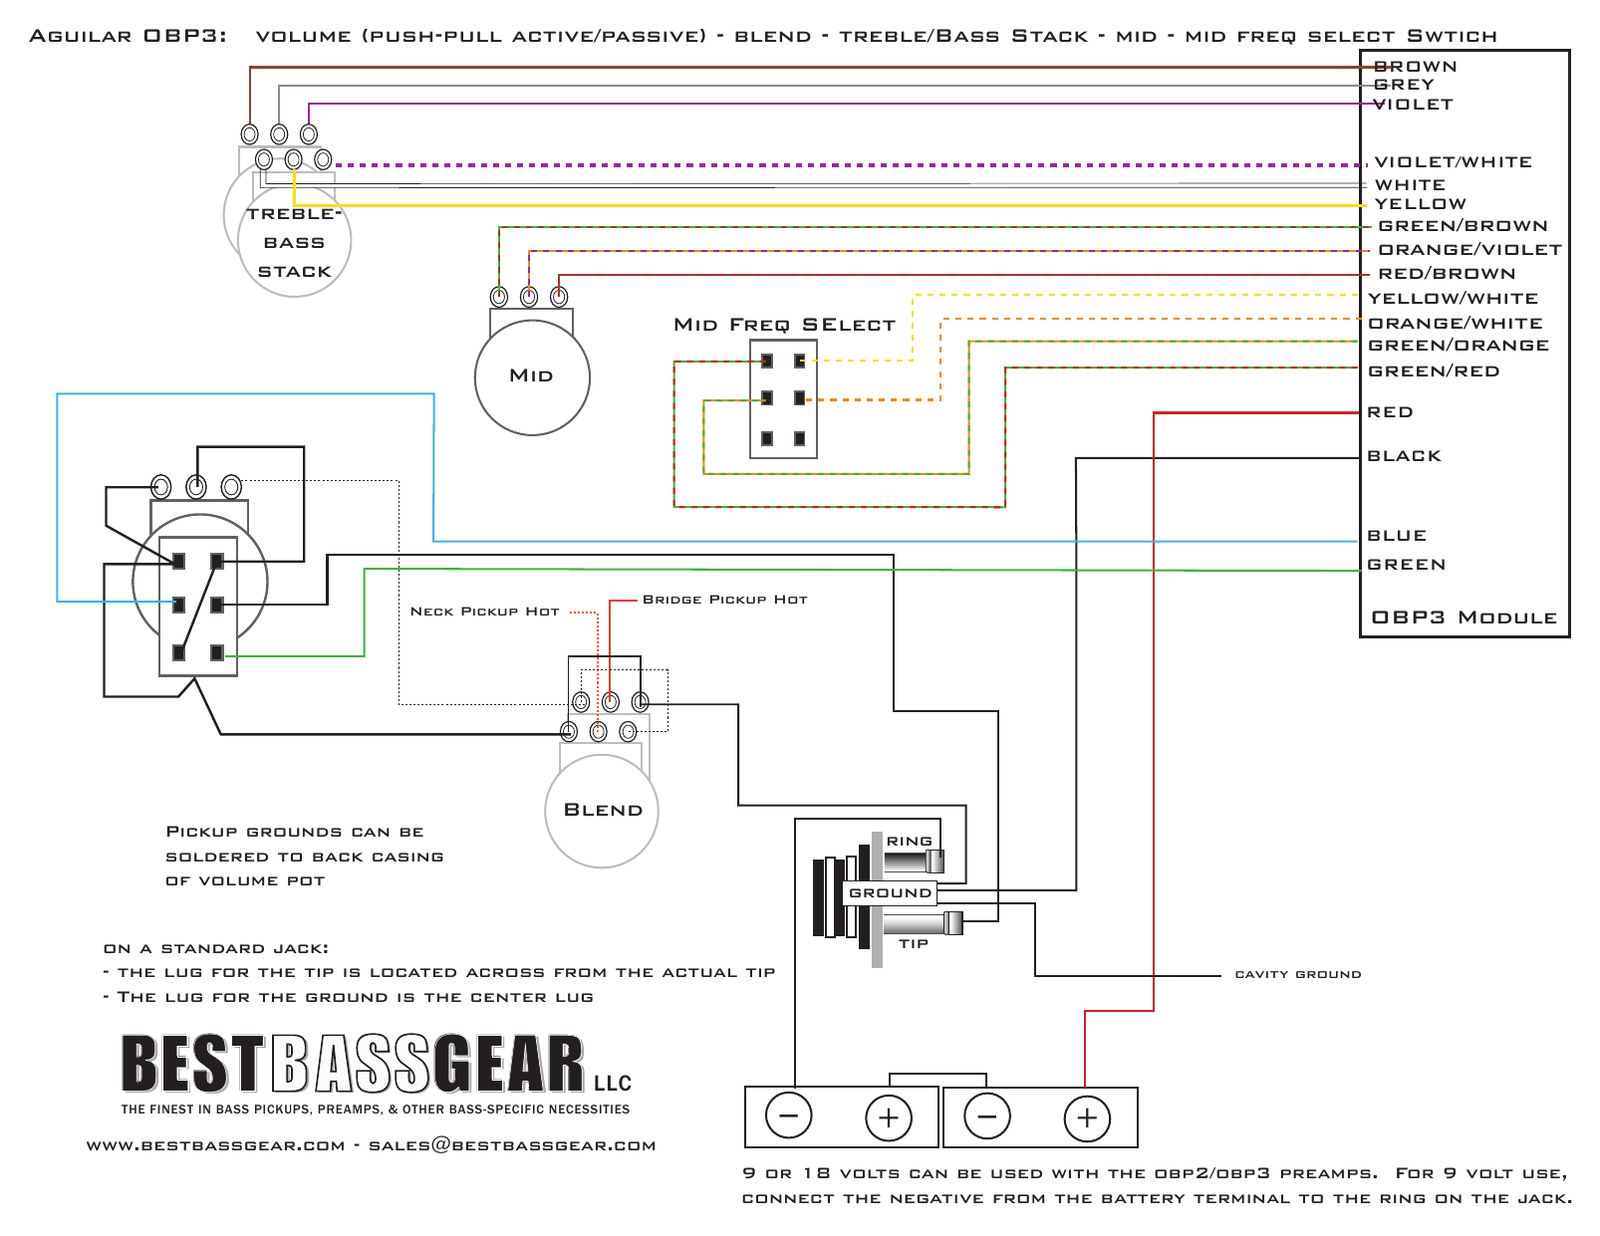
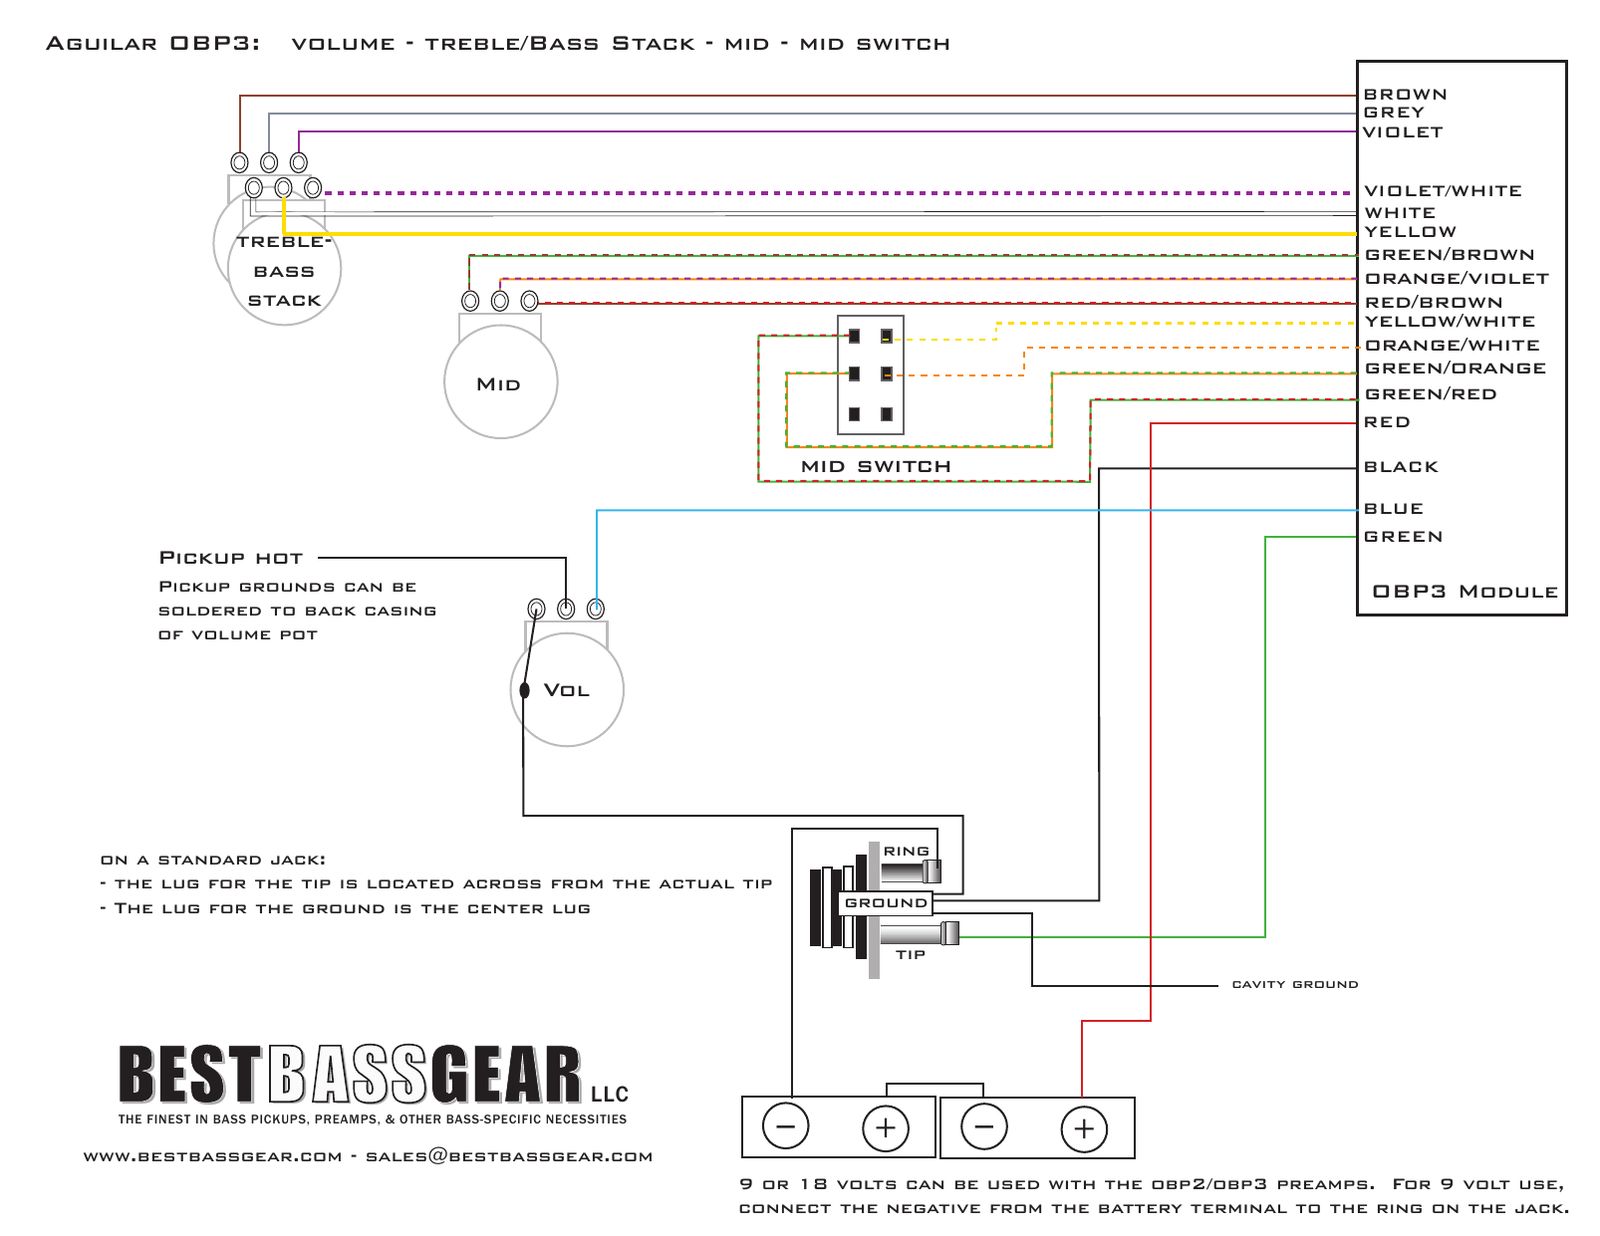
Aguilar OBP-3 with a stacked bass/treble pot
For a 4-knob layout: bass and treble share one dual 50K linear stacked pot, and mid gets its own 50K pot.
You need: Dual 50K linear stacked pot (bass and treble), 50K linear pot (mid), other parts as in the blend version.
Stacked pot wiring
Gang
Wires (same lug order as the single pots)
Bass gang
BRN, GRY, VIO
Treble gang
WHT, YEL, VIO/WHT
Mid (separate pot)
GRN/BRN, ORG/VIO, RED/BRN
Step by step
Wire the stack. Put the bass wires on the bass gang and the treble wires on the treble gang, in the same left, middle, right order as the single pots.
Everything else. Blend, volume, mid pot, mid switch, batteries and jack are as in the blend version.
Test. Plug in at low volume and tap each pickup's pole pieces with a screwdriver. Turn each knob end to end before closing the cavity.
Aguilar OBP-3 midrange options
Aguilar's page 5 lists other ways to set the mid frequency with the four switch wires and a pair of capacitors.
OBP-3 mid frequency options
Option
How to wire it
1: Standard
Mid switch: 800 Hz or 400 Hz (as above)
2: Fixed 800 Hz
Leave all four switch wires unconnected; tape or heat-shrink the ends
3: Fixed 400 Hz
Join GRN/ORG to GRN/RED, and YEL/WHT to ORG/WHT; tape both joints
4: Fixed 400-800 Hz
Capacitor C1 across GRN/ORG and GRN/RED, C2 across YEL/WHT and ORG/WHT (values below)
5: Fixed below 400 Hz
Join the pairs as in option 3, then add C1 and C2 as Aguilar draws them, with C2 going to the mid pot
6 and 7
The same capacitors on the mid switch, so it picks 800 Hz or the frequency you set
8
Replace the switch with a dual 500K linear pot for a sweepable mid
Capacitor values, option 4 (and 6)
Mid frequency
C1
C2
450 Hz
0.008 µF
0.270 µF
500 Hz
0.003 µF
0.127 µF
550 Hz
0.0016 µF
0.072 µF
600 Hz
0.0011 µF
0.043 µF
Capacitor values, option 5 (and 7)
Mid frequency
C1
C2
200 Hz
0.004 µF
0.190 µF
250 Hz
0.0024 µF
0.112 µF
300 Hz
0.0013 µF
0.060 µF
350 Hz
0.0006 µF
0.023 µF
Step by step
Pick a mid option. Choose the option from the table and wire the four switch wires (and capacitors, if used) as listed.
Insulate. Tape or heat-shrink every unused wire end and every joint so nothing shorts in the cavity.
Test. Plug in at low volume and tap each pickup's pole pieces with a screwdriver. Turn each knob end to end before closing the cavity.
Options 5 to 8 involve more parts than this table can show: follow Aguilar's page 5 drawing for them.
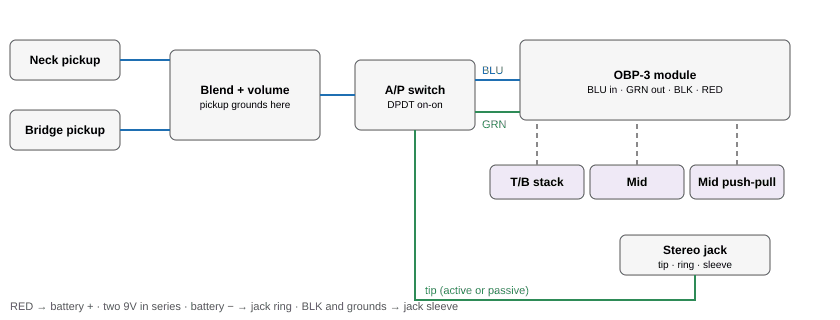
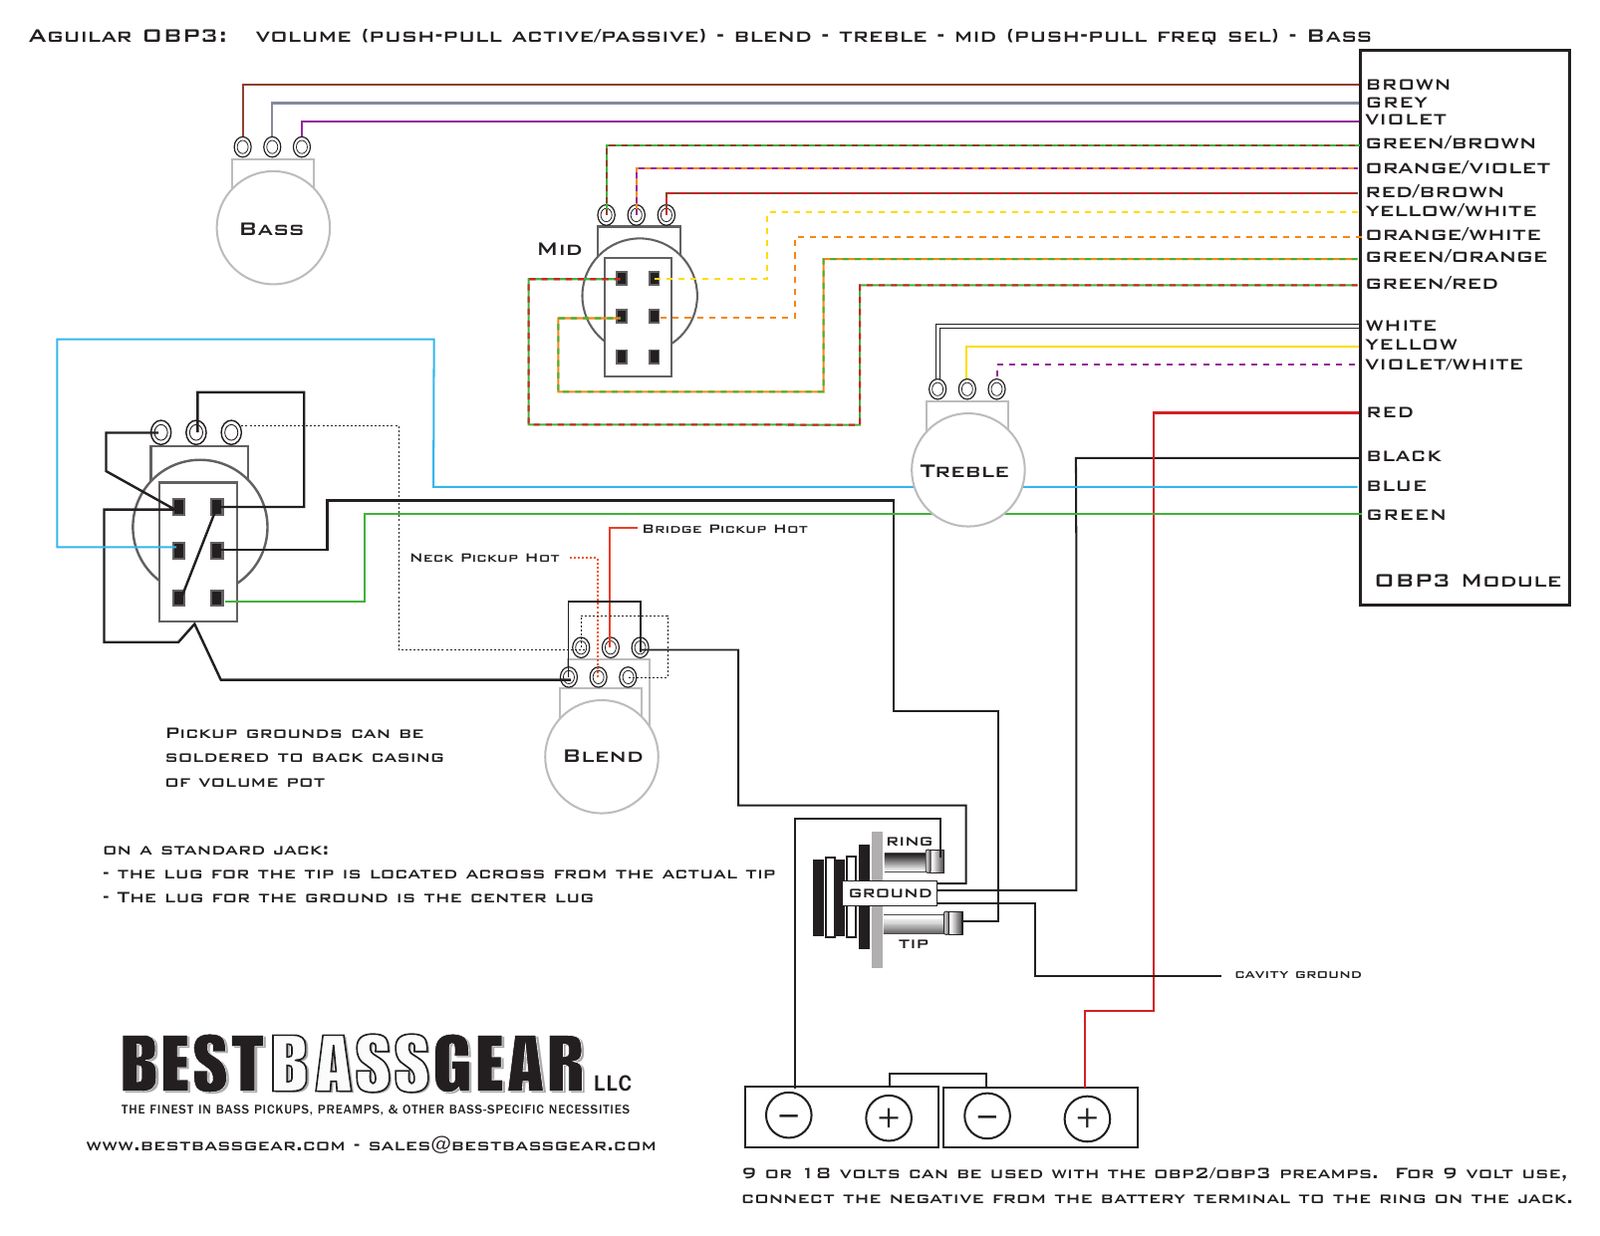
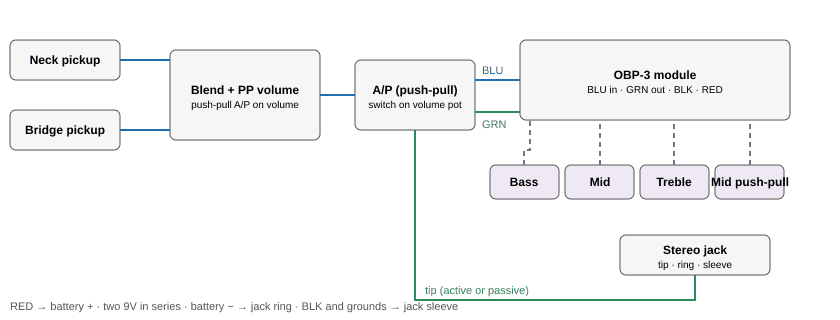
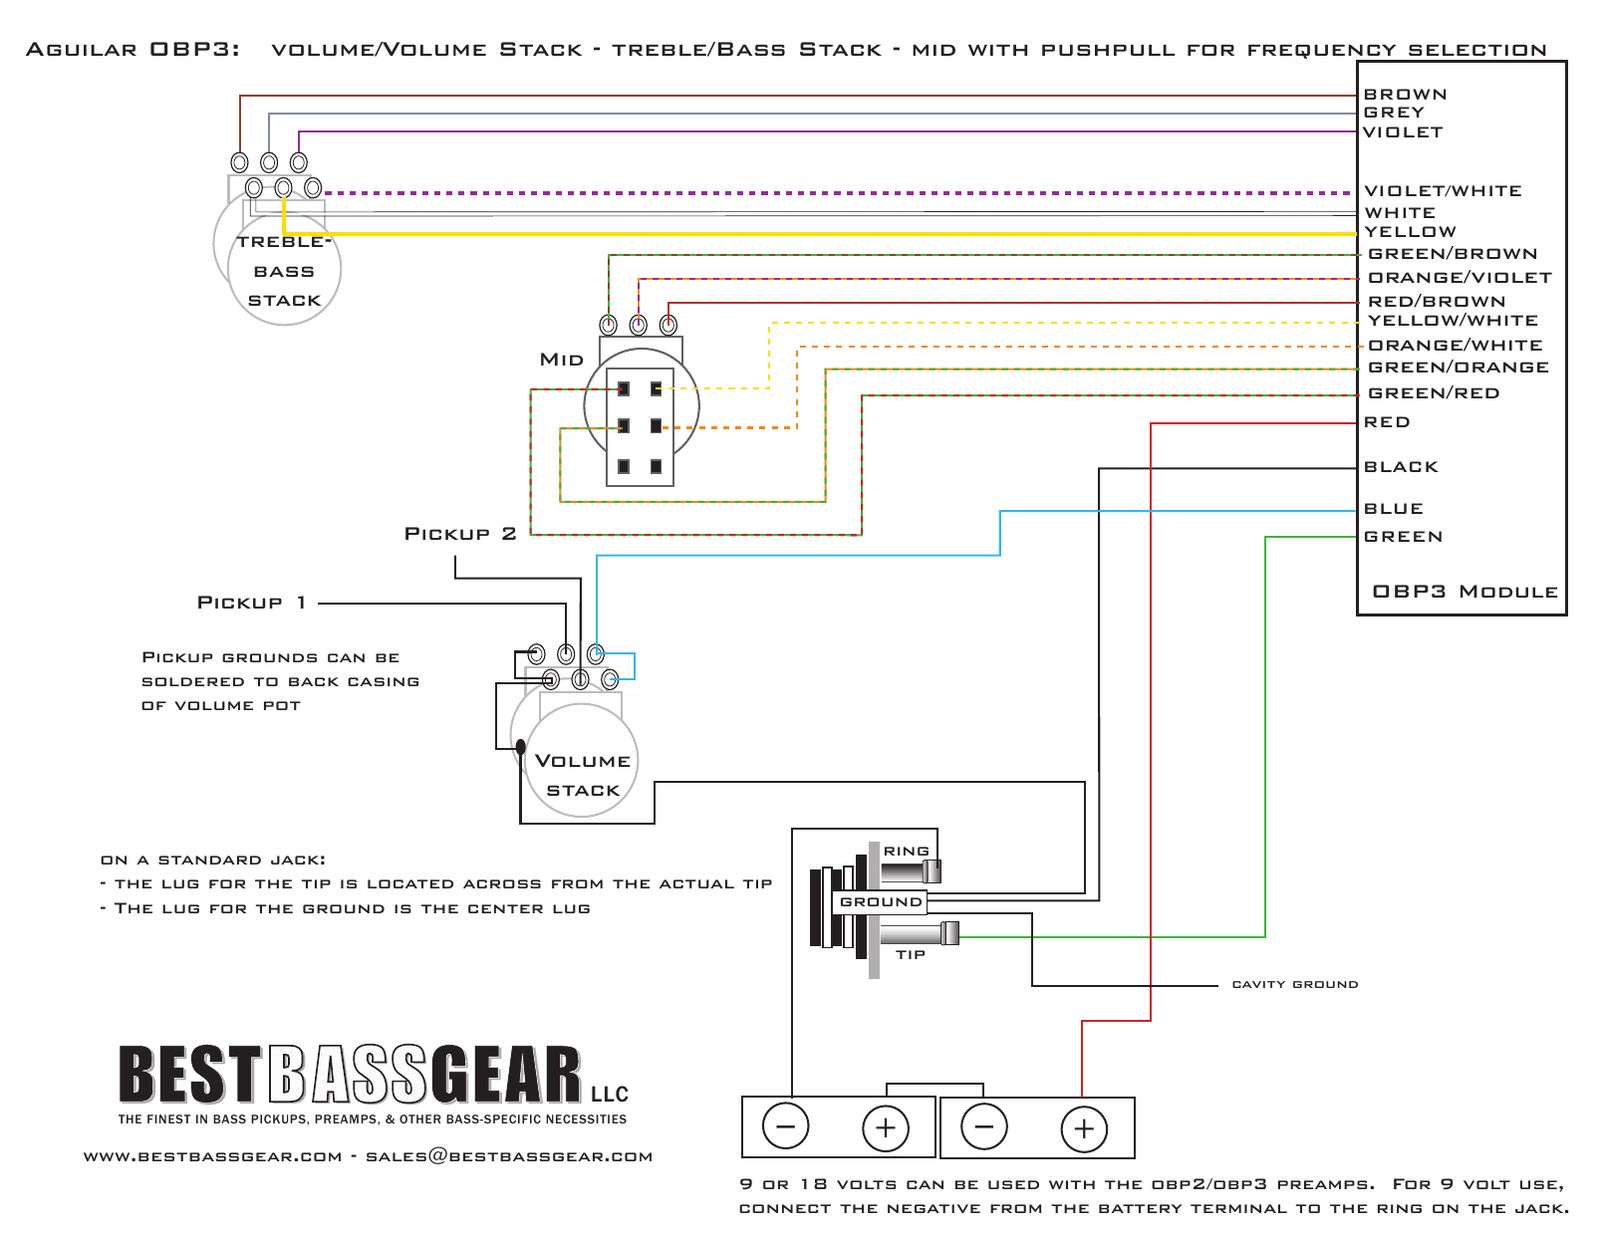
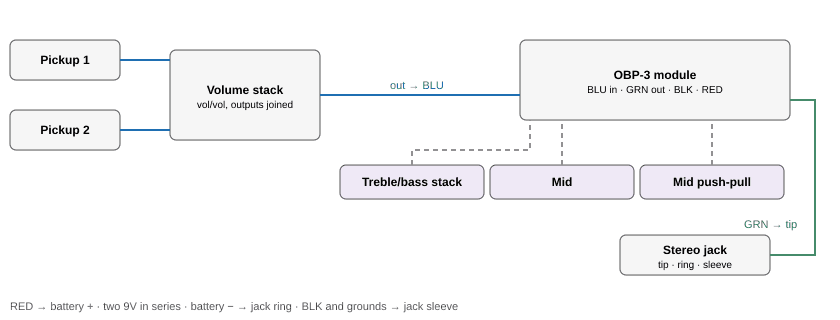
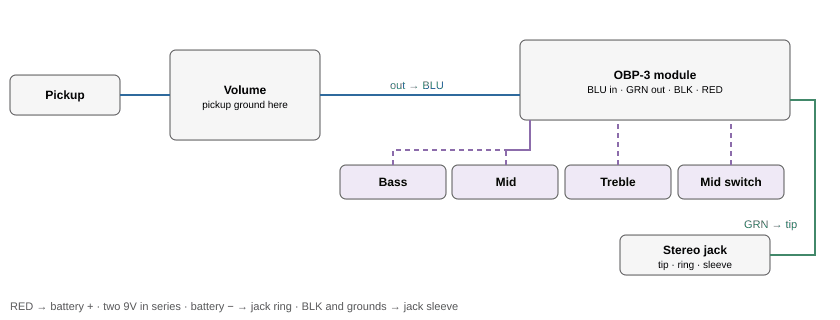
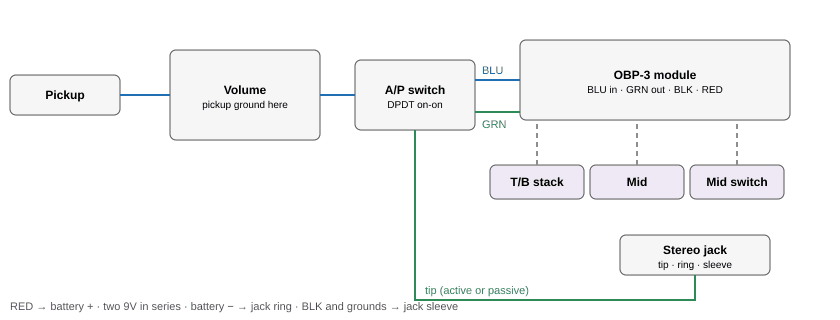
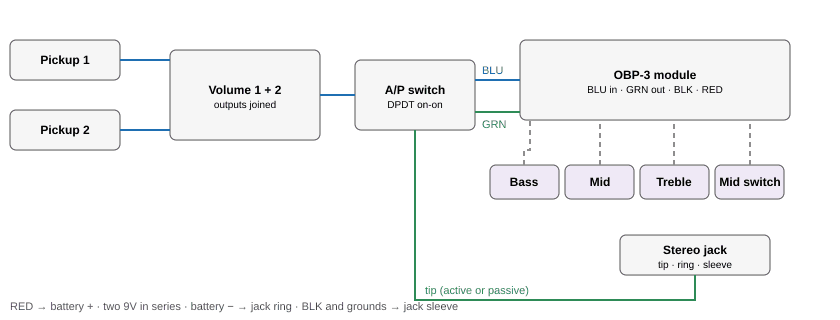
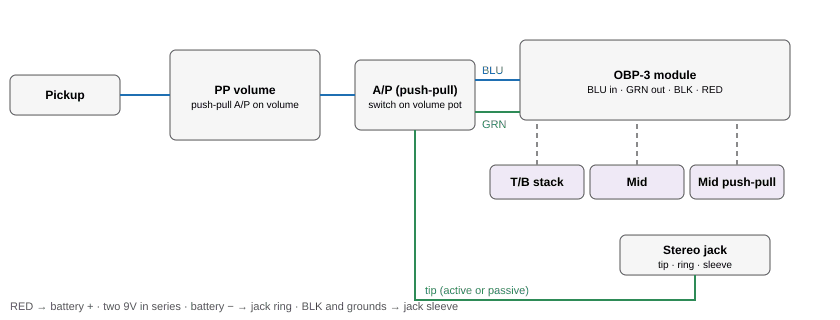
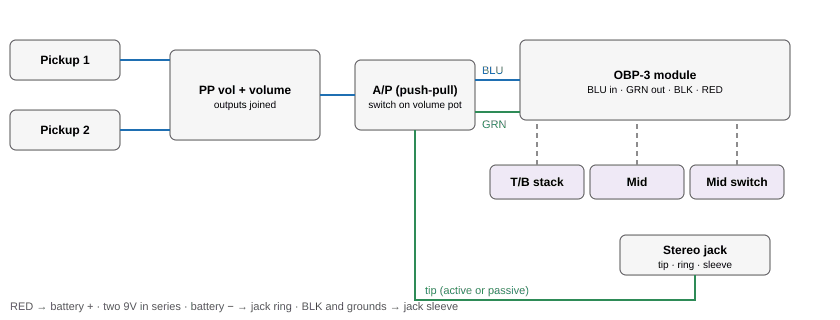
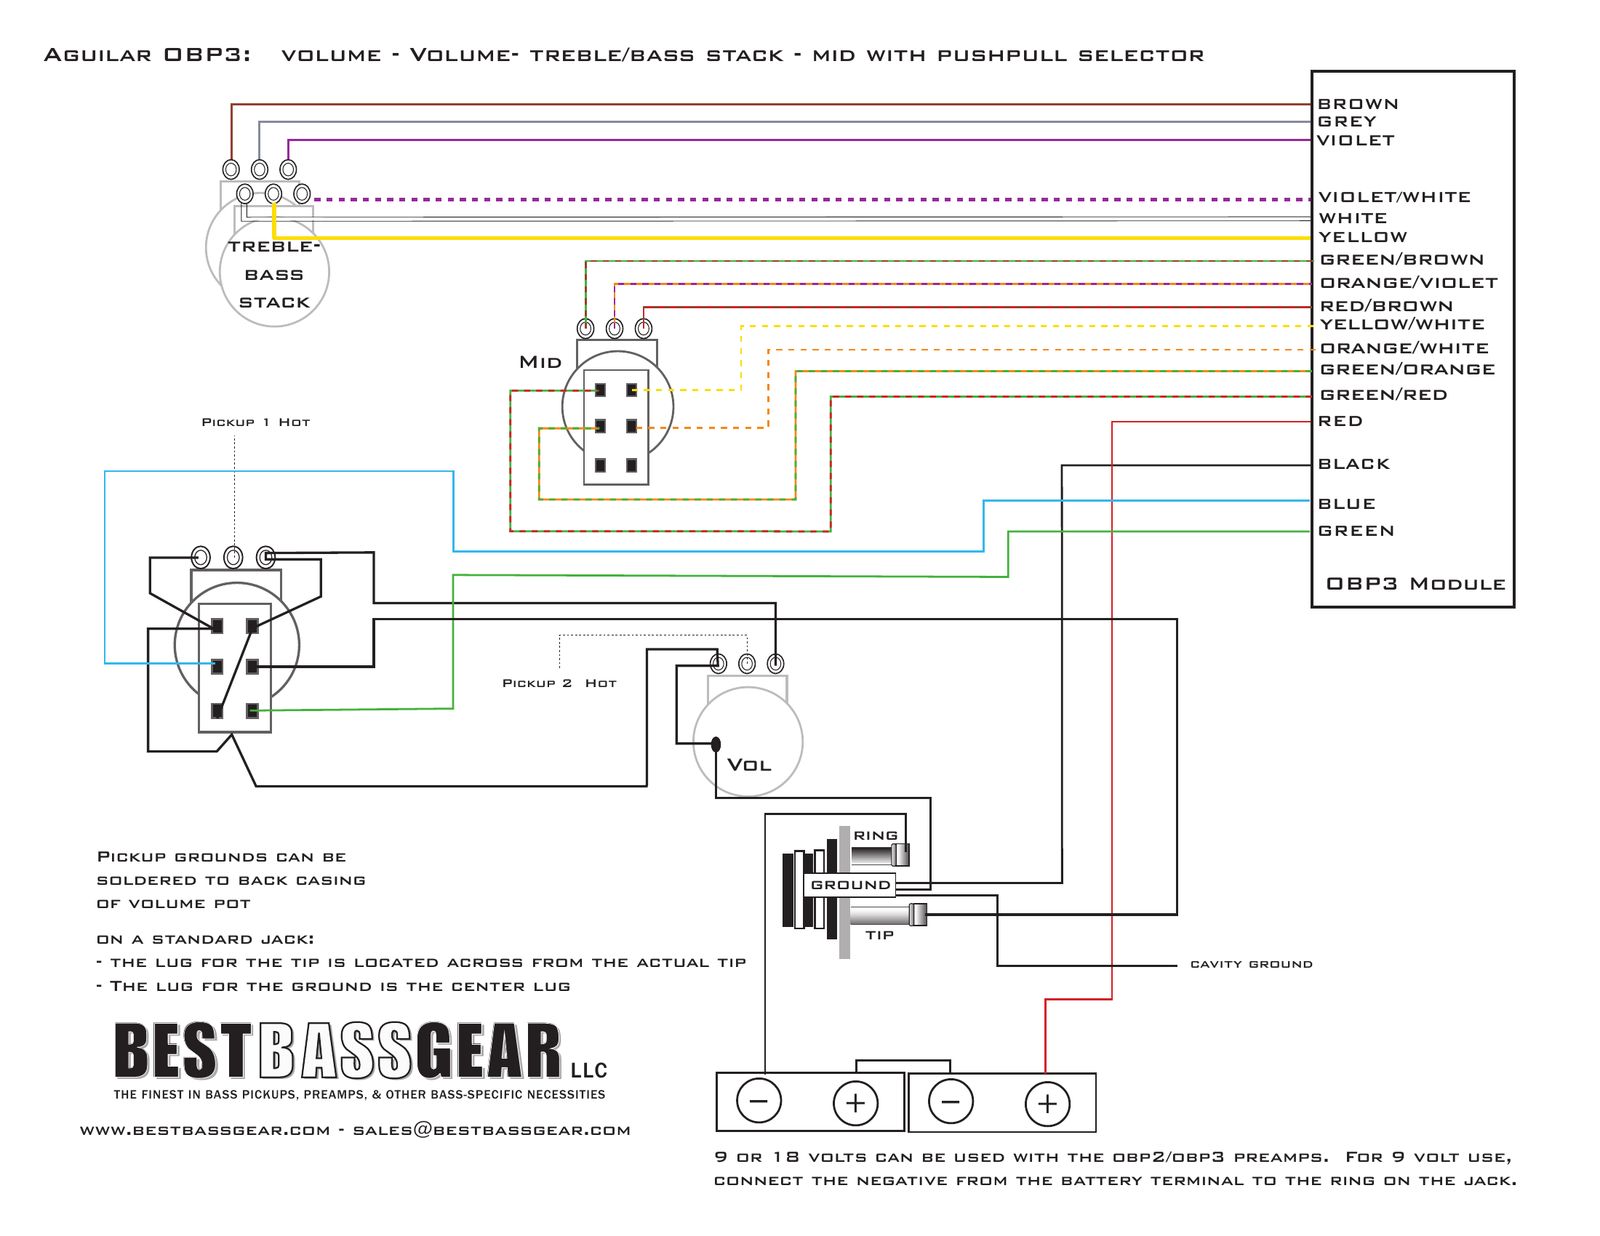
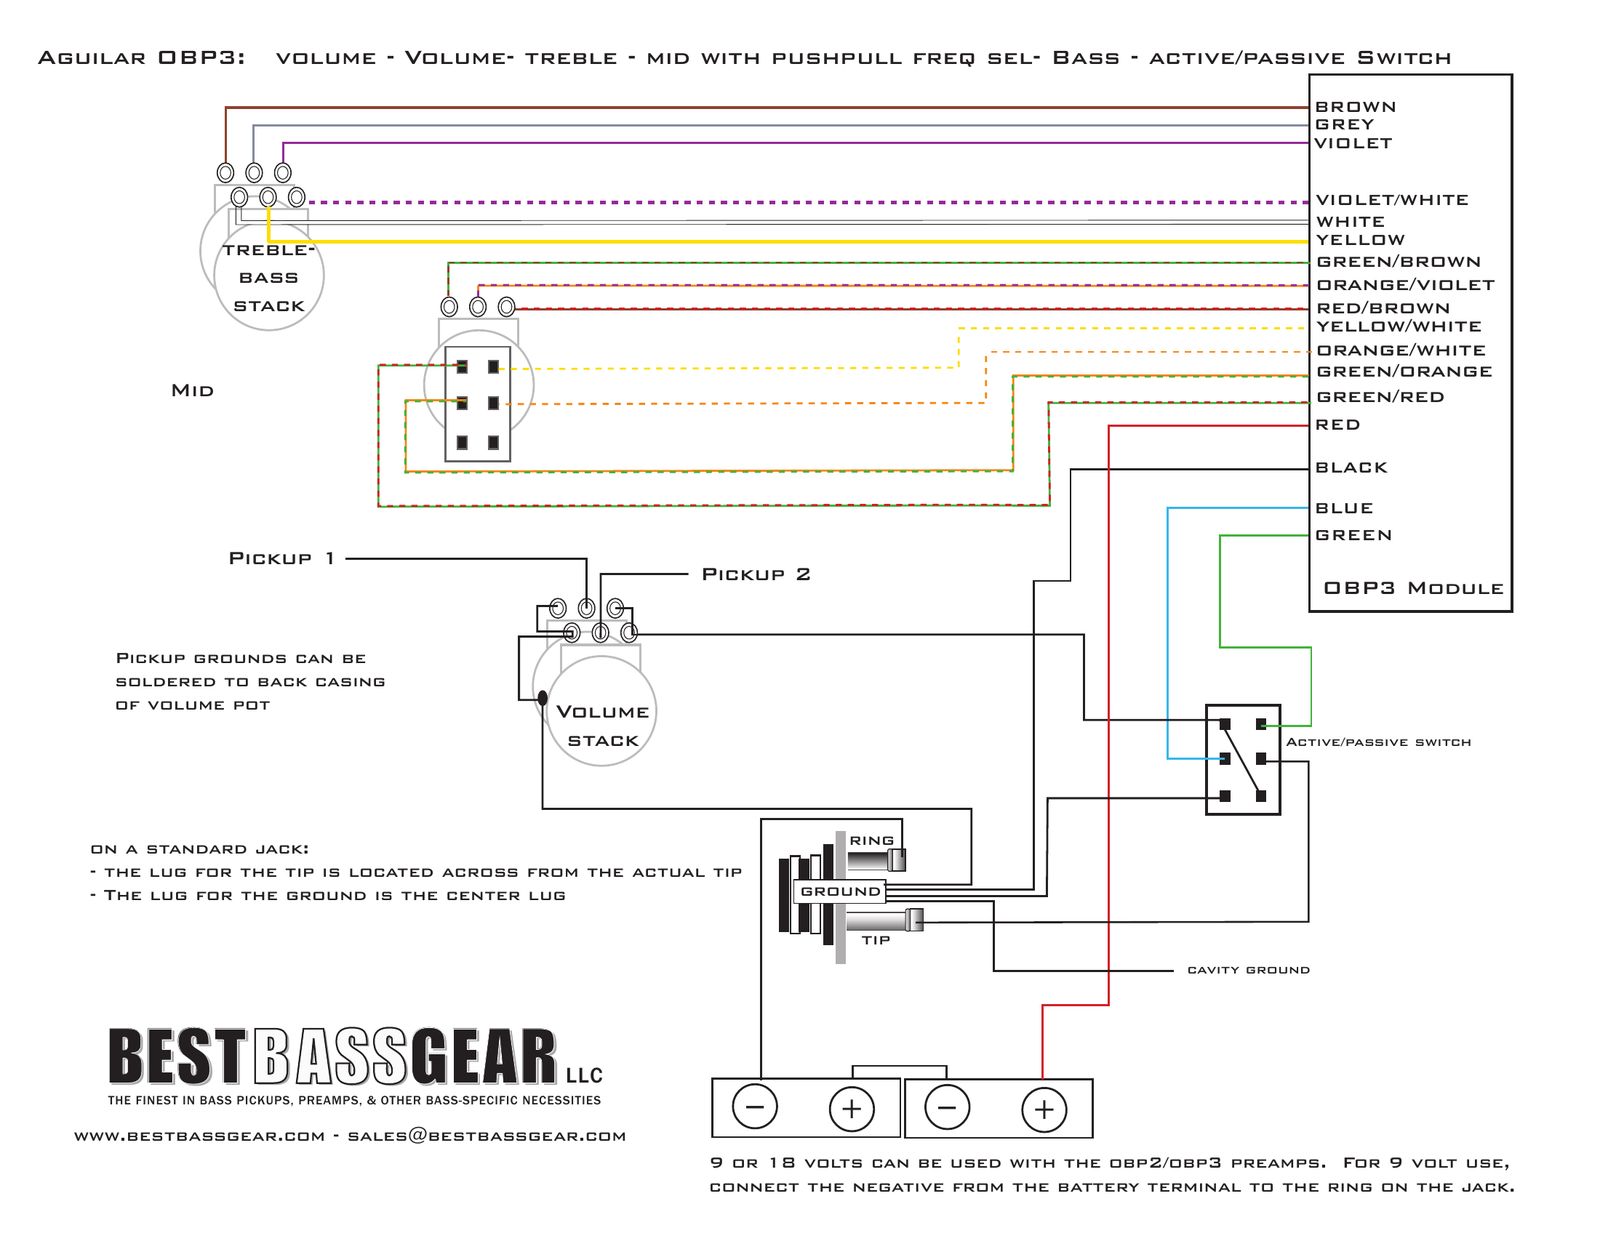
Aguilar OBP-3 with blend, volume and a push-pull mid
Two pickups into a blend and a volume, separate bass, mid and treble pots, and the 400/800 Hz mid select on a push-pull mid pot instead of a mini switch.
You need: OBP-3 module, 2 pots 50K linear: bass, treble, push-pull 50K linear pot for the mid (DPDT), dual-audio blend pot, volume pot (value to suit the pickups), 2 x 9V batteries, stereo output jack.
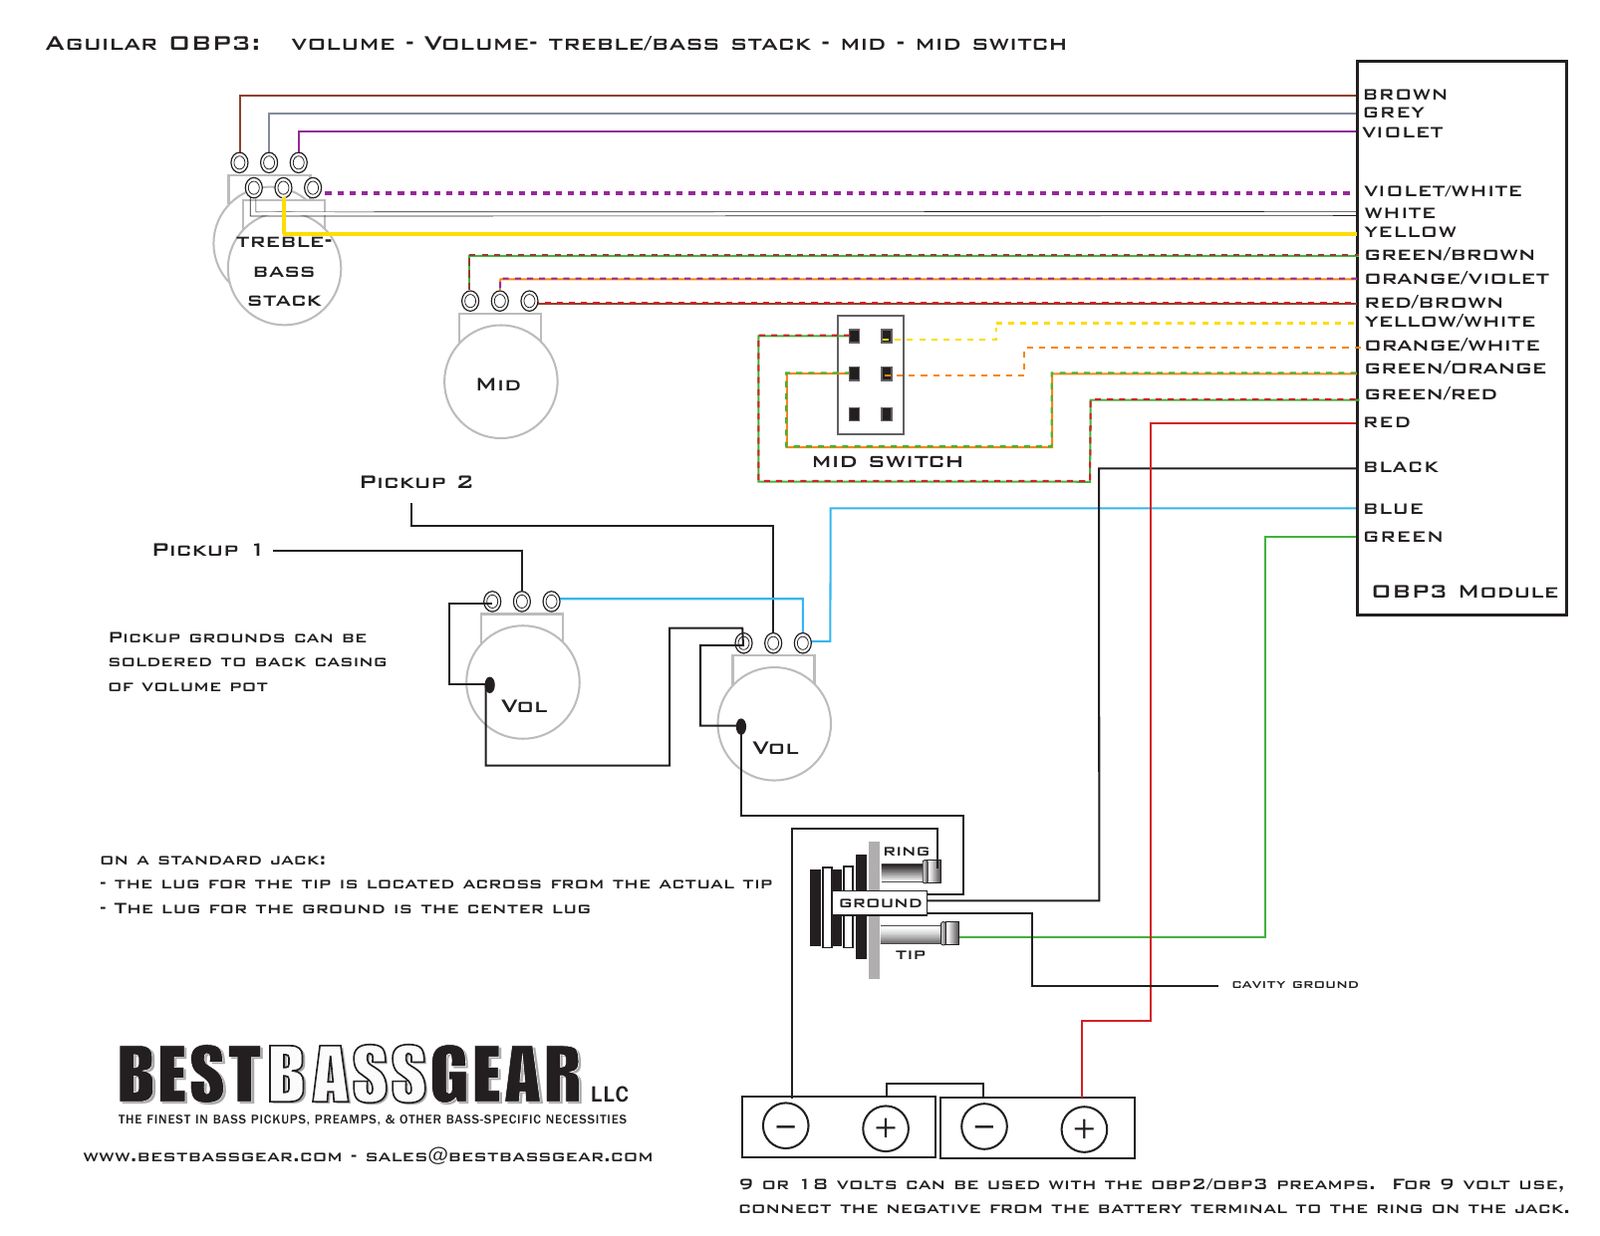
Best Bass Gear's drawing, as originally published. Click to enlarge.Aguilar OBP-3 with blend, volume and a push-pull mid, redrawn as a connection diagram.
Aguilar OBP-3 with blend, volume and a push-pull mid: wire by wire
#
From
To
Notes
1
Bridge pickup: Hot
Blend: middle lug of one gang
2
Neck pickup: Hot
Blend: middle lug of the other gang
3
Both pickups: Ground
Ground (back of the volume pot)
4
Blend: output lugs (one outer lug per gang, joined)
Volume: Right lug
5
Blend: ground lugs (the other outer lug per gang, joined)
Ground (back of the volume pot)
6
Volume: Left lug
Volume casing
Jumper to ground
7
Volume: Middle lug
OBP-3 module: BLU (input)
8
OBP-3 module: GRN (output)
Stereo jack: Tip
Preamp output
9
OBP-3 module: BLK (ground)
Stereo jack: Sleeve (ground)
10
OBP-3 module: 9 EQ wires
Bass, mid and treble pots
See the EQ table
11
OBP-3 module: GRN/ORG, GRN/RED, YEL/WHT, ORG/WHT
Mid pot's push-pull switch
See the mid switch table
12
OBP-3 module: RED (+)
First battery +
13
First battery −
Second battery +
Two 9V in series (18V)
14
Second battery −
Stereo jack: Ring
Plugging in powers the preamp
15
Stereo jack: Sleeve
Cavity ground / shielding
OBP-3 EQ pots: which module wire goes on which lug (pots seen from the back, lugs up)
Pot
Left lug
Middle lug
Right lug
Bass 50K linear
BRN
GRY
VIO
Mid 50K linear
GRN/BRN
ORG/VIO
RED/BRN
Treble 50K linear
WHT
YEL
VIO/WHT
Push-pull switch on the mid pot (DPDT)
Switch
Wires
Result
Pole 1
GRN/ORG (middle row) and GRN/RED (top row)
Joined in one position
Pole 2
ORG/WHT (middle row) and YEL/WHT (top row)
Joined in the same position
Pairs joined
both poles closed
Mid centered at 400 Hz
Pairs apart
both poles open
Mid centered at 800 Hz
Step by step
Mount everything. Fit the pots and the stereo jack. Join the pot casings with a bare wire.
Pickups to the blend and volume. Bridge hot to the middle lug of one blend gang, neck hot to the middle lug of the other. Join one outer lug of each gang and run it to the volume's right lug; join the other two outer lugs to ground. Volume left lug to its casing. Pickup grounds go to the back of the volume pot.
Volume to the module. Volume middle lug to the module's BLU wire.
EQ pots. Solder the module's nine EQ wires to the bass, mid and treble pots exactly as in the EQ table, left to right with the pots seen from the back, lugs up.
Push-pull mid. On the mid pot's push-pull switch: GRN/ORG and GRN/RED go to one pole, YEL/WHT and ORG/WHT to the other (common lugs in the middle row, the other wire on the row above). With each pair joined the mid is centered at 400 Hz; apart, 800 Hz.
Output and power. Module GRN to the jack tip. Module BLK to the jack sleeve and RED to battery +. Wire the two 9V batteries in series and run the free battery − to the jack ring, so plugging in turns the preamp on. Jack sleeve to the cavity shielding.
Test. Plug in at low volume and tap each pickup's pole pieces with a screwdriver. Turn every knob end to end and try both mid settings before closing the cavity.
Volume and blend values depend on the pickups: use what the pickup maker recommends.
9V or 18V both work: for one 9V battery, run its − to the jack ring.
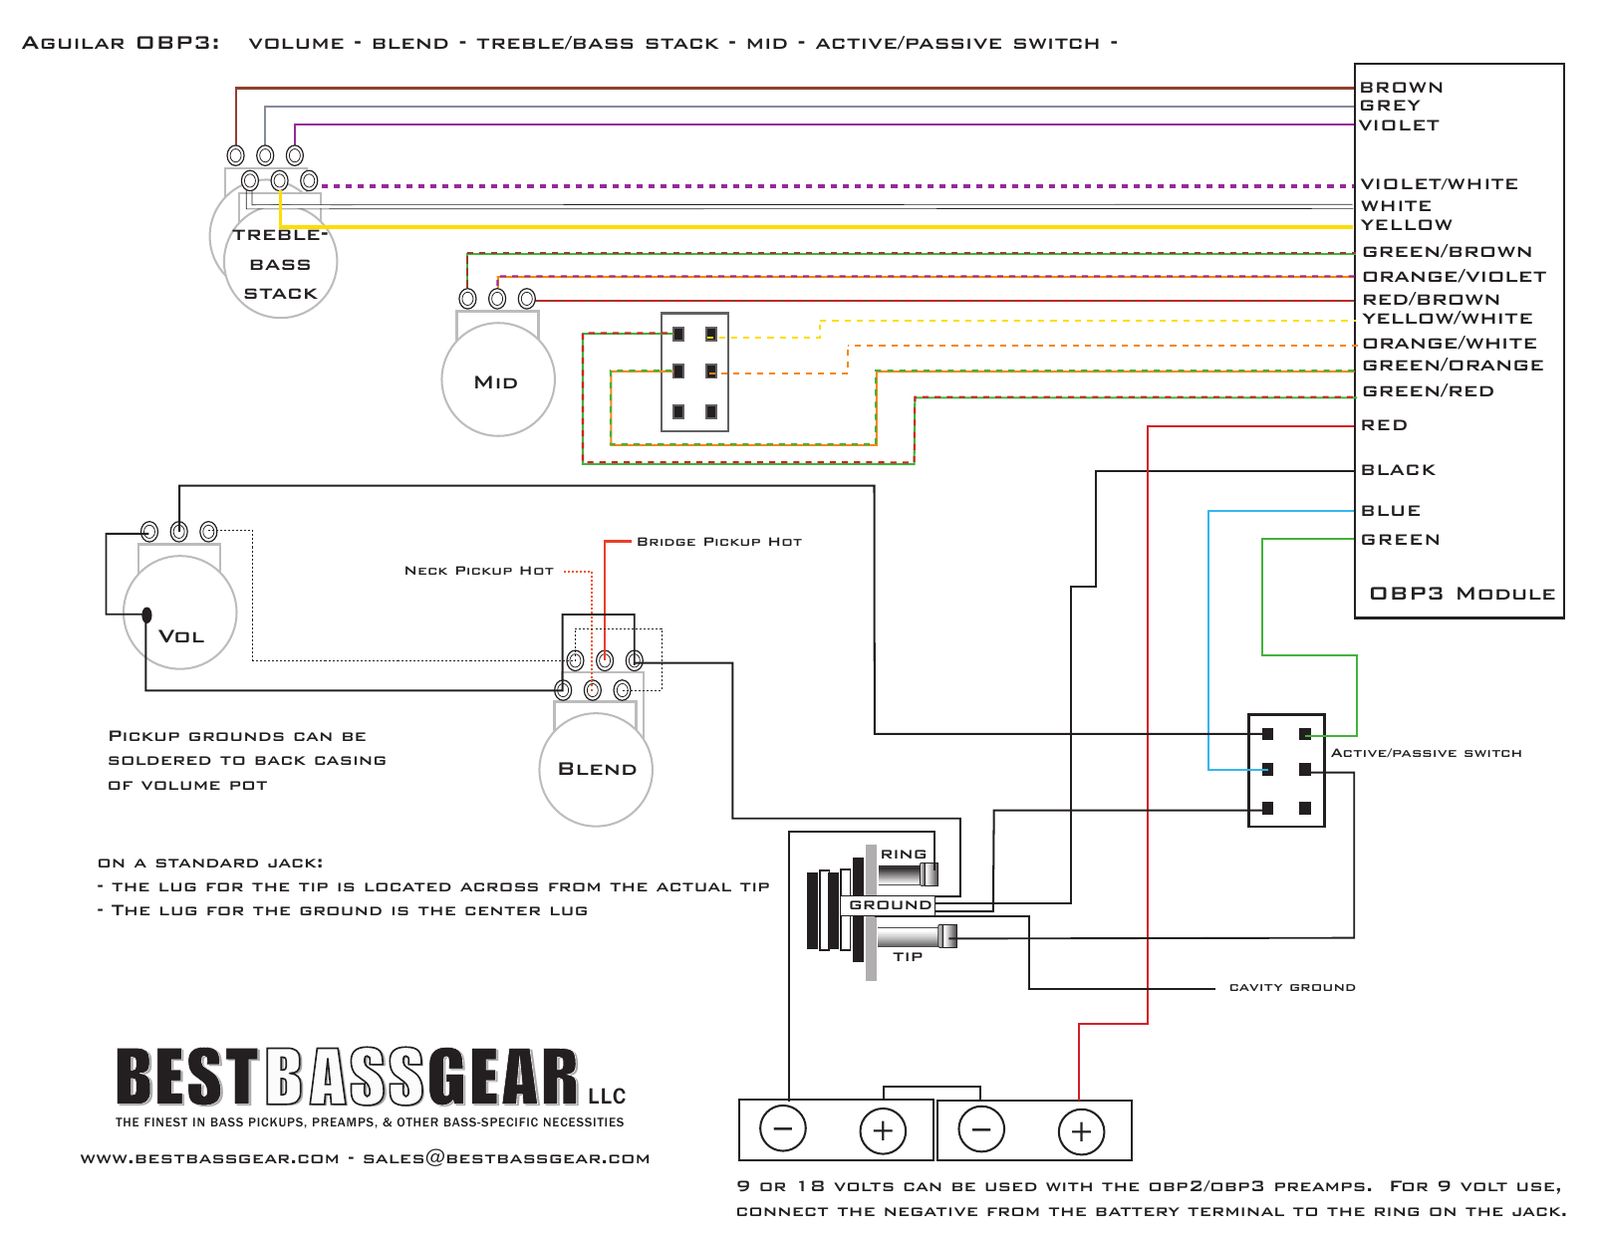
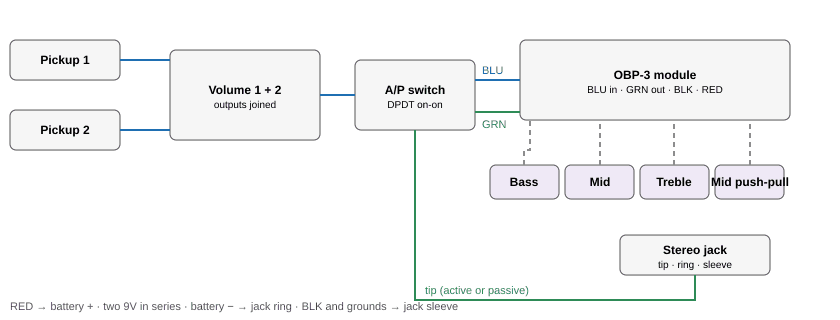
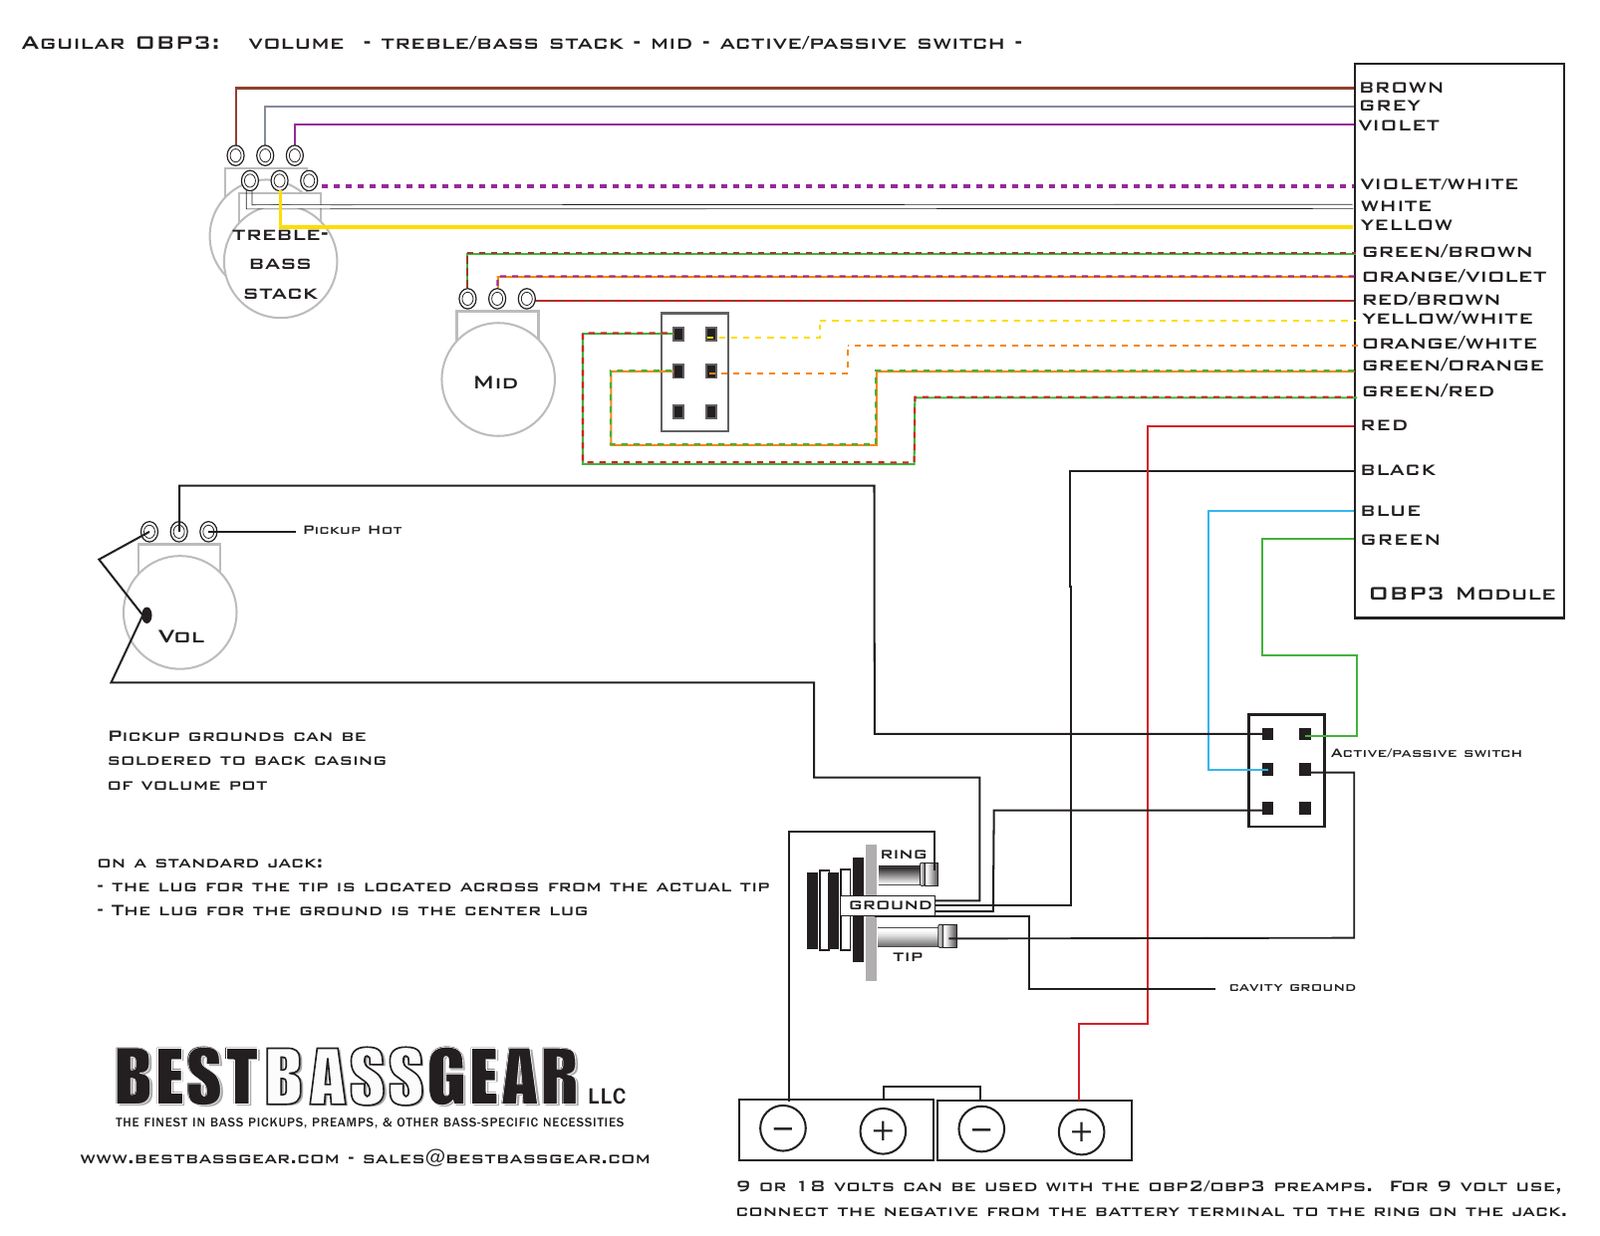
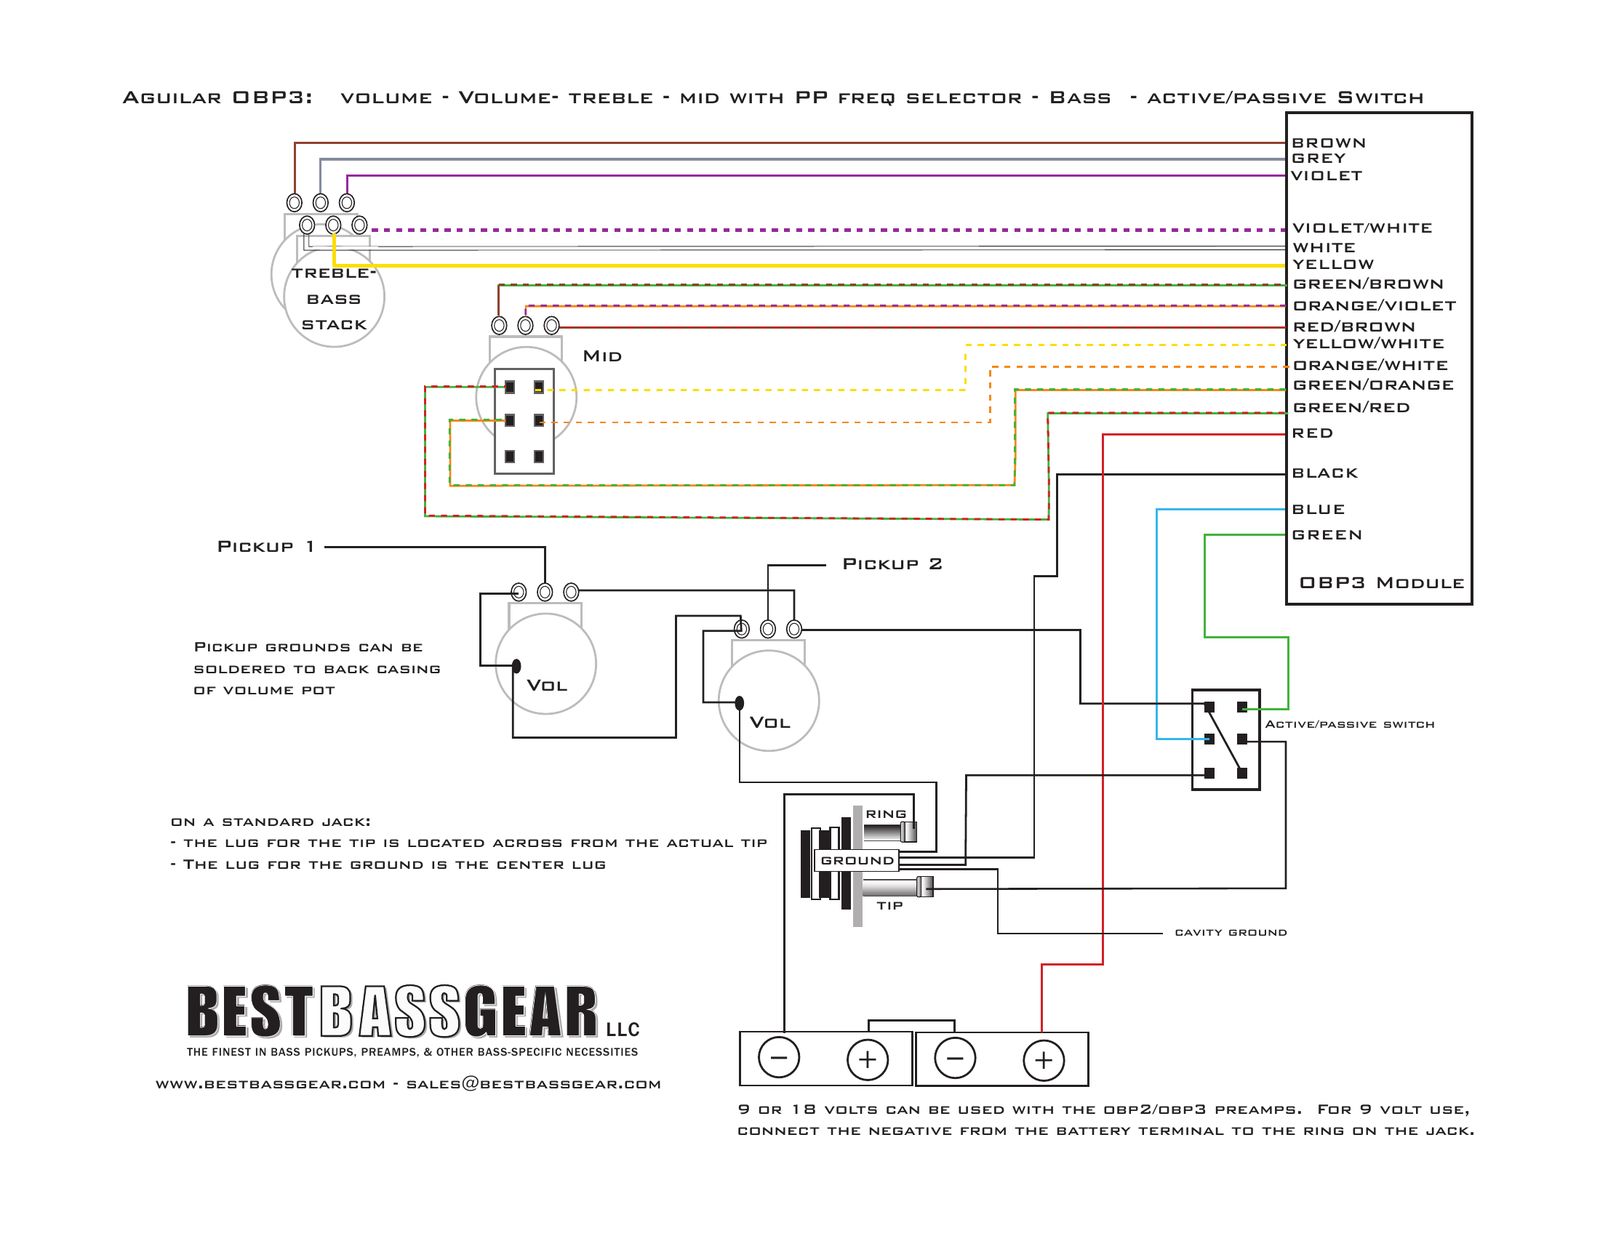
Aguilar OBP-3 with blend, volume, push-pull mid and A/P switch
Blend and volume, separate bass, mid and treble pots, a push-pull mid for 400/800 Hz, and a mini switch to bypass the preamp (active/passive).
You need: OBP-3 module, 2 pots 50K linear: bass, treble, push-pull 50K linear pot for the mid (DPDT), dual-audio blend pot, volume pot (value to suit the pickups), DPDT on-on mini switch for active/passive, 2 x 9V batteries, stereo output jack.
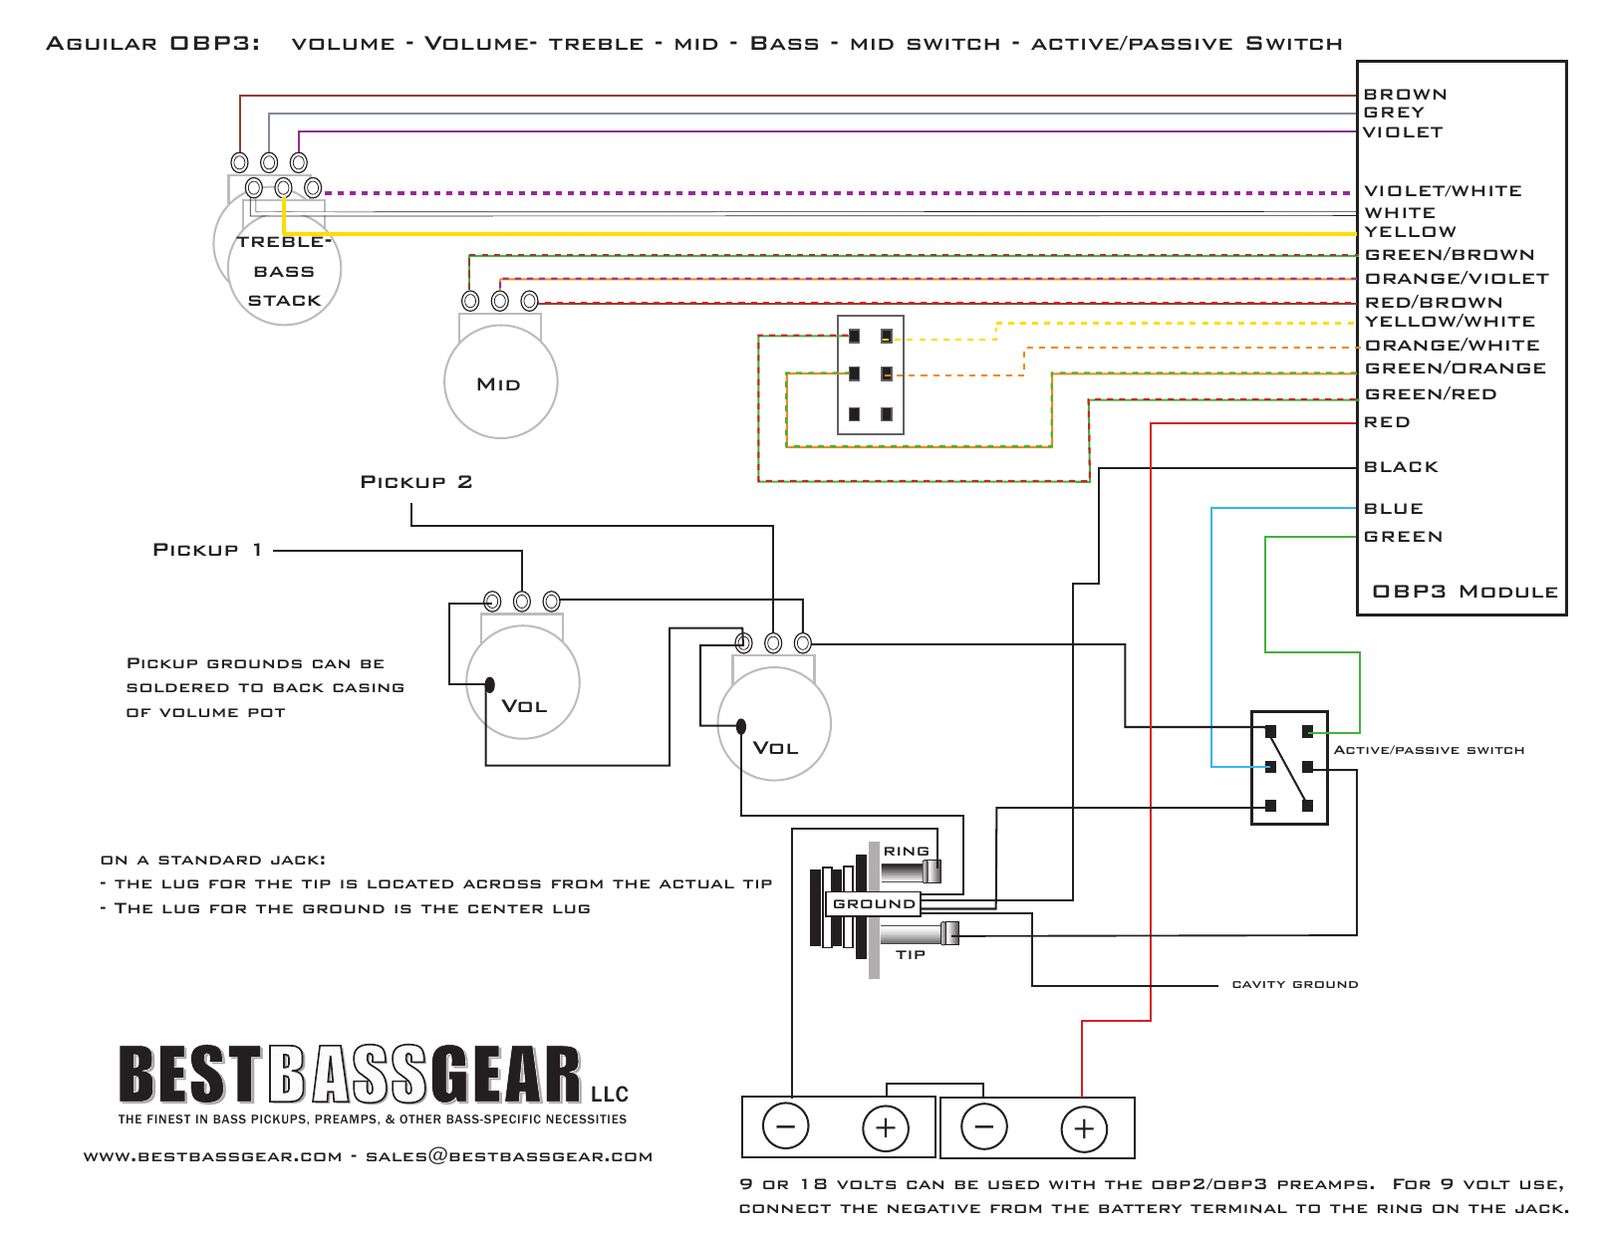
Best Bass Gear's drawing, as originally published. Click to enlarge.Aguilar OBP-3 with blend, volume, push-pull mid and A/P switch, redrawn as a connection diagram.
Aguilar OBP-3 with blend, volume, push-pull mid and A/P switch: wire by wire
#
From
To
Notes
1
Bridge pickup: Hot
Blend: middle lug of one gang
2
Neck pickup: Hot
Blend: middle lug of the other gang
3
Both pickups: Ground
Ground (back of the volume pot)
4
Blend: output lugs (one outer lug per gang, joined)
Volume: Right lug
5
Blend: ground lugs (the other outer lug per gang, joined)
Ground (back of the volume pot)
6
Volume: Left lug
Volume casing
Jumper to ground
7
Volume: Middle lug
A/P switch: top-left lug
Passive signal
8
OBP-3 module: BLU (input)
A/P switch: middle-left lug
Common, pole 1
9
A/P switch: bottom-left lug
Ground
Grounds the preamp input in passive
10
OBP-3 module: GRN (output)
A/P switch: top-right lug
11
A/P switch: middle-right lug
Stereo jack: Tip
Common, pole 2
12
A/P switch: bottom-right lug
A/P switch: top-left lug
Jumper: passive signal to the tip
13
OBP-3 module: BLK (ground)
Stereo jack: Sleeve (ground)
14
OBP-3 module: 9 EQ wires
Bass, mid and treble pots
See the EQ table
15
OBP-3 module: GRN/ORG, GRN/RED, YEL/WHT, ORG/WHT
Mid pot's push-pull switch
See the mid switch table
16
OBP-3 module: RED (+)
First battery +
17
First battery −
Second battery +
Two 9V in series (18V)
18
Second battery −
Stereo jack: Ring
Plugging in powers the preamp
19
Stereo jack: Sleeve
Cavity ground / shielding
OBP-3 EQ pots: which module wire goes on which lug (pots seen from the back, lugs up)
Pot
Left lug
Middle lug
Right lug
Bass 50K linear
BRN
GRY
VIO
Mid 50K linear
GRN/BRN
ORG/VIO
RED/BRN
Treble 50K linear
WHT
YEL
VIO/WHT
Push-pull switch on the mid pot (DPDT)
Switch
Wires
Result
Pole 1
GRN/ORG (middle row) and GRN/RED (top row)
Joined in one position
Pole 2
ORG/WHT (middle row) and YEL/WHT (top row)
Joined in the same position
Pairs joined
both poles closed
Mid centered at 400 Hz
Pairs apart
both poles open
Mid centered at 800 Hz
Step by step
Mount everything. Fit the pots, the mini switch and the stereo jack. Join the pot casings with a bare wire.
Pickups to the blend and volume. Bridge hot to the middle lug of one blend gang, neck hot to the middle lug of the other. Join one outer lug of each gang and run it to the volume's right lug; join the other two outer lugs to ground. Volume left lug to its casing. Pickup grounds go to the back of the volume pot.
Active/passive switch. Volume output to the top-left lug, module BLU to middle-left, bottom-left to ground. Module GRN to top-right, middle-right to the jack tip, and a jumper from bottom-right to top-left. Active: the signal runs through the preamp. Passive: the preamp input is grounded and the volume output goes straight to the tip.
EQ pots. Solder the module's nine EQ wires to the bass, mid and treble pots exactly as in the EQ table, left to right with the pots seen from the back, lugs up.
Push-pull mid. On the mid pot's push-pull switch: GRN/ORG and GRN/RED go to one pole, YEL/WHT and ORG/WHT to the other (common lugs in the middle row, the other wire on the row above). With each pair joined the mid is centered at 400 Hz; apart, 800 Hz.
Output and power. Module BLK to the jack sleeve and RED to battery +. Wire the two 9V batteries in series and run the free battery − to the jack ring, so plugging in turns the preamp on. Jack sleeve to the cavity shielding.
Test. Plug in at low volume and tap each pickup's pole pieces with a screwdriver. Turn every knob end to end, flip the active/passive switch and try both mid settings before closing the cavity.
Our drawing for this layout leaves out the jumper from the A/P switch's bottom-right lug to its top-left lug. Without it the bass is silent in passive, so the table includes it, as in our other A/P drawings.
Volume and blend values depend on the pickups: use what the pickup maker recommends.
9V or 18V both work: for one 9V battery, run its − to the jack ring.
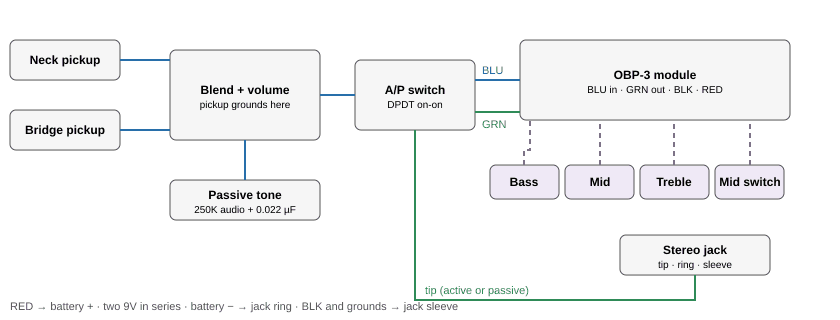
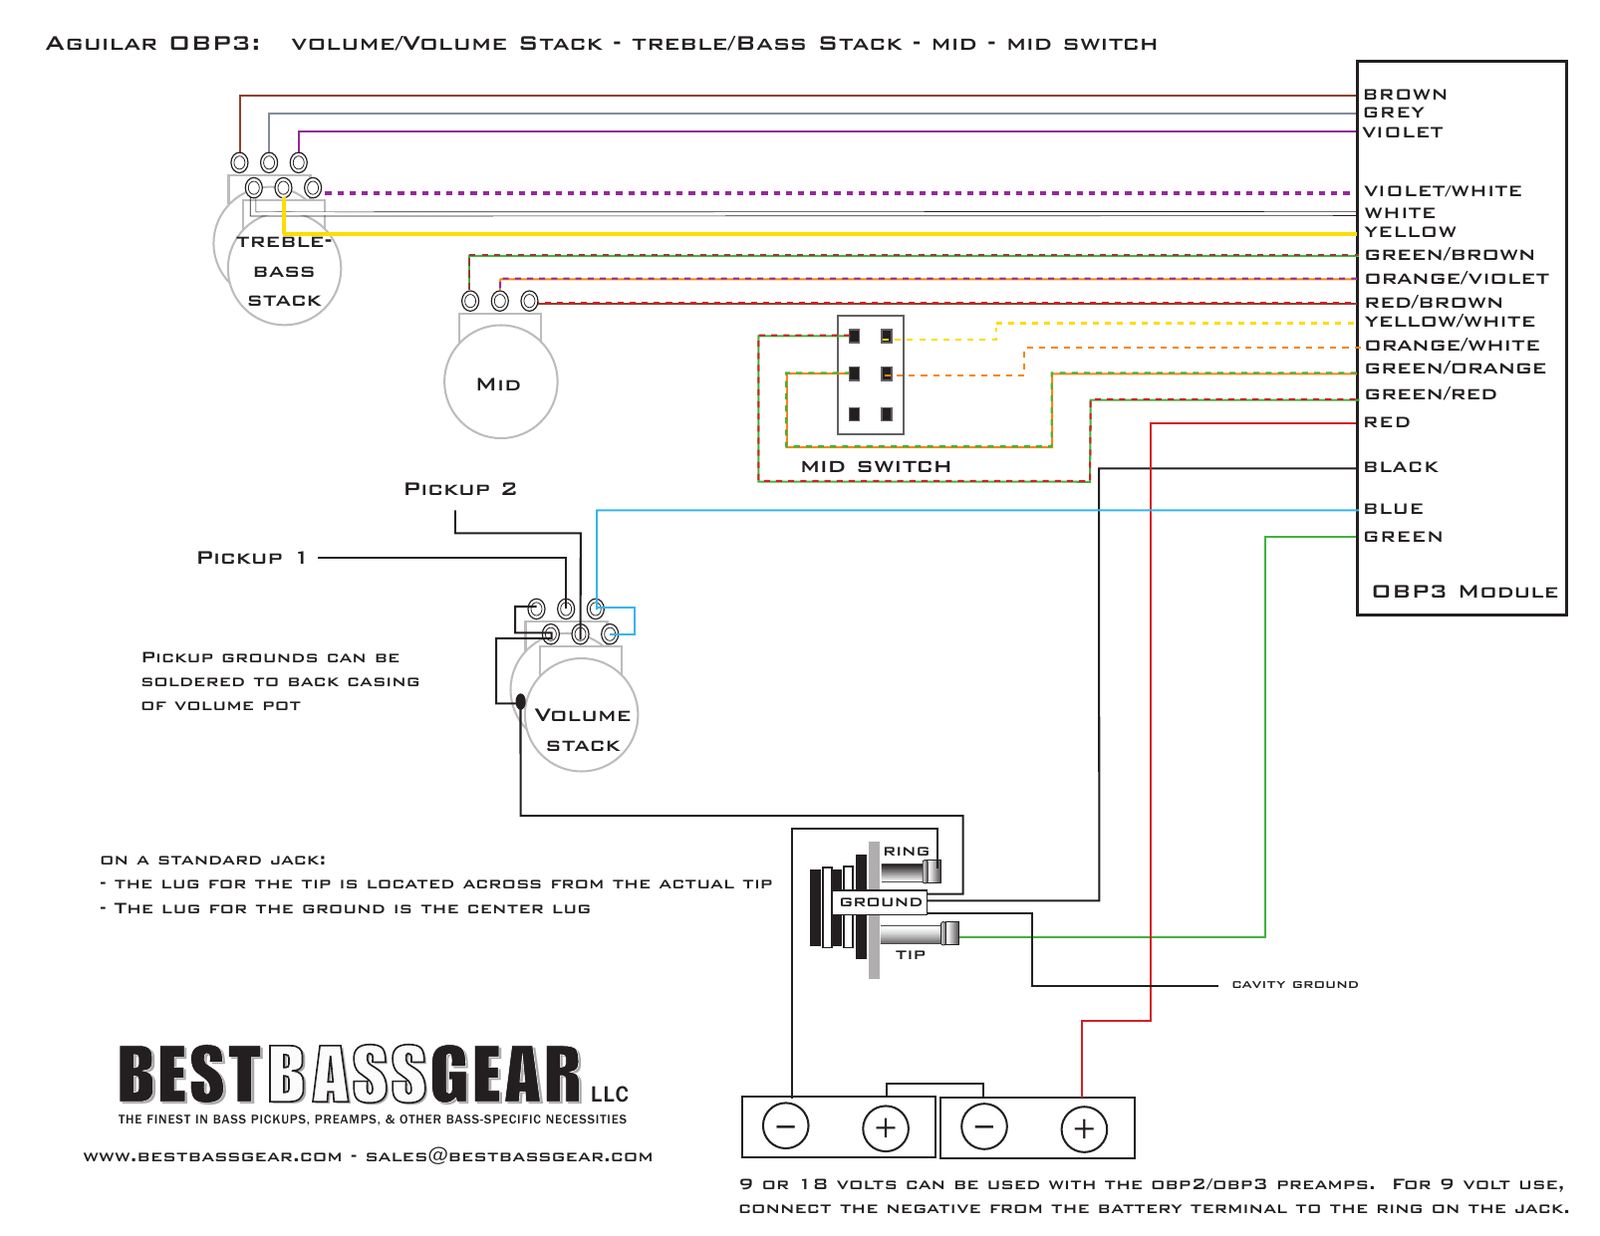
Aguilar OBP-3 with blend, volume, passive tone, mid switch and A/P switch
Blend and volume, a passive tone control, separate bass, mid and treble pots, a mid switch and an active/passive switch: the full five-knob, two-switch layout.
You need: OBP-3 module, 2 pots 50K linear: bass, treble, 50K linear mid pot, DPDT on-on mini switch for the mid, dual-audio blend pot, volume pot (value to suit the pickups), tone pot, tone capacitor, DPDT on-on mini switch for active/passive, 2 x 9V batteries, stereo output jack.
Best Bass Gear's drawing, as originally published. Click to enlarge.Aguilar OBP-3 with blend, volume, passive tone, mid switch and A/P switch, redrawn as a connection diagram.
Aguilar OBP-3 with blend, volume, passive tone, mid switch and A/P switch: wire by wire
#
From
To
Notes
1
Bridge pickup: Hot
Blend: middle lug of one gang
2
Neck pickup: Hot
Blend: middle lug of the other gang
3
Both pickups: Ground
Ground (back of the volume pot)
4
Blend: output lugs (one outer lug per gang, joined)
Volume: Right lug
5
Blend: ground lugs (the other outer lug per gang, joined)
Ground (back of the volume pot)
6
Volume: Left lug
Volume casing
Jumper to ground
7
Tone pot: Outer lug
Volume: Middle lug
Passive tone
8
Tone: Middle lug
Capacitor
9
Capacitor: other leg
Stereo jack: Sleeve (ground)
10
Volume: Middle lug
A/P switch: top-left lug
Passive signal
11
OBP-3 module: BLU (input)
A/P switch: middle-left lug
Common, pole 1
12
A/P switch: bottom-left lug
Ground
Grounds the preamp input in passive
13
OBP-3 module: GRN (output)
A/P switch: top-right lug
14
A/P switch: middle-right lug
Stereo jack: Tip
Common, pole 2
15
A/P switch: bottom-right lug
A/P switch: top-left lug
Jumper: passive signal to the tip
16
OBP-3 module: BLK (ground)
Stereo jack: Sleeve (ground)
17
OBP-3 module: 9 EQ wires
Bass, mid and treble pots
See the EQ table
18
OBP-3 module: GRN/ORG, GRN/RED, YEL/WHT, ORG/WHT
Mid switch
See the mid switch table
19
OBP-3 module: RED (+)
First battery +
20
First battery −
Second battery +
Two 9V in series (18V)
21
Second battery −
Stereo jack: Ring
Plugging in powers the preamp
22
Stereo jack: Sleeve
Cavity ground / shielding
OBP-3 EQ pots: which module wire goes on which lug (pots seen from the back, lugs up)
Pot
Left lug
Middle lug
Right lug
Bass 50K linear
BRN
GRY
VIO
Mid 50K linear
GRN/BRN
ORG/VIO
RED/BRN
Treble 50K linear
WHT
YEL
VIO/WHT
Mid switch (DPDT on-on mini toggle)
Switch
Wires
Result
Pole 1
GRN/ORG (middle row) and GRN/RED (top row)
Joined in one position
Pole 2
ORG/WHT (middle row) and YEL/WHT (top row)
Joined in the same position
Pairs joined
both poles closed
Mid centered at 400 Hz
Pairs apart
both poles open
Mid centered at 800 Hz
Step by step
Mount everything. Fit the pots, both mini switches and the stereo jack. Join the pot casings with a bare wire.
Pickups to the blend and volume. Bridge hot to the middle lug of one blend gang, neck hot to the middle lug of the other. Join one outer lug of each gang and run it to the volume's right lug; join the other two outer lugs to ground. Volume left lug to its casing. Pickup grounds go to the back of the volume pot.
Passive tone. One outer lug of the tone pot to the volume output, the middle lug to the capacitor, and the capacitor's other leg to ground. Our drawing gives no values: most passive tone controls use a 250K audio pot and a 0.022 µF to 0.047 µF cap, but go by your pickups.
Active/passive switch. Volume output to the top-left lug, module BLU to middle-left, bottom-left to ground. Module GRN to top-right, middle-right to the jack tip, and a jumper from bottom-right to top-left. Active: the signal runs through the preamp. Passive: the preamp input is grounded and the volume output goes straight to the tip.
EQ pots. Solder the module's nine EQ wires to the bass, mid and treble pots exactly as in the EQ table, left to right with the pots seen from the back, lugs up.
Mid switch. On the mini switch: GRN/ORG and GRN/RED go to one pole, YEL/WHT and ORG/WHT to the other (common lugs in the middle row, the other wire on the row above). With each pair joined the mid is centered at 400 Hz; apart, 800 Hz.
Output and power. Module BLK to the jack sleeve and RED to battery +. Wire the two 9V batteries in series and run the free battery − to the jack ring, so plugging in turns the preamp on. Jack sleeve to the cavity shielding.
Test. Plug in at low volume and tap each pickup's pole pieces with a screwdriver. Turn every knob end to end, flip the active/passive switch and try both mid settings before closing the cavity.
The drawing's title says push-pull mid, but it shows a separate mini switch for the mid. Either works: the four switch wires are the same.
Volume and blend values depend on the pickups: use what the pickup maker recommends.
9V or 18V both work: for one 9V battery, run its − to the jack ring.
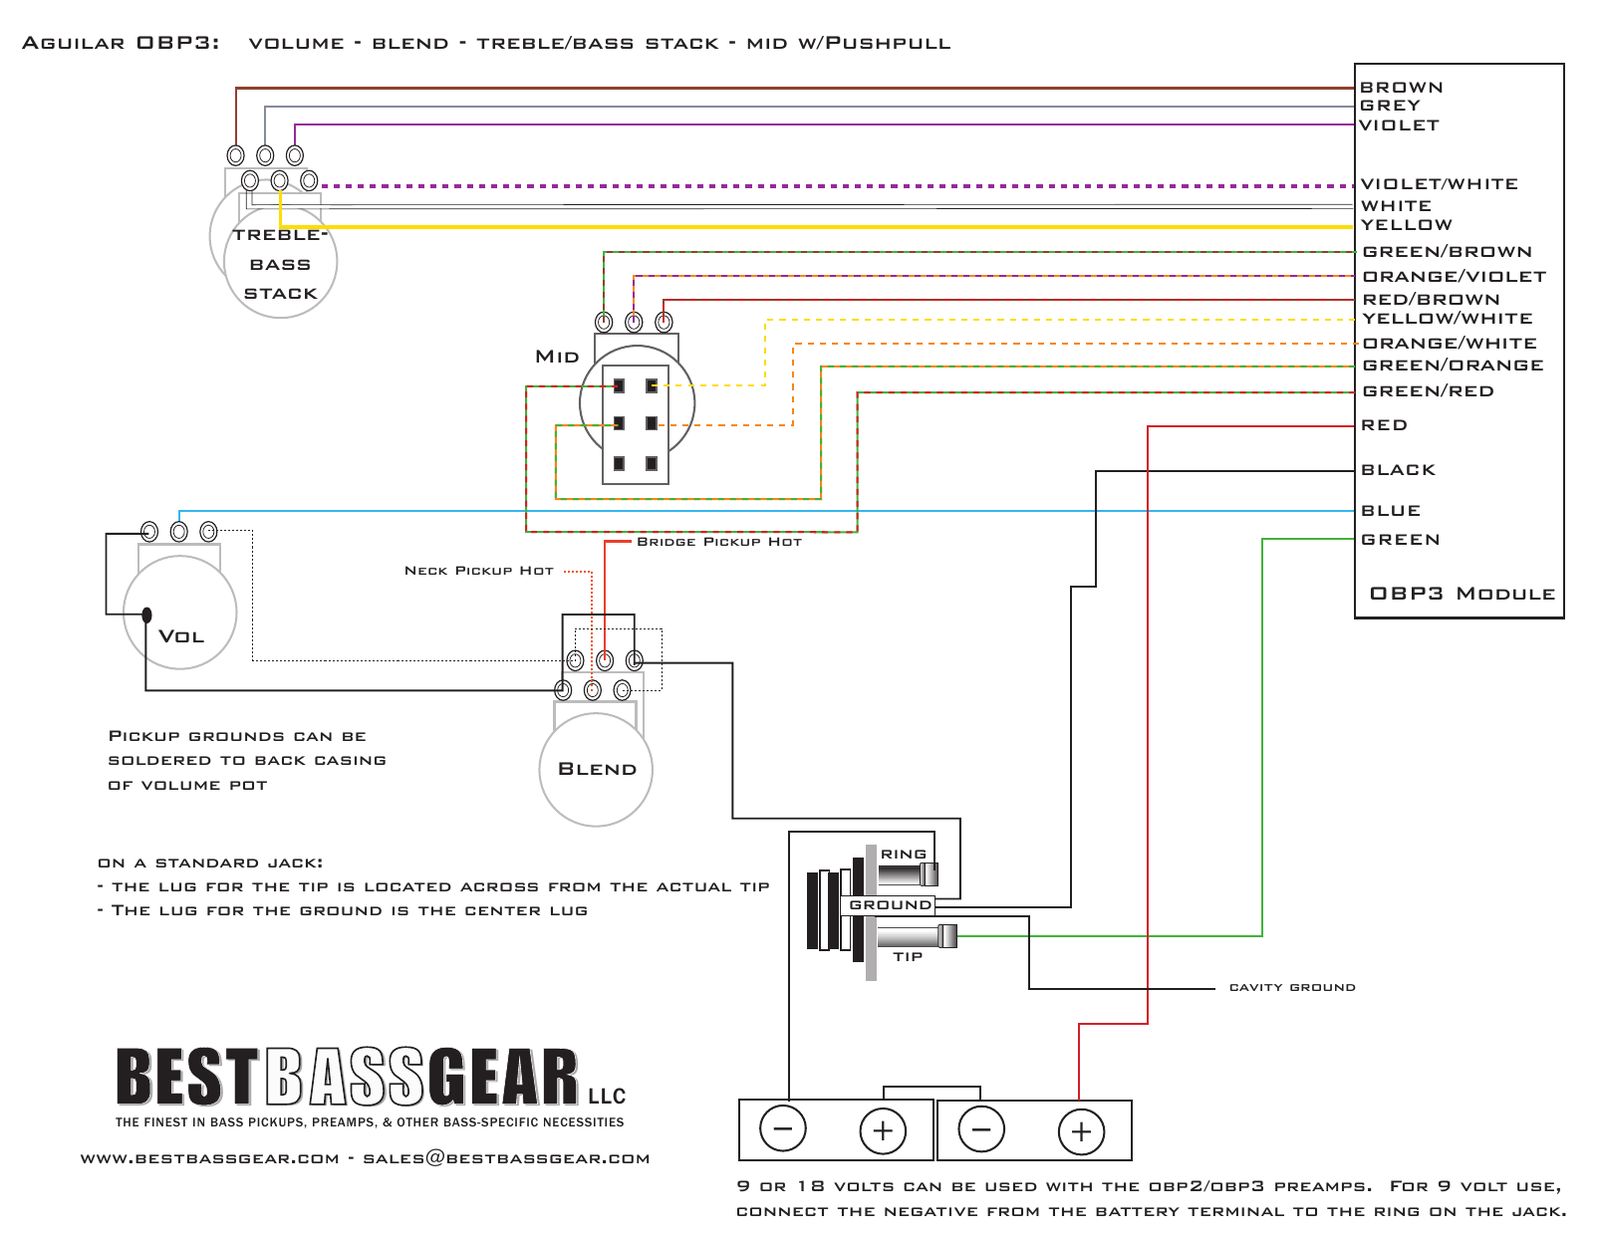
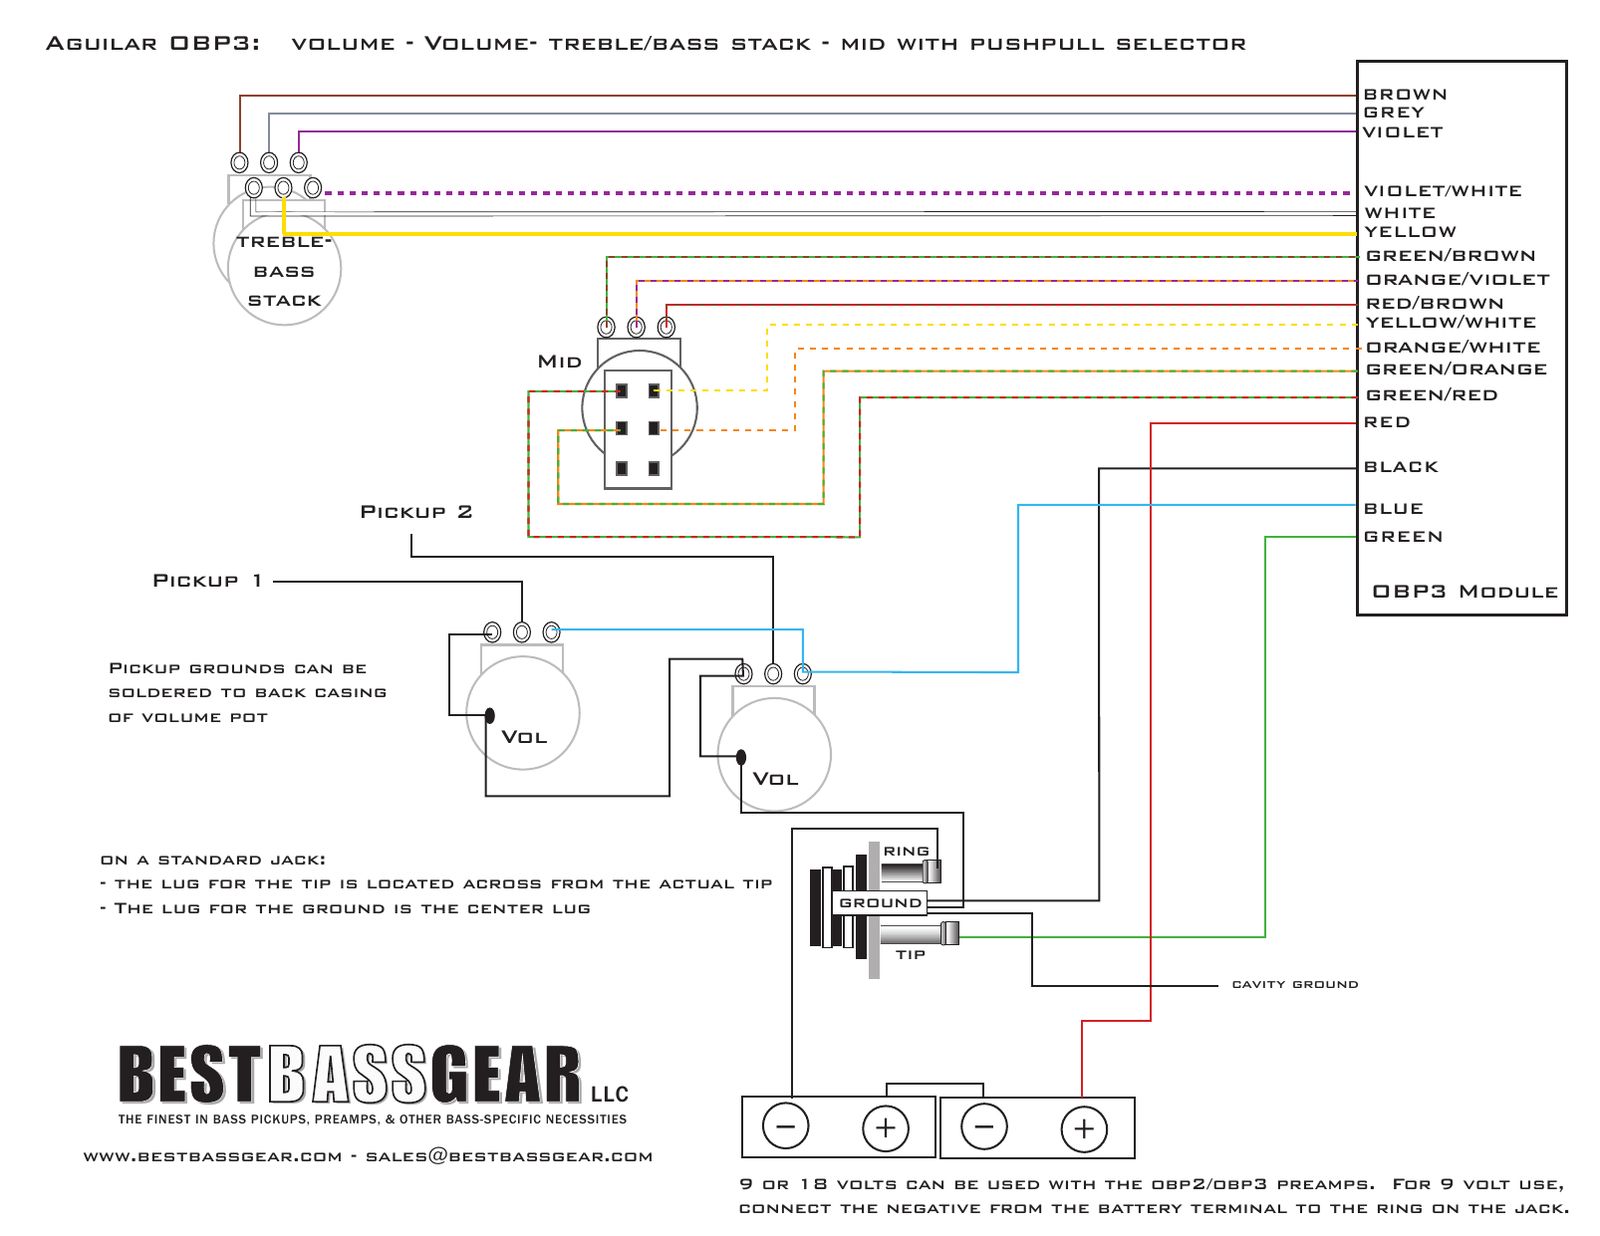
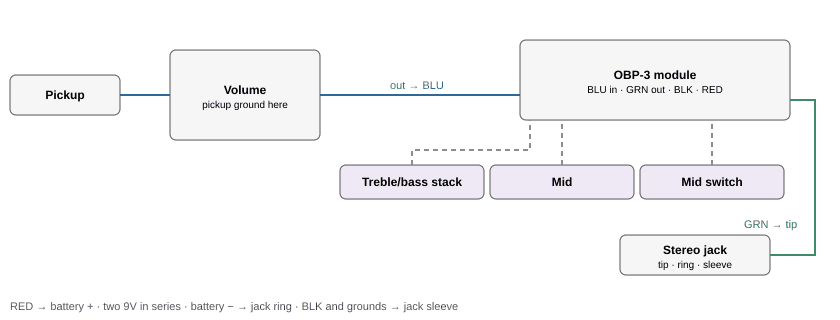
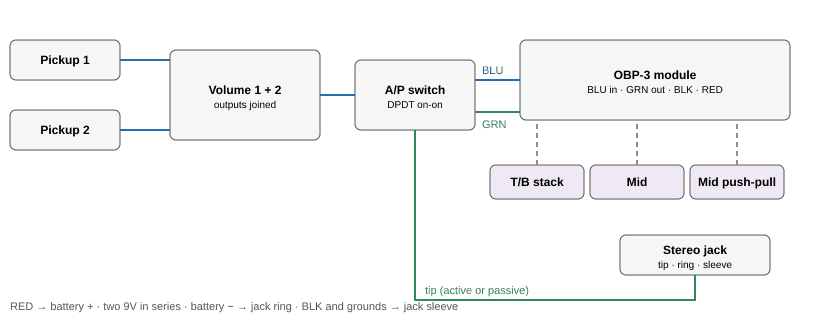
Aguilar OBP-3 with blend, volume, stacked bass/treble and push-pull mid
Blend and volume, bass and treble on one stacked pot, and the mid on a push-pull pot that selects 400 or 800 Hz. Four knobs, no switches.
You need: OBP-3 module, dual 50K linear treble/bass stack, push-pull 50K linear pot for the mid (DPDT), dual-audio blend pot, volume pot (value to suit the pickups), 2 x 9V batteries, stereo output jack.
Best Bass Gear's drawing, as originally published. Click to enlarge.Aguilar OBP-3 with blend, volume, stacked bass/treble and push-pull mid, redrawn as a connection diagram.
Aguilar OBP-3 with blend, volume, stacked bass/treble and push-pull mid: wire by wire
#
From
To
Notes
1
Bridge pickup: Hot
Blend: middle lug of one gang
2
Neck pickup: Hot
Blend: middle lug of the other gang
3
Both pickups: Ground
Ground (back of the volume pot)
4
Blend: output lugs (one outer lug per gang, joined)
Volume: Right lug
5
Blend: ground lugs (the other outer lug per gang, joined)
Ground (back of the volume pot)
6
Volume: Left lug
Volume casing
Jumper to ground
7
Volume: Middle lug
OBP-3 module: BLU (input)
8
OBP-3 module: GRN (output)
Stereo jack: Tip
Preamp output
9
OBP-3 module: BLK (ground)
Stereo jack: Sleeve (ground)
10
OBP-3 module: 9 EQ wires
Bass, mid and treble pots
See the EQ table
11
OBP-3 module: GRN/ORG, GRN/RED, YEL/WHT, ORG/WHT
Mid pot's push-pull switch
See the mid switch table
12
OBP-3 module: RED (+)
First battery +
13
First battery −
Second battery +
Two 9V in series (18V)
14
Second battery −
Stereo jack: Ring
Plugging in powers the preamp
15
Stereo jack: Sleeve
Cavity ground / shielding
OBP-3 EQ pots: which module wire goes on which lug (pots seen from the back, lugs up)
Pot
Left lug
Middle lug
Right lug
Treble/bass stack, bass deck (dual 50K linear)
BRN
GRY
VIO
Treble/bass stack, treble deck
WHT
YEL
VIO/WHT
Mid 50K linear
GRN/BRN
ORG/VIO
RED/BRN
Push-pull switch on the mid pot (DPDT)
Switch
Wires
Result
Pole 1
GRN/ORG (middle row) and GRN/RED (top row)
Joined in one position
Pole 2
ORG/WHT (middle row) and YEL/WHT (top row)
Joined in the same position
Pairs joined
both poles closed
Mid centered at 400 Hz
Pairs apart
both poles open
Mid centered at 800 Hz
Step by step
Mount everything. Fit the pots and the stereo jack. Join the pot casings with a bare wire.
Pickups to the blend and volume. Bridge hot to the middle lug of one blend gang, neck hot to the middle lug of the other. Join one outer lug of each gang and run it to the volume's right lug; join the other two outer lugs to ground. Volume left lug to its casing. Pickup grounds go to the back of the volume pot.
Volume to the module. Volume middle lug to the module's BLU wire.
EQ pots. Solder the module's nine EQ wires to the bass, mid and treble pots exactly as in the EQ table, left to right with the pots seen from the back, lugs up.
Push-pull mid. On the mid pot's push-pull switch: GRN/ORG and GRN/RED go to one pole, YEL/WHT and ORG/WHT to the other (common lugs in the middle row, the other wire on the row above). With each pair joined the mid is centered at 400 Hz; apart, 800 Hz.
Output and power. Module GRN to the jack tip. Module BLK to the jack sleeve and RED to battery +. Wire the two 9V batteries in series and run the free battery − to the jack ring, so plugging in turns the preamp on. Jack sleeve to the cavity shielding.
Test. Plug in at low volume and tap each pickup's pole pieces with a screwdriver. Turn every knob end to end and try both mid settings before closing the cavity.
Volume and blend values depend on the pickups: use what the pickup maker recommends.
9V or 18V both work: for one 9V battery, run its − to the jack ring.
Aguilar OBP-3 with blend, volume, stacked bass/treble, push-pull mid and A/P switch
The four-knob stacked layout with a push-pull mid, plus a mini switch for active/passive.
You need: OBP-3 module, dual 50K linear treble/bass stack, push-pull 50K linear pot for the mid (DPDT), dual-audio blend pot, volume pot (value to suit the pickups), DPDT on-on mini switch for active/passive, 2 x 9V batteries, stereo output jack.
Best Bass Gear's drawing, as originally published. Click to enlarge.Aguilar OBP-3 with blend, volume, stacked bass/treble, push-pull mid and A/P switch, redrawn as a connection diagram.
Aguilar OBP-3 with blend, volume, stacked bass/treble, push-pull mid and A/P switch: wire by wire
#
From
To
Notes
1
Bridge pickup: Hot
Blend: middle lug of one gang
2
Neck pickup: Hot
Blend: middle lug of the other gang
3
Both pickups: Ground
Ground (back of the volume pot)
4
Blend: output lugs (one outer lug per gang, joined)
Volume: Right lug
5
Blend: ground lugs (the other outer lug per gang, joined)
Ground (back of the volume pot)
6
Volume: Left lug
Volume casing
Jumper to ground
7
Volume: Middle lug
A/P switch: top-left lug
Passive signal
8
OBP-3 module: BLU (input)
A/P switch: middle-left lug
Common, pole 1
9
A/P switch: bottom-left lug
Ground
Grounds the preamp input in passive
10
OBP-3 module: GRN (output)
A/P switch: top-right lug
11
A/P switch: middle-right lug
Stereo jack: Tip
Common, pole 2
12
A/P switch: bottom-right lug
A/P switch: top-left lug
Jumper: passive signal to the tip
13
OBP-3 module: BLK (ground)
Stereo jack: Sleeve (ground)
14
OBP-3 module: 9 EQ wires
Bass, mid and treble pots
See the EQ table
15
OBP-3 module: GRN/ORG, GRN/RED, YEL/WHT, ORG/WHT
Mid pot's push-pull switch
See the mid switch table
16
OBP-3 module: RED (+)
First battery +
17
First battery −
Second battery +
Two 9V in series (18V)
18
Second battery −
Stereo jack: Ring
Plugging in powers the preamp
19
Stereo jack: Sleeve
Cavity ground / shielding
OBP-3 EQ pots: which module wire goes on which lug (pots seen from the back, lugs up)
Pot
Left lug
Middle lug
Right lug
Treble/bass stack, bass deck (dual 50K linear)
BRN
GRY
VIO
Treble/bass stack, treble deck
WHT
YEL
VIO/WHT
Mid 50K linear
GRN/BRN
ORG/VIO
RED/BRN
Push-pull switch on the mid pot (DPDT)
Switch
Wires
Result
Pole 1
GRN/ORG (middle row) and GRN/RED (top row)
Joined in one position
Pole 2
ORG/WHT (middle row) and YEL/WHT (top row)
Joined in the same position
Pairs joined
both poles closed
Mid centered at 400 Hz
Pairs apart
both poles open
Mid centered at 800 Hz
Step by step
Mount everything. Fit the pots, the mini switch and the stereo jack. Join the pot casings with a bare wire.
Pickups to the blend and volume. Bridge hot to the middle lug of one blend gang, neck hot to the middle lug of the other. Join one outer lug of each gang and run it to the volume's right lug; join the other two outer lugs to ground. Volume left lug to its casing. Pickup grounds go to the back of the volume pot.
Active/passive switch. Volume output to the top-left lug, module BLU to middle-left, bottom-left to ground. Module GRN to top-right, middle-right to the jack tip, and a jumper from bottom-right to top-left. Active: the signal runs through the preamp. Passive: the preamp input is grounded and the volume output goes straight to the tip.
EQ pots. Solder the module's nine EQ wires to the bass, mid and treble pots exactly as in the EQ table, left to right with the pots seen from the back, lugs up.
Push-pull mid. On the mid pot's push-pull switch: GRN/ORG and GRN/RED go to one pole, YEL/WHT and ORG/WHT to the other (common lugs in the middle row, the other wire on the row above). With each pair joined the mid is centered at 400 Hz; apart, 800 Hz.
Output and power. Module BLK to the jack sleeve and RED to battery +. Wire the two 9V batteries in series and run the free battery − to the jack ring, so plugging in turns the preamp on. Jack sleeve to the cavity shielding.
Test. Plug in at low volume and tap each pickup's pole pieces with a screwdriver. Turn every knob end to end, flip the active/passive switch and try both mid settings before closing the cavity.
Volume and blend values depend on the pickups: use what the pickup maker recommends.
9V or 18V both work: for one 9V battery, run its − to the jack ring.
Aguilar OBP-3 with blend, volume, stacked bass/treble, mid switch and A/P switch
Blend and volume, stacked bass/treble, a mid pot, and two mini switches: one for the 400/800 Hz mid, one for active/passive.
You need: OBP-3 module, dual 50K linear treble/bass stack, 50K linear mid pot, DPDT on-on mini switch for the mid, dual-audio blend pot, volume pot (value to suit the pickups), DPDT on-on mini switch for active/passive, 2 x 9V batteries, stereo output jack.
Best Bass Gear's drawing, as originally published. Click to enlarge.Aguilar OBP-3 with blend, volume, stacked bass/treble, mid switch and A/P switch, redrawn as a connection diagram.
Aguilar OBP-3 with blend, volume, stacked bass/treble, mid switch and A/P switch: wire by wire
#
From
To
Notes
1
Bridge pickup: Hot
Blend: middle lug of one gang
2
Neck pickup: Hot
Blend: middle lug of the other gang
3
Both pickups: Ground
Ground (back of the volume pot)
4
Blend: output lugs (one outer lug per gang, joined)
Volume: Right lug
5
Blend: ground lugs (the other outer lug per gang, joined)
Ground (back of the volume pot)
6
Volume: Left lug
Volume casing
Jumper to ground
7
Volume: Middle lug
A/P switch: top-left lug
Passive signal
8
OBP-3 module: BLU (input)
A/P switch: middle-left lug
Common, pole 1
9
A/P switch: bottom-left lug
Ground
Grounds the preamp input in passive
10
OBP-3 module: GRN (output)
A/P switch: top-right lug
11
A/P switch: middle-right lug
Stereo jack: Tip
Common, pole 2
12
A/P switch: bottom-right lug
A/P switch: top-left lug
Jumper: passive signal to the tip
13
OBP-3 module: BLK (ground)
Stereo jack: Sleeve (ground)
14
OBP-3 module: 9 EQ wires
Bass, mid and treble pots
See the EQ table
15
OBP-3 module: GRN/ORG, GRN/RED, YEL/WHT, ORG/WHT
Mid switch
See the mid switch table
16
OBP-3 module: RED (+)
First battery +
17
First battery −
Second battery +
Two 9V in series (18V)
18
Second battery −
Stereo jack: Ring
Plugging in powers the preamp
19
Stereo jack: Sleeve
Cavity ground / shielding
OBP-3 EQ pots: which module wire goes on which lug (pots seen from the back, lugs up)
Pot
Left lug
Middle lug
Right lug
Treble/bass stack, bass deck (dual 50K linear)
BRN
GRY
VIO
Treble/bass stack, treble deck
WHT
YEL
VIO/WHT
Mid 50K linear
GRN/BRN
ORG/VIO
RED/BRN
Mid switch (DPDT on-on mini toggle)
Switch
Wires
Result
Pole 1
GRN/ORG (middle row) and GRN/RED (top row)
Joined in one position
Pole 2
ORG/WHT (middle row) and YEL/WHT (top row)
Joined in the same position
Pairs joined
both poles closed
Mid centered at 400 Hz
Pairs apart
both poles open
Mid centered at 800 Hz
Step by step
Mount everything. Fit the pots, both mini switches and the stereo jack. Join the pot casings with a bare wire.
Pickups to the blend and volume. Bridge hot to the middle lug of one blend gang, neck hot to the middle lug of the other. Join one outer lug of each gang and run it to the volume's right lug; join the other two outer lugs to ground. Volume left lug to its casing. Pickup grounds go to the back of the volume pot.
Active/passive switch. Volume output to the top-left lug, module BLU to middle-left, bottom-left to ground. Module GRN to top-right, middle-right to the jack tip, and a jumper from bottom-right to top-left. Active: the signal runs through the preamp. Passive: the preamp input is grounded and the volume output goes straight to the tip.
EQ pots. Solder the module's nine EQ wires to the bass, mid and treble pots exactly as in the EQ table, left to right with the pots seen from the back, lugs up.
Mid switch. On the mini switch: GRN/ORG and GRN/RED go to one pole, YEL/WHT and ORG/WHT to the other (common lugs in the middle row, the other wire on the row above). With each pair joined the mid is centered at 400 Hz; apart, 800 Hz.
Output and power. Module BLK to the jack sleeve and RED to battery +. Wire the two 9V batteries in series and run the free battery − to the jack ring, so plugging in turns the preamp on. Jack sleeve to the cavity shielding.
Test. Plug in at low volume and tap each pickup's pole pieces with a screwdriver. Turn every knob end to end, flip the active/passive switch and try both mid settings before closing the cavity.
Our drawing for this layout leaves out the jumper from the A/P switch's bottom-right lug to its top-left lug. Without it the bass is silent in passive, so the table includes it, as in our other A/P drawings.
Volume and blend values depend on the pickups: use what the pickup maker recommends.
9V or 18V both work: for one 9V battery, run its − to the jack ring.
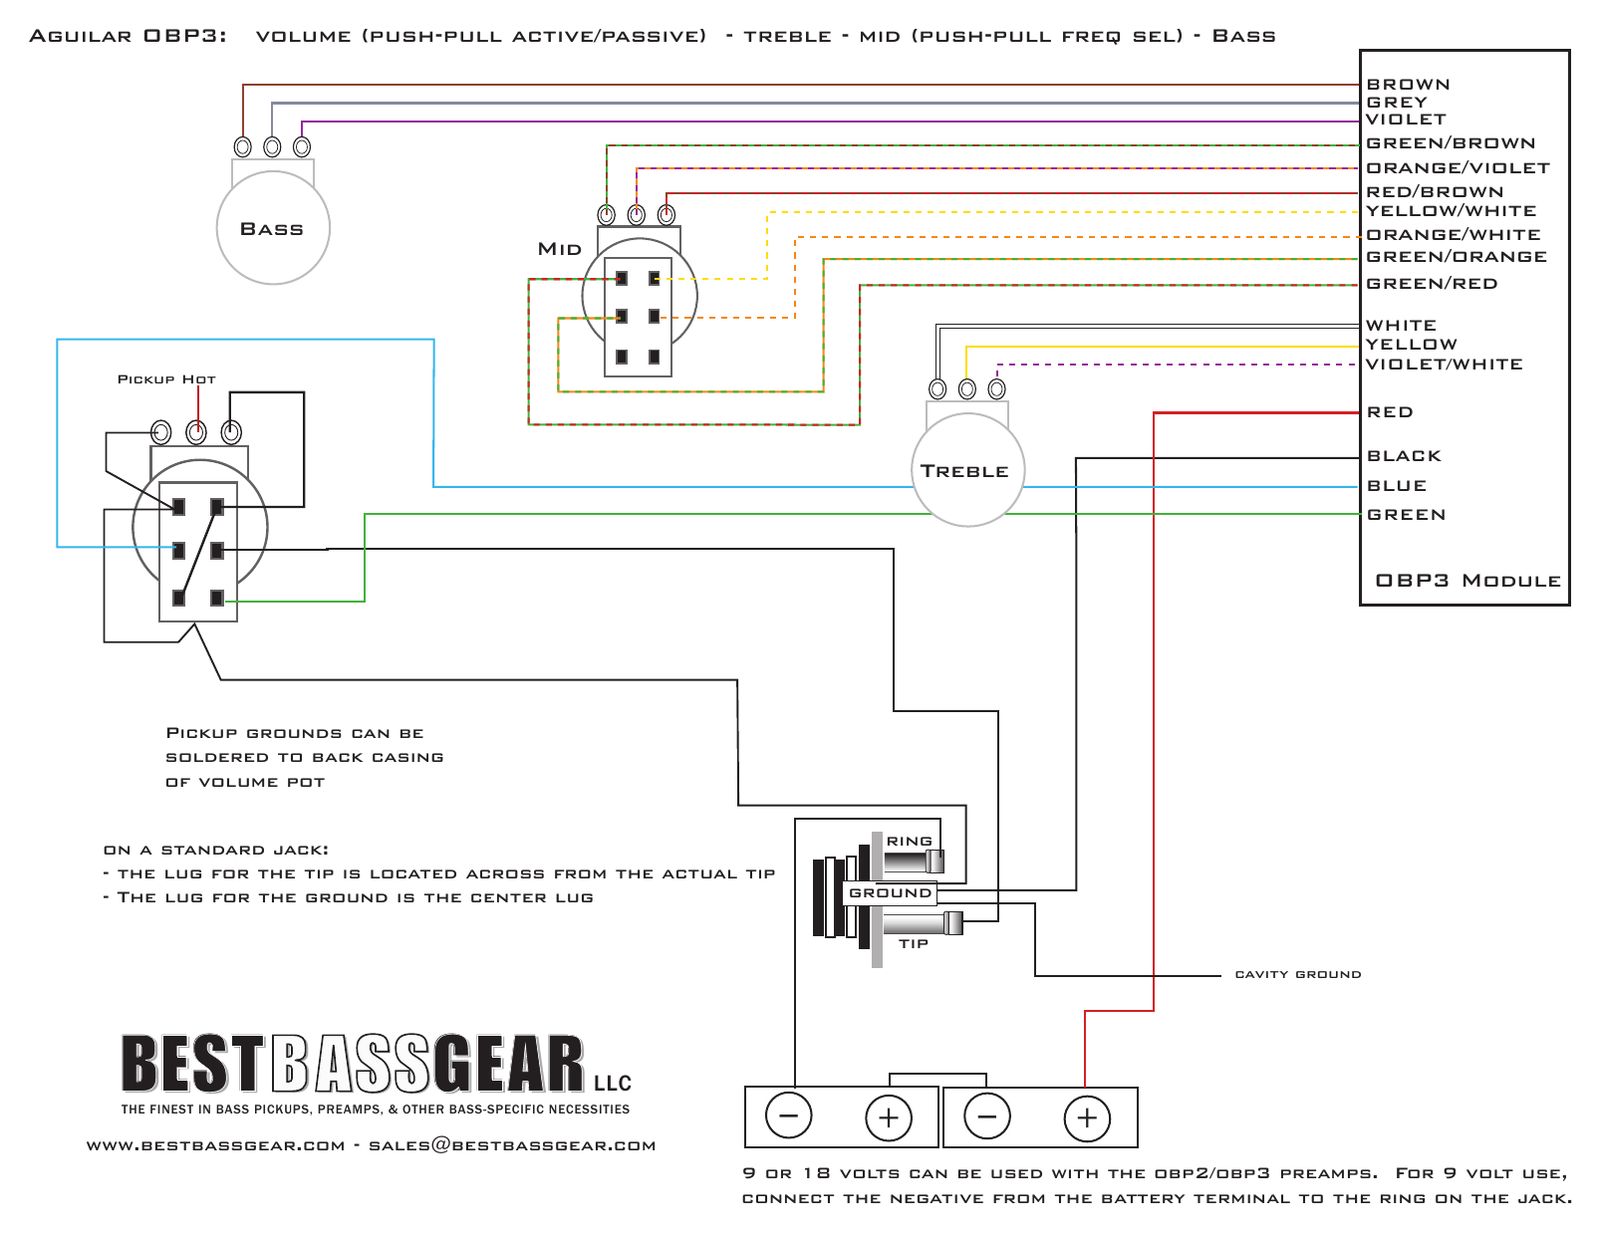
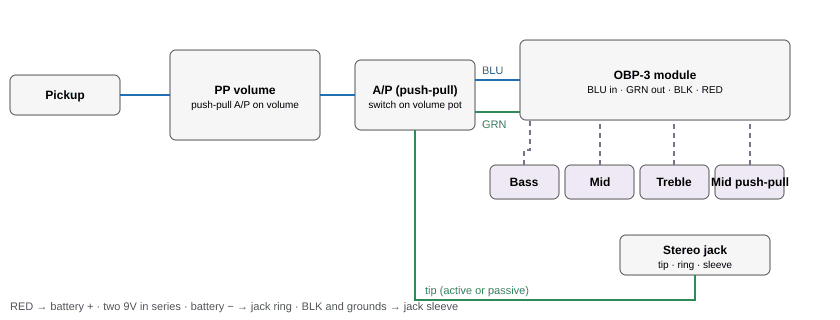
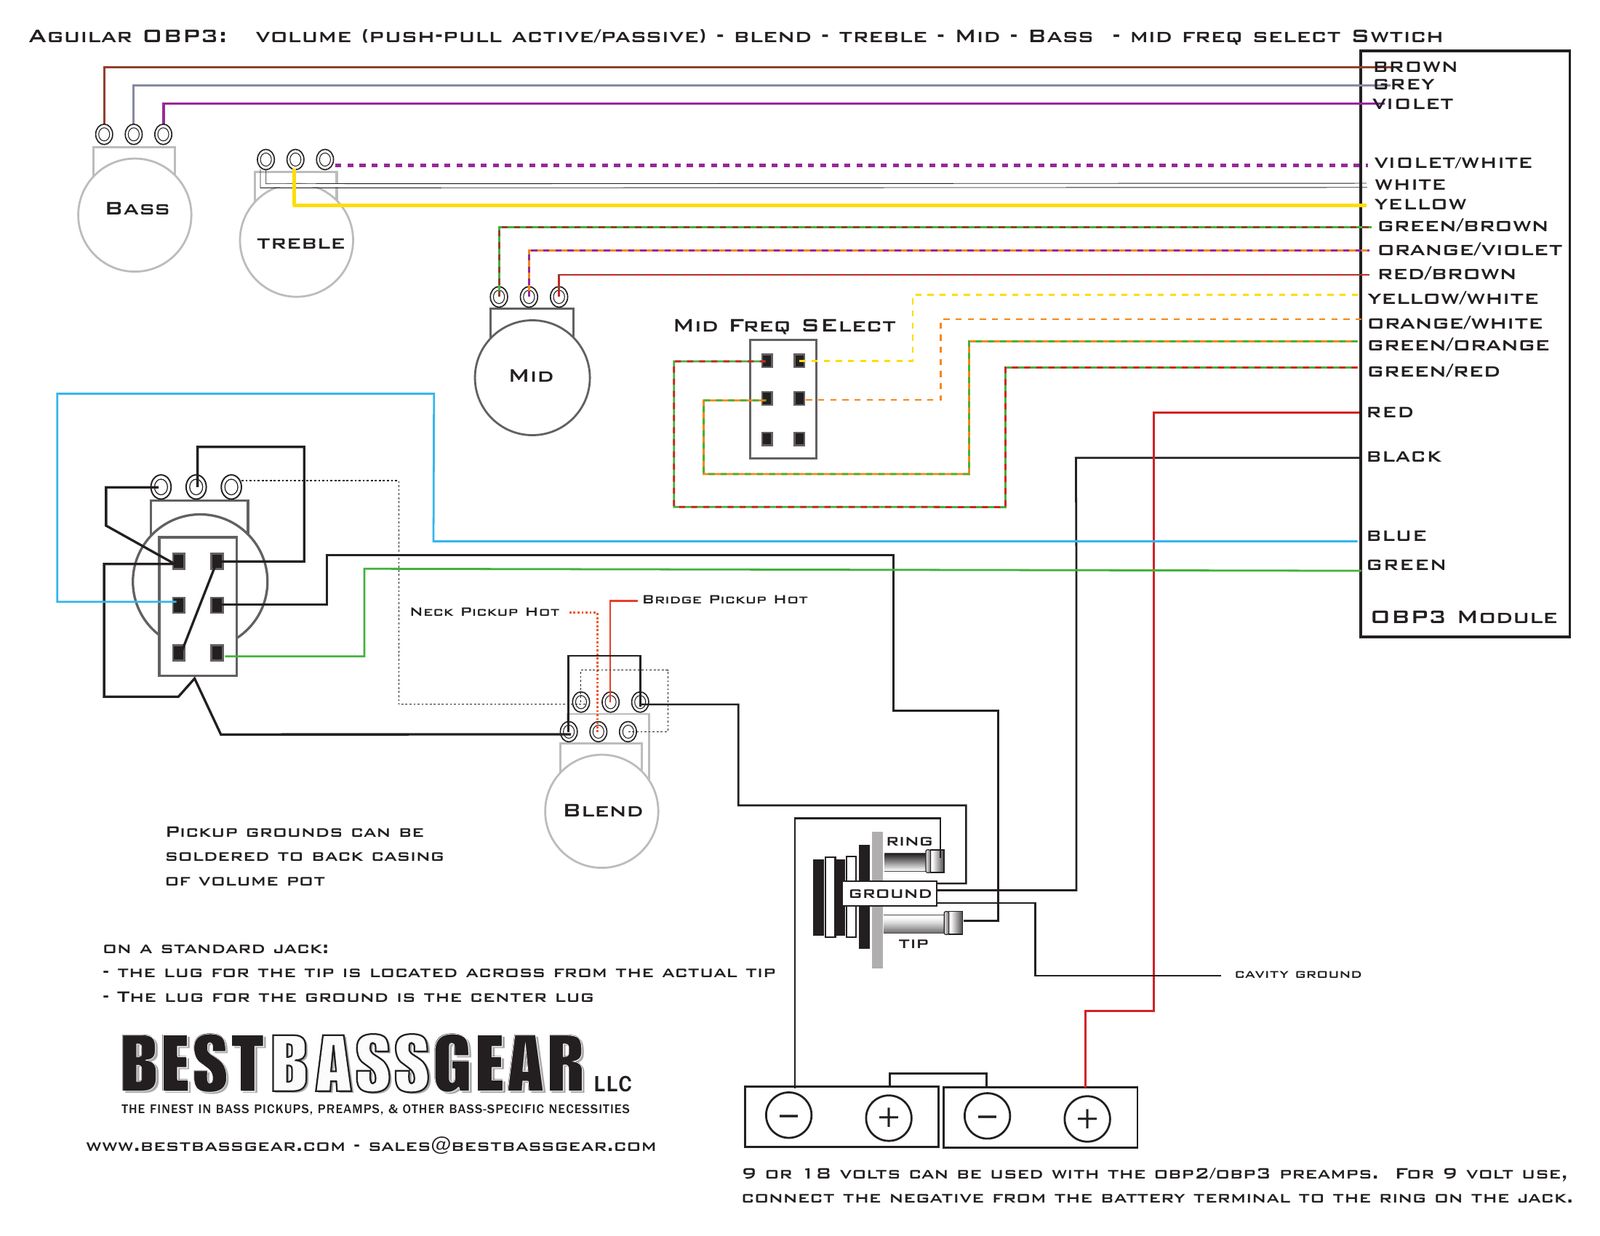
Aguilar OBP-3 with push-pull active/passive volume, blend and push-pull mid
Active/passive moves onto a push-pull volume, the mid select onto a push-pull mid pot, with blend and separate bass and treble: five knobs and no visible switches.
You need: OBP-3 module, 2 pots 50K linear: bass, treble, push-pull 50K linear pot for the mid (DPDT), dual-audio blend pot, push-pull volume pot (DPDT) for active/passive, 2 x 9V batteries, stereo output jack.
Best Bass Gear's drawing, as originally published. Click to enlarge.Aguilar OBP-3 with push-pull active/passive volume, blend and push-pull mid, redrawn as a connection diagram.
Aguilar OBP-3 with push-pull active/passive volume, blend and push-pull mid: wire by wire
#
From
To
Notes
1
Bridge pickup: Hot
Blend: middle lug of one gang
2
Neck pickup: Hot
Blend: middle lug of the other gang
3
Both pickups: Ground
Ground (back of the volume pot)
4
Blend: output lugs (joined)
Volume: Right lug
5
Blend: ground lugs (joined)
Ground (back of the volume pot)
6
Volume: Left lug
Volume casing
Jumper to ground
7
Volume: Middle lug
Volume switch: top-right lug
Passive signal
8
OBP-3 module: BLU (input)
Volume switch: middle-left lug
Common, pole 1
9
Volume switch: top-left lug
Ground
Grounds the preamp input in passive
10
Volume switch: bottom-left lug
Volume switch: top-right lug
Jumper
11
Volume switch: middle-right lug
Stereo jack: Tip
Common, pole 2
12
OBP-3 module: GRN (output)
Volume switch: bottom-right lug
13
OBP-3 module: BLK (ground)
Stereo jack: Sleeve (ground)
14
OBP-3 module: 9 EQ wires
Bass, mid and treble pots
See the EQ table
15
OBP-3 module: GRN/ORG, GRN/RED, YEL/WHT, ORG/WHT
Mid pot's push-pull switch
See the mid switch table
16
OBP-3 module: RED (+)
First battery +
17
First battery −
Second battery +
Two 9V in series (18V)
18
Second battery −
Stereo jack: Ring
Plugging in powers the preamp
19
Stereo jack: Sleeve
Cavity ground / shielding
OBP-3 EQ pots: which module wire goes on which lug (pots seen from the back, lugs up)
Pot
Left lug
Middle lug
Right lug
Bass 50K linear
BRN
GRY
VIO
Mid 50K linear
GRN/BRN
ORG/VIO
RED/BRN
Treble 50K linear
WHT
YEL
VIO/WHT
Push-pull switch on the mid pot (DPDT)
Switch
Wires
Result
Pole 1
GRN/ORG (middle row) and GRN/RED (top row)
Joined in one position
Pole 2
ORG/WHT (middle row) and YEL/WHT (top row)
Joined in the same position
Pairs joined
both poles closed
Mid centered at 400 Hz
Pairs apart
both poles open
Mid centered at 800 Hz
Step by step
Mount everything. Fit the pots and the stereo jack. Join the pot casings with a bare wire.
Pickups to the blend and volume. Bridge hot to the middle lug of one blend gang, neck hot to the middle lug of the other. Join one outer lug of each gang and run it to the volume's right lug; join the other two to ground. Volume left lug to the casing. Pickup grounds go to the back of the volume pot.
Push-pull active/passive. On the volume pot's switch: volume output to top-right, module BLU to middle-left, top-left to ground, and a jumper from bottom-left to top-right. Middle-right to the jack tip, module GRN to bottom-right. Pushed down, the preamp is on; pulled up, it is bypassed. If your pot works the other way round, swap the top and bottom wires on both sides.
EQ pots. Solder the module's nine EQ wires to the bass, mid and treble pots exactly as in the EQ table, left to right with the pots seen from the back, lugs up.
Push-pull mid. On the mid pot's push-pull switch: GRN/ORG and GRN/RED go to one pole, YEL/WHT and ORG/WHT to the other (common lugs in the middle row, the other wire on the row above). With each pair joined the mid is centered at 400 Hz; apart, 800 Hz.
Output and power. Module BLK to the jack sleeve and RED to battery +. Wire the two 9V batteries in series and run the free battery − to the jack ring, so plugging in turns the preamp on. Jack sleeve to the cavity shielding.
Test. Plug in at low volume and tap each pickup's pole pieces with a screwdriver. Turn every knob end to end, flip the active/passive switch and try both mid settings before closing the cavity.
Volume and blend values depend on the pickups: use what the pickup maker recommends.
9V or 18V both work: for one 9V battery, run its − to the jack ring.
Aguilar OBP-3 with push-pull A/P volume, blend, stacked bass/treble and mid switch
Push-pull volume for active/passive, a blend, stacked bass/treble, a mid pot and a mini switch for the mid frequency.
You need: OBP-3 module, dual 50K linear treble/bass stack, 50K linear mid pot, DPDT on-on mini switch for the mid, dual-audio blend pot, push-pull volume pot (DPDT) for active/passive, 2 x 9V batteries, stereo output jack.
Best Bass Gear's drawing, as originally published. Click to enlarge.Aguilar OBP-3 with push-pull A/P volume, blend, stacked bass/treble and mid switch, redrawn as a connection diagram.
Aguilar OBP-3 with push-pull A/P volume, blend, stacked bass/treble and mid switch: wire by wire
#
From
To
Notes
1
Bridge pickup: Hot
Blend: middle lug of one gang
2
Neck pickup: Hot
Blend: middle lug of the other gang
3
Both pickups: Ground
Ground (back of the volume pot)
4
Blend: output lugs (joined)
Volume: Right lug
5
Blend: ground lugs (joined)
Ground (back of the volume pot)
6
Volume: Left lug
Volume casing
Jumper to ground
7
Volume: Middle lug
Volume switch: top-right lug
Passive signal
8
OBP-3 module: BLU (input)
Volume switch: middle-left lug
Common, pole 1
9
Volume switch: top-left lug
Ground
Grounds the preamp input in passive
10
Volume switch: bottom-left lug
Volume switch: top-right lug
Jumper
11
Volume switch: middle-right lug
Stereo jack: Tip
Common, pole 2
12
OBP-3 module: GRN (output)
Volume switch: bottom-right lug
13
OBP-3 module: BLK (ground)
Stereo jack: Sleeve (ground)
14
OBP-3 module: 9 EQ wires
Bass, mid and treble pots
See the EQ table
15
OBP-3 module: GRN/ORG, GRN/RED, YEL/WHT, ORG/WHT
Mid switch
See the mid switch table
16
OBP-3 module: RED (+)
First battery +
17
First battery −
Second battery +
Two 9V in series (18V)
18
Second battery −
Stereo jack: Ring
Plugging in powers the preamp
19
Stereo jack: Sleeve
Cavity ground / shielding
OBP-3 EQ pots: which module wire goes on which lug (pots seen from the back, lugs up)
Pot
Left lug
Middle lug
Right lug
Treble/bass stack, bass deck (dual 50K linear)
BRN
GRY
VIO
Treble/bass stack, treble deck
WHT
YEL
VIO/WHT
Mid 50K linear
GRN/BRN
ORG/VIO
RED/BRN
Mid switch (DPDT on-on mini toggle)
Switch
Wires
Result
Pole 1
GRN/ORG (middle row) and GRN/RED (top row)
Joined in one position
Pole 2
ORG/WHT (middle row) and YEL/WHT (top row)
Joined in the same position
Pairs joined
both poles closed
Mid centered at 400 Hz
Pairs apart
both poles open
Mid centered at 800 Hz
Step by step
Mount everything. Fit the pots, the mini switch and the stereo jack. Join the pot casings with a bare wire.
Pickups to the blend and volume. Bridge hot to the middle lug of one blend gang, neck hot to the middle lug of the other. Join one outer lug of each gang and run it to the volume's right lug; join the other two to ground. Volume left lug to the casing. Pickup grounds go to the back of the volume pot.
Push-pull active/passive. On the volume pot's switch: volume output to top-right, module BLU to middle-left, top-left to ground, and a jumper from bottom-left to top-right. Middle-right to the jack tip, module GRN to bottom-right. Pushed down, the preamp is on; pulled up, it is bypassed. If your pot works the other way round, swap the top and bottom wires on both sides.
EQ pots. Solder the module's nine EQ wires to the bass, mid and treble pots exactly as in the EQ table, left to right with the pots seen from the back, lugs up.
Mid switch. On the mini switch: GRN/ORG and GRN/RED go to one pole, YEL/WHT and ORG/WHT to the other (common lugs in the middle row, the other wire on the row above). With each pair joined the mid is centered at 400 Hz; apart, 800 Hz.
Output and power. Module BLK to the jack sleeve and RED to battery +. Wire the two 9V batteries in series and run the free battery − to the jack ring, so plugging in turns the preamp on. Jack sleeve to the cavity shielding.
Test. Plug in at low volume and tap each pickup's pole pieces with a screwdriver. Turn every knob end to end, flip the active/passive switch and try both mid settings before closing the cavity.
Volume and blend values depend on the pickups: use what the pickup maker recommends.
9V or 18V both work: for one 9V battery, run its − to the jack ring.
Aguilar OBP-3 with push-pull A/P volume, blend, stacked bass/treble and push-pull mid
Four knobs, two push-pulls: the volume pulls for active/passive and the mid pulls for 400/800 Hz, with blend and a stacked bass/treble.
You need: OBP-3 module, dual 50K linear treble/bass stack, push-pull 50K linear pot for the mid (DPDT), dual-audio blend pot, push-pull volume pot (DPDT) for active/passive, 2 x 9V batteries, stereo output jack.
Best Bass Gear's drawing, as originally published. Click to enlarge.Aguilar OBP-3 with push-pull A/P volume, blend, stacked bass/treble and push-pull mid, redrawn as a connection diagram.
Aguilar OBP-3 with push-pull A/P volume, blend, stacked bass/treble and push-pull mid: wire by wire
#
From
To
Notes
1
Bridge pickup: Hot
Blend: middle lug of one gang
2
Neck pickup: Hot
Blend: middle lug of the other gang
3
Both pickups: Ground
Ground (back of the volume pot)
4
Blend: output lugs (joined)
Volume: Right lug
5
Blend: ground lugs (joined)
Ground (back of the volume pot)
6
Volume: Left lug
Volume casing
Jumper to ground
7
Volume: Middle lug
Volume switch: top-right lug
Passive signal
8
OBP-3 module: BLU (input)
Volume switch: middle-left lug
Common, pole 1
9
Volume switch: top-left lug
Ground
Grounds the preamp input in passive
10
Volume switch: bottom-left lug
Volume switch: top-right lug
Jumper
11
Volume switch: middle-right lug
Stereo jack: Tip
Common, pole 2
12
OBP-3 module: GRN (output)
Volume switch: bottom-right lug
13
OBP-3 module: BLK (ground)
Stereo jack: Sleeve (ground)
14
OBP-3 module: 9 EQ wires
Bass, mid and treble pots
See the EQ table
15
OBP-3 module: GRN/ORG, GRN/RED, YEL/WHT, ORG/WHT
Mid pot's push-pull switch
See the mid switch table
16
OBP-3 module: RED (+)
First battery +
17
First battery −
Second battery +
Two 9V in series (18V)
18
Second battery −
Stereo jack: Ring
Plugging in powers the preamp
19
Stereo jack: Sleeve
Cavity ground / shielding
OBP-3 EQ pots: which module wire goes on which lug (pots seen from the back, lugs up)
Pot
Left lug
Middle lug
Right lug
Treble/bass stack, bass deck (dual 50K linear)
BRN
GRY
VIO
Treble/bass stack, treble deck
WHT
YEL
VIO/WHT
Mid 50K linear
GRN/BRN
ORG/VIO
RED/BRN
Push-pull switch on the mid pot (DPDT)
Switch
Wires
Result
Pole 1
GRN/ORG (middle row) and GRN/RED (top row)
Joined in one position
Pole 2
ORG/WHT (middle row) and YEL/WHT (top row)
Joined in the same position
Pairs joined
both poles closed
Mid centered at 400 Hz
Pairs apart
both poles open
Mid centered at 800 Hz
Step by step
Mount everything. Fit the pots and the stereo jack. Join the pot casings with a bare wire.
Pickups to the blend and volume. Bridge hot to the middle lug of one blend gang, neck hot to the middle lug of the other. Join one outer lug of each gang and run it to the volume's right lug; join the other two to ground. Volume left lug to the casing. Pickup grounds go to the back of the volume pot.
Push-pull active/passive. On the volume pot's switch: volume output to top-right, module BLU to middle-left, top-left to ground, and a jumper from bottom-left to top-right. Middle-right to the jack tip, module GRN to bottom-right. Pushed down, the preamp is on; pulled up, it is bypassed. If your pot works the other way round, swap the top and bottom wires on both sides.
EQ pots. Solder the module's nine EQ wires to the bass, mid and treble pots exactly as in the EQ table, left to right with the pots seen from the back, lugs up.
Push-pull mid. On the mid pot's push-pull switch: GRN/ORG and GRN/RED go to one pole, YEL/WHT and ORG/WHT to the other (common lugs in the middle row, the other wire on the row above). With each pair joined the mid is centered at 400 Hz; apart, 800 Hz.
Output and power. Module BLK to the jack sleeve and RED to battery +. Wire the two 9V batteries in series and run the free battery − to the jack ring, so plugging in turns the preamp on. Jack sleeve to the cavity shielding.
Test. Plug in at low volume and tap each pickup's pole pieces with a screwdriver. Turn every knob end to end, flip the active/passive switch and try both mid settings before closing the cavity.
Volume and blend values depend on the pickups: use what the pickup maker recommends.
9V or 18V both work: for one 9V battery, run its − to the jack ring.
Aguilar OBP-3 with two volumes and push-pull mid
A volume for each pickup (Jazz Bass style), separate bass, mid and treble pots, and a push-pull mid for 400/800 Hz.
You need: OBP-3 module, 2 pots 50K linear: bass, treble, push-pull 50K linear pot for the mid (DPDT), 2 volume pots (value to suit the pickups), 2 x 9V batteries, stereo output jack.
Best Bass Gear's drawing, as originally published. Click to enlarge.Aguilar OBP-3 with two volumes and push-pull mid, redrawn as a connection diagram.
Aguilar OBP-3 with two volumes and push-pull mid: wire by wire
#
From
To
Notes
1
Pickup 1: Hot
Volume 1: Middle lug
2
Pickup 2: Hot
Volume 2: Middle lug
3
Both pickups: Ground
Ground (back of the volume pot)
4
Volume 1: Right lug
Volume 2: Right lug
Joined: this is the output
5
Volume 1 and 2: Left lugs
Their own casings
Jumpered; casings joined to ground
6
Both volumes: Right lugs (joined)
OBP-3 module: BLU (input)
7
OBP-3 module: GRN (output)
Stereo jack: Tip
Preamp output
8
OBP-3 module: BLK (ground)
Stereo jack: Sleeve (ground)
9
OBP-3 module: 9 EQ wires
Bass, mid and treble pots
See the EQ table
10
OBP-3 module: GRN/ORG, GRN/RED, YEL/WHT, ORG/WHT
Mid pot's push-pull switch
See the mid switch table
11
OBP-3 module: RED (+)
First battery +
12
First battery −
Second battery +
Two 9V in series (18V)
13
Second battery −
Stereo jack: Ring
Plugging in powers the preamp
14
Stereo jack: Sleeve
Cavity ground / shielding
OBP-3 EQ pots: which module wire goes on which lug (pots seen from the back, lugs up)
Pot
Left lug
Middle lug
Right lug
Bass 50K linear
BRN
GRY
VIO
Mid 50K linear
GRN/BRN
ORG/VIO
RED/BRN
Treble 50K linear
WHT
YEL
VIO/WHT
Push-pull switch on the mid pot (DPDT)
Switch
Wires
Result
Pole 1
GRN/ORG (middle row) and GRN/RED (top row)
Joined in one position
Pole 2
ORG/WHT (middle row) and YEL/WHT (top row)
Joined in the same position
Pairs joined
both poles closed
Mid centered at 400 Hz
Pairs apart
both poles open
Mid centered at 800 Hz
Step by step
Mount everything. Fit the pots and the stereo jack. Join the pot casings with a bare wire.
Pickups to the volumes. Pickup 1 hot to the middle lug of volume 1, pickup 2 hot to the middle lug of volume 2. Join the two right lugs: that pair is the output. Jumper each left lug to its casing and join the casings. Pickup grounds to the back of a volume pot.
Volume to the module. Both volumes right lugs (joined) to the module's BLU wire.
EQ pots. Solder the module's nine EQ wires to the bass, mid and treble pots exactly as in the EQ table, left to right with the pots seen from the back, lugs up.
Push-pull mid. On the mid pot's push-pull switch: GRN/ORG and GRN/RED go to one pole, YEL/WHT and ORG/WHT to the other (common lugs in the middle row, the other wire on the row above). With each pair joined the mid is centered at 400 Hz; apart, 800 Hz.
Output and power. Module GRN to the jack tip. Module BLK to the jack sleeve and RED to battery +. Wire the two 9V batteries in series and run the free battery − to the jack ring, so plugging in turns the preamp on. Jack sleeve to the cavity shielding.
Test. Plug in at low volume and tap each pickup's pole pieces with a screwdriver. Turn every knob end to end and try both mid settings before closing the cavity.
Volume and blend values depend on the pickups: use what the pickup maker recommends.
9V or 18V both work: for one 9V battery, run its − to the jack ring.
Aguilar OBP-3 with two volumes, push-pull mid and A/P switch
Two volumes, separate bass, mid and treble pots, a push-pull mid and a mini switch for active/passive.
You need: OBP-3 module, 2 pots 50K linear: bass, treble, push-pull 50K linear pot for the mid (DPDT), 2 volume pots (value to suit the pickups), DPDT on-on mini switch for active/passive, 2 x 9V batteries, stereo output jack.
Best Bass Gear's drawing, as originally published. Click to enlarge.Aguilar OBP-3 with two volumes, push-pull mid and A/P switch, redrawn as a connection diagram.
Aguilar OBP-3 with two volumes, push-pull mid and A/P switch: wire by wire
#
From
To
Notes
1
Pickup 1: Hot
Volume 1: Middle lug
2
Pickup 2: Hot
Volume 2: Middle lug
3
Both pickups: Ground
Ground (back of the volume pot)
4
Volume 1: Right lug
Volume 2: Right lug
Joined: this is the output
5
Volume 1 and 2: Left lugs
Their own casings
Jumpered; casings joined to ground
6
Both volumes: Right lugs (joined)
A/P switch: top-left lug
Passive signal
7
OBP-3 module: BLU (input)
A/P switch: middle-left lug
Common, pole 1
8
A/P switch: bottom-left lug
Ground
Grounds the preamp input in passive
9
OBP-3 module: GRN (output)
A/P switch: top-right lug
10
A/P switch: middle-right lug
Stereo jack: Tip
Common, pole 2
11
A/P switch: bottom-right lug
A/P switch: top-left lug
Jumper: passive signal to the tip
12
OBP-3 module: BLK (ground)
Stereo jack: Sleeve (ground)
13
OBP-3 module: 9 EQ wires
Bass, mid and treble pots
See the EQ table
14
OBP-3 module: GRN/ORG, GRN/RED, YEL/WHT, ORG/WHT
Mid pot's push-pull switch
See the mid switch table
15
OBP-3 module: RED (+)
First battery +
16
First battery −
Second battery +
Two 9V in series (18V)
17
Second battery −
Stereo jack: Ring
Plugging in powers the preamp
18
Stereo jack: Sleeve
Cavity ground / shielding
OBP-3 EQ pots: which module wire goes on which lug (pots seen from the back, lugs up)
Pot
Left lug
Middle lug
Right lug
Bass 50K linear
BRN
GRY
VIO
Mid 50K linear
GRN/BRN
ORG/VIO
RED/BRN
Treble 50K linear
WHT
YEL
VIO/WHT
Push-pull switch on the mid pot (DPDT)
Switch
Wires
Result
Pole 1
GRN/ORG (middle row) and GRN/RED (top row)
Joined in one position
Pole 2
ORG/WHT (middle row) and YEL/WHT (top row)
Joined in the same position
Pairs joined
both poles closed
Mid centered at 400 Hz
Pairs apart
both poles open
Mid centered at 800 Hz
Step by step
Mount everything. Fit the pots, the mini switch and the stereo jack. Join the pot casings with a bare wire.
Pickups to the volumes. Pickup 1 hot to the middle lug of volume 1, pickup 2 hot to the middle lug of volume 2. Join the two right lugs: that pair is the output. Jumper each left lug to its casing and join the casings. Pickup grounds to the back of a volume pot.
Active/passive switch. Volume output to the top-left lug, module BLU to middle-left, bottom-left to ground. Module GRN to top-right, middle-right to the jack tip, and a jumper from bottom-right to top-left. Active: the signal runs through the preamp. Passive: the preamp input is grounded and the volume output goes straight to the tip.
EQ pots. Solder the module's nine EQ wires to the bass, mid and treble pots exactly as in the EQ table, left to right with the pots seen from the back, lugs up.
Push-pull mid. On the mid pot's push-pull switch: GRN/ORG and GRN/RED go to one pole, YEL/WHT and ORG/WHT to the other (common lugs in the middle row, the other wire on the row above). With each pair joined the mid is centered at 400 Hz; apart, 800 Hz.
Output and power. Module BLK to the jack sleeve and RED to battery +. Wire the two 9V batteries in series and run the free battery − to the jack ring, so plugging in turns the preamp on. Jack sleeve to the cavity shielding.
Test. Plug in at low volume and tap each pickup's pole pieces with a screwdriver. Turn every knob end to end, flip the active/passive switch and try both mid settings before closing the cavity.
Volume and blend values depend on the pickups: use what the pickup maker recommends.
9V or 18V both work: for one 9V battery, run its − to the jack ring.
Aguilar OBP-3 with two volumes, stacked bass/treble and push-pull mid
Two volumes, bass and treble on one stacked pot, and a push-pull mid: four knobs for a stock J-style control plate.
You need: OBP-3 module, dual 50K linear treble/bass stack, push-pull 50K linear pot for the mid (DPDT), 2 volume pots (value to suit the pickups), 2 x 9V batteries, stereo output jack.
Best Bass Gear's drawing, as originally published. Click to enlarge.Aguilar OBP-3 with two volumes, stacked bass/treble and push-pull mid, redrawn as a connection diagram.
Aguilar OBP-3 with two volumes, stacked bass/treble and push-pull mid: wire by wire
#
From
To
Notes
1
Pickup 1: Hot
Volume 1: Middle lug
2
Pickup 2: Hot
Volume 2: Middle lug
3
Both pickups: Ground
Ground (back of the volume pot)
4
Volume 1: Right lug
Volume 2: Right lug
Joined: this is the output
5
Volume 1 and 2: Left lugs
Their own casings
Jumpered; casings joined to ground
6
Both volumes: Right lugs (joined)
OBP-3 module: BLU (input)
7
OBP-3 module: GRN (output)
Stereo jack: Tip
Preamp output
8
OBP-3 module: BLK (ground)
Stereo jack: Sleeve (ground)
9
OBP-3 module: 9 EQ wires
Bass, mid and treble pots
See the EQ table
10
OBP-3 module: GRN/ORG, GRN/RED, YEL/WHT, ORG/WHT
Mid pot's push-pull switch
See the mid switch table
11
OBP-3 module: RED (+)
First battery +
12
First battery −
Second battery +
Two 9V in series (18V)
13
Second battery −
Stereo jack: Ring
Plugging in powers the preamp
14
Stereo jack: Sleeve
Cavity ground / shielding
OBP-3 EQ pots: which module wire goes on which lug (pots seen from the back, lugs up)
Pot
Left lug
Middle lug
Right lug
Treble/bass stack, bass deck (dual 50K linear)
BRN
GRY
VIO
Treble/bass stack, treble deck
WHT
YEL
VIO/WHT
Mid 50K linear
GRN/BRN
ORG/VIO
RED/BRN
Push-pull switch on the mid pot (DPDT)
Switch
Wires
Result
Pole 1
GRN/ORG (middle row) and GRN/RED (top row)
Joined in one position
Pole 2
ORG/WHT (middle row) and YEL/WHT (top row)
Joined in the same position
Pairs joined
both poles closed
Mid centered at 400 Hz
Pairs apart
both poles open
Mid centered at 800 Hz
Step by step
Mount everything. Fit the pots and the stereo jack. Join the pot casings with a bare wire.
Pickups to the volumes. Pickup 1 hot to the middle lug of volume 1, pickup 2 hot to the middle lug of volume 2. Join the two right lugs: that pair is the output. Jumper each left lug to its casing and join the casings. Pickup grounds to the back of a volume pot.
Volume to the module. Both volumes right lugs (joined) to the module's BLU wire.
EQ pots. Solder the module's nine EQ wires to the bass, mid and treble pots exactly as in the EQ table, left to right with the pots seen from the back, lugs up.
Push-pull mid. On the mid pot's push-pull switch: GRN/ORG and GRN/RED go to one pole, YEL/WHT and ORG/WHT to the other (common lugs in the middle row, the other wire on the row above). With each pair joined the mid is centered at 400 Hz; apart, 800 Hz.
Output and power. Module GRN to the jack tip. Module BLK to the jack sleeve and RED to battery +. Wire the two 9V batteries in series and run the free battery − to the jack ring, so plugging in turns the preamp on. Jack sleeve to the cavity shielding.
Test. Plug in at low volume and tap each pickup's pole pieces with a screwdriver. Turn every knob end to end and try both mid settings before closing the cavity.
Volume and blend values depend on the pickups: use what the pickup maker recommends.
9V or 18V both work: for one 9V battery, run its − to the jack ring.
Aguilar OBP-3 with two volumes, stacked bass/treble and mid switch
Two volumes, stacked bass/treble, a mid pot and a mini switch for the 400/800 Hz mid.
You need: OBP-3 module, dual 50K linear treble/bass stack, 50K linear mid pot, DPDT on-on mini switch for the mid, 2 volume pots (value to suit the pickups), 2 x 9V batteries, stereo output jack.
Best Bass Gear's drawing, as originally published. Click to enlarge.Aguilar OBP-3 with two volumes, stacked bass/treble and mid switch, redrawn as a connection diagram.
Aguilar OBP-3 with two volumes, stacked bass/treble and mid switch: wire by wire
#
From
To
Notes
1
Pickup 1: Hot
Volume 1: Middle lug
2
Pickup 2: Hot
Volume 2: Middle lug
3
Both pickups: Ground
Ground (back of the volume pot)
4
Volume 1: Right lug
Volume 2: Right lug
Joined: this is the output
5
Volume 1 and 2: Left lugs
Their own casings
Jumpered; casings joined to ground
6
Both volumes: Right lugs (joined)
OBP-3 module: BLU (input)
7
OBP-3 module: GRN (output)
Stereo jack: Tip
Preamp output
8
OBP-3 module: BLK (ground)
Stereo jack: Sleeve (ground)
9
OBP-3 module: 9 EQ wires
Bass, mid and treble pots
See the EQ table
10
OBP-3 module: GRN/ORG, GRN/RED, YEL/WHT, ORG/WHT
Mid switch
See the mid switch table
11
OBP-3 module: RED (+)
First battery +
12
First battery −
Second battery +
Two 9V in series (18V)
13
Second battery −
Stereo jack: Ring
Plugging in powers the preamp
14
Stereo jack: Sleeve
Cavity ground / shielding
OBP-3 EQ pots: which module wire goes on which lug (pots seen from the back, lugs up)
Pot
Left lug
Middle lug
Right lug
Treble/bass stack, bass deck (dual 50K linear)
BRN
GRY
VIO
Treble/bass stack, treble deck
WHT
YEL
VIO/WHT
Mid 50K linear
GRN/BRN
ORG/VIO
RED/BRN
Mid switch (DPDT on-on mini toggle)
Switch
Wires
Result
Pole 1
GRN/ORG (middle row) and GRN/RED (top row)
Joined in one position
Pole 2
ORG/WHT (middle row) and YEL/WHT (top row)
Joined in the same position
Pairs joined
both poles closed
Mid centered at 400 Hz
Pairs apart
both poles open
Mid centered at 800 Hz
Step by step
Mount everything. Fit the pots, the mini switch and the stereo jack. Join the pot casings with a bare wire.
Pickups to the volumes. Pickup 1 hot to the middle lug of volume 1, pickup 2 hot to the middle lug of volume 2. Join the two right lugs: that pair is the output. Jumper each left lug to its casing and join the casings. Pickup grounds to the back of a volume pot.
Volume to the module. Both volumes right lugs (joined) to the module's BLU wire.
EQ pots. Solder the module's nine EQ wires to the bass, mid and treble pots exactly as in the EQ table, left to right with the pots seen from the back, lugs up.
Mid switch. On the mini switch: GRN/ORG and GRN/RED go to one pole, YEL/WHT and ORG/WHT to the other (common lugs in the middle row, the other wire on the row above). With each pair joined the mid is centered at 400 Hz; apart, 800 Hz.
Output and power. Module GRN to the jack tip. Module BLK to the jack sleeve and RED to battery +. Wire the two 9V batteries in series and run the free battery − to the jack ring, so plugging in turns the preamp on. Jack sleeve to the cavity shielding.
Test. Plug in at low volume and tap each pickup's pole pieces with a screwdriver. Turn every knob end to end and try both mid settings before closing the cavity.
Volume and blend values depend on the pickups: use what the pickup maker recommends.
9V or 18V both work: for one 9V battery, run its − to the jack ring.
Aguilar OBP-3 with two volumes, stacked bass/treble, mid switch and A/P switch
Two volumes, stacked bass/treble and a mid pot, plus two mini switches: mid frequency and active/passive.
You need: OBP-3 module, dual 50K linear treble/bass stack, 50K linear mid pot, DPDT on-on mini switch for the mid, 2 volume pots (value to suit the pickups), DPDT on-on mini switch for active/passive, 2 x 9V batteries, stereo output jack.
Best Bass Gear's drawing, as originally published. Click to enlarge.Aguilar OBP-3 with two volumes, stacked bass/treble, mid switch and A/P switch, redrawn as a connection diagram.
Aguilar OBP-3 with two volumes, stacked bass/treble, mid switch and A/P switch: wire by wire
#
From
To
Notes
1
Pickup 1: Hot
Volume 1: Middle lug
2
Pickup 2: Hot
Volume 2: Middle lug
3
Both pickups: Ground
Ground (back of the volume pot)
4
Volume 1: Right lug
Volume 2: Right lug
Joined: this is the output
5
Volume 1 and 2: Left lugs
Their own casings
Jumpered; casings joined to ground
6
Both volumes: Right lugs (joined)
A/P switch: top-left lug
Passive signal
7
OBP-3 module: BLU (input)
A/P switch: middle-left lug
Common, pole 1
8
A/P switch: bottom-left lug
Ground
Grounds the preamp input in passive
9
OBP-3 module: GRN (output)
A/P switch: top-right lug
10
A/P switch: middle-right lug
Stereo jack: Tip
Common, pole 2
11
A/P switch: bottom-right lug
A/P switch: top-left lug
Jumper: passive signal to the tip
12
OBP-3 module: BLK (ground)
Stereo jack: Sleeve (ground)
13
OBP-3 module: 9 EQ wires
Bass, mid and treble pots
See the EQ table
14
OBP-3 module: GRN/ORG, GRN/RED, YEL/WHT, ORG/WHT
Mid switch
See the mid switch table
15
OBP-3 module: RED (+)
First battery +
16
First battery −
Second battery +
Two 9V in series (18V)
17
Second battery −
Stereo jack: Ring
Plugging in powers the preamp
18
Stereo jack: Sleeve
Cavity ground / shielding
OBP-3 EQ pots: which module wire goes on which lug (pots seen from the back, lugs up)
Pot
Left lug
Middle lug
Right lug
Treble/bass stack, bass deck (dual 50K linear)
BRN
GRY
VIO
Treble/bass stack, treble deck
WHT
YEL
VIO/WHT
Mid 50K linear
GRN/BRN
ORG/VIO
RED/BRN
Mid switch (DPDT on-on mini toggle)
Switch
Wires
Result
Pole 1
GRN/ORG (middle row) and GRN/RED (top row)
Joined in one position
Pole 2
ORG/WHT (middle row) and YEL/WHT (top row)
Joined in the same position
Pairs joined
both poles closed
Mid centered at 400 Hz
Pairs apart
both poles open
Mid centered at 800 Hz
Step by step
Mount everything. Fit the pots, both mini switches and the stereo jack. Join the pot casings with a bare wire.
Pickups to the volumes. Pickup 1 hot to the middle lug of volume 1, pickup 2 hot to the middle lug of volume 2. Join the two right lugs: that pair is the output. Jumper each left lug to its casing and join the casings. Pickup grounds to the back of a volume pot.
Active/passive switch. Volume output to the top-left lug, module BLU to middle-left, bottom-left to ground. Module GRN to top-right, middle-right to the jack tip, and a jumper from bottom-right to top-left. Active: the signal runs through the preamp. Passive: the preamp input is grounded and the volume output goes straight to the tip.
EQ pots. Solder the module's nine EQ wires to the bass, mid and treble pots exactly as in the EQ table, left to right with the pots seen from the back, lugs up.
Mid switch. On the mini switch: GRN/ORG and GRN/RED go to one pole, YEL/WHT and ORG/WHT to the other (common lugs in the middle row, the other wire on the row above). With each pair joined the mid is centered at 400 Hz; apart, 800 Hz.
Output and power. Module BLK to the jack sleeve and RED to battery +. Wire the two 9V batteries in series and run the free battery − to the jack ring, so plugging in turns the preamp on. Jack sleeve to the cavity shielding.
Test. Plug in at low volume and tap each pickup's pole pieces with a screwdriver. Turn every knob end to end, flip the active/passive switch and try both mid settings before closing the cavity.
Volume and blend values depend on the pickups: use what the pickup maker recommends.
9V or 18V both work: for one 9V battery, run its − to the jack ring.
Aguilar OBP-3 with stacked volumes, stacked bass/treble and push-pull mid
Three knobs for two pickups: a volume/volume stack, a bass/treble stack, and a push-pull mid for 400/800 Hz. Good for three-hole Jazz Bass plates.
You need: OBP-3 module, dual 50K linear treble/bass stack, push-pull 50K linear pot for the mid (DPDT), dual concentric volume pot (value to suit the pickups), 2 x 9V batteries, stereo output jack.
Best Bass Gear's drawing, as originally published. Click to enlarge.Aguilar OBP-3 with stacked volumes, stacked bass/treble and push-pull mid, redrawn as a connection diagram.
Aguilar OBP-3 with stacked volumes, stacked bass/treble and push-pull mid: wire by wire
#
From
To
Notes
1
Pickup 1: Hot
Volume stack, upper deck: Middle lug
2
Pickup 2: Hot
Volume stack, lower deck: Middle lug
3
Both pickups: Ground
Ground (back of the volume pot)
4
Upper deck: Right lug
Lower deck: Right lug
Joined: this is the output
5
Upper and lower deck: Left lugs
Pot casing
Jumpered to ground
6
Volume stack: Right lugs (joined)
OBP-3 module: BLU (input)
7
OBP-3 module: GRN (output)
Stereo jack: Tip
Preamp output
8
OBP-3 module: BLK (ground)
Stereo jack: Sleeve (ground)
9
OBP-3 module: 9 EQ wires
Bass, mid and treble pots
See the EQ table
10
OBP-3 module: GRN/ORG, GRN/RED, YEL/WHT, ORG/WHT
Mid pot's push-pull switch
See the mid switch table
11
OBP-3 module: RED (+)
First battery +
12
First battery −
Second battery +
Two 9V in series (18V)
13
Second battery −
Stereo jack: Ring
Plugging in powers the preamp
14
Stereo jack: Sleeve
Cavity ground / shielding
OBP-3 EQ pots: which module wire goes on which lug (pots seen from the back, lugs up)
Pot
Left lug
Middle lug
Right lug
Treble/bass stack, bass deck (dual 50K linear)
BRN
GRY
VIO
Treble/bass stack, treble deck
WHT
YEL
VIO/WHT
Mid 50K linear
GRN/BRN
ORG/VIO
RED/BRN
Push-pull switch on the mid pot (DPDT)
Switch
Wires
Result
Pole 1
GRN/ORG (middle row) and GRN/RED (top row)
Joined in one position
Pole 2
ORG/WHT (middle row) and YEL/WHT (top row)
Joined in the same position
Pairs joined
both poles closed
Mid centered at 400 Hz
Pairs apart
both poles open
Mid centered at 800 Hz
Step by step
Mount everything. Fit the pots and the stereo jack. Join the pot casings with a bare wire.
Pickups to the stacked volume. Pickup 1 hot to the middle lug of one deck, pickup 2 hot to the middle lug of the other. Join the two right lugs: that is the output. Jumper both left lugs to the casing. Pickup grounds to the back of the pot.
Volume to the module. Volume stack right lugs (joined) to the module's BLU wire.
EQ pots. Solder the module's nine EQ wires to the bass, mid and treble pots exactly as in the EQ table, left to right with the pots seen from the back, lugs up.
Push-pull mid. On the mid pot's push-pull switch: GRN/ORG and GRN/RED go to one pole, YEL/WHT and ORG/WHT to the other (common lugs in the middle row, the other wire on the row above). With each pair joined the mid is centered at 400 Hz; apart, 800 Hz.
Output and power. Module GRN to the jack tip. Module BLK to the jack sleeve and RED to battery +. Wire the two 9V batteries in series and run the free battery − to the jack ring, so plugging in turns the preamp on. Jack sleeve to the cavity shielding.
Test. Plug in at low volume and tap each pickup's pole pieces with a screwdriver. Turn every knob end to end and try both mid settings before closing the cavity.
Volume and blend values depend on the pickups: use what the pickup maker recommends.
9V or 18V both work: for one 9V battery, run its − to the jack ring.
Aguilar OBP-3 with stacked volumes, stacked bass/treble and mid switch
Volume/volume stack, bass/treble stack and a mid pot, with the 400/800 Hz mid on a mini switch.
You need: OBP-3 module, dual 50K linear treble/bass stack, 50K linear mid pot, DPDT on-on mini switch for the mid, dual concentric volume pot (value to suit the pickups), 2 x 9V batteries, stereo output jack.
Best Bass Gear's drawing, as originally published. Click to enlarge.Aguilar OBP-3 with stacked volumes, stacked bass/treble and mid switch, redrawn as a connection diagram.
Aguilar OBP-3 with stacked volumes, stacked bass/treble and mid switch: wire by wire
#
From
To
Notes
1
Pickup 1: Hot
Volume stack, upper deck: Middle lug
2
Pickup 2: Hot
Volume stack, lower deck: Middle lug
3
Both pickups: Ground
Ground (back of the volume pot)
4
Upper deck: Right lug
Lower deck: Right lug
Joined: this is the output
5
Upper and lower deck: Left lugs
Pot casing
Jumpered to ground
6
Volume stack: Right lugs (joined)
OBP-3 module: BLU (input)
7
OBP-3 module: GRN (output)
Stereo jack: Tip
Preamp output
8
OBP-3 module: BLK (ground)
Stereo jack: Sleeve (ground)
9
OBP-3 module: 9 EQ wires
Bass, mid and treble pots
See the EQ table
10
OBP-3 module: GRN/ORG, GRN/RED, YEL/WHT, ORG/WHT
Mid switch
See the mid switch table
11
OBP-3 module: RED (+)
First battery +
12
First battery −
Second battery +
Two 9V in series (18V)
13
Second battery −
Stereo jack: Ring
Plugging in powers the preamp
14
Stereo jack: Sleeve
Cavity ground / shielding
OBP-3 EQ pots: which module wire goes on which lug (pots seen from the back, lugs up)
Pot
Left lug
Middle lug
Right lug
Treble/bass stack, bass deck (dual 50K linear)
BRN
GRY
VIO
Treble/bass stack, treble deck
WHT
YEL
VIO/WHT
Mid 50K linear
GRN/BRN
ORG/VIO
RED/BRN
Mid switch (DPDT on-on mini toggle)
Switch
Wires
Result
Pole 1
GRN/ORG (middle row) and GRN/RED (top row)
Joined in one position
Pole 2
ORG/WHT (middle row) and YEL/WHT (top row)
Joined in the same position
Pairs joined
both poles closed
Mid centered at 400 Hz
Pairs apart
both poles open
Mid centered at 800 Hz
Step by step
Mount everything. Fit the pots, the mini switch and the stereo jack. Join the pot casings with a bare wire.
Pickups to the stacked volume. Pickup 1 hot to the middle lug of one deck, pickup 2 hot to the middle lug of the other. Join the two right lugs: that is the output. Jumper both left lugs to the casing. Pickup grounds to the back of the pot.
Volume to the module. Volume stack right lugs (joined) to the module's BLU wire.
EQ pots. Solder the module's nine EQ wires to the bass, mid and treble pots exactly as in the EQ table, left to right with the pots seen from the back, lugs up.
Mid switch. On the mini switch: GRN/ORG and GRN/RED go to one pole, YEL/WHT and ORG/WHT to the other (common lugs in the middle row, the other wire on the row above). With each pair joined the mid is centered at 400 Hz; apart, 800 Hz.
Output and power. Module GRN to the jack tip. Module BLK to the jack sleeve and RED to battery +. Wire the two 9V batteries in series and run the free battery − to the jack ring, so plugging in turns the preamp on. Jack sleeve to the cavity shielding.
Test. Plug in at low volume and tap each pickup's pole pieces with a screwdriver. Turn every knob end to end and try both mid settings before closing the cavity.
Volume and blend values depend on the pickups: use what the pickup maker recommends.
9V or 18V both work: for one 9V battery, run its − to the jack ring.
Aguilar OBP-3 with stacked volumes, stacked bass/treble, mid switch and A/P switch
Volume/volume stack, bass/treble stack, mid pot, and two mini switches for mid frequency and active/passive.
You need: OBP-3 module, dual 50K linear treble/bass stack, 50K linear mid pot, DPDT on-on mini switch for the mid, dual concentric volume pot (value to suit the pickups), DPDT on-on mini switch for active/passive, 2 x 9V batteries, stereo output jack.
Best Bass Gear's drawing, as originally published. Click to enlarge.Aguilar OBP-3 with stacked volumes, stacked bass/treble, mid switch and A/P switch, redrawn as a connection diagram.
Aguilar OBP-3 with stacked volumes, stacked bass/treble, mid switch and A/P switch: wire by wire
#
From
To
Notes
1
Pickup 1: Hot
Volume stack, upper deck: Middle lug
2
Pickup 2: Hot
Volume stack, lower deck: Middle lug
3
Both pickups: Ground
Ground (back of the volume pot)
4
Upper deck: Right lug
Lower deck: Right lug
Joined: this is the output
5
Upper and lower deck: Left lugs
Pot casing
Jumpered to ground
6
Volume stack: Right lugs (joined)
A/P switch: top-left lug
Passive signal
7
OBP-3 module: BLU (input)
A/P switch: middle-left lug
Common, pole 1
8
A/P switch: bottom-left lug
Ground
Grounds the preamp input in passive
9
OBP-3 module: GRN (output)
A/P switch: top-right lug
10
A/P switch: middle-right lug
Stereo jack: Tip
Common, pole 2
11
A/P switch: bottom-right lug
A/P switch: top-left lug
Jumper: passive signal to the tip
12
OBP-3 module: BLK (ground)
Stereo jack: Sleeve (ground)
13
OBP-3 module: 9 EQ wires
Bass, mid and treble pots
See the EQ table
14
OBP-3 module: GRN/ORG, GRN/RED, YEL/WHT, ORG/WHT
Mid switch
See the mid switch table
15
OBP-3 module: RED (+)
First battery +
16
First battery −
Second battery +
Two 9V in series (18V)
17
Second battery −
Stereo jack: Ring
Plugging in powers the preamp
18
Stereo jack: Sleeve
Cavity ground / shielding
OBP-3 EQ pots: which module wire goes on which lug (pots seen from the back, lugs up)
Pot
Left lug
Middle lug
Right lug
Treble/bass stack, bass deck (dual 50K linear)
BRN
GRY
VIO
Treble/bass stack, treble deck
WHT
YEL
VIO/WHT
Mid 50K linear
GRN/BRN
ORG/VIO
RED/BRN
Mid switch (DPDT on-on mini toggle)
Switch
Wires
Result
Pole 1
GRN/ORG (middle row) and GRN/RED (top row)
Joined in one position
Pole 2
ORG/WHT (middle row) and YEL/WHT (top row)
Joined in the same position
Pairs joined
both poles closed
Mid centered at 400 Hz
Pairs apart
both poles open
Mid centered at 800 Hz
Step by step
Mount everything. Fit the pots, both mini switches and the stereo jack. Join the pot casings with a bare wire.
Pickups to the stacked volume. Pickup 1 hot to the middle lug of one deck, pickup 2 hot to the middle lug of the other. Join the two right lugs: that is the output. Jumper both left lugs to the casing. Pickup grounds to the back of the pot.
Active/passive switch. Volume output to the top-left lug, module BLU to middle-left, bottom-left to ground. Module GRN to top-right, middle-right to the jack tip, and a jumper from bottom-right to top-left. Active: the signal runs through the preamp. Passive: the preamp input is grounded and the volume output goes straight to the tip.
EQ pots. Solder the module's nine EQ wires to the bass, mid and treble pots exactly as in the EQ table, left to right with the pots seen from the back, lugs up.
Mid switch. On the mini switch: GRN/ORG and GRN/RED go to one pole, YEL/WHT and ORG/WHT to the other (common lugs in the middle row, the other wire on the row above). With each pair joined the mid is centered at 400 Hz; apart, 800 Hz.
Output and power. Module BLK to the jack sleeve and RED to battery +. Wire the two 9V batteries in series and run the free battery − to the jack ring, so plugging in turns the preamp on. Jack sleeve to the cavity shielding.
Test. Plug in at low volume and tap each pickup's pole pieces with a screwdriver. Turn every knob end to end, flip the active/passive switch and try both mid settings before closing the cavity.
The drawing's title line was copied from the two-volume version; the drawing itself shows a volume/volume stack, which is what this table follows.
Volume and blend values depend on the pickups: use what the pickup maker recommends.
9V or 18V both work: for one 9V battery, run its − to the jack ring.
Aguilar OBP-3 with one pickup: volume, treble, mid, bass and mid switch
One pickup (P-Bass, Music Man style or a single soapbar) into a volume, then separate treble, mid and bass and a 400/800 Hz mid switch.
You need: OBP-3 module, 2 pots 50K linear: bass, treble, 50K linear mid pot, DPDT on-on mini switch for the mid, volume pot (value to suit the pickup), 2 x 9V batteries, stereo output jack.
Best Bass Gear's drawing, as originally published. Click to enlarge.Aguilar OBP-3 with one pickup: volume, treble, mid, bass and mid switch, redrawn as a connection diagram.
Aguilar OBP-3 with one pickup: volume, treble, mid, bass and mid switch: wire by wire
#
From
To
Notes
1
Pickup: Hot
Volume: Middle lug
2
Pickup: Ground
Ground (back of the volume pot)
3
Volume: Left lug
Volume casing
Jumper to ground
4
Volume: Right lug
OBP-3 module: BLU (input)
5
OBP-3 module: GRN (output)
Stereo jack: Tip
Preamp output
6
OBP-3 module: BLK (ground)
Stereo jack: Sleeve (ground)
7
OBP-3 module: 9 EQ wires
Bass, mid and treble pots
See the EQ table
8
OBP-3 module: GRN/ORG, GRN/RED, YEL/WHT, ORG/WHT
Mid switch
See the mid switch table
9
OBP-3 module: RED (+)
First battery +
10
First battery −
Second battery +
Two 9V in series (18V)
11
Second battery −
Stereo jack: Ring
Plugging in powers the preamp
12
Stereo jack: Sleeve
Cavity ground / shielding
OBP-3 EQ pots: which module wire goes on which lug (pots seen from the back, lugs up)
Pot
Left lug
Middle lug
Right lug
Bass 50K linear
BRN
GRY
VIO
Mid 50K linear
GRN/BRN
ORG/VIO
RED/BRN
Treble 50K linear
WHT
YEL
VIO/WHT
Mid switch (DPDT on-on mini toggle)
Switch
Wires
Result
Pole 1
GRN/ORG (middle row) and GRN/RED (top row)
Joined in one position
Pole 2
ORG/WHT (middle row) and YEL/WHT (top row)
Joined in the same position
Pairs joined
both poles closed
Mid centered at 400 Hz
Pairs apart
both poles open
Mid centered at 800 Hz
Step by step
Mount everything. Fit the pots, the mini switch and the stereo jack. Join the pot casings with a bare wire.
Pickup to the volume. Pickup hot to the volume's middle lug and pickup ground to the back of the pot. Jumper the left lug to the casing. In this drawing the right lug is the output.
Volume to the module. Volume right lug to the module's BLU wire.
EQ pots. Solder the module's nine EQ wires to the bass, mid and treble pots exactly as in the EQ table, left to right with the pots seen from the back, lugs up.
Mid switch. On the mini switch: GRN/ORG and GRN/RED go to one pole, YEL/WHT and ORG/WHT to the other (common lugs in the middle row, the other wire on the row above). With each pair joined the mid is centered at 400 Hz; apart, 800 Hz.
Output and power. Module GRN to the jack tip. Module BLK to the jack sleeve and RED to battery +. Wire the two 9V batteries in series and run the free battery − to the jack ring, so plugging in turns the preamp on. Jack sleeve to the cavity shielding.
Test. Plug in at low volume and tap each pickup's pole pieces with a screwdriver. Turn every knob end to end and try both mid settings before closing the cavity.
Volume and blend values depend on the pickups: use what the pickup maker recommends.
9V or 18V both work: for one 9V battery, run its − to the jack ring.
Aguilar OBP-3 with one pickup: volume, stacked bass/treble, mid and mid switch
One pickup, a volume, stacked bass/treble and a mid pot, with a mini switch for the mid frequency. Three knobs.
You need: OBP-3 module, dual 50K linear treble/bass stack, 50K linear mid pot, DPDT on-on mini switch for the mid, volume pot (value to suit the pickup), 2 x 9V batteries, stereo output jack.
Best Bass Gear's drawing, as originally published. Click to enlarge.Aguilar OBP-3 with one pickup: volume, stacked bass/treble, mid and mid switch, redrawn as a connection diagram.
Aguilar OBP-3 with one pickup: volume, stacked bass/treble, mid and mid switch: wire by wire
#
From
To
Notes
1
Pickup: Hot
Volume: Middle lug
2
Pickup: Ground
Ground (back of the volume pot)
3
Volume: Left lug
Volume casing
Jumper to ground
4
Volume: Right lug
OBP-3 module: BLU (input)
5
OBP-3 module: GRN (output)
Stereo jack: Tip
Preamp output
6
OBP-3 module: BLK (ground)
Stereo jack: Sleeve (ground)
7
OBP-3 module: 9 EQ wires
Bass, mid and treble pots
See the EQ table
8
OBP-3 module: GRN/ORG, GRN/RED, YEL/WHT, ORG/WHT
Mid switch
See the mid switch table
9
OBP-3 module: RED (+)
First battery +
10
First battery −
Second battery +
Two 9V in series (18V)
11
Second battery −
Stereo jack: Ring
Plugging in powers the preamp
12
Stereo jack: Sleeve
Cavity ground / shielding
OBP-3 EQ pots: which module wire goes on which lug (pots seen from the back, lugs up)
Pot
Left lug
Middle lug
Right lug
Treble/bass stack, bass deck (dual 50K linear)
BRN
GRY
VIO
Treble/bass stack, treble deck
WHT
YEL
VIO/WHT
Mid 50K linear
GRN/BRN
ORG/VIO
RED/BRN
Mid switch (DPDT on-on mini toggle)
Switch
Wires
Result
Pole 1
GRN/ORG (middle row) and GRN/RED (top row)
Joined in one position
Pole 2
ORG/WHT (middle row) and YEL/WHT (top row)
Joined in the same position
Pairs joined
both poles closed
Mid centered at 400 Hz
Pairs apart
both poles open
Mid centered at 800 Hz
Step by step
Mount everything. Fit the pots, the mini switch and the stereo jack. Join the pot casings with a bare wire.
Pickup to the volume. Pickup hot to the volume's middle lug and pickup ground to the back of the pot. Jumper the left lug to the casing. In this drawing the right lug is the output.
Volume to the module. Volume right lug to the module's BLU wire.
EQ pots. Solder the module's nine EQ wires to the bass, mid and treble pots exactly as in the EQ table, left to right with the pots seen from the back, lugs up.
Mid switch. On the mini switch: GRN/ORG and GRN/RED go to one pole, YEL/WHT and ORG/WHT to the other (common lugs in the middle row, the other wire on the row above). With each pair joined the mid is centered at 400 Hz; apart, 800 Hz.
Output and power. Module GRN to the jack tip. Module BLK to the jack sleeve and RED to battery +. Wire the two 9V batteries in series and run the free battery − to the jack ring, so plugging in turns the preamp on. Jack sleeve to the cavity shielding.
Test. Plug in at low volume and tap each pickup's pole pieces with a screwdriver. Turn every knob end to end and try both mid settings before closing the cavity.
Volume and blend values depend on the pickups: use what the pickup maker recommends.
9V or 18V both work: for one 9V battery, run its − to the jack ring.
Aguilar OBP-3 with one pickup: volume, stacked bass/treble, mid, mid switch and A/P switch
One pickup, three knobs (volume, bass/treble stack, mid) and two mini switches for mid frequency and active/passive.
You need: OBP-3 module, dual 50K linear treble/bass stack, 50K linear mid pot, DPDT on-on mini switch for the mid, volume pot (value to suit the pickup), DPDT on-on mini switch for active/passive, 2 x 9V batteries, stereo output jack.
Best Bass Gear's drawing, as originally published. Click to enlarge.Aguilar OBP-3 with one pickup: volume, stacked bass/treble, mid, mid switch and A/P switch, redrawn as a connection diagram.
Aguilar OBP-3 with one pickup: volume, stacked bass/treble, mid, mid switch and A/P switch: wire by wire
#
From
To
Notes
1
Pickup: Hot
Volume: Right lug
2
Pickup: Ground
Ground (back of the volume pot)
3
Volume: Left lug
Volume casing
Jumper to ground
4
Volume: Middle lug
A/P switch: top-left lug
Passive signal
5
OBP-3 module: BLU (input)
A/P switch: middle-left lug
Common, pole 1
6
A/P switch: bottom-left lug
Ground
Grounds the preamp input in passive
7
OBP-3 module: GRN (output)
A/P switch: top-right lug
8
A/P switch: middle-right lug
Stereo jack: Tip
Common, pole 2
9
A/P switch: bottom-right lug
A/P switch: top-left lug
Jumper: passive signal to the tip
10
OBP-3 module: BLK (ground)
Stereo jack: Sleeve (ground)
11
OBP-3 module: 9 EQ wires
Bass, mid and treble pots
See the EQ table
12
OBP-3 module: GRN/ORG, GRN/RED, YEL/WHT, ORG/WHT
Mid switch
See the mid switch table
13
OBP-3 module: RED (+)
First battery +
14
First battery −
Second battery +
Two 9V in series (18V)
15
Second battery −
Stereo jack: Ring
Plugging in powers the preamp
16
Stereo jack: Sleeve
Cavity ground / shielding
OBP-3 EQ pots: which module wire goes on which lug (pots seen from the back, lugs up)
Pot
Left lug
Middle lug
Right lug
Treble/bass stack, bass deck (dual 50K linear)
BRN
GRY
VIO
Treble/bass stack, treble deck
WHT
YEL
VIO/WHT
Mid 50K linear
GRN/BRN
ORG/VIO
RED/BRN
Mid switch (DPDT on-on mini toggle)
Switch
Wires
Result
Pole 1
GRN/ORG (middle row) and GRN/RED (top row)
Joined in one position
Pole 2
ORG/WHT (middle row) and YEL/WHT (top row)
Joined in the same position
Pairs joined
both poles closed
Mid centered at 400 Hz
Pairs apart
both poles open
Mid centered at 800 Hz
Step by step
Mount everything. Fit the pots, both mini switches and the stereo jack. Join the pot casings with a bare wire.
Pickup to the volume. Pickup hot to the volume's right lug, pickup ground to the back of the pot, left lug jumpered to the casing. The middle lug is the output.
Active/passive switch. Volume output to the top-left lug, module BLU to middle-left, bottom-left to ground. Module GRN to top-right, middle-right to the jack tip, and a jumper from bottom-right to top-left. Active: the signal runs through the preamp. Passive: the preamp input is grounded and the volume output goes straight to the tip.
EQ pots. Solder the module's nine EQ wires to the bass, mid and treble pots exactly as in the EQ table, left to right with the pots seen from the back, lugs up.
Mid switch. On the mini switch: GRN/ORG and GRN/RED go to one pole, YEL/WHT and ORG/WHT to the other (common lugs in the middle row, the other wire on the row above). With each pair joined the mid is centered at 400 Hz; apart, 800 Hz.
Output and power. Module BLK to the jack sleeve and RED to battery +. Wire the two 9V batteries in series and run the free battery − to the jack ring, so plugging in turns the preamp on. Jack sleeve to the cavity shielding.
Test. Plug in at low volume and tap each pickup's pole pieces with a screwdriver. Turn every knob end to end, flip the active/passive switch and try both mid settings before closing the cavity.
Our drawing for this layout leaves out the jumper from the A/P switch's bottom-right lug to its top-left lug. Without it the bass is silent in passive, so the table includes it, as in our other A/P drawings.
Volume and blend values depend on the pickups: use what the pickup maker recommends.
9V or 18V both work: for one 9V battery, run its − to the jack ring.
Aguilar OBP-3 with one pickup: push-pull A/P volume, treble, push-pull mid, bass
One pickup and four knobs: the volume pulls for active/passive and the mid pulls for 400/800 Hz, with separate treble and bass. A straight swap for a four-knob plate.
You need: OBP-3 module, 2 pots 50K linear: bass, treble, push-pull 50K linear pot for the mid (DPDT), push-pull volume pot (DPDT) for active/passive, 2 x 9V batteries, stereo output jack.
Best Bass Gear's drawing, as originally published. Click to enlarge.Aguilar OBP-3 with one pickup: push-pull A/P volume, treble, push-pull mid, bass, redrawn as a connection diagram.
Aguilar OBP-3 with one pickup: push-pull A/P volume, treble, push-pull mid, bass: wire by wire
#
From
To
Notes
1
Pickup: Hot
Volume: Middle lug
2
Pickup: Ground
Ground (back of the volume pot)
3
Volume: Left lug
Ground (volume casing)
4
Volume: Right lug
Volume switch: top-right lug
Passive signal
5
OBP-3 module: BLU (input)
Volume switch: middle-left lug
Common, pole 1
6
Volume switch: top-left lug
Ground
Grounds the preamp input in passive
7
Volume switch: bottom-left lug
Volume switch: top-right lug
Jumper
8
Volume switch: middle-right lug
Stereo jack: Tip
Common, pole 2
9
OBP-3 module: GRN (output)
Volume switch: bottom-right lug
10
OBP-3 module: BLK (ground)
Stereo jack: Sleeve (ground)
11
OBP-3 module: 9 EQ wires
Bass, mid and treble pots
See the EQ table
12
OBP-3 module: GRN/ORG, GRN/RED, YEL/WHT, ORG/WHT
Mid pot's push-pull switch
See the mid switch table
13
OBP-3 module: RED (+)
First battery +
14
First battery −
Second battery +
Two 9V in series (18V)
15
Second battery −
Stereo jack: Ring
Plugging in powers the preamp
16
Stereo jack: Sleeve
Cavity ground / shielding
OBP-3 EQ pots: which module wire goes on which lug (pots seen from the back, lugs up)
Pot
Left lug
Middle lug
Right lug
Bass 50K linear
BRN
GRY
VIO
Mid 50K linear
GRN/BRN
ORG/VIO
RED/BRN
Treble 50K linear
WHT
YEL
VIO/WHT
Push-pull switch on the mid pot (DPDT)
Switch
Wires
Result
Pole 1
GRN/ORG (middle row) and GRN/RED (top row)
Joined in one position
Pole 2
ORG/WHT (middle row) and YEL/WHT (top row)
Joined in the same position
Pairs joined
both poles closed
Mid centered at 400 Hz
Pairs apart
both poles open
Mid centered at 800 Hz
Step by step
Mount everything. Fit the pots and the stereo jack. Join the pot casings with a bare wire.
Pickup to the volume. Pickup hot to the volume's middle lug, pickup ground to the back of the pot, left lug to ground. In this drawing the right lug is the output, and it goes to the pot's switch.
Push-pull active/passive. On the volume pot's switch: volume output to top-right, module BLU to middle-left, top-left to ground, and a jumper from bottom-left to top-right. Middle-right to the jack tip, module GRN to bottom-right. Pushed down, the preamp is on; pulled up, it is bypassed. If your pot works the other way round, swap the top and bottom wires on both sides.
EQ pots. Solder the module's nine EQ wires to the bass, mid and treble pots exactly as in the EQ table, left to right with the pots seen from the back, lugs up.
Push-pull mid. On the mid pot's push-pull switch: GRN/ORG and GRN/RED go to one pole, YEL/WHT and ORG/WHT to the other (common lugs in the middle row, the other wire on the row above). With each pair joined the mid is centered at 400 Hz; apart, 800 Hz.
Output and power. Module BLK to the jack sleeve and RED to battery +. Wire the two 9V batteries in series and run the free battery − to the jack ring, so plugging in turns the preamp on. Jack sleeve to the cavity shielding.
Test. Plug in at low volume and tap each pickup's pole pieces with a screwdriver. Turn every knob end to end, flip the active/passive switch and try both mid settings before closing the cavity.
Volume and blend values depend on the pickups: use what the pickup maker recommends.
9V or 18V both work: for one 9V battery, run its − to the jack ring.
Aguilar OBP-3 with two volumes, passive tone, stacked bass/treble, mid switch and bypass
Aguilar's own drawing: two volumes, a passive tone (250K audio, 0.022 µF), stacked bass/treble, a mid pot with a 400/800 Hz switch, and a DPDT bypass (active/passive) switch.
You need: OBP-3 module, dual 50K linear treble/bass stack, 50K linear mid pot, DPDT on-on mini switch for the mid, 2 volume pots (value to suit the pickups), 250K audio pot (passive tone), 0.022 µF capacitor, DPDT on-on mini switch for active/passive, 2 x 9V batteries, stereo output jack.
Aguilar's drawing, as originally published. Click to enlarge.Aguilar OBP-3 with two volumes, passive tone, stacked bass/treble, mid switch and bypass, redrawn as a connection diagram.
Aguilar OBP-3 with two volumes, passive tone, stacked bass/treble, mid switch and bypass: wire by wire
#
From
To
Notes
1
Neck pickup: Hot
Volume 1: Middle lug
2
Bridge pickup: Hot
Volume 2: Middle lug
3
Both pickups: Ground
Ground
4
Volume 1: Right lug
Volume 2: Right lug
Joined: this is the output
5
Volume 1 and 2: Left lugs
Ground
6
Tone pot: Outer lug
Both volumes: Right lugs (joined)
Passive tone
7
Tone: Middle lug
Capacitor (0.022 µF)
8
Capacitor: other leg
Stereo jack: Sleeve (ground)
9
Both volumes: Right lugs (joined)
A/P switch: top-left lug
Passive signal
10
OBP-3 module: BLU (input)
A/P switch: middle-left lug
Common, pole 1
11
A/P switch: bottom-left lug
Ground
Grounds the preamp input in passive
12
OBP-3 module: GRN (output)
A/P switch: top-right lug
13
A/P switch: middle-right lug
Stereo jack: Tip
Common, pole 2
14
A/P switch: bottom-right lug
A/P switch: top-left lug
Jumper: passive signal to the tip
15
OBP-3 module: BLK (ground)
Stereo jack: Sleeve (ground)
16
OBP-3 module: 9 EQ wires
Bass, mid and treble pots
See the EQ table
17
OBP-3 module: GRN/ORG, GRN/RED, YEL/WHT, ORG/WHT
Mid switch
See the mid switch table
18
OBP-3 module: RED (+)
First battery +
19
First battery −
Second battery +
Two 9V in series (18V)
20
Second battery −
Stereo jack: Ring
Plugging in powers the preamp
21
Stereo jack: Sleeve
Cavity ground / shielding
OBP-3 EQ pots: which module wire goes on which lug (pots seen from the back, lugs up)
Pot
Left lug
Middle lug
Right lug
Treble/bass stack, bass deck (dual 50K linear)
BRN
GRY
VIO
Treble/bass stack, treble deck
WHT
YEL
VIO/WHT
Mid 50K linear
GRN/BRN
ORG/VIO
RED/BRN
Mid switch (DPDT on-on mini toggle)
Switch
Wires
Result
Pole 1
GRN/ORG (middle row) and GRN/RED (top row)
Joined in one position
Pole 2
ORG/WHT (middle row) and YEL/WHT (top row)
Joined in the same position
Pairs joined
both poles closed
Mid centered at 400 Hz
Pairs apart
both poles open
Mid centered at 800 Hz
Step by step
Mount everything. Fit the pots, both mini switches and the stereo jack. Join the pot casings with a bare wire.
Pickups to the volumes. Neck hot to the middle lug of the first volume, bridge hot to the middle lug of the second. Join the two right lugs: that is the output. Both left lugs and the pickup grounds go to ground.
Passive tone. One outer lug of the tone pot to the volume output, the middle lug to the capacitor, and the capacitor's other leg to ground. Our drawing gives no values: most passive tone controls use a 250K audio pot and a 0.022 µF to 0.047 µF cap, but go by your pickups.
Active/passive switch. Volume output to the top-left lug, module BLU to middle-left, bottom-left to ground. Module GRN to top-right, middle-right to the jack tip, and a jumper from bottom-right to top-left. Active: the signal runs through the preamp. Passive: the preamp input is grounded and the volume output goes straight to the tip.
EQ pots. Solder the module's nine EQ wires to the bass, mid and treble pots exactly as in the EQ table, left to right with the pots seen from the back, lugs up.
Mid switch. On the mini switch: GRN/ORG and GRN/RED go to one pole, YEL/WHT and ORG/WHT to the other (common lugs in the middle row, the other wire on the row above). With each pair joined the mid is centered at 400 Hz; apart, 800 Hz.
Output and power. Module BLK to the jack sleeve and RED to battery +. Wire the two 9V batteries in series and run the free battery − to the jack ring, so plugging in turns the preamp on. Jack sleeve to the cavity shielding.
Test. Plug in at low volume and tap each pickup's pole pieces with a screwdriver. Turn every knob end to end, flip the active/passive switch and try both mid settings before closing the cavity.
Aguilar's title line says blend and volume, but both pots in the drawing are marked VOL. with the outputs joined, so this table follows the drawing: two volumes.
Aguilar notes the bypass switch can be a push-pull on the neck pickup's volume pot.
Aguilar shows optional 1 MΩ resistors on the mid switch to reduce the click when you flip it.
Volume and blend values depend on the pickups: use what the pickup maker recommends.
9V or 18V both work: for one 9V battery, run its − to the jack ring.
Aguilar OBP-3 with one pickup: volume, treble, mid, bass, mid switch and A/P switch
One pickup, four knobs and two mini switches: mid frequency and active/passive.
You need: OBP-3 module, 2 pots 50K linear: bass, treble, 50K linear mid pot, DPDT on-on mini switch for the mid, volume pot (value to suit the pickup), DPDT on-on mini switch for active/passive, 2 x 9V batteries, stereo output jack.
Best Bass Gear's drawing, as originally published. Click to enlarge.Aguilar OBP-3 with one pickup: volume, treble, mid, bass, mid switch and A/P switch, redrawn as a connection diagram.
Aguilar OBP-3 with one pickup: volume, treble, mid, bass, mid switch and A/P switch: wire by wire
#
From
To
Notes
1
Pickup: Hot
Volume: Right lug
2
Pickup: Ground
Ground (back of the volume pot)
3
Volume: Left lug
Volume casing
Jumper to ground
4
Volume: Middle lug
A/P switch: top-left lug
Passive signal
5
OBP-3 module: BLU (input)
A/P switch: middle-left lug
Common, pole 1
6
A/P switch: bottom-left lug
Ground
Grounds the preamp input in passive
7
OBP-3 module: GRN (output)
A/P switch: top-right lug
8
A/P switch: middle-right lug
Stereo jack: Tip
Common, pole 2
9
A/P switch: bottom-right lug
A/P switch: top-left lug
Jumper: passive signal to the tip
10
OBP-3 module: BLK (ground)
Stereo jack: Sleeve (ground)
11
OBP-3 module: 9 EQ wires
Bass, mid and treble pots
See the EQ table
12
OBP-3 module: GRN/ORG, GRN/RED, YEL/WHT, ORG/WHT
Mid switch
See the mid switch table
13
OBP-3 module: RED (+)
First battery +
14
First battery −
Second battery +
Two 9V in series (18V)
15
Second battery −
Stereo jack: Ring
Plugging in powers the preamp
16
Stereo jack: Sleeve
Cavity ground / shielding
OBP-3 EQ pots: which module wire goes on which lug (pots seen from the back, lugs up)
Pot
Left lug
Middle lug
Right lug
Bass 50K linear
BRN
GRY
VIO
Mid 50K linear
GRN/BRN
ORG/VIO
RED/BRN
Treble 50K linear
WHT
YEL
VIO/WHT
Mid switch (DPDT on-on mini toggle)
Switch
Wires
Result
Pole 1
GRN/ORG (middle row) and GRN/RED (top row)
Joined in one position
Pole 2
ORG/WHT (middle row) and YEL/WHT (top row)
Joined in the same position
Pairs joined
both poles closed
Mid centered at 400 Hz
Pairs apart
both poles open
Mid centered at 800 Hz
Step by step
Mount everything. Fit the pots, both mini switches and the stereo jack. Join the pot casings with a bare wire.
Pickup to the volume. Pickup hot to the volume's right lug, pickup ground to the back of the pot, left lug jumpered to the casing. The middle lug is the output.
Active/passive switch. Volume output to the top-left lug, module BLU to middle-left, bottom-left to ground. Module GRN to top-right, middle-right to the jack tip, and a jumper from bottom-right to top-left. Active: the signal runs through the preamp. Passive: the preamp input is grounded and the volume output goes straight to the tip.
EQ pots. Solder the module's nine EQ wires to the bass, mid and treble pots exactly as in the EQ table, left to right with the pots seen from the back, lugs up.
Mid switch. On the mini switch: GRN/ORG and GRN/RED go to one pole, YEL/WHT and ORG/WHT to the other (common lugs in the middle row, the other wire on the row above). With each pair joined the mid is centered at 400 Hz; apart, 800 Hz.
Output and power. Module BLK to the jack sleeve and RED to battery +. Wire the two 9V batteries in series and run the free battery − to the jack ring, so plugging in turns the preamp on. Jack sleeve to the cavity shielding.
Test. Plug in at low volume and tap each pickup's pole pieces with a screwdriver. Turn every knob end to end, flip the active/passive switch and try both mid settings before closing the cavity.
Our drawing for this layout leaves out the jumper from the A/P switch's bottom-right lug to its top-left lug. Without it the bass is silent in passive, so the table includes it, as in our other A/P drawings.
Volume and blend values depend on the pickups: use what the pickup maker recommends.
9V or 18V both work: for one 9V battery, run its − to the jack ring.
Aguilar OBP-3 with two volumes, treble, mid, bass, mid switch and A/P switch
Two volumes, separate treble, mid and bass, and two mini switches for mid frequency and active/passive.
You need: OBP-3 module, 2 pots 50K linear: bass, treble, 50K linear mid pot, DPDT on-on mini switch for the mid, 2 volume pots (value to suit the pickups), DPDT on-on mini switch for active/passive, 2 x 9V batteries, stereo output jack.
Best Bass Gear's drawing, as originally published. Click to enlarge.Aguilar OBP-3 with two volumes, treble, mid, bass, mid switch and A/P switch, redrawn as a connection diagram.
Aguilar OBP-3 with two volumes, treble, mid, bass, mid switch and A/P switch: wire by wire
#
From
To
Notes
1
Pickup 1: Hot
Volume 1: Middle lug
2
Pickup 2: Hot
Volume 2: Middle lug
3
Both pickups: Ground
Ground (back of the volume pot)
4
Volume 1: Right lug
Volume 2: Right lug
Joined: this is the output
5
Volume 1 and 2: Left lugs
Their own casings
Jumpered; casings joined to ground
6
Both volumes: Right lugs (joined)
A/P switch: top-left lug
Passive signal
7
OBP-3 module: BLU (input)
A/P switch: middle-left lug
Common, pole 1
8
A/P switch: bottom-left lug
Ground
Grounds the preamp input in passive
9
OBP-3 module: GRN (output)
A/P switch: top-right lug
10
A/P switch: middle-right lug
Stereo jack: Tip
Common, pole 2
11
A/P switch: bottom-right lug
A/P switch: top-left lug
Jumper: passive signal to the tip
12
OBP-3 module: BLK (ground)
Stereo jack: Sleeve (ground)
13
OBP-3 module: 9 EQ wires
Bass, mid and treble pots
See the EQ table
14
OBP-3 module: GRN/ORG, GRN/RED, YEL/WHT, ORG/WHT
Mid switch
See the mid switch table
15
OBP-3 module: RED (+)
First battery +
16
First battery −
Second battery +
Two 9V in series (18V)
17
Second battery −
Stereo jack: Ring
Plugging in powers the preamp
18
Stereo jack: Sleeve
Cavity ground / shielding
OBP-3 EQ pots: which module wire goes on which lug (pots seen from the back, lugs up)
Pot
Left lug
Middle lug
Right lug
Bass 50K linear
BRN
GRY
VIO
Mid 50K linear
GRN/BRN
ORG/VIO
RED/BRN
Treble 50K linear
WHT
YEL
VIO/WHT
Mid switch (DPDT on-on mini toggle)
Switch
Wires
Result
Pole 1
GRN/ORG (middle row) and GRN/RED (top row)
Joined in one position
Pole 2
ORG/WHT (middle row) and YEL/WHT (top row)
Joined in the same position
Pairs joined
both poles closed
Mid centered at 400 Hz
Pairs apart
both poles open
Mid centered at 800 Hz
Step by step
Mount everything. Fit the pots, both mini switches and the stereo jack. Join the pot casings with a bare wire.
Pickups to the volumes. Pickup 1 hot to the middle lug of volume 1, pickup 2 hot to the middle lug of volume 2. Join the two right lugs: that pair is the output. Jumper each left lug to its casing and join the casings. Pickup grounds to the back of a volume pot.
Active/passive switch. Volume output to the top-left lug, module BLU to middle-left, bottom-left to ground. Module GRN to top-right, middle-right to the jack tip, and a jumper from bottom-right to top-left. Active: the signal runs through the preamp. Passive: the preamp input is grounded and the volume output goes straight to the tip.
EQ pots. Solder the module's nine EQ wires to the bass, mid and treble pots exactly as in the EQ table, left to right with the pots seen from the back, lugs up.
Mid switch. On the mini switch: GRN/ORG and GRN/RED go to one pole, YEL/WHT and ORG/WHT to the other (common lugs in the middle row, the other wire on the row above). With each pair joined the mid is centered at 400 Hz; apart, 800 Hz.
Output and power. Module BLK to the jack sleeve and RED to battery +. Wire the two 9V batteries in series and run the free battery − to the jack ring, so plugging in turns the preamp on. Jack sleeve to the cavity shielding.
Test. Plug in at low volume and tap each pickup's pole pieces with a screwdriver. Turn every knob end to end, flip the active/passive switch and try both mid settings before closing the cavity.
Volume and blend values depend on the pickups: use what the pickup maker recommends.
9V or 18V both work: for one 9V battery, run its − to the jack ring.
Aguilar OBP-3 with two volumes, stacked bass/treble, push-pull mid and A/P switch
Two volumes, stacked bass/treble, a push-pull mid for 400/800 Hz and a mini switch for active/passive.
You need: OBP-3 module, dual 50K linear treble/bass stack, push-pull 50K linear pot for the mid (DPDT), 2 volume pots (value to suit the pickups), DPDT on-on mini switch for active/passive, 2 x 9V batteries, stereo output jack.
Best Bass Gear's drawing, as originally published. Click to enlarge.Aguilar OBP-3 with two volumes, stacked bass/treble, push-pull mid and A/P switch, redrawn as a connection diagram.
Aguilar OBP-3 with two volumes, stacked bass/treble, push-pull mid and A/P switch: wire by wire
#
From
To
Notes
1
Pickup 1: Hot
Volume 1: Middle lug
2
Pickup 2: Hot
Volume 2: Middle lug
3
Both pickups: Ground
Ground (back of the volume pot)
4
Volume 1: Right lug
Volume 2: Right lug
Joined: this is the output
5
Volume 1 and 2: Left lugs
Their own casings
Jumpered; casings joined to ground
6
Both volumes: Right lugs (joined)
A/P switch: top-left lug
Passive signal
7
OBP-3 module: BLU (input)
A/P switch: middle-left lug
Common, pole 1
8
A/P switch: bottom-left lug
Ground
Grounds the preamp input in passive
9
OBP-3 module: GRN (output)
A/P switch: top-right lug
10
A/P switch: middle-right lug
Stereo jack: Tip
Common, pole 2
11
A/P switch: bottom-right lug
A/P switch: top-left lug
Jumper: passive signal to the tip
12
OBP-3 module: BLK (ground)
Stereo jack: Sleeve (ground)
13
OBP-3 module: 9 EQ wires
Bass, mid and treble pots
See the EQ table
14
OBP-3 module: GRN/ORG, GRN/RED, YEL/WHT, ORG/WHT
Mid pot's push-pull switch
See the mid switch table
15
OBP-3 module: RED (+)
First battery +
16
First battery −
Second battery +
Two 9V in series (18V)
17
Second battery −
Stereo jack: Ring
Plugging in powers the preamp
18
Stereo jack: Sleeve
Cavity ground / shielding
OBP-3 EQ pots: which module wire goes on which lug (pots seen from the back, lugs up)
Pot
Left lug
Middle lug
Right lug
Treble/bass stack, bass deck (dual 50K linear)
BRN
GRY
VIO
Treble/bass stack, treble deck
WHT
YEL
VIO/WHT
Mid 50K linear
GRN/BRN
ORG/VIO
RED/BRN
Push-pull switch on the mid pot (DPDT)
Switch
Wires
Result
Pole 1
GRN/ORG (middle row) and GRN/RED (top row)
Joined in one position
Pole 2
ORG/WHT (middle row) and YEL/WHT (top row)
Joined in the same position
Pairs joined
both poles closed
Mid centered at 400 Hz
Pairs apart
both poles open
Mid centered at 800 Hz
Step by step
Mount everything. Fit the pots, the mini switch and the stereo jack. Join the pot casings with a bare wire.
Pickups to the volumes. Pickup 1 hot to the middle lug of volume 1, pickup 2 hot to the middle lug of volume 2. Join the two right lugs: that pair is the output. Jumper each left lug to its casing and join the casings. Pickup grounds to the back of a volume pot.
Active/passive switch. Volume output to the top-left lug, module BLU to middle-left, bottom-left to ground. Module GRN to top-right, middle-right to the jack tip, and a jumper from bottom-right to top-left. Active: the signal runs through the preamp. Passive: the preamp input is grounded and the volume output goes straight to the tip.
EQ pots. Solder the module's nine EQ wires to the bass, mid and treble pots exactly as in the EQ table, left to right with the pots seen from the back, lugs up.
Push-pull mid. On the mid pot's push-pull switch: GRN/ORG and GRN/RED go to one pole, YEL/WHT and ORG/WHT to the other (common lugs in the middle row, the other wire on the row above). With each pair joined the mid is centered at 400 Hz; apart, 800 Hz.
Output and power. Module BLK to the jack sleeve and RED to battery +. Wire the two 9V batteries in series and run the free battery − to the jack ring, so plugging in turns the preamp on. Jack sleeve to the cavity shielding.
Test. Plug in at low volume and tap each pickup's pole pieces with a screwdriver. Turn every knob end to end, flip the active/passive switch and try both mid settings before closing the cavity.
Volume and blend values depend on the pickups: use what the pickup maker recommends.
9V or 18V both work: for one 9V battery, run its − to the jack ring.
Aguilar OBP-3 with push-pull A/P volume, blend, treble, mid, bass and mid switch
Five knobs and one mini switch: the volume pulls up for passive and the switch sets the mid frequency.
You need: OBP-3 module, 2 pots 50K linear: bass, treble, 50K linear mid pot, DPDT on-on mini switch for the mid, dual-audio blend pot, push-pull volume pot (DPDT) for active/passive, 2 x 9V batteries, stereo output jack.
Best Bass Gear's drawing, as originally published. Click to enlarge.Aguilar OBP-3 with push-pull A/P volume, blend, treble, mid, bass and mid switch, redrawn as a connection diagram.
Aguilar OBP-3 with push-pull A/P volume, blend, treble, mid, bass and mid switch: wire by wire
#
From
To
Notes
1
Bridge pickup: Hot
Blend: middle lug of one gang
2
Neck pickup: Hot
Blend: middle lug of the other gang
3
Both pickups: Ground
Ground (back of the volume pot)
4
Blend: output lugs (joined)
Volume: Right lug
5
Blend: ground lugs (joined)
Ground (back of the volume pot)
6
Volume: Left lug
Volume casing
Jumper to ground
7
Volume: Middle lug
Volume switch: top-right lug
Passive signal
8
OBP-3 module: BLU (input)
Volume switch: middle-left lug
Common, pole 1
9
Volume switch: top-left lug
Ground
Grounds the preamp input in passive
10
Volume switch: bottom-left lug
Volume switch: top-right lug
Jumper
11
Volume switch: middle-right lug
Stereo jack: Tip
Common, pole 2
12
OBP-3 module: GRN (output)
Volume switch: bottom-right lug
13
OBP-3 module: BLK (ground)
Stereo jack: Sleeve (ground)
14
OBP-3 module: 9 EQ wires
Bass, mid and treble pots
See the EQ table
15
OBP-3 module: GRN/ORG, GRN/RED, YEL/WHT, ORG/WHT
Mid switch
See the mid switch table
16
OBP-3 module: RED (+)
First battery +
17
First battery −
Second battery +
Two 9V in series (18V)
18
Second battery −
Stereo jack: Ring
Plugging in powers the preamp
19
Stereo jack: Sleeve
Cavity ground / shielding
OBP-3 EQ pots: which module wire goes on which lug (pots seen from the back, lugs up)
Pot
Left lug
Middle lug
Right lug
Bass 50K linear
BRN
GRY
VIO
Mid 50K linear
GRN/BRN
ORG/VIO
RED/BRN
Treble 50K linear
WHT
YEL
VIO/WHT
Mid switch (DPDT on-on mini toggle)
Switch
Wires
Result
Pole 1
GRN/ORG (middle row) and GRN/RED (top row)
Joined in one position
Pole 2
ORG/WHT (middle row) and YEL/WHT (top row)
Joined in the same position
Pairs joined
both poles closed
Mid centered at 400 Hz
Pairs apart
both poles open
Mid centered at 800 Hz
Step by step
Mount everything. Fit the pots, the mini switch and the stereo jack. Join the pot casings with a bare wire.
Pickups to the blend and volume. Bridge hot to the middle lug of one blend gang, neck hot to the middle lug of the other. Join one outer lug of each gang and run it to the volume's right lug; join the other two to ground. Volume left lug to the casing. Pickup grounds go to the back of the volume pot.
Push-pull active/passive. On the volume pot's switch: volume output to top-right, module BLU to middle-left, top-left to ground, and a jumper from bottom-left to top-right. Middle-right to the jack tip, module GRN to bottom-right. Pushed down, the preamp is on; pulled up, it is bypassed. If your pot works the other way round, swap the top and bottom wires on both sides.
EQ pots. Solder the module's nine EQ wires to the bass, mid and treble pots exactly as in the EQ table, left to right with the pots seen from the back, lugs up.
Mid switch. On the mini switch: GRN/ORG and GRN/RED go to one pole, YEL/WHT and ORG/WHT to the other (common lugs in the middle row, the other wire on the row above). With each pair joined the mid is centered at 400 Hz; apart, 800 Hz.
Output and power. Module BLK to the jack sleeve and RED to battery +. Wire the two 9V batteries in series and run the free battery − to the jack ring, so plugging in turns the preamp on. Jack sleeve to the cavity shielding.
Test. Plug in at low volume and tap each pickup's pole pieces with a screwdriver. Turn every knob end to end, flip the active/passive switch and try both mid settings before closing the cavity.
Volume and blend values depend on the pickups: use what the pickup maker recommends.
9V or 18V both work: for one 9V battery, run its − to the jack ring.
Aguilar OBP-3 with one pickup: push-pull A/P volume, stacked bass/treble, push-pull mid
One pickup, three knobs, two push-pulls: the volume for active/passive and the mid for 400/800 Hz.
You need: OBP-3 module, dual 50K linear treble/bass stack, push-pull 50K linear pot for the mid (DPDT), push-pull volume pot (DPDT) for active/passive, 2 x 9V batteries, stereo output jack.
Best Bass Gear's drawing, as originally published. Click to enlarge.Aguilar OBP-3 with one pickup: push-pull A/P volume, stacked bass/treble, push-pull mid, redrawn as a connection diagram.
Aguilar OBP-3 with one pickup: push-pull A/P volume, stacked bass/treble, push-pull mid: wire by wire
#
From
To
Notes
1
Pickup: Hot
Volume: Middle lug
2
Pickup: Ground
Ground (back of the volume pot)
3
Volume: Left lug
Ground (volume casing)
4
Volume: Right lug
Volume switch: top-right lug
Passive signal
5
OBP-3 module: BLU (input)
Volume switch: middle-left lug
Common, pole 1
6
Volume switch: top-left lug
Ground
Grounds the preamp input in passive
7
Volume switch: bottom-left lug
Volume switch: top-right lug
Jumper
8
Volume switch: middle-right lug
Stereo jack: Tip
Common, pole 2
9
OBP-3 module: GRN (output)
Volume switch: bottom-right lug
10
OBP-3 module: BLK (ground)
Stereo jack: Sleeve (ground)
11
OBP-3 module: 9 EQ wires
Bass, mid and treble pots
See the EQ table
12
OBP-3 module: GRN/ORG, GRN/RED, YEL/WHT, ORG/WHT
Mid pot's push-pull switch
See the mid switch table
13
OBP-3 module: RED (+)
First battery +
14
First battery −
Second battery +
Two 9V in series (18V)
15
Second battery −
Stereo jack: Ring
Plugging in powers the preamp
16
Stereo jack: Sleeve
Cavity ground / shielding
OBP-3 EQ pots: which module wire goes on which lug (pots seen from the back, lugs up)
Pot
Left lug
Middle lug
Right lug
Treble/bass stack, bass deck (dual 50K linear)
BRN
GRY
VIO
Treble/bass stack, treble deck
WHT
YEL
VIO/WHT
Mid 50K linear
GRN/BRN
ORG/VIO
RED/BRN
Push-pull switch on the mid pot (DPDT)
Switch
Wires
Result
Pole 1
GRN/ORG (middle row) and GRN/RED (top row)
Joined in one position
Pole 2
ORG/WHT (middle row) and YEL/WHT (top row)
Joined in the same position
Pairs joined
both poles closed
Mid centered at 400 Hz
Pairs apart
both poles open
Mid centered at 800 Hz
Step by step
Mount everything. Fit the pots and the stereo jack. Join the pot casings with a bare wire.
Pickup to the volume. Pickup hot to the volume's middle lug, pickup ground to the back of the pot, left lug to ground. In this drawing the right lug is the output, and it goes to the pot's switch.
Push-pull active/passive. On the volume pot's switch: volume output to top-right, module BLU to middle-left, top-left to ground, and a jumper from bottom-left to top-right. Middle-right to the jack tip, module GRN to bottom-right. Pushed down, the preamp is on; pulled up, it is bypassed. If your pot works the other way round, swap the top and bottom wires on both sides.
EQ pots. Solder the module's nine EQ wires to the bass, mid and treble pots exactly as in the EQ table, left to right with the pots seen from the back, lugs up.
Push-pull mid. On the mid pot's push-pull switch: GRN/ORG and GRN/RED go to one pole, YEL/WHT and ORG/WHT to the other (common lugs in the middle row, the other wire on the row above). With each pair joined the mid is centered at 400 Hz; apart, 800 Hz.
Output and power. Module BLK to the jack sleeve and RED to battery +. Wire the two 9V batteries in series and run the free battery − to the jack ring, so plugging in turns the preamp on. Jack sleeve to the cavity shielding.
Test. Plug in at low volume and tap each pickup's pole pieces with a screwdriver. Turn every knob end to end, flip the active/passive switch and try both mid settings before closing the cavity.
Volume and blend values depend on the pickups: use what the pickup maker recommends.
9V or 18V both work: for one 9V battery, run its − to the jack ring.
Aguilar OBP-3 with push-pull A/P volume, second volume, treble, push-pull mid, bass
Two volumes (the first pulls up for passive), separate treble and bass, and a push-pull mid: five knobs, no switches.
You need: OBP-3 module, 2 pots 50K linear: bass, treble, push-pull 50K linear pot for the mid (DPDT), push-pull volume pot (DPDT) for active/passive, second volume pot, 2 x 9V batteries, stereo output jack.
Best Bass Gear's drawing, as originally published. Click to enlarge.Aguilar OBP-3 with push-pull A/P volume, second volume, treble, push-pull mid, bass, redrawn as a connection diagram.
Aguilar OBP-3 with push-pull A/P volume, second volume, treble, push-pull mid, bass: wire by wire
#
From
To
Notes
1
Pickup 1: Hot
Push-pull volume: Middle lug
2
Pickup 2: Hot
Volume 2: Middle lug
3
Both pickups: Ground
Ground (back of the volume pot)
4
Push-pull volume: Right lug
Volume 2: Right lug
Joined: this is the output
5
Both volumes: Left lugs
Ground (pot casings)
6
Both volumes: Right lugs (joined)
Volume switch: top-right lug
Passive signal
7
OBP-3 module: BLU (input)
Volume switch: middle-left lug
Common, pole 1
8
Volume switch: top-left lug
Ground
Grounds the preamp input in passive
9
Volume switch: bottom-left lug
Volume switch: top-right lug
Jumper
10
Volume switch: middle-right lug
Stereo jack: Tip
Common, pole 2
11
OBP-3 module: GRN (output)
Volume switch: bottom-right lug
12
OBP-3 module: BLK (ground)
Stereo jack: Sleeve (ground)
13
OBP-3 module: 9 EQ wires
Bass, mid and treble pots
See the EQ table
14
OBP-3 module: GRN/ORG, GRN/RED, YEL/WHT, ORG/WHT
Mid pot's push-pull switch
See the mid switch table
15
OBP-3 module: RED (+)
First battery +
16
First battery −
Second battery +
Two 9V in series (18V)
17
Second battery −
Stereo jack: Ring
Plugging in powers the preamp
18
Stereo jack: Sleeve
Cavity ground / shielding
OBP-3 EQ pots: which module wire goes on which lug (pots seen from the back, lugs up)
Pot
Left lug
Middle lug
Right lug
Bass 50K linear
BRN
GRY
VIO
Mid 50K linear
GRN/BRN
ORG/VIO
RED/BRN
Treble 50K linear
WHT
YEL
VIO/WHT
Push-pull switch on the mid pot (DPDT)
Switch
Wires
Result
Pole 1
GRN/ORG (middle row) and GRN/RED (top row)
Joined in one position
Pole 2
ORG/WHT (middle row) and YEL/WHT (top row)
Joined in the same position
Pairs joined
both poles closed
Mid centered at 400 Hz
Pairs apart
both poles open
Mid centered at 800 Hz
Step by step
Mount everything. Fit the pots and the stereo jack. Join the pot casings with a bare wire.
Pickups to the volumes. Pickup 1 hot to the middle lug of the push-pull volume, pickup 2 hot to the middle lug of the second volume. Join the two right lugs: that is the output, and it goes to the push-pull switch. Both left lugs to ground; pickup grounds to the back of a volume pot.
Push-pull active/passive. On the volume pot's switch: volume output to top-right, module BLU to middle-left, top-left to ground, and a jumper from bottom-left to top-right. Middle-right to the jack tip, module GRN to bottom-right. Pushed down, the preamp is on; pulled up, it is bypassed. If your pot works the other way round, swap the top and bottom wires on both sides.
EQ pots. Solder the module's nine EQ wires to the bass, mid and treble pots exactly as in the EQ table, left to right with the pots seen from the back, lugs up.
Push-pull mid. On the mid pot's push-pull switch: GRN/ORG and GRN/RED go to one pole, YEL/WHT and ORG/WHT to the other (common lugs in the middle row, the other wire on the row above). With each pair joined the mid is centered at 400 Hz; apart, 800 Hz.
Output and power. Module BLK to the jack sleeve and RED to battery +. Wire the two 9V batteries in series and run the free battery − to the jack ring, so plugging in turns the preamp on. Jack sleeve to the cavity shielding.
Test. Plug in at low volume and tap each pickup's pole pieces with a screwdriver. Turn every knob end to end, flip the active/passive switch and try both mid settings before closing the cavity.
Volume and blend values depend on the pickups: use what the pickup maker recommends.
9V or 18V both work: for one 9V battery, run its − to the jack ring.
Aguilar OBP-3 with push-pull A/P volume, second volume, stacked bass/treble, mid and mid switch
Two volumes with push-pull active/passive, stacked bass/treble, a mid pot and a mini switch for the mid frequency.
You need: OBP-3 module, dual 50K linear treble/bass stack, 50K linear mid pot, DPDT on-on mini switch for the mid, push-pull volume pot (DPDT) for active/passive, second volume pot, 2 x 9V batteries, stereo output jack.
Best Bass Gear's drawing, as originally published. Click to enlarge.Aguilar OBP-3 with push-pull A/P volume, second volume, stacked bass/treble, mid and mid switch, redrawn as a connection diagram.
Aguilar OBP-3 with push-pull A/P volume, second volume, stacked bass/treble, mid and mid switch: wire by wire
#
From
To
Notes
1
Pickup 1: Hot
Push-pull volume: Middle lug
2
Pickup 2: Hot
Volume 2: Middle lug
3
Both pickups: Ground
Ground (back of the volume pot)
4
Push-pull volume: Right lug
Volume 2: Right lug
Joined: this is the output
5
Both volumes: Left lugs
Ground (pot casings)
6
Both volumes: Right lugs (joined)
Volume switch: top-right lug
Passive signal
7
OBP-3 module: BLU (input)
Volume switch: middle-left lug
Common, pole 1
8
Volume switch: top-left lug
Ground
Grounds the preamp input in passive
9
Volume switch: bottom-left lug
Volume switch: top-right lug
Jumper
10
Volume switch: middle-right lug
Stereo jack: Tip
Common, pole 2
11
OBP-3 module: GRN (output)
Volume switch: bottom-right lug
12
OBP-3 module: BLK (ground)
Stereo jack: Sleeve (ground)
13
OBP-3 module: 9 EQ wires
Bass, mid and treble pots
See the EQ table
14
OBP-3 module: GRN/ORG, GRN/RED, YEL/WHT, ORG/WHT
Mid switch
See the mid switch table
15
OBP-3 module: RED (+)
First battery +
16
First battery −
Second battery +
Two 9V in series (18V)
17
Second battery −
Stereo jack: Ring
Plugging in powers the preamp
18
Stereo jack: Sleeve
Cavity ground / shielding
OBP-3 EQ pots: which module wire goes on which lug (pots seen from the back, lugs up)
Pot
Left lug
Middle lug
Right lug
Treble/bass stack, bass deck (dual 50K linear)
BRN
GRY
VIO
Treble/bass stack, treble deck
WHT
YEL
VIO/WHT
Mid 50K linear
GRN/BRN
ORG/VIO
RED/BRN
Mid switch (DPDT on-on mini toggle)
Switch
Wires
Result
Pole 1
GRN/ORG (middle row) and GRN/RED (top row)
Joined in one position
Pole 2
ORG/WHT (middle row) and YEL/WHT (top row)
Joined in the same position
Pairs joined
both poles closed
Mid centered at 400 Hz
Pairs apart
both poles open
Mid centered at 800 Hz
Step by step
Mount everything. Fit the pots, the mini switch and the stereo jack. Join the pot casings with a bare wire.
Pickups to the volumes. Pickup 1 hot to the middle lug of the push-pull volume, pickup 2 hot to the middle lug of the second volume. Join the two right lugs: that is the output, and it goes to the push-pull switch. Both left lugs to ground; pickup grounds to the back of a volume pot.
Push-pull active/passive. On the volume pot's switch: volume output to top-right, module BLU to middle-left, top-left to ground, and a jumper from bottom-left to top-right. Middle-right to the jack tip, module GRN to bottom-right. Pushed down, the preamp is on; pulled up, it is bypassed. If your pot works the other way round, swap the top and bottom wires on both sides.
EQ pots. Solder the module's nine EQ wires to the bass, mid and treble pots exactly as in the EQ table, left to right with the pots seen from the back, lugs up.
Mid switch. On the mini switch: GRN/ORG and GRN/RED go to one pole, YEL/WHT and ORG/WHT to the other (common lugs in the middle row, the other wire on the row above). With each pair joined the mid is centered at 400 Hz; apart, 800 Hz.
Output and power. Module BLK to the jack sleeve and RED to battery +. Wire the two 9V batteries in series and run the free battery − to the jack ring, so plugging in turns the preamp on. Jack sleeve to the cavity shielding.
Test. Plug in at low volume and tap each pickup's pole pieces with a screwdriver. Turn every knob end to end, flip the active/passive switch and try both mid settings before closing the cavity.
Volume and blend values depend on the pickups: use what the pickup maker recommends.
9V or 18V both work: for one 9V battery, run its − to the jack ring.
Aguilar OBP-3 with push-pull A/P volume, second volume, stacked bass/treble and push-pull mid
Four knobs, two push-pulls: active/passive on the first volume and 400/800 Hz on the mid.
You need: OBP-3 module, dual 50K linear treble/bass stack, push-pull 50K linear pot for the mid (DPDT), push-pull volume pot (DPDT) for active/passive, second volume pot, 2 x 9V batteries, stereo output jack.
Best Bass Gear's drawing, as originally published. Click to enlarge.Aguilar OBP-3 with push-pull A/P volume, second volume, stacked bass/treble and push-pull mid, redrawn as a connection diagram.
Aguilar OBP-3 with push-pull A/P volume, second volume, stacked bass/treble and push-pull mid: wire by wire
#
From
To
Notes
1
Pickup 1: Hot
Push-pull volume: Middle lug
2
Pickup 2: Hot
Volume 2: Middle lug
3
Both pickups: Ground
Ground (back of the volume pot)
4
Push-pull volume: Right lug
Volume 2: Right lug
Joined: this is the output
5
Both volumes: Left lugs
Ground (pot casings)
6
Both volumes: Right lugs (joined)
Volume switch: top-right lug
Passive signal
7
OBP-3 module: BLU (input)
Volume switch: middle-left lug
Common, pole 1
8
Volume switch: top-left lug
Ground
Grounds the preamp input in passive
9
Volume switch: bottom-left lug
Volume switch: top-right lug
Jumper
10
Volume switch: middle-right lug
Stereo jack: Tip
Common, pole 2
11
OBP-3 module: GRN (output)
Volume switch: bottom-right lug
12
OBP-3 module: BLK (ground)
Stereo jack: Sleeve (ground)
13
OBP-3 module: 9 EQ wires
Bass, mid and treble pots
See the EQ table
14
OBP-3 module: GRN/ORG, GRN/RED, YEL/WHT, ORG/WHT
Mid pot's push-pull switch
See the mid switch table
15
OBP-3 module: RED (+)
First battery +
16
First battery −
Second battery +
Two 9V in series (18V)
17
Second battery −
Stereo jack: Ring
Plugging in powers the preamp
18
Stereo jack: Sleeve
Cavity ground / shielding
OBP-3 EQ pots: which module wire goes on which lug (pots seen from the back, lugs up)
Pot
Left lug
Middle lug
Right lug
Treble/bass stack, bass deck (dual 50K linear)
BRN
GRY
VIO
Treble/bass stack, treble deck
WHT
YEL
VIO/WHT
Mid 50K linear
GRN/BRN
ORG/VIO
RED/BRN
Push-pull switch on the mid pot (DPDT)
Switch
Wires
Result
Pole 1
GRN/ORG (middle row) and GRN/RED (top row)
Joined in one position
Pole 2
ORG/WHT (middle row) and YEL/WHT (top row)
Joined in the same position
Pairs joined
both poles closed
Mid centered at 400 Hz
Pairs apart
both poles open
Mid centered at 800 Hz
Step by step
Mount everything. Fit the pots and the stereo jack. Join the pot casings with a bare wire.
Pickups to the volumes. Pickup 1 hot to the middle lug of the push-pull volume, pickup 2 hot to the middle lug of the second volume. Join the two right lugs: that is the output, and it goes to the push-pull switch. Both left lugs to ground; pickup grounds to the back of a volume pot.
Push-pull active/passive. On the volume pot's switch: volume output to top-right, module BLU to middle-left, top-left to ground, and a jumper from bottom-left to top-right. Middle-right to the jack tip, module GRN to bottom-right. Pushed down, the preamp is on; pulled up, it is bypassed. If your pot works the other way round, swap the top and bottom wires on both sides.
EQ pots. Solder the module's nine EQ wires to the bass, mid and treble pots exactly as in the EQ table, left to right with the pots seen from the back, lugs up.
Push-pull mid. On the mid pot's push-pull switch: GRN/ORG and GRN/RED go to one pole, YEL/WHT and ORG/WHT to the other (common lugs in the middle row, the other wire on the row above). With each pair joined the mid is centered at 400 Hz; apart, 800 Hz.
Output and power. Module BLK to the jack sleeve and RED to battery +. Wire the two 9V batteries in series and run the free battery − to the jack ring, so plugging in turns the preamp on. Jack sleeve to the cavity shielding.
Test. Plug in at low volume and tap each pickup's pole pieces with a screwdriver. Turn every knob end to end, flip the active/passive switch and try both mid settings before closing the cavity.
Volume and blend values depend on the pickups: use what the pickup maker recommends.
9V or 18V both work: for one 9V battery, run its − to the jack ring.
Aguilar OBP-3 with stacked volumes, treble, mid, bass, mid switch and A/P switch
A volume/volume stack, separate treble, mid and bass, and two mini switches for mid frequency and active/passive.
You need: OBP-3 module, 2 pots 50K linear: bass, treble, 50K linear mid pot, DPDT on-on mini switch for the mid, dual concentric volume pot (value to suit the pickups), DPDT on-on mini switch for active/passive, 2 x 9V batteries, stereo output jack.
Best Bass Gear's drawing, as originally published. Click to enlarge.Aguilar OBP-3 with stacked volumes, treble, mid, bass, mid switch and A/P switch, redrawn as a connection diagram.
Aguilar OBP-3 with stacked volumes, treble, mid, bass, mid switch and A/P switch: wire by wire
#
From
To
Notes
1
Pickup 1: Hot
Volume stack, upper deck: Middle lug
2
Pickup 2: Hot
Volume stack, lower deck: Middle lug
3
Both pickups: Ground
Ground (back of the volume pot)
4
Upper deck: Right lug
Lower deck: Right lug
Joined: this is the output
5
Upper and lower deck: Left lugs
Pot casing
Jumpered to ground
6
Volume stack: Right lugs (joined)
A/P switch: top-left lug
Passive signal
7
OBP-3 module: BLU (input)
A/P switch: middle-left lug
Common, pole 1
8
A/P switch: bottom-left lug
Ground
Grounds the preamp input in passive
9
OBP-3 module: GRN (output)
A/P switch: top-right lug
10
A/P switch: middle-right lug
Stereo jack: Tip
Common, pole 2
11
A/P switch: bottom-right lug
A/P switch: top-left lug
Jumper: passive signal to the tip
12
OBP-3 module: BLK (ground)
Stereo jack: Sleeve (ground)
13
OBP-3 module: 9 EQ wires
Bass, mid and treble pots
See the EQ table
14
OBP-3 module: GRN/ORG, GRN/RED, YEL/WHT, ORG/WHT
Mid switch
See the mid switch table
15
OBP-3 module: RED (+)
First battery +
16
First battery −
Second battery +
Two 9V in series (18V)
17
Second battery −
Stereo jack: Ring
Plugging in powers the preamp
18
Stereo jack: Sleeve
Cavity ground / shielding
OBP-3 EQ pots: which module wire goes on which lug (pots seen from the back, lugs up)
Pot
Left lug
Middle lug
Right lug
Bass 50K linear
BRN
GRY
VIO
Mid 50K linear
GRN/BRN
ORG/VIO
RED/BRN
Treble 50K linear
WHT
YEL
VIO/WHT
Mid switch (DPDT on-on mini toggle)
Switch
Wires
Result
Pole 1
GRN/ORG (middle row) and GRN/RED (top row)
Joined in one position
Pole 2
ORG/WHT (middle row) and YEL/WHT (top row)
Joined in the same position
Pairs joined
both poles closed
Mid centered at 400 Hz
Pairs apart
both poles open
Mid centered at 800 Hz
Step by step
Mount everything. Fit the pots, both mini switches and the stereo jack. Join the pot casings with a bare wire.
Pickups to the stacked volume. Pickup 1 hot to the middle lug of one deck, pickup 2 hot to the middle lug of the other. Join the two right lugs: that is the output. Jumper both left lugs to the casing. Pickup grounds to the back of the pot.
Active/passive switch. Volume output to the top-left lug, module BLU to middle-left, bottom-left to ground. Module GRN to top-right, middle-right to the jack tip, and a jumper from bottom-right to top-left. Active: the signal runs through the preamp. Passive: the preamp input is grounded and the volume output goes straight to the tip.
EQ pots. Solder the module's nine EQ wires to the bass, mid and treble pots exactly as in the EQ table, left to right with the pots seen from the back, lugs up.
Mid switch. On the mini switch: GRN/ORG and GRN/RED go to one pole, YEL/WHT and ORG/WHT to the other (common lugs in the middle row, the other wire on the row above). With each pair joined the mid is centered at 400 Hz; apart, 800 Hz.
Output and power. Module BLK to the jack sleeve and RED to battery +. Wire the two 9V batteries in series and run the free battery − to the jack ring, so plugging in turns the preamp on. Jack sleeve to the cavity shielding.
Test. Plug in at low volume and tap each pickup's pole pieces with a screwdriver. Turn every knob end to end, flip the active/passive switch and try both mid settings before closing the cavity.
Volume and blend values depend on the pickups: use what the pickup maker recommends.
9V or 18V both work: for one 9V battery, run its − to the jack ring.
Aguilar OBP-3 with stacked volumes, stacked bass/treble, push-pull mid and A/P switch
Three knobs (volume stack, bass/treble stack, push-pull mid) and a mini switch for active/passive.
You need: OBP-3 module, dual 50K linear treble/bass stack, push-pull 50K linear pot for the mid (DPDT), dual concentric volume pot (value to suit the pickups), DPDT on-on mini switch for active/passive, 2 x 9V batteries, stereo output jack.
Best Bass Gear's drawing, as originally published. Click to enlarge.Aguilar OBP-3 with stacked volumes, stacked bass/treble, push-pull mid and A/P switch, redrawn as a connection diagram.
Aguilar OBP-3 with stacked volumes, stacked bass/treble, push-pull mid and A/P switch: wire by wire
#
From
To
Notes
1
Pickup 1: Hot
Volume stack, upper deck: Middle lug
2
Pickup 2: Hot
Volume stack, lower deck: Middle lug
3
Both pickups: Ground
Ground (back of the volume pot)
4
Upper deck: Right lug
Lower deck: Right lug
Joined: this is the output
5
Upper and lower deck: Left lugs
Pot casing
Jumpered to ground
6
Volume stack: Right lugs (joined)
A/P switch: top-left lug
Passive signal
7
OBP-3 module: BLU (input)
A/P switch: middle-left lug
Common, pole 1
8
A/P switch: bottom-left lug
Ground
Grounds the preamp input in passive
9
OBP-3 module: GRN (output)
A/P switch: top-right lug
10
A/P switch: middle-right lug
Stereo jack: Tip
Common, pole 2
11
A/P switch: bottom-right lug
A/P switch: top-left lug
Jumper: passive signal to the tip
12
OBP-3 module: BLK (ground)
Stereo jack: Sleeve (ground)
13
OBP-3 module: 9 EQ wires
Bass, mid and treble pots
See the EQ table
14
OBP-3 module: GRN/ORG, GRN/RED, YEL/WHT, ORG/WHT
Mid pot's push-pull switch
See the mid switch table
15
OBP-3 module: RED (+)
First battery +
16
First battery −
Second battery +
Two 9V in series (18V)
17
Second battery −
Stereo jack: Ring
Plugging in powers the preamp
18
Stereo jack: Sleeve
Cavity ground / shielding
OBP-3 EQ pots: which module wire goes on which lug (pots seen from the back, lugs up)
Pot
Left lug
Middle lug
Right lug
Treble/bass stack, bass deck (dual 50K linear)
BRN
GRY
VIO
Treble/bass stack, treble deck
WHT
YEL
VIO/WHT
Mid 50K linear
GRN/BRN
ORG/VIO
RED/BRN
Push-pull switch on the mid pot (DPDT)
Switch
Wires
Result
Pole 1
GRN/ORG (middle row) and GRN/RED (top row)
Joined in one position
Pole 2
ORG/WHT (middle row) and YEL/WHT (top row)
Joined in the same position
Pairs joined
both poles closed
Mid centered at 400 Hz
Pairs apart
both poles open
Mid centered at 800 Hz
Step by step
Mount everything. Fit the pots, the mini switch and the stereo jack. Join the pot casings with a bare wire.
Pickups to the stacked volume. Pickup 1 hot to the middle lug of one deck, pickup 2 hot to the middle lug of the other. Join the two right lugs: that is the output. Jumper both left lugs to the casing. Pickup grounds to the back of the pot.
Active/passive switch. Volume output to the top-left lug, module BLU to middle-left, bottom-left to ground. Module GRN to top-right, middle-right to the jack tip, and a jumper from bottom-right to top-left. Active: the signal runs through the preamp. Passive: the preamp input is grounded and the volume output goes straight to the tip.
EQ pots. Solder the module's nine EQ wires to the bass, mid and treble pots exactly as in the EQ table, left to right with the pots seen from the back, lugs up.
Push-pull mid. On the mid pot's push-pull switch: GRN/ORG and GRN/RED go to one pole, YEL/WHT and ORG/WHT to the other (common lugs in the middle row, the other wire on the row above). With each pair joined the mid is centered at 400 Hz; apart, 800 Hz.
Output and power. Module BLK to the jack sleeve and RED to battery +. Wire the two 9V batteries in series and run the free battery − to the jack ring, so plugging in turns the preamp on. Jack sleeve to the cavity shielding.
Test. Plug in at low volume and tap each pickup's pole pieces with a screwdriver. Turn every knob end to end, flip the active/passive switch and try both mid settings before closing the cavity.
Volume and blend values depend on the pickups: use what the pickup maker recommends.
9V or 18V both work: for one 9V battery, run its − to the jack ring.
Aguilar blend pot: the November 2015 lug change
Aguilar changed the lug layout of its blend pot in November 2015. The older pots are marked A250/C250 (15A250K / 15C250K) and the newer ones Z250/Z250 (1Z250K / 2Z250K). Bridge input, neck input, output and ground sit on different lugs on the two versions, so check the markings on yours against this drawing before you solder.
If the bass goes quiet with the blend centered or the blend works backwards, swap the wire from the blend to the volume with the wire from the blend to ground.
Best Bass Gear's addendum to the Aguilar blend pot. Click to enlarge.
Push-pull active/passive volume for any Aguilar OBP preamp
The same six connections add active/passive to an OBP-1, OBP-2 or OBP-3: swap your volume for a push-pull pot and wire its switch like this. Pushed down, the preamp is on; pulled up, it is bypassed and the volume goes straight to the jack.
You need: push-pull volume pot (DPDT, same value as your current volume), stereo jack already wired for the preamp.
Best Bass Gear's drawing, as originally published. Click to enlarge.
Push-pull active/passive volume: wire by wire
#
From
To
Notes
1
Blend output (or a single pickup's hot)
Volume: Right lug
2
Volume: Left lug
Volume casing, then the jack ground
3
Volume: Middle lug
Switch: top-right lug
Passive signal
4
OBP module: BLU (input)
Switch: middle-left lug
Common, pole 1
5
Switch: top-left lug
Ground
Grounds the preamp input in passive
6
Switch: bottom-left lug
Switch: top-right lug
Jumper
7
Switch: middle-right lug
Stereo jack: Tip
Common, pole 2
8
OBP module: GRN (output)
Switch: bottom-right lug
If yours works the other way round (bypassed when pushed down), swap the top and bottom wires on both sides of the switch.
The rest of the preamp (EQ pots, battery, jack) stays as in your layout above.
Install hints and troubleshooting for Aguilar OBP preamps
From our install sheet for the OBP-1, OBP-2 and OBP-3, based on years of fitting these on the bench.
Before you start
Have a skilled tech do the install if you aren't comfortable soldering.
Shield the control cavity before the preamp goes in: it cuts noise.
Grounding
Solder the volume pot's ground lug to its casing, and carry the ground on to the jack.
Run a wire from the jack ground to the cavity shielding.
Pickup grounds can go on the back of the volume pot. Scuff the casing with sandpaper first so the solder takes.
On our prewired kits, the extra wire on the jack is for the shielding: solder it straight to the cavity shielding.
Troubleshooting
Test on the bench first: with the pots and jack out of the body and jumpers from the pickups, output problems are much easier to find.
Most grounding problems are a lug, a stray strand of wire or a drop of solder touching the shielding, or pot lugs bent into each other. Pull one pot at a time out of its hole while checking for output.
Keep the module's BLU and GRN wires apart: don't braid or wrap them with other wires.
To test without the preamp, unsolder BLU and GRN and wire the volume's output straight to the jack tip. That leaves just pickups, blend and volume.
No output with the blend centered
Either one pickup is out of phase with the other, or the blend pot is the wrong type. Reverse ONE pickup's leads: if the dead spot goes away, it was phase. If not, check the blend: it must be a special-taper blend, not any dual pot.
Some blend pots need the opposite wiring to our drawings: swap the wire from the blend to the volume with the wire from the blend to ground.
A pop when you flip the bypass switch
For up to 30 seconds after the preamp powers up, its output capacitor is still charging, so switching makes a pop that fades with each flip. That is normal.
If it keeps popping: make sure the switch's ground connection is in place, since it stops the preamp oscillating while the switch is between positions. A make-before-break switch also helps.
1 MΩ resistors on the mid switch reduce its click.
Volume and blend values
The OBP preamps work with any value of volume and blend. Your pickups decide the value: passive pickups usually want 250K or 500K audio volume and a 250K blend; active pickups usually want 25K audio pots. Ask the pickup maker.
The OBP-1, OBP-2 and OBP-3 each have one input with 1 MΩ impedance, so blend multiple pickups before the preamp. Most piezos work with that input, but some need more: check with the piezo maker, or add a buffer if you mix piezo with magnetic pickups.
It's a DPDT on-on switch that picks the mid frequency: closed is 400 Hz and open is 800 Hz. The midrange sheet also shows how to fix the mid at one frequency, or move it with capacitors.
Why does the OBP-3 need a stereo jack?
The battery ground goes through the jack's ring, so plugging in a 1/4" cable turns the preamp on. Unplug when you're done to save the batteries.
What value blend and volume pots should I use?
The diagram doesn't set a value. It says to use what your pickup maker recommends.
Can I wire an OBP-3 with one pickup?
Yes. Leave out the blend pot and wire the pickup directly to the volume pot.