DiMarzio Bass Wiring Diagrams
DiMarzio wiring diagrams for bass, written out as text: 36 hookups for the Model P, Model J, Ultra Jazz, Ultra Jazz 5, Model One and Will Power pickups, from basic two-volume setups to pan pots, series/parallel (dual sound), neck/bridge series and phase switching. Each one has DiMarzio's original drawing, a wire-by-wire table and steps.
Before you solder
- DiMarzio bass humbucker colours: one coil is red and black, the other white and green. For the standard series sound, red is hot, green goes to ground, and black and white are soldered together and taped.
- Pots are drawn from the back. On every pot here, the ground lug is the outer lug soldered to the casing; the other outer lug is called the free outer lug.
- All grounds must be connected, and the bridge (tailpiece) should be connected to ground.
- DiMarzio's sheets don't give pot or capacitor values: 250K pots and a 0.047 µF tone cap are typical for passive bass.
Every diagram, wire by wire
Standard hookups
- DiMarzio Model P / Split P: 1 volume, 1 tone
- DiMarzio Ultra Jazz, Model J, Model P+J: 2 volumes, master tone
- DiMarzio Ultra Jazz, Model J, Model P+J: 2 volumes, master tone (coils in parallel)
- DiMarzio Ultra Jazz, Model J, Model P+J: parallel humbucking
- DiMarzio Ultra Jazz, Model J, Model P+J: 2 volumes, no tone
- DiMarzio Ultra Jazz, Model J, Model P+J: 2 volumes and a master volume
- DiMarzio Model One, Model J: 3 volumes, master tone
- DiMarzio Ultra Jazz 5: 2 volumes, master tone
- DiMarzio Ultra Jazz: 2 volumes, 2 tones
- DiMarzio Will Power Neck/Model One and Will Power Middle/Model P: 2 volumes, master tone
Pan (blend) pot hookups
- DiMarzio 2 pickups: pan pot, master volume, no tone
- DiMarzio 2 pickups: pan pot, master volume, master tone
- DiMarzio 2 pickups: pan pot, master volume, 2 tones
- DiMarzio 2 pickups: neck volume, bridge volume, blend pot, master tone
Dual sound (series/parallel) and other switches
- DiMarzio Model P / Split P with dual sound (series/parallel switch)
- DiMarzio Ultra Jazz, Model J, Model P+J: 2 DPDT series/parallel switches
- DiMarzio 2 humbuckers: push-pull neck volume (dual sound), bridge volume, master tone
- DiMarzio Ultra Jazz, Model J, Model P+J: 2 push-pull volumes for dual sound
- DiMarzio Ultra Jazz, Model J, Model P+J: push-pull tone for bridge dual sound
- DiMarzio bass: dual sound, blend pot, master volume, master tone
- DiMarzio bass: dual sound, blend pot, master volume
- DiMarzio 2 humbuckers: pan pot, master volume, 2 push-pull tones (dual sound)
- DiMarzio 2 humbuckers: pan pot, push-pull master volume and tone (dual sound)
- DiMarzio 2 singles: neck volume, bridge volume, stacked tone, stereo/mono switch, 2 jacks
- DiMarzio 3 humbuckers: volume, tone, 3-way toggle and on/on/on switch
Neck/bridge series switching
- DiMarzio 2 humbuckers: neck/bridge in series switch (neck volume bypassed)
- DiMarzio 2 humbuckers: neck/bridge in series switch (bridge volume bypassed)
- DiMarzio 2 humbuckers: push-pull tone for bridge/neck series (neck volume turns off)
- DiMarzio Ultra Jazz 5: push-pull neck volume for neck/bridge series
- DiMarzio Ultra Jazz 5: push-pull series neck volume and push-pull phase tone
- DiMarzio P+J / J set: push-pull dual sound volumes and push-pull series tone
- DiMarzio 2 humbuckers: 2 volumes, master tone, 5-way EP1112 switch
Phase switching
- DiMarzio 2 humbuckers: 2 volumes, master tone, DPDT neck phase switch
- DiMarzio Ultra Jazz, Model J, Model P+J: push-pull dual sound volumes and DPDT phase switch
- DiMarzio Ultra Jazz, Model J, Model P+J: push-pull dual sound volumes and push-pull phase tone
- DiMarzio Ultra Jazz, Model J, Model P+J: neck pickup with dual sound and phase switching
DiMarzio Model P / Split P: 1 volume, 1 tone
The standard P-bass hookup for DiMarzio's Model P and other split-P humbuckers: one volume and one tone.
You need: 1 volume pot, 1 tone pot, tone capacitor, mono output jack.
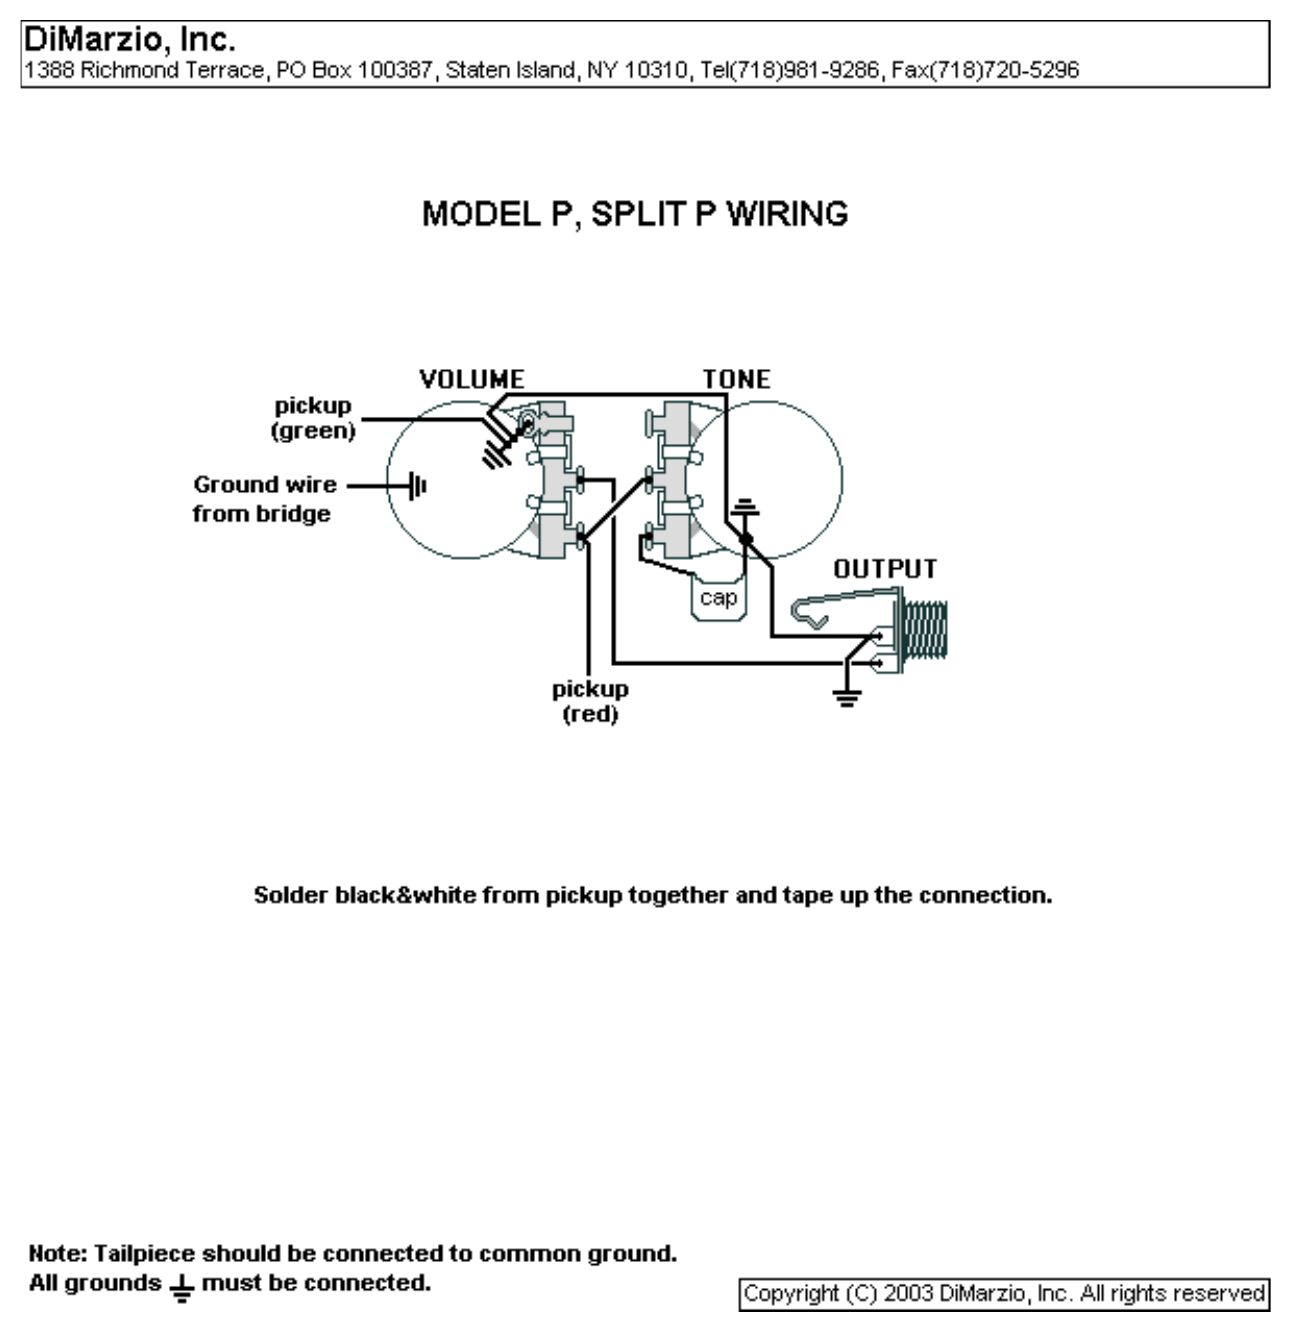
| # | From | To | Notes |
|---|---|---|---|
| 1 | Pickup: red | Volume: free outer lug | Hot |
| 2 | Pickup: green | Volume casing (ground) | |
| 3 | Pickup: black + white | Join and tape | Series link between the two coils |
| 4 | Volume: free outer lug | Tone: middle lug | |
| 5 | Tone: one outer lug | Capacitor, other leg to ground | |
| 6 | Volume: middle lug | Output jack: tip | |
| 7 | Volume: ground lug | Volume casing | |
| 8 | Bridge ground wire | Volume casing | |
| 9 | Pot casings | Output jack: sleeve |
Step by step
- Join the pickup's black and white wires and tape the joint.
- Red to the volume's free outer lug, green to the volume casing.
- Jumper the volume's free outer lug to the tone's middle lug. Tone outer lug to the capacitor, capacitor to ground.
- Volume middle lug to the jack tip; casings and bridge ground to the jack sleeve.
- Test: plug in at low volume, tap each pickup and try every control and switch position before closing the cavity.
- Lug names are described by role, as drawn by DiMarzio: on each pot, the ground lug is the outer lug soldered to the casing, the other outer lug is the free one, and the middle lug is the wiper.
DiMarzio Ultra Jazz, Model J, Model P+J: 2 volumes, master tone
DiMarzio's standard two-pickup hookup (J/J or P/J): a volume for each pickup and a master tone, with each humbucker's coils in series.
You need: 2 volume pots, 1 tone pot, tone capacitor, mono output jack.
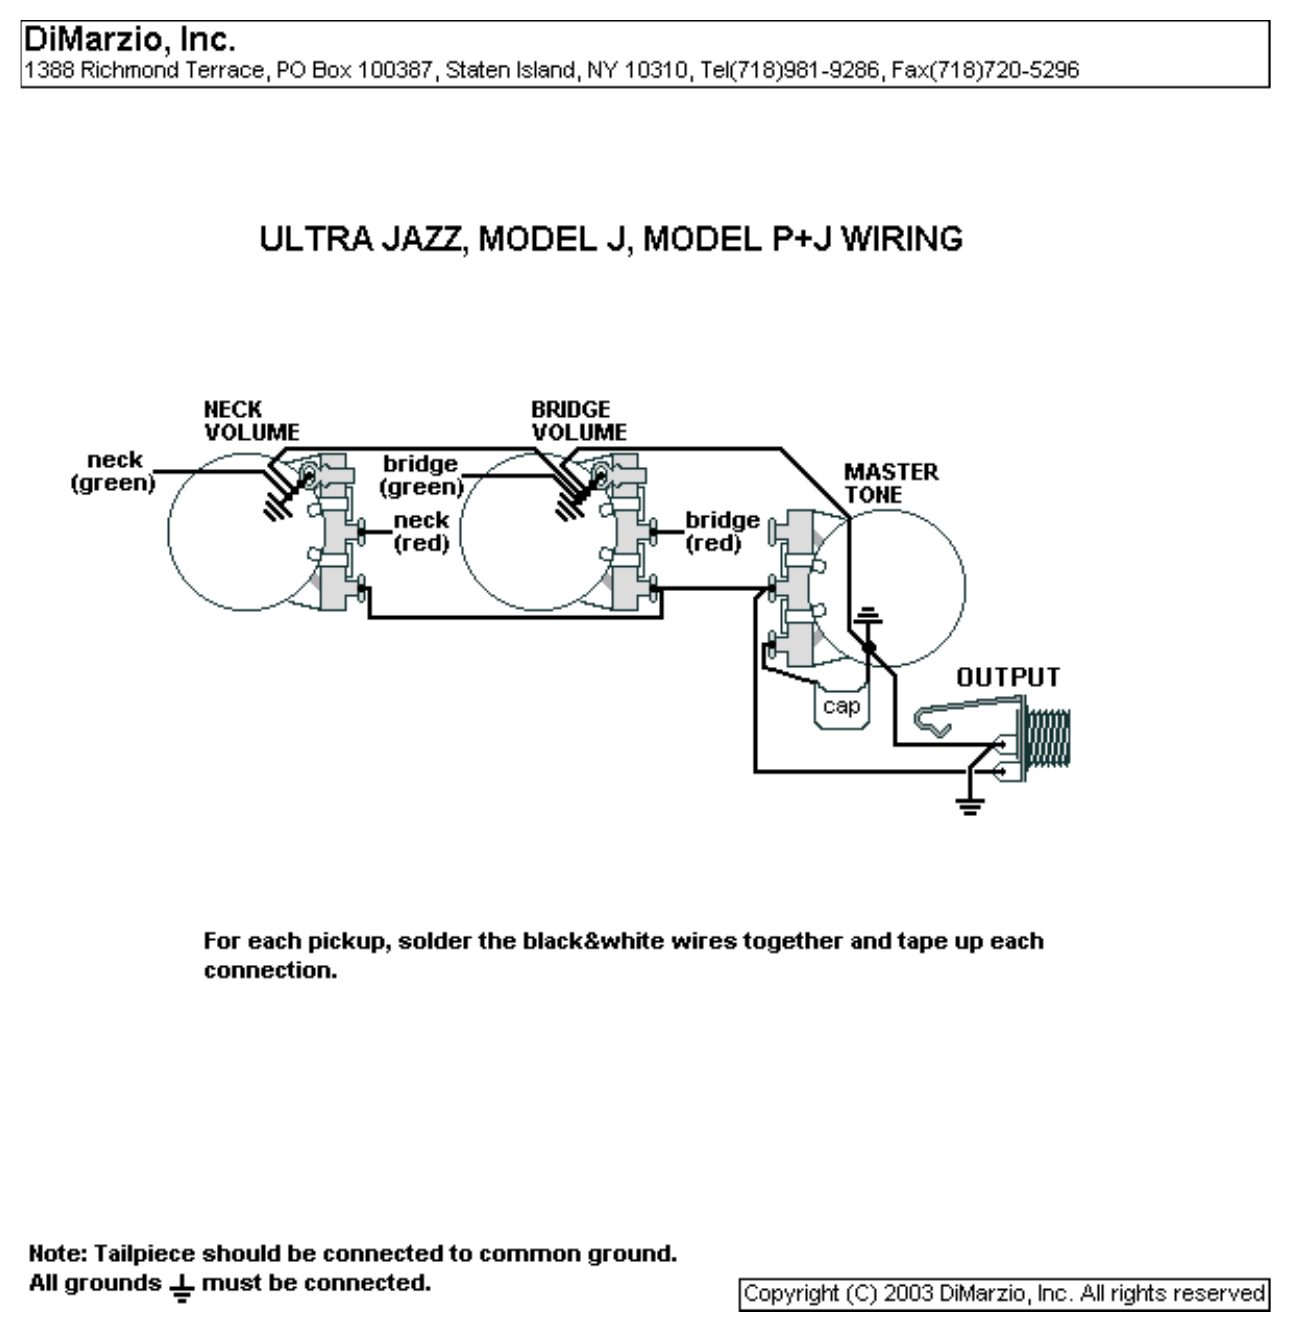
| # | From | To | Notes |
|---|---|---|---|
| 1 | Neck pickup: red | Neck volume: middle lug | |
| 2 | Neck pickup: green | Neck volume casing (ground) | |
| 3 | Bridge pickup: red | Bridge volume: middle lug | |
| 4 | Bridge pickup: green | Bridge volume casing (ground) | |
| 5 | Each pickup: black + white | Join and tape | Not connected to anything else |
| 6 | Each volume: ground lug | Its casing | |
| 7 | Neck volume: free outer lug | Bridge volume: free outer lug | These joined lugs are the output |
| 8 | Master tone: middle lug | Joined volume outputs | Tone sits across the output |
| 9 | Master tone: one outer lug | Capacitor, other leg to ground | Other outer lug left empty |
| 10 | Joined volume outputs | Output jack: tip | |
| 11 | All pot casings | Output jack: sleeve (ground) | Bridge ground wire to a pot casing |
Step by step
- For each pickup, join black and white and tape the joint.
- Each red to its volume's middle lug, each green to that volume's casing.
- Join the two volumes' free outer lugs; this is the output. Run it to the tone's middle lug and the jack tip.
- Tone outer lug to the capacitor, capacitor to ground. Casings and bridge ground to the jack sleeve.
- Test: plug in at low volume, tap each pickup and try every control and switch position before closing the cavity.
- Lug names are described by role, as drawn by DiMarzio: on each pot, the ground lug is the outer lug soldered to the casing, the other outer lug is the free one, and the middle lug is the wiper.
- DiMarzio draws the pickup on the volume's middle lug and takes the output from the outer lug, which keeps one volume from muting the other when turned down.
DiMarzio Ultra Jazz, Model J, Model P+J: 2 volumes, master tone (coils in parallel)
The same 2 volume / master tone layout with each humbucker's coils in parallel.
You need: 2 volume pots, 1 tone pot, tone capacitor, mono output jack.
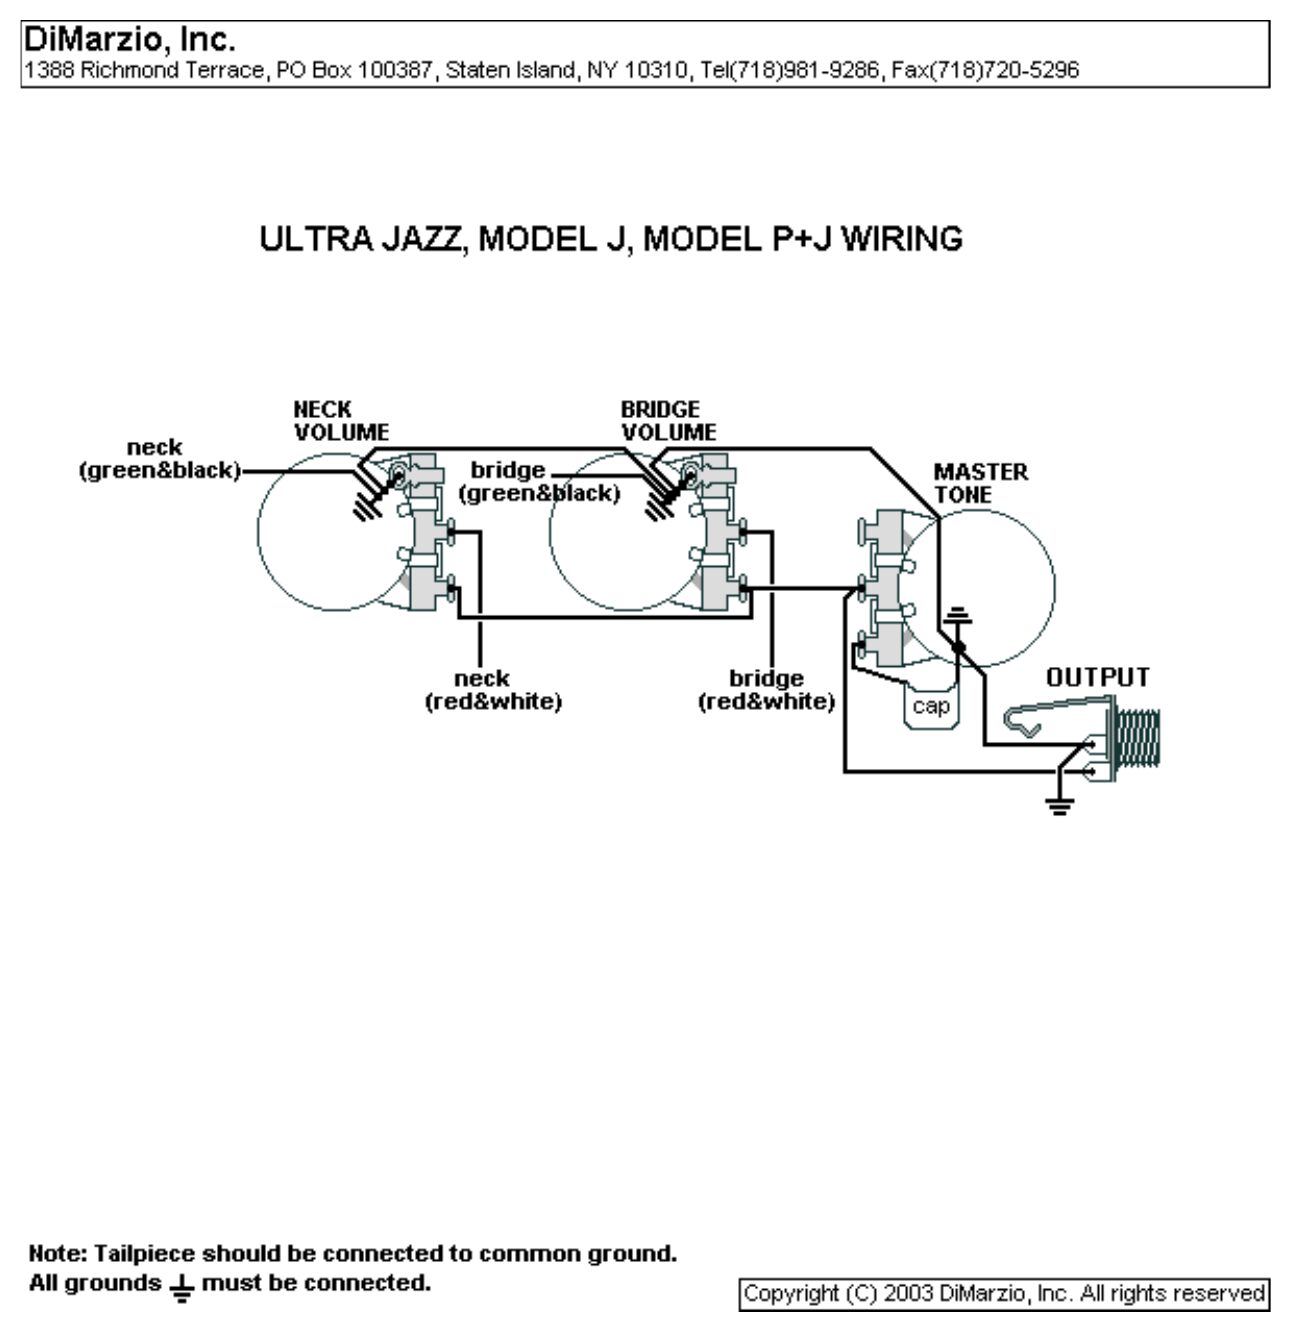
| # | From | To | Notes |
|---|---|---|---|
| 1 | Neck pickup: red + white | Neck volume: middle lug | |
| 2 | Neck pickup: green + black | Neck volume casing (ground) | |
| 3 | Bridge pickup: red + white | Bridge volume: middle lug | |
| 4 | Bridge pickup: green + black | Bridge volume casing (ground) | |
| 5 | Each volume: ground lug | Its casing | |
| 6 | Neck volume: free outer lug | Bridge volume: free outer lug | These joined lugs are the output |
| 7 | Master tone: middle lug | Joined volume outputs | Tone sits across the output |
| 8 | Master tone: one outer lug | Capacitor, other leg to ground | Other outer lug left empty |
| 9 | Joined volume outputs | Output jack: tip | |
| 10 | All pot casings | Output jack: sleeve (ground) | Bridge ground wire to a pot casing |
Step by step
- For each pickup, join red and white (hot) and join green and black (ground).
- Hot pair to the volume's middle lug, ground pair to its casing.
- Join the volumes' free outer lugs and run them to the tone's middle lug and the jack tip.
- Tone outer lug to the capacitor, capacitor to ground. Casings to the jack sleeve.
- Test: plug in at low volume, tap each pickup and try every control and switch position before closing the cavity.
- Lug names are described by role, as drawn by DiMarzio: on each pot, the ground lug is the outer lug soldered to the casing, the other outer lug is the free one, and the middle lug is the wiper.
DiMarzio Ultra Jazz, Model J, Model P+J: parallel humbucking
DiMarzio's parallel-humbucking sheet: red and white together as the hot, black and green together to ground.
You need: 2 volume pots, 1 tone pot, tone capacitor, mono output jack.
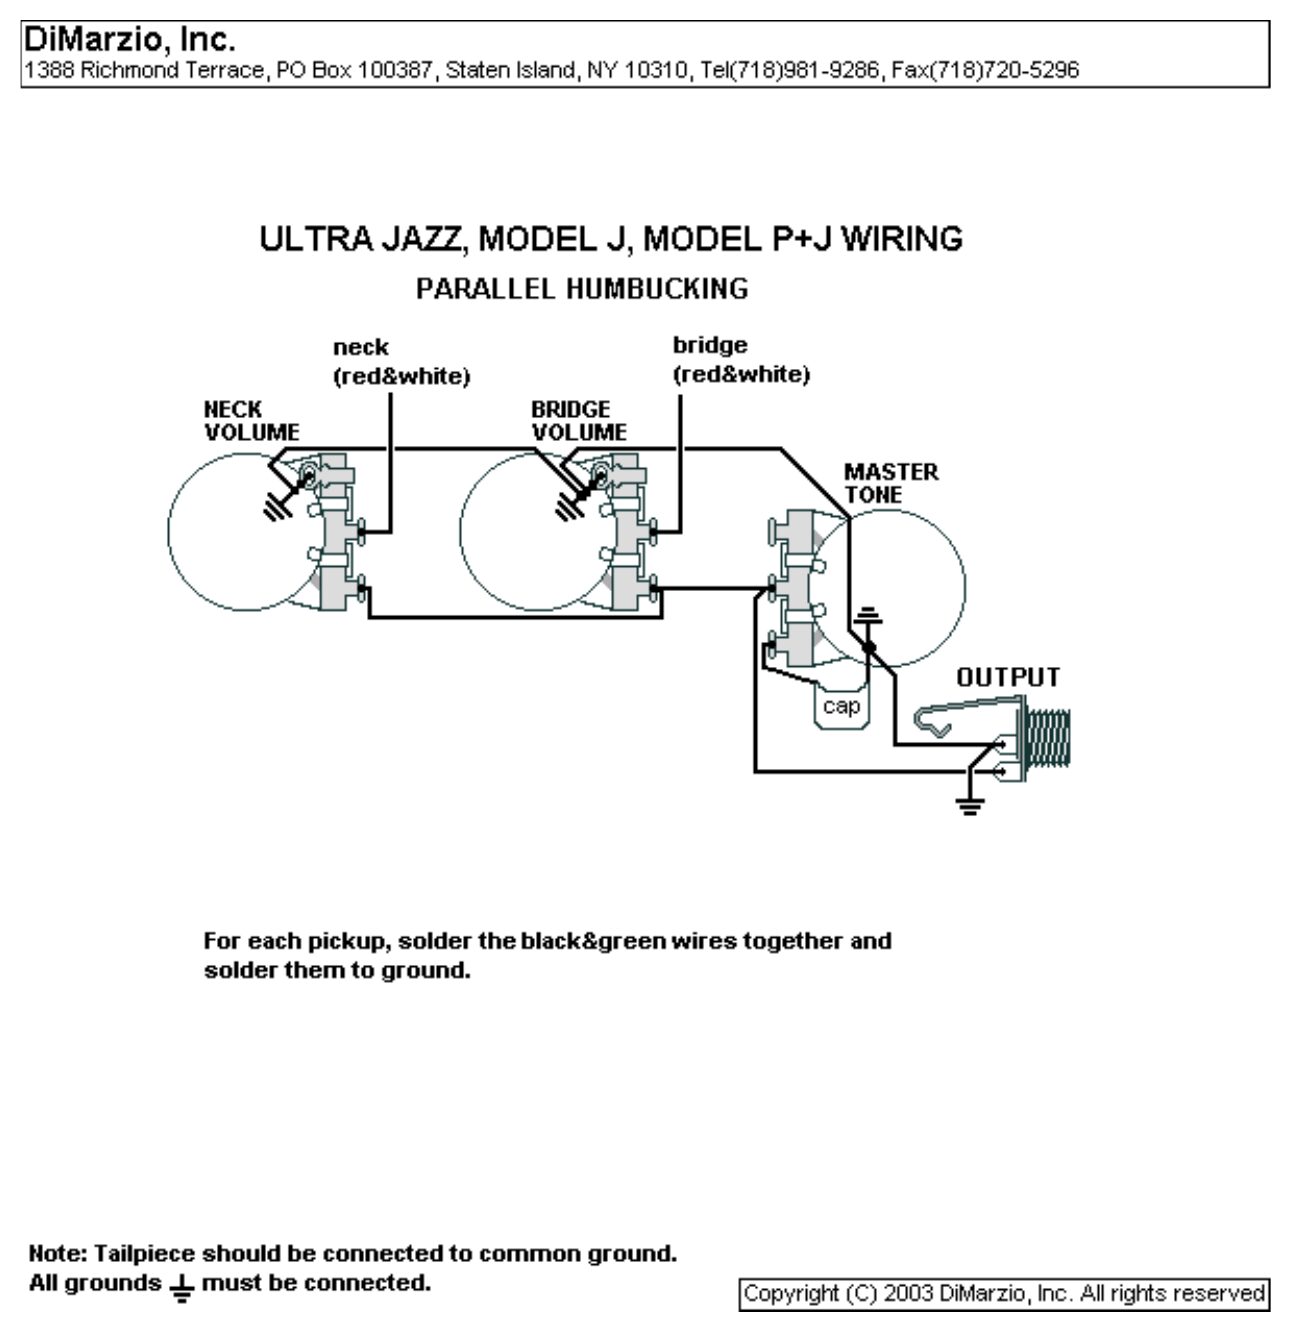
| # | From | To | Notes |
|---|---|---|---|
| 1 | Neck pickup: red + white | Neck volume: middle lug | |
| 2 | Neck pickup: black + green | Neck volume casing (ground) | |
| 3 | Bridge pickup: red + white | Bridge volume: middle lug | |
| 4 | Bridge pickup: black + green | Bridge volume casing (ground) | |
| 5 | Each volume: ground lug | Its casing | |
| 6 | Neck volume: free outer lug | Bridge volume: free outer lug | These joined lugs are the output |
| 7 | Master tone: middle lug | Joined volume outputs | Tone sits across the output |
| 8 | Master tone: one outer lug | Capacitor, other leg to ground | Other outer lug left empty |
| 9 | Joined volume outputs | Output jack: tip | |
| 10 | All pot casings | Output jack: sleeve (ground) | Bridge ground wire to a pot casing |
Step by step
- For each pickup, join red and white (hot); join black and green and solder them to ground.
- Hot pair to the volume's middle lug.
- Join the volumes' free outer lugs and run them to the tone's middle lug and the jack tip.
- Tone outer lug to the capacitor, capacitor to ground.
- Test: plug in at low volume, tap each pickup and try every control and switch position before closing the cavity.
- Lug names are described by role, as drawn by DiMarzio: on each pot, the ground lug is the outer lug soldered to the casing, the other outer lug is the free one, and the middle lug is the wiper.
- This sheet and the 'coils in parallel' sheet above differ only in DiMarzio's wire labels: both make the hot from red and white and ground black and green.
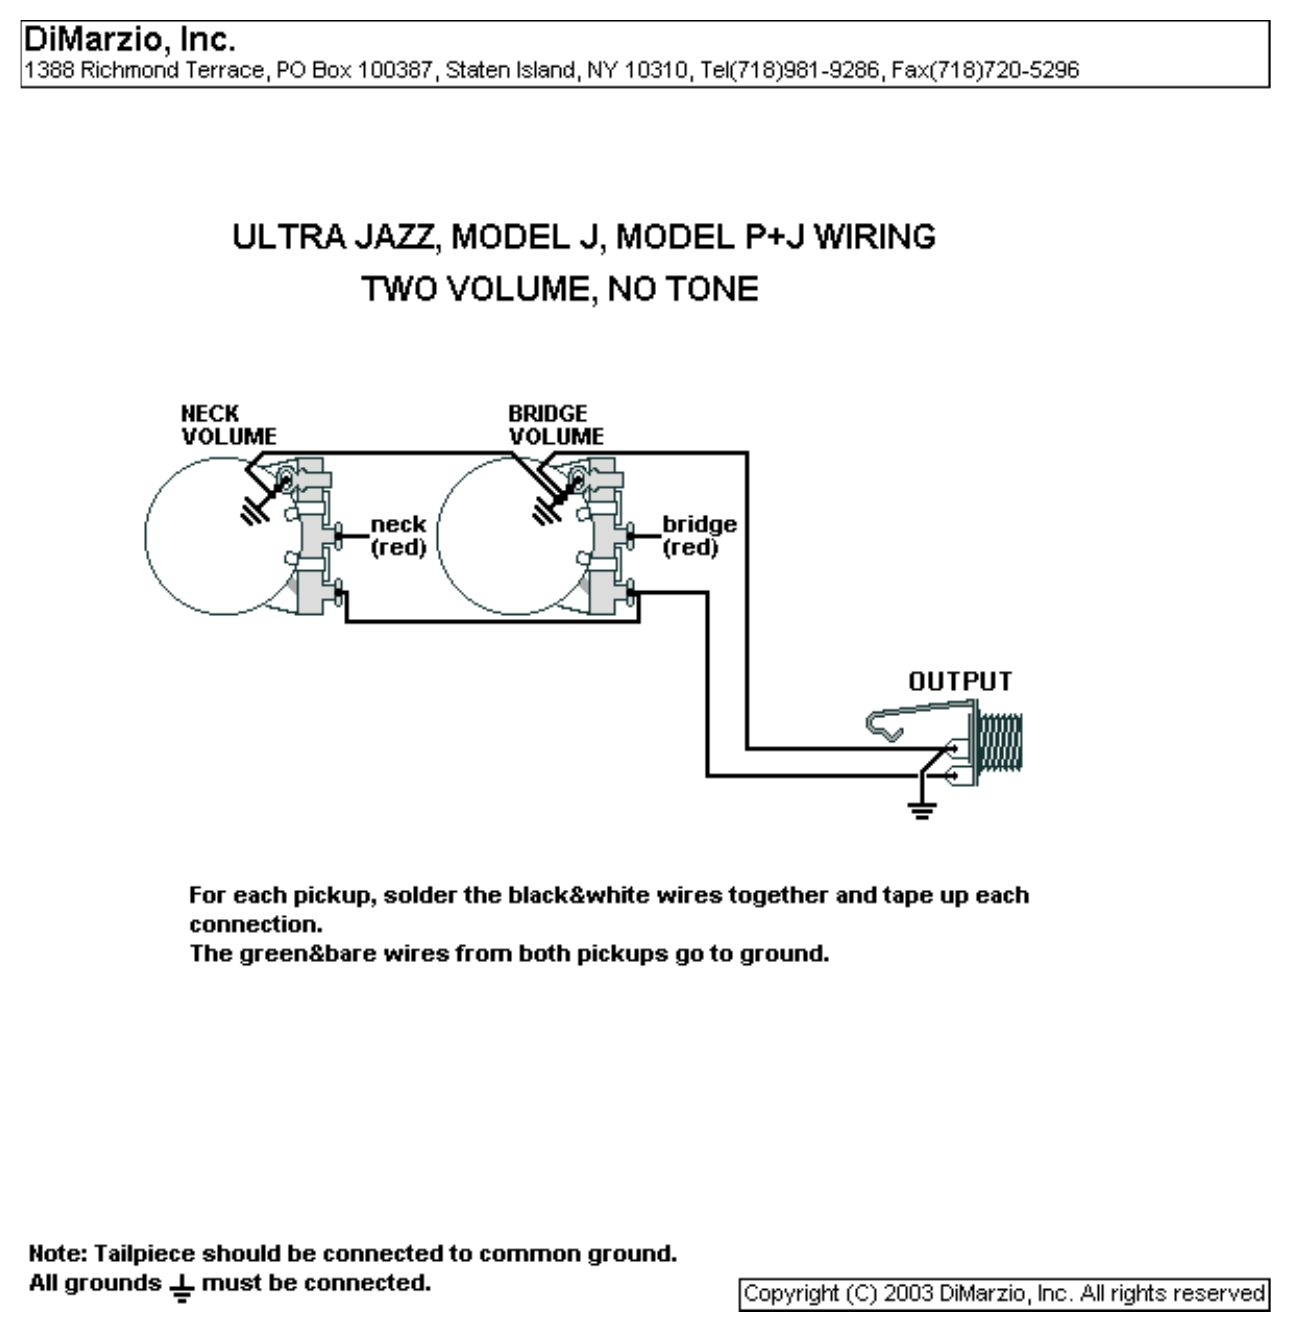
DiMarzio Ultra Jazz, Model J, Model P+J: 2 volumes, no tone
Two volumes straight to the jack, with no tone control.
You need: 2 volume pots, mono output jack.
| # | From | To | Notes |
|---|---|---|---|
| 1 | Neck pickup: red | Neck volume: middle lug | |
| 2 | Neck pickup: green + bare | Neck volume casing (ground) | |
| 3 | Bridge pickup: red | Bridge volume: middle lug | |
| 4 | Bridge pickup: green + bare | Bridge volume casing (ground) | |
| 5 | Each pickup: black + white | Join and tape | Not connected to anything else |
| 6 | Each volume: ground lug | Its casing | |
| 7 | Neck volume: free outer lug | Bridge volume: free outer lug | These joined lugs are the output |
| 8 | Joined volume outputs | Output jack: tip | |
| 9 | Pot casings | Output jack: sleeve |
Step by step
- For each pickup, join black and white and tape the joint.
- Each red to its volume's middle lug; green and bare to ground.
- Join the volumes' free outer lugs and run them to the jack tip. Casings to the jack sleeve.
- Test: plug in at low volume, tap each pickup and try every control and switch position before closing the cavity.
- Lug names are described by role, as drawn by DiMarzio: on each pot, the ground lug is the outer lug soldered to the casing, the other outer lug is the free one, and the middle lug is the wiper.
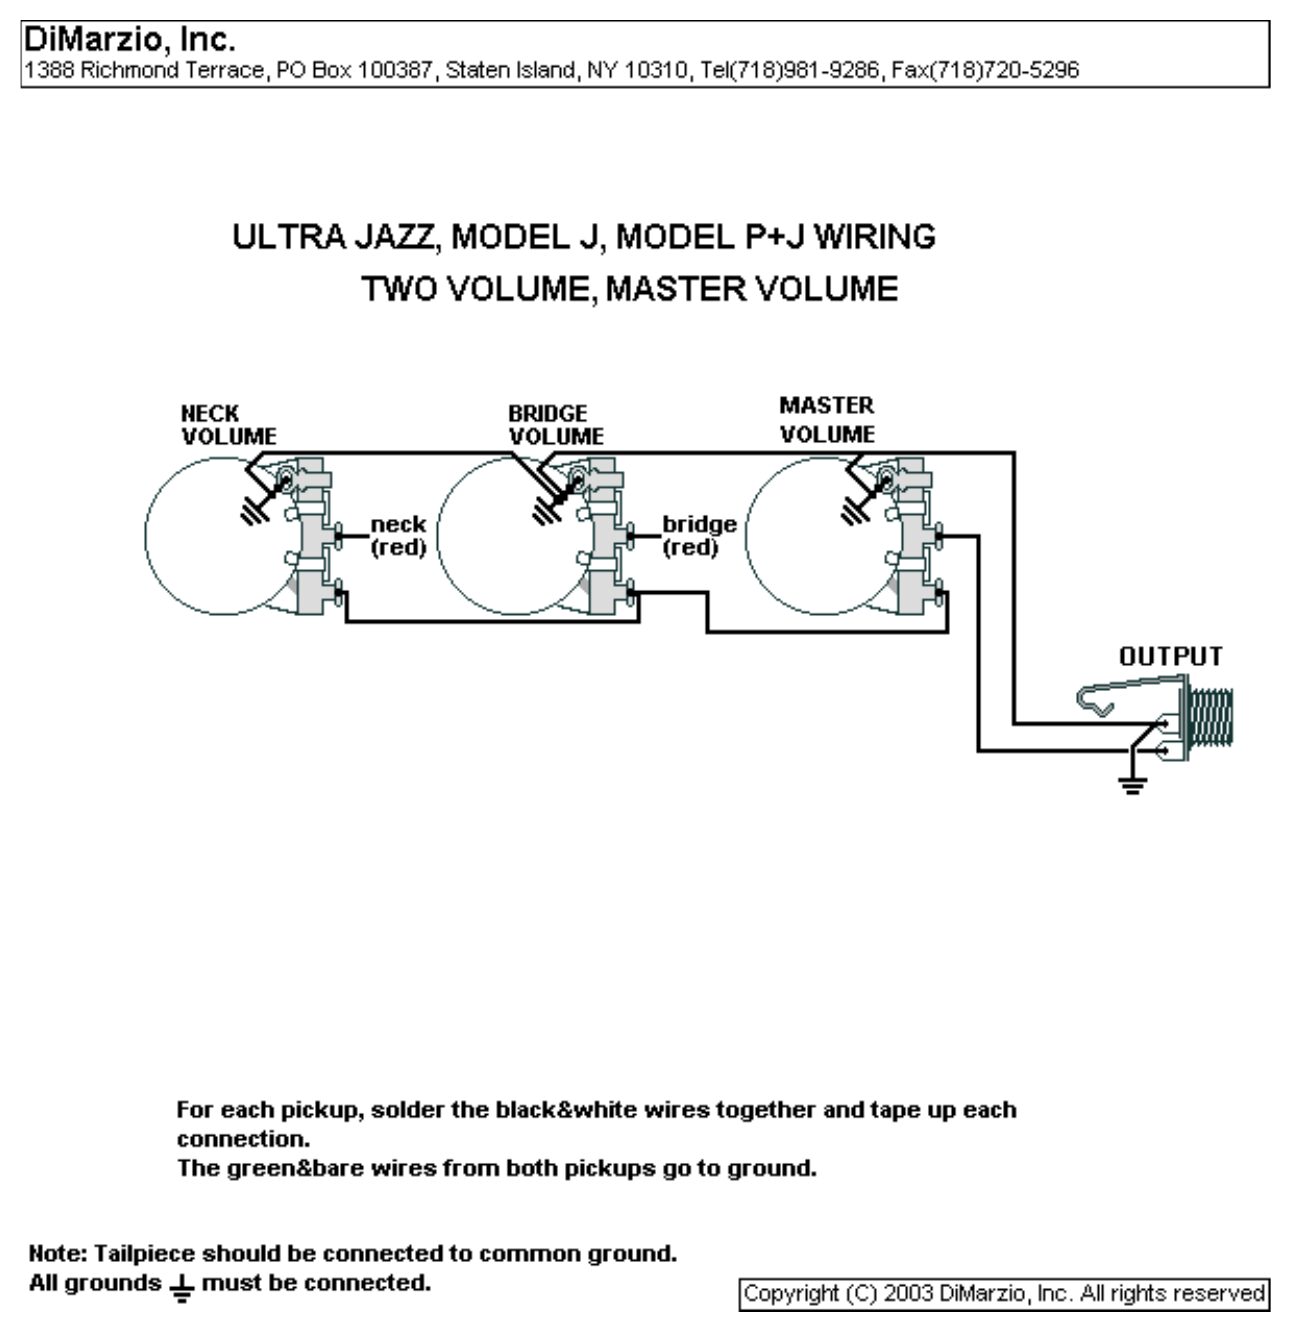
DiMarzio Ultra Jazz, Model J, Model P+J: 2 volumes and a master volume
A volume for each pickup feeding a master volume, no tone.
You need: 3 volume pots, mono output jack.
| # | From | To | Notes |
|---|---|---|---|
| 1 | Neck pickup: red | Neck volume: middle lug | |
| 2 | Neck pickup: green + bare | Neck volume casing (ground) | |
| 3 | Bridge pickup: red | Bridge volume: middle lug | |
| 4 | Bridge pickup: green + bare | Bridge volume casing (ground) | |
| 5 | Each pickup: black + white | Join and tape | Not connected to anything else |
| 6 | Each volume: ground lug | Its casing | |
| 7 | Neck volume: free outer lug | Bridge volume: free outer lug | These joined lugs are the output |
| 8 | Joined volume outputs | Master volume: free outer lug | |
| 9 | Master volume: middle lug | Output jack: tip | |
| 10 | Master volume: ground lug | Its casing | |
| 11 | Pot casings | Output jack: sleeve |
Step by step
- For each pickup, join black and white and tape the joint.
- Each red to its volume's middle lug; green and bare to ground.
- Join the two volumes' free outer lugs and run them to the master volume's free outer lug.
- Master middle lug to the jack tip; casings to the jack sleeve.
- Test: plug in at low volume, tap each pickup and try every control and switch position before closing the cavity.
- Lug names are described by role, as drawn by DiMarzio: on each pot, the ground lug is the outer lug soldered to the casing, the other outer lug is the free one, and the middle lug is the wiper.
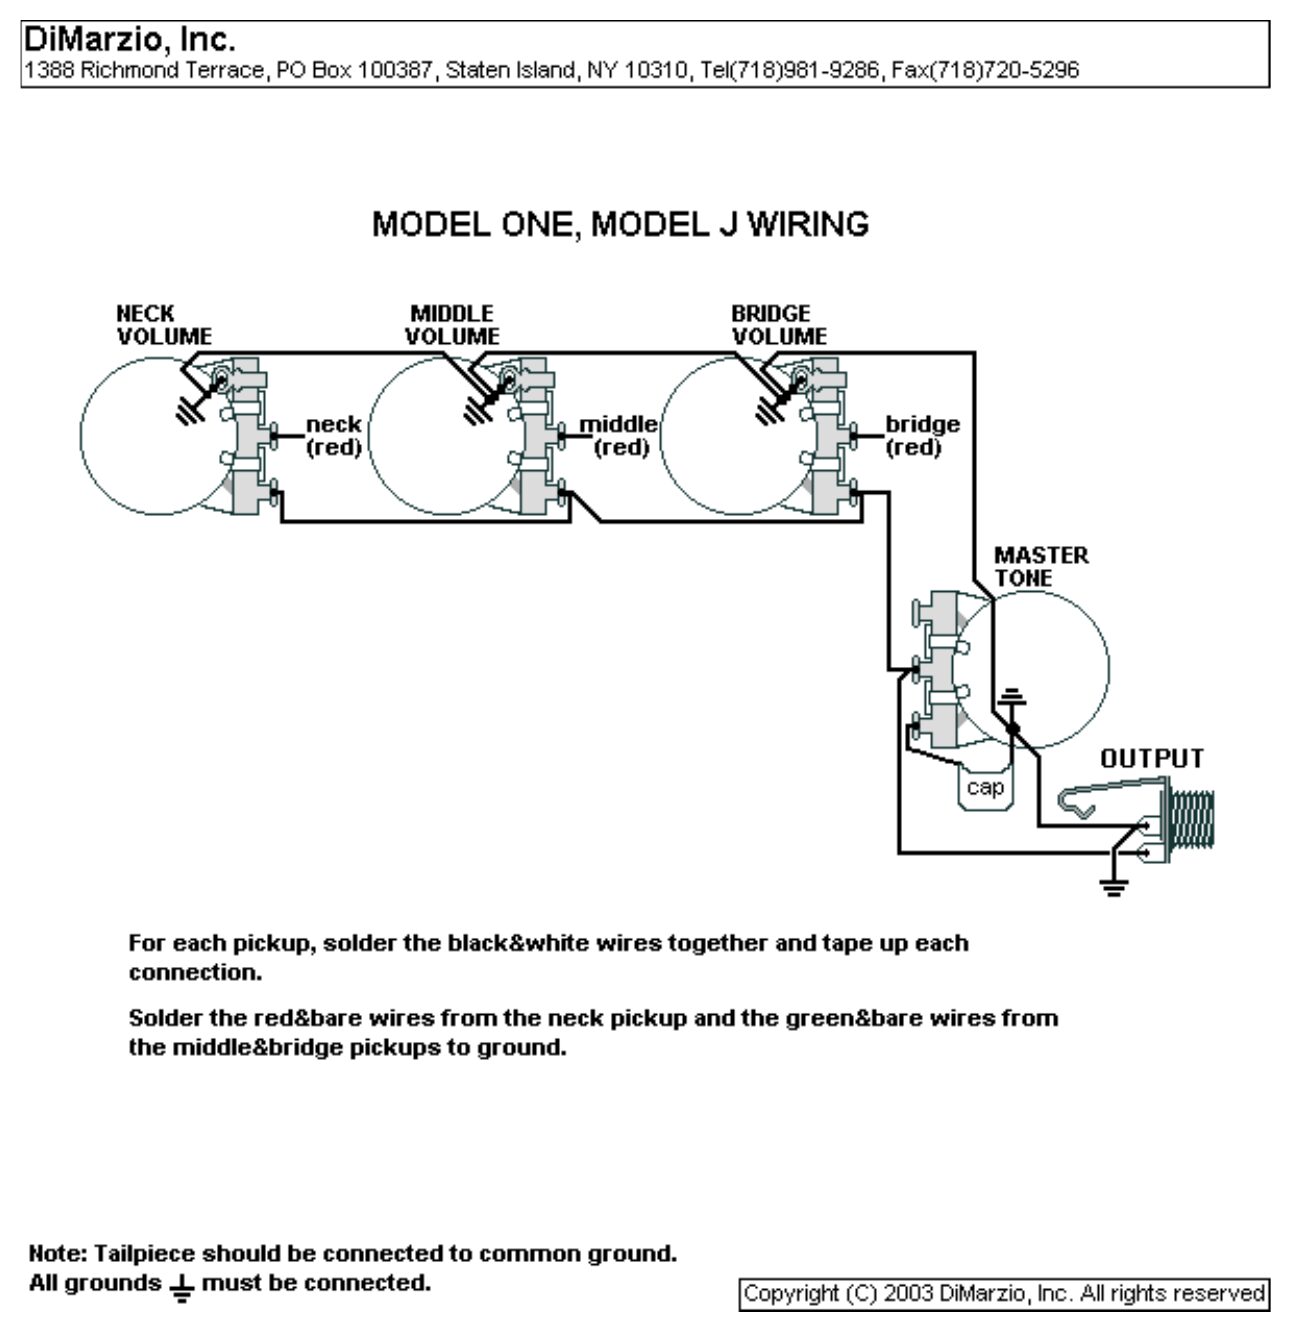
DiMarzio Model One, Model J: 3 volumes, master tone
Three humbuckers (neck, middle, bridge), each with its own volume, and a master tone.
You need: 3 volume pots, 1 tone pot, tone capacitor, mono output jack.
| # | From | To | Notes |
|---|---|---|---|
| 1 | Each pickup: black + white | Join and tape | |
| 2 | Neck pickup: hot | Neck volume: middle lug | See the note on neck colours |
| 3 | Middle pickup: red | Middle volume: middle lug | |
| 4 | Bridge pickup: red | Bridge volume: middle lug | |
| 5 | Middle and bridge: green + bare; neck: red + bare | Ground | DiMarzio's text |
| 6 | All three volumes: free outer lugs | Join together | Output |
| 7 | Master tone: middle lug | Joined volume outputs | Tone sits across the output |
| 8 | Master tone: one outer lug | Capacitor, other leg to ground | Other outer lug left empty |
| 9 | Joined volume outputs | Output jack: tip | |
| 10 | All pot casings | Output jack: sleeve (ground) | Bridge ground wire to a pot casing |
Step by step
- Join black and white on each pickup and tape.
- Each hot to its volume's middle lug; the ground wires to the casings.
- Join the three volumes' free outer lugs and run them to the tone's middle lug and the jack tip.
- Tone outer lug to the capacitor, capacitor to ground.
- Test: plug in at low volume, tap each pickup and try every control and switch position before closing the cavity.
- Lug names are described by role, as drawn by DiMarzio: on each pot, the ground lug is the outer lug soldered to the casing, the other outer lug is the free one, and the middle lug is the wiper.
- Check: DiMarzio's drawing labels the neck hot 'red', but its text says to ground the neck pickup's red and bare wires. If you follow the text, the neck's green is its hot. Confirm with the pickup's own sheet before soldering.
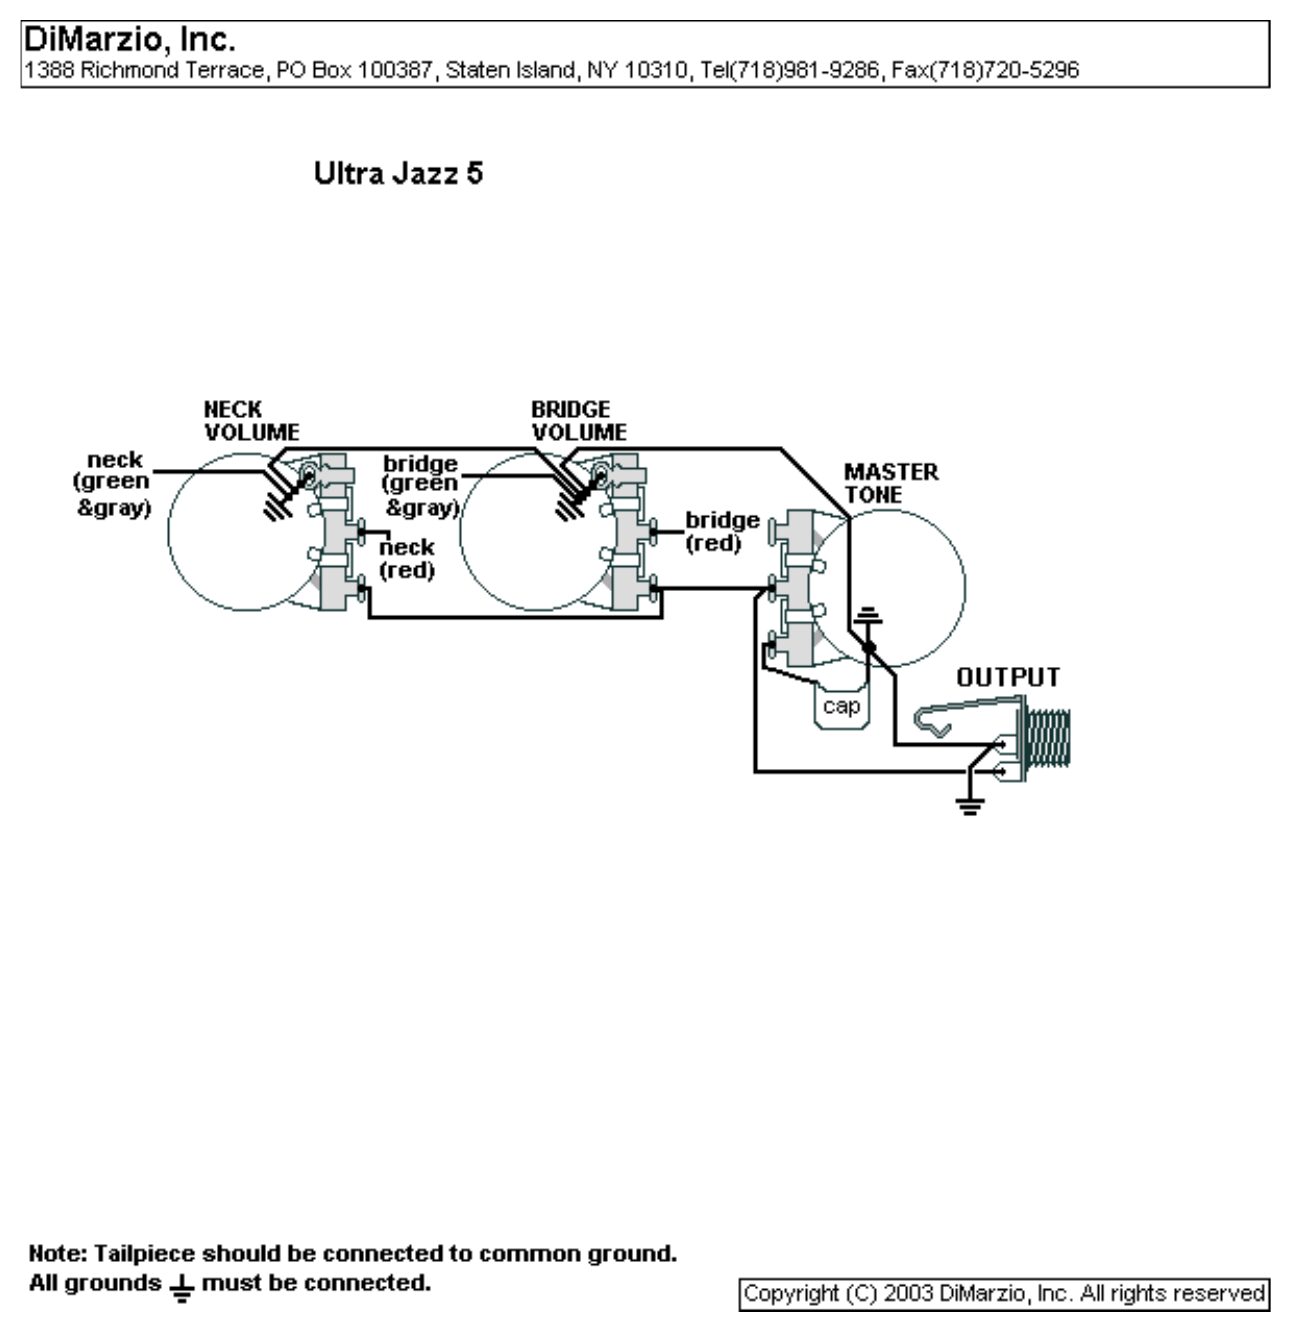
DiMarzio Ultra Jazz 5: 2 volumes, master tone
The Ultra Jazz 5 set with a volume for each pickup and a master tone.
You need: 2 volume pots, 1 tone pot, tone capacitor, mono output jack.
| # | From | To | Notes |
|---|---|---|---|
| 1 | Each pickup: red | Its volume: middle lug | Hot |
| 2 | Each pickup: green + gray | Its volume casing (ground) | |
| 3 | Neck volume: free outer lug | Bridge volume: free outer lug | Output |
| 4 | Master tone: middle lug | Joined volume outputs | Tone sits across the output |
| 5 | Master tone: one outer lug | Capacitor, other leg to ground | Other outer lug left empty |
| 6 | Joined volume outputs | Output jack: tip | |
| 7 | All pot casings | Output jack: sleeve (ground) | Bridge ground wire to a pot casing |
Step by step
- Each red to its volume's middle lug; green and gray to the casing.
- Join the volumes' free outer lugs; run them to the tone's middle lug and the jack tip.
- Tone outer lug to the capacitor, capacitor to ground.
- Test: plug in at low volume, tap each pickup and try every control and switch position before closing the cavity.
- Lug names are described by role, as drawn by DiMarzio: on each pot, the ground lug is the outer lug soldered to the casing, the other outer lug is the free one, and the middle lug is the wiper.
DiMarzio Ultra Jazz: 2 volumes, 2 tones
Each pickup gets its own volume and its own tone.
You need: 2 volume pots, 2 tone pots, 2 tone capacitors, mono output jack.
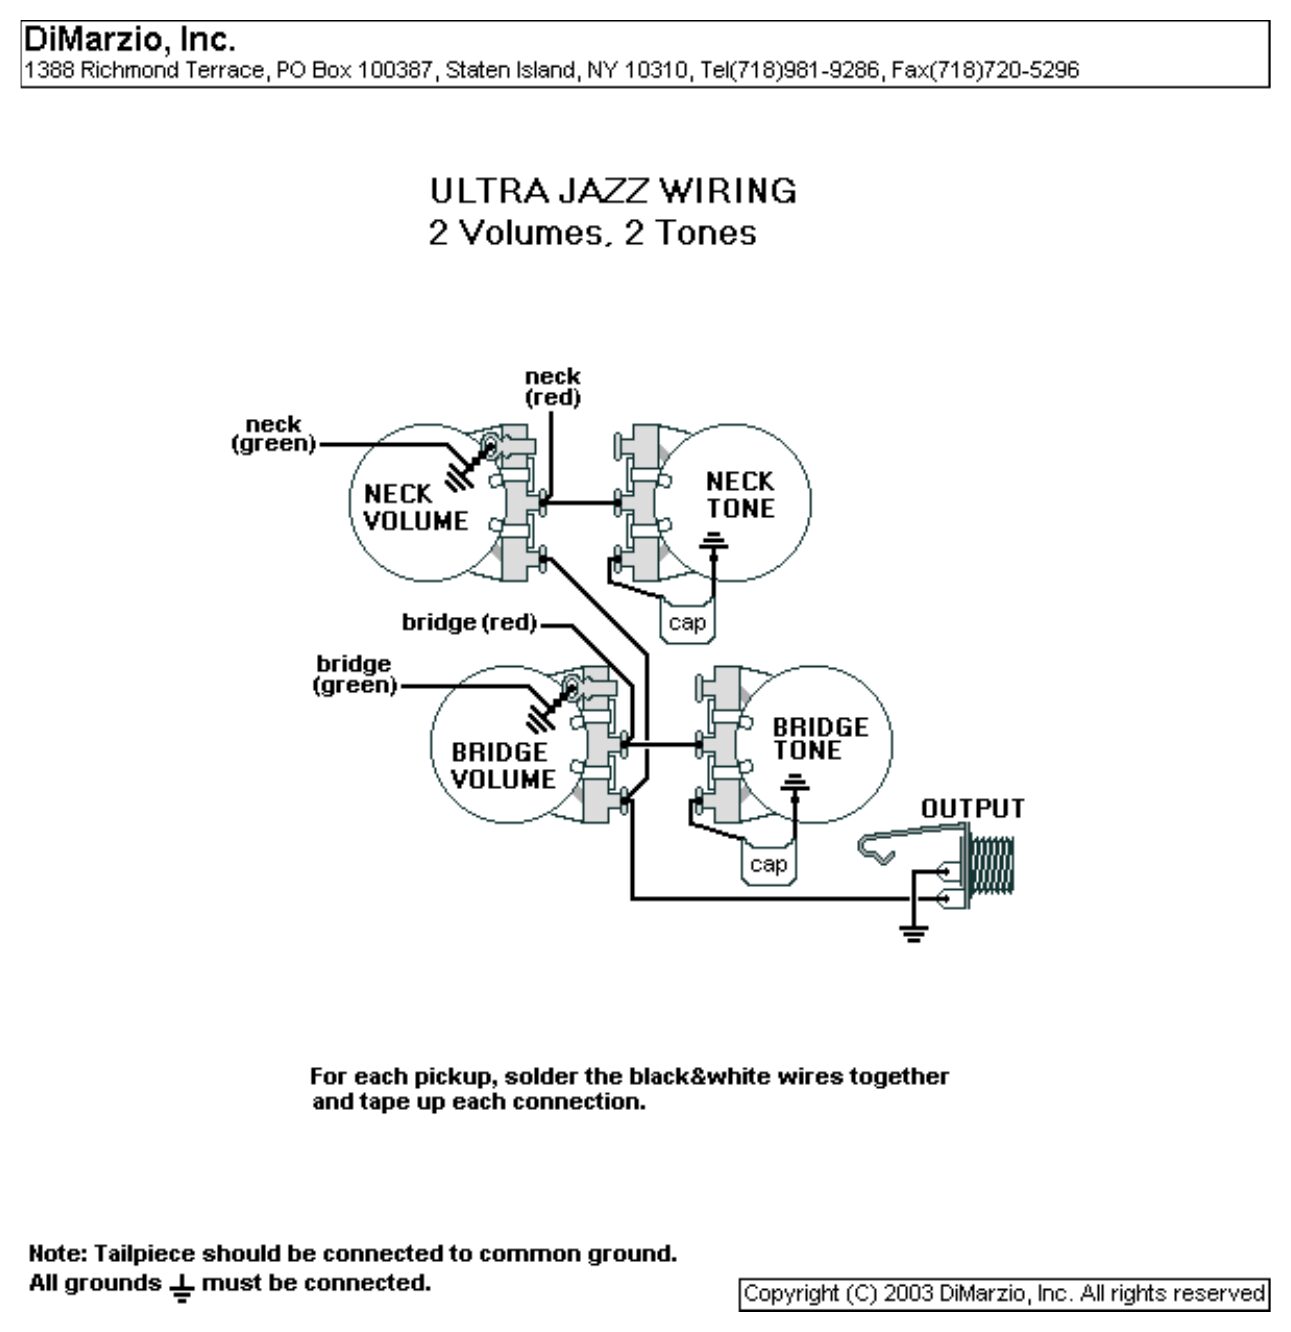
| # | From | To | Notes |
|---|---|---|---|
| 1 | Each pickup: red | Its volume: middle lug | Hot |
| 2 | Each pickup: green | Its volume casing | |
| 3 | Each volume: middle lug | Its tone: middle lug | Tone is on the pickup side of the volume |
| 4 | Each tone: one outer lug | Capacitor, other leg to ground | |
| 5 | Neck volume: free outer lug | Bridge volume: free outer lug | Output |
| 6 | Joined volume outputs | Output jack: tip | |
| 7 | Pot casings | Output jack: sleeve |
Step by step
- Each red to its volume's middle lug, each green to that volume's casing.
- Jumper each volume's middle lug to its tone's middle lug; tone outer lug to a capacitor, capacitor to ground.
- Join the two volumes' free outer lugs and run them to the jack tip.
- Test: plug in at low volume, tap each pickup and try every control and switch position before closing the cavity.
- Lug names are described by role, as drawn by DiMarzio: on each pot, the ground lug is the outer lug soldered to the casing, the other outer lug is the free one, and the middle lug is the wiper.
DiMarzio Will Power Neck/Model One and Will Power Middle/Model P: 2 volumes, master tone
Will Power neck and middle pickups with two volumes and a master tone. The two pickups use opposite wire colours for hot.
You need: 2 volume pots, 1 tone pot, tone capacitor, mono output jack.
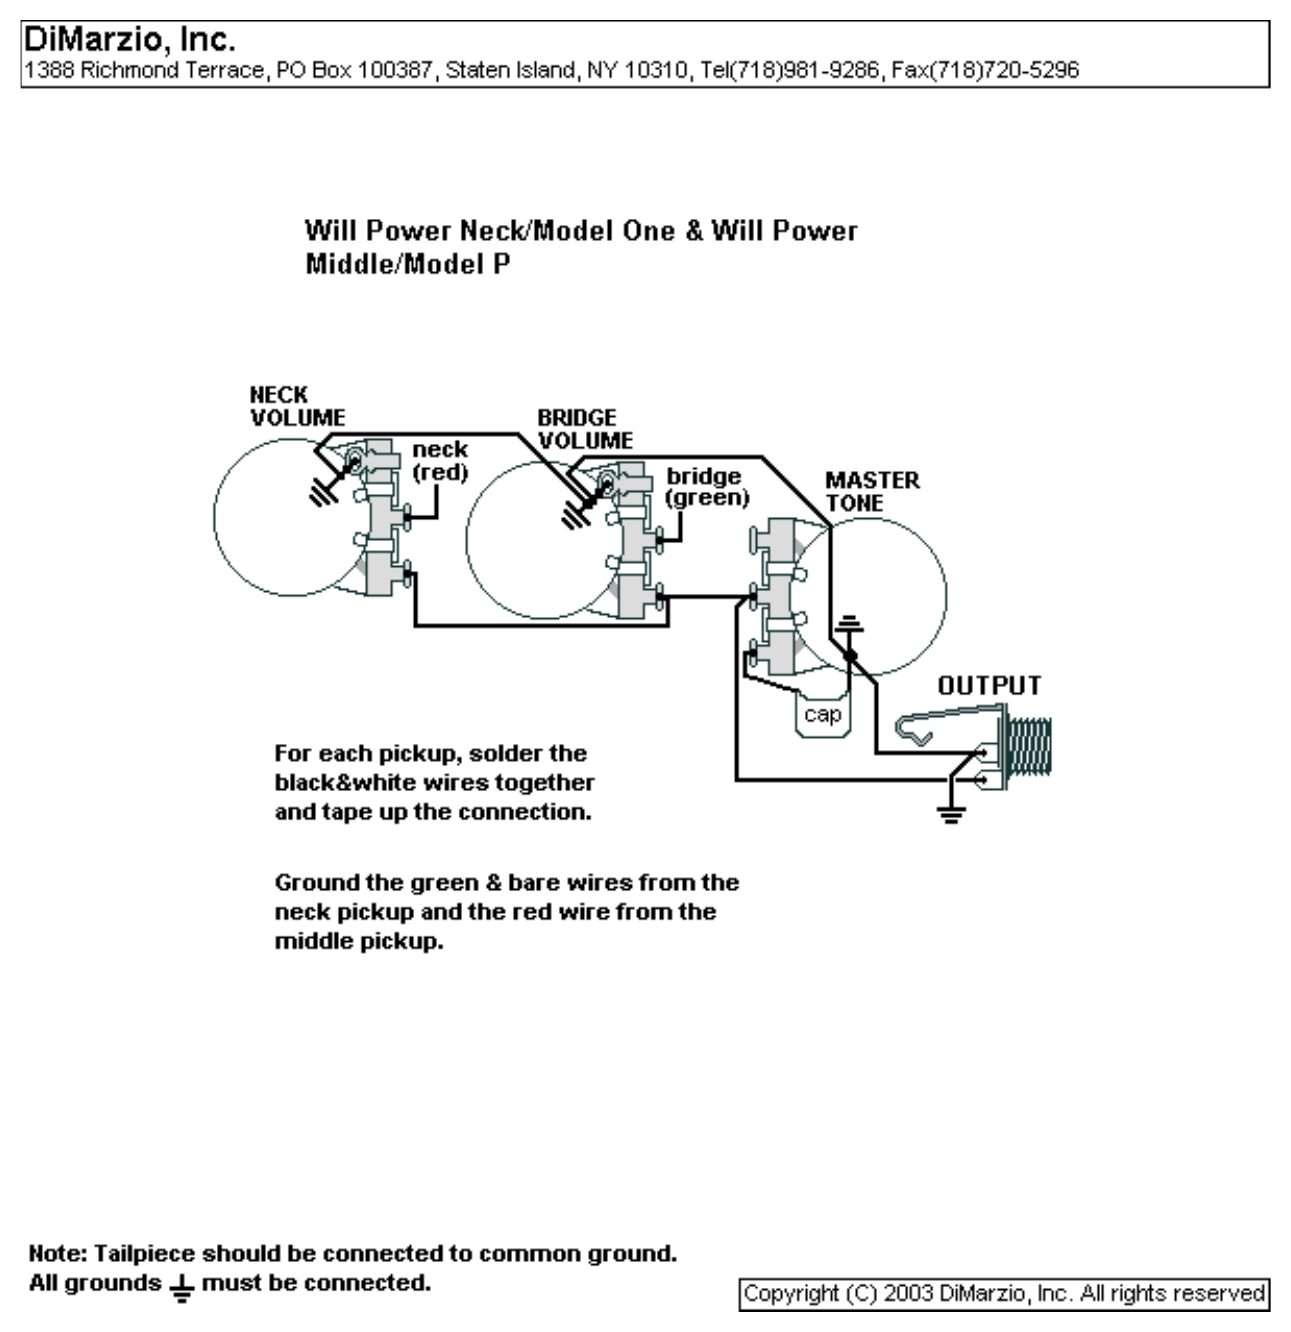
| # | From | To | Notes |
|---|---|---|---|
| 1 | Each pickup: black + white | Join and tape | |
| 2 | Neck pickup: red | Neck volume: middle lug | Hot |
| 3 | Neck pickup: green + bare | Ground | |
| 4 | Middle pickup: green | Second volume: middle lug | Hot (drawn on the 'bridge volume') |
| 5 | Middle pickup: red | Ground | |
| 6 | Neck volume: free outer lug | Second volume: free outer lug | Output |
| 7 | Master tone: middle lug | Joined volume outputs | Tone sits across the output |
| 8 | Master tone: one outer lug | Capacitor, other leg to ground | Other outer lug left empty |
| 9 | Joined volume outputs | Output jack: tip | |
| 10 | All pot casings | Output jack: sleeve (ground) | Bridge ground wire to a pot casing |
Step by step
- Join black and white on each pickup and tape.
- Neck red to the neck volume's middle lug; neck green and bare to ground.
- Middle pickup green to the second volume's middle lug; its red to ground.
- Join the volumes' free outer lugs and run them to the tone's middle lug and the jack tip.
- Test: plug in at low volume, tap each pickup and try every control and switch position before closing the cavity.
- Lug names are described by role, as drawn by DiMarzio: on each pot, the ground lug is the outer lug soldered to the casing, the other outer lug is the free one, and the middle lug is the wiper.
DiMarzio 2 pickups: pan pot, master volume, no tone
A pan (blend) pot between two humbuckers, then a master volume.
You need: Dual pan pot, 1 volume pot, mono output jack.
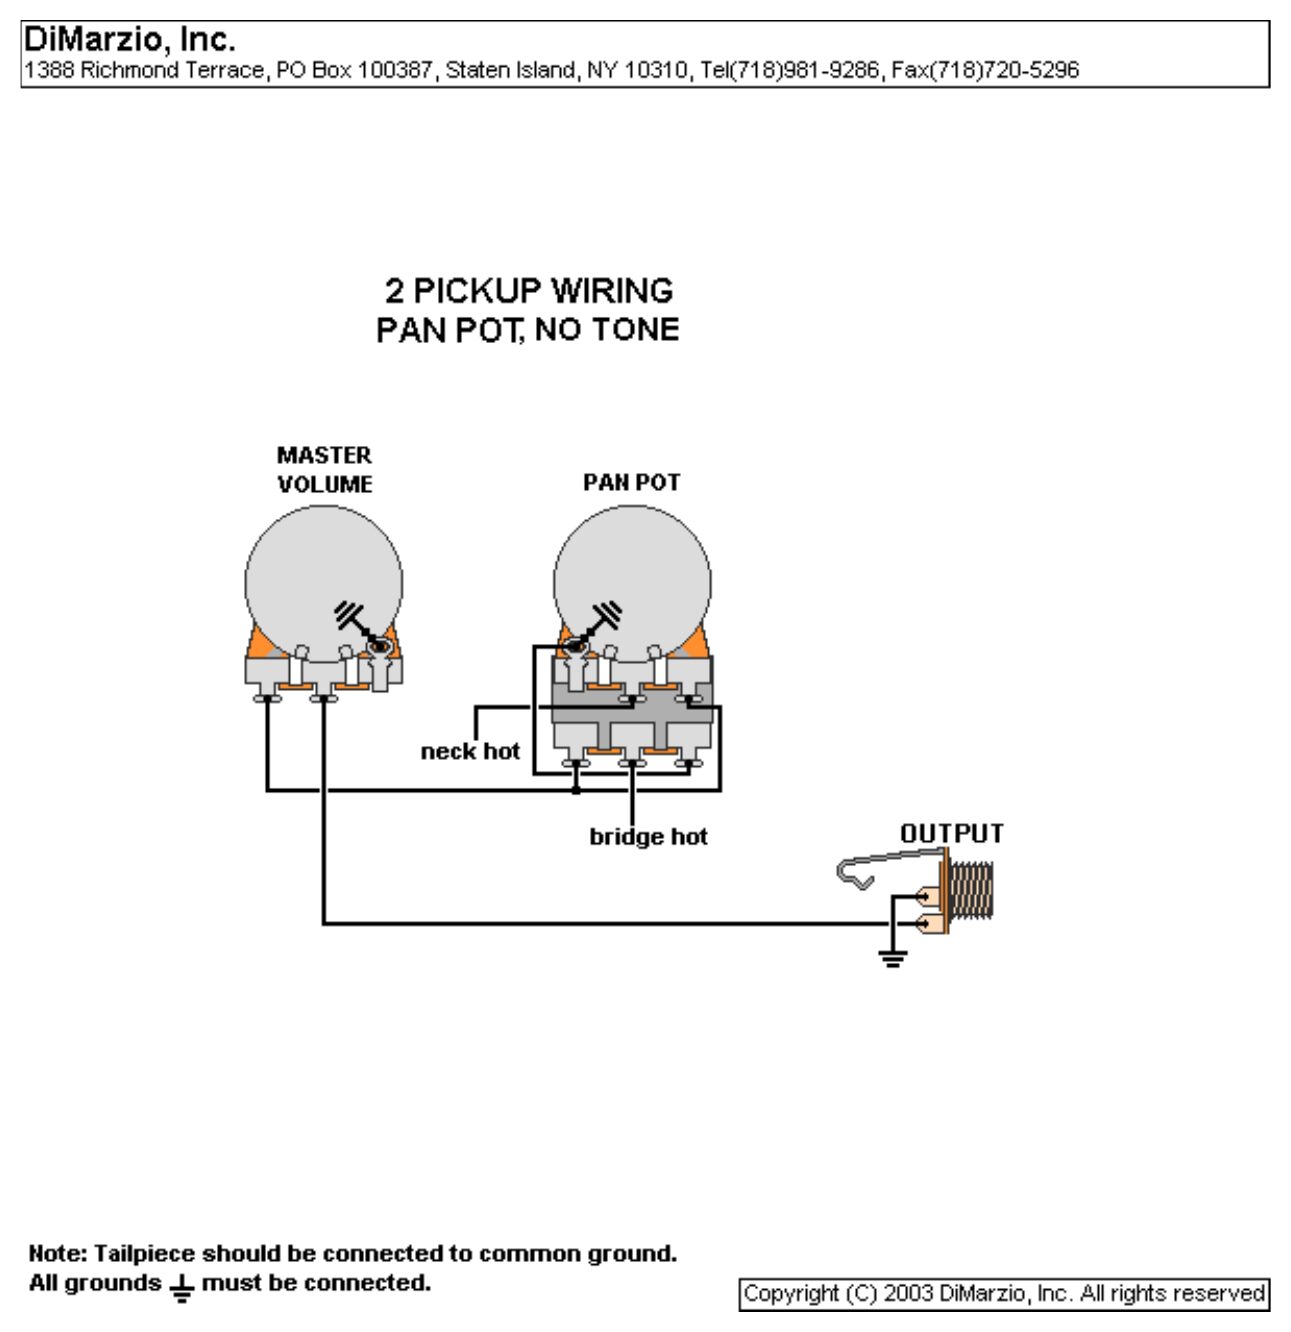
| # | From | To | Notes |
|---|---|---|---|
| 1 | Each pickup: black + white | Join and tape | |
| 2 | Each pickup: green | Ground | |
| 3 | Pan pot, top gang: middle lug | Neck hot | |
| 4 | Pan pot, top gang: right lug | Pan output | Pot seen from the back, lugs down |
| 5 | Pan pot, top gang: left lug | Casing (ground) | |
| 6 | Pan pot, bottom gang: middle lug | Bridge hot | |
| 7 | Pan pot, bottom gang: left lug | Pan output | Join with the top gang's right lug |
| 8 | Pan pot, bottom gang: right lug | Ground | |
| 9 | Pan output | Master volume: free outer lug | |
| 10 | Master volume: middle lug | Output jack: tip | |
| 11 | Master volume: ground lug | Casing | |
| 12 | Pot casings | Output jack: sleeve |
Step by step
- Join black and white on each pickup and tape; greens to ground.
- Neck hot to the top gang's middle lug, bridge hot to the bottom gang's middle lug.
- Join the top gang's right lug and the bottom gang's left lug (the pan output); ground the other two outer lugs.
- Pan output to the master volume's free outer lug; master middle lug to the jack tip.
- Test: plug in at low volume, tap each pickup and try every control and switch position before closing the cavity.
- Pan pot lugs as DiMarzio draws them: a dual pot seen from the back with the lugs pointing down. Each gang takes one pickup on its middle lug; the output sits on opposite outer lugs of the two gangs, which is what makes it pan.
DiMarzio 2 pickups: pan pot, master volume, master tone
Pan pot, master volume and master tone.
You need: Dual pan pot, 1 volume pot, 1 tone pot, tone capacitor, mono output jack.
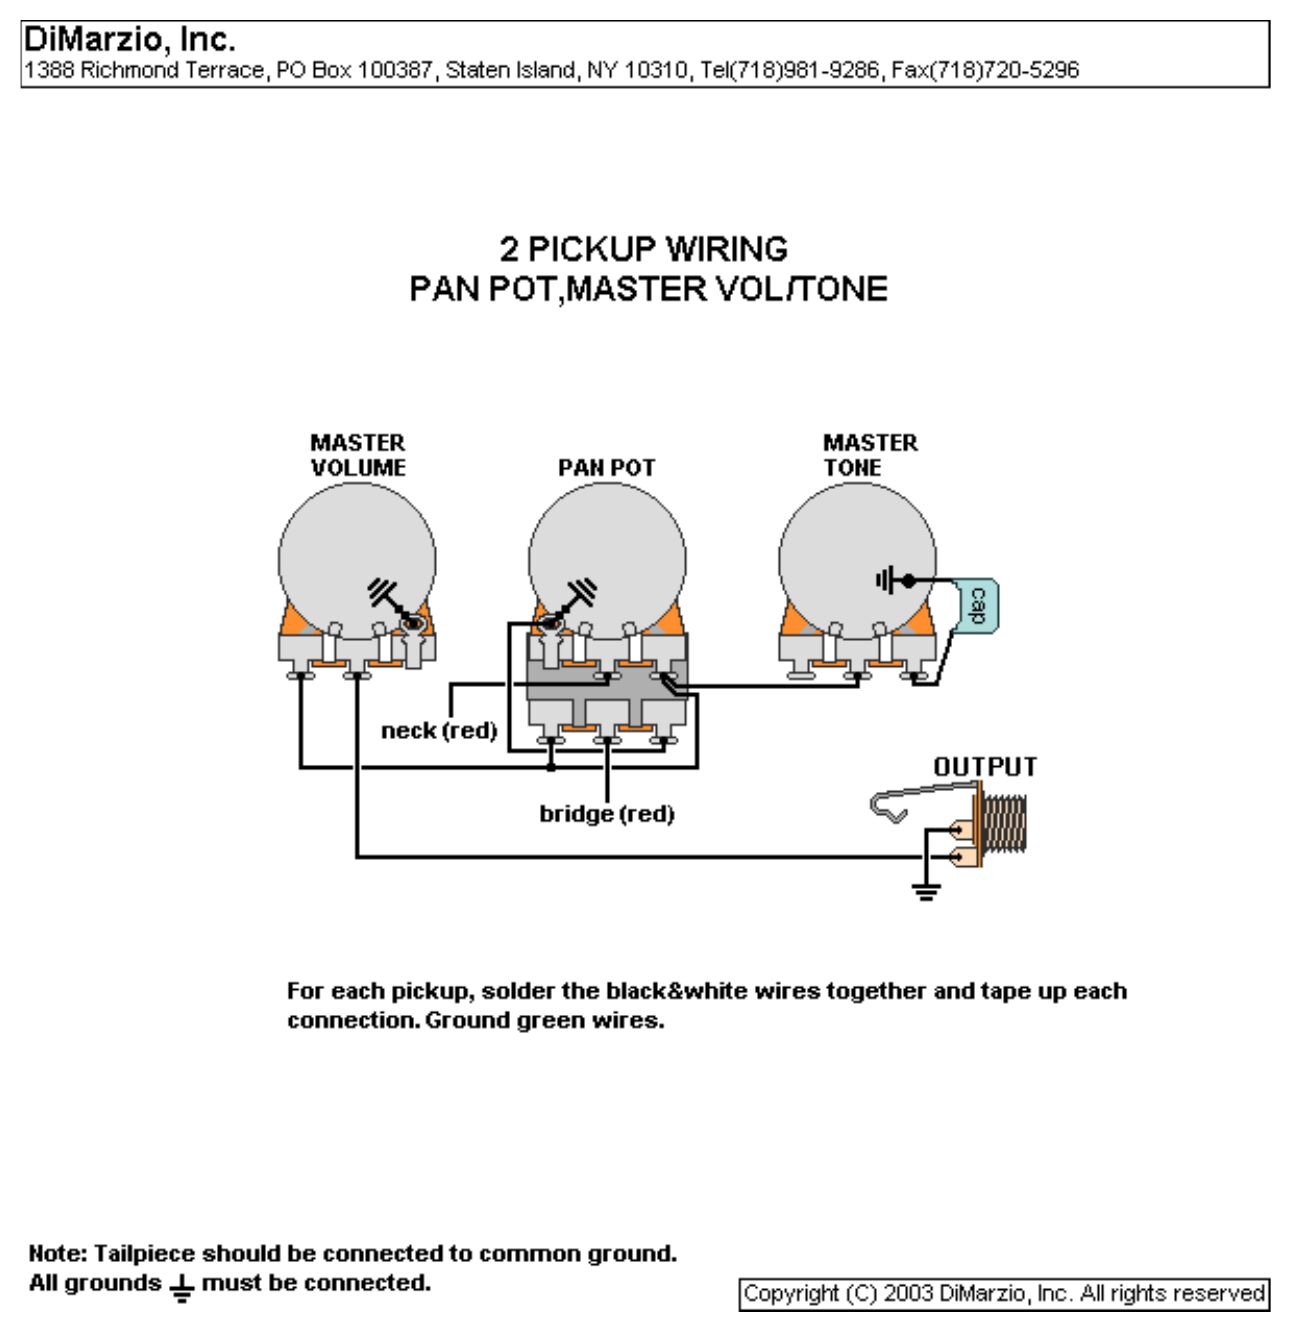
| # | From | To | Notes |
|---|---|---|---|
| 1 | Each pickup: black + white | Join and tape | |
| 2 | Each pickup: green | Ground | |
| 3 | Pan pot, top gang: middle lug | Neck hot | |
| 4 | Pan pot, top gang: right lug | Pan output | Pot seen from the back, lugs down |
| 5 | Pan pot, top gang: left lug | Casing (ground) | |
| 6 | Pan pot, bottom gang: middle lug | Bridge hot | |
| 7 | Pan pot, bottom gang: left lug | Pan output | Join with the top gang's right lug |
| 8 | Pan pot, bottom gang: right lug | Ground | |
| 9 | Pan output | Master volume: free outer lug | |
| 10 | Pan output | Master tone: middle lug | |
| 11 | Master tone: right lug | Capacitor, other leg to the casing | |
| 12 | Master volume: middle lug | Output jack: tip | |
| 13 | Pot casings | Output jack: sleeve |
Step by step
- Wire the pan pot as in the table.
- Pan output to the master volume's free outer lug and to the tone's middle lug.
- Tone right lug to the capacitor, capacitor to the casing.
- Master middle lug to the jack tip.
- Test: plug in at low volume, tap each pickup and try every control and switch position before closing the cavity.
- Pan pot lugs as DiMarzio draws them: a dual pot seen from the back with the lugs pointing down. Each gang takes one pickup on its middle lug; the output sits on opposite outer lugs of the two gangs, which is what makes it pan.
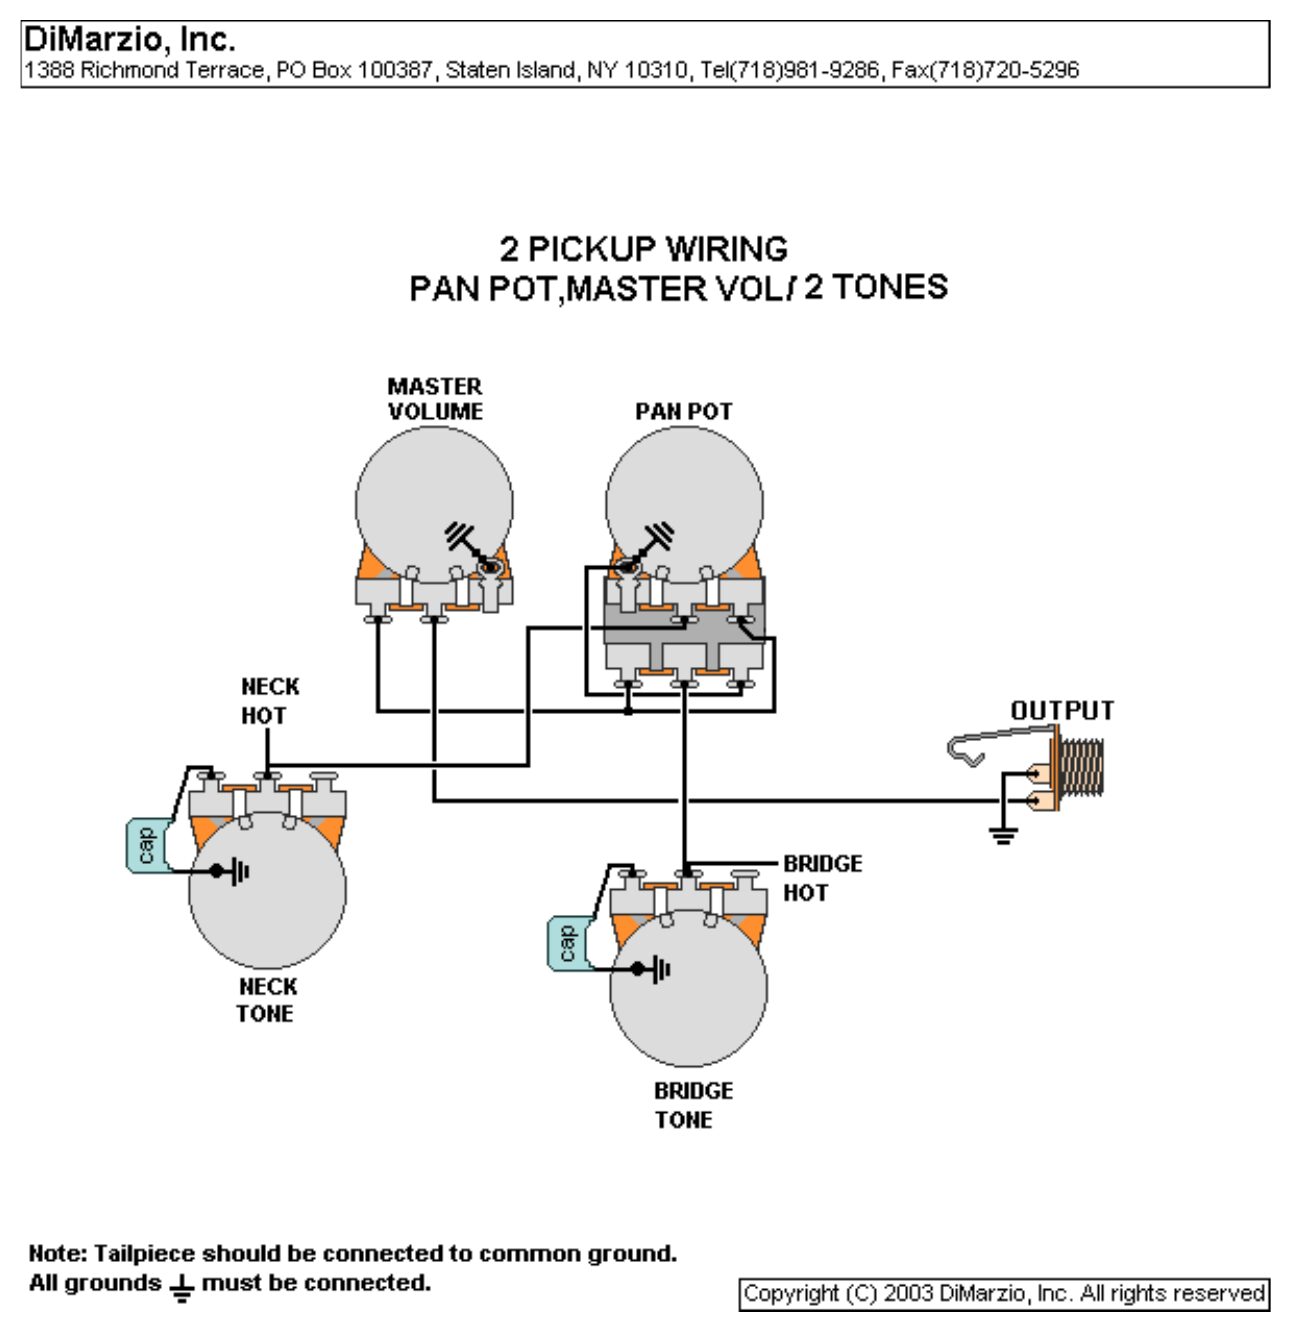
DiMarzio 2 pickups: pan pot, master volume, 2 tones
Pan pot and master volume, with a separate tone for each pickup ahead of the pan.
You need: Dual pan pot, 1 volume pot, 2 tone pots, 2 capacitors, mono output jack.
| # | From | To | Notes |
|---|---|---|---|
| 1 | Each pickup: black + white | Join and tape | |
| 2 | Each pickup: green | Ground | |
| 3 | Neck hot | Neck tone: middle lug | and on to the pan's top gang |
| 4 | Bridge hot | Bridge tone: middle lug | and on to the pan's bottom gang |
| 5 | Each tone: outer lug | Capacitor, other leg to ground | |
| 6 | Pan pot, top gang: middle lug | Neck hot | |
| 7 | Pan pot, top gang: right lug | Pan output | Pot seen from the back, lugs down |
| 8 | Pan pot, top gang: left lug | Casing (ground) | |
| 9 | Pan pot, bottom gang: middle lug | Bridge hot | |
| 10 | Pan pot, bottom gang: left lug | Pan output | Join with the top gang's right lug |
| 11 | Pan pot, bottom gang: right lug | Ground | |
| 12 | Pan output | Master volume: free outer lug | |
| 13 | Master volume: middle lug | Output jack: tip |
Step by step
- Each hot to its own tone's middle lug, and from there to its pan gang's middle lug.
- Each tone outer lug to a capacitor, capacitor to ground.
- Pan output to the master volume's free outer lug; master middle lug to the jack tip.
- Test: plug in at low volume, tap each pickup and try every control and switch position before closing the cavity.
- Pan pot lugs as DiMarzio draws them: a dual pot seen from the back with the lugs pointing down. Each gang takes one pickup on its middle lug; the output sits on opposite outer lugs of the two gangs, which is what makes it pan.
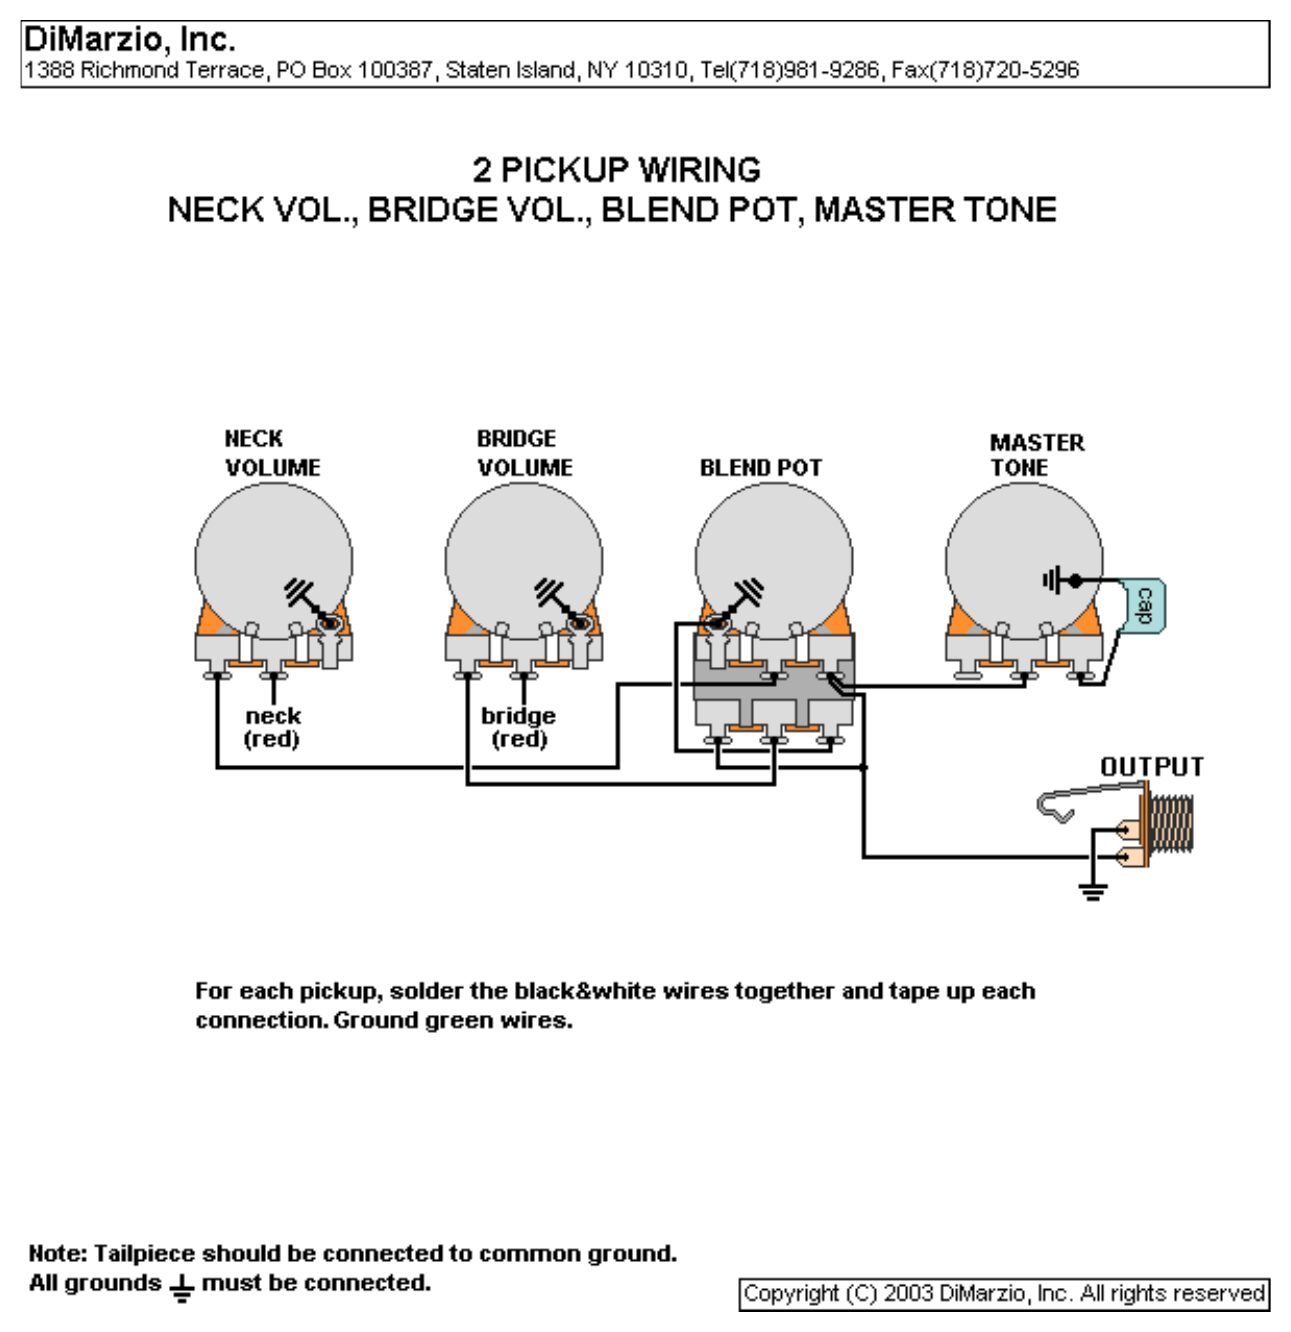
DiMarzio 2 pickups: neck volume, bridge volume, blend pot, master tone
Each pickup has its own volume ahead of a blend (pan) pot, then a master tone.
You need: 2 volume pots, dual blend pot, 1 tone pot, capacitor, mono output jack.
| # | From | To | Notes |
|---|---|---|---|
| 1 | Each pickup: black + white | Join and tape | |
| 2 | Each pickup: green | Ground | |
| 3 | Each pickup: red | Its volume: middle lug | |
| 4 | Neck volume: free outer lug | Blend, one gang: middle lug | |
| 5 | Bridge volume: free outer lug | Blend, other gang: middle lug | |
| 6 | Blend output (one outer lug per gang, joined) | Tone middle lug and jack tip | |
| 7 | Blend: other outer lugs | Ground | |
| 8 | Tone: outer lug | Capacitor, other leg to the casing |
Step by step
- Each red to its volume's middle lug.
- Each volume's free outer lug to the middle lug of one blend gang.
- Blend output to the tone's middle lug and the jack tip.
- Tone outer lug to the capacitor, capacitor to ground.
- Test: plug in at low volume, tap each pickup and try every control and switch position before closing the cavity.
- Lug names are described by role, as drawn by DiMarzio: on each pot, the ground lug is the outer lug soldered to the casing, the other outer lug is the free one, and the middle lug is the wiper.
- Some of the blend pot's lugs are hidden in DiMarzio's drawing, so the blend is described by role: output on opposite outer lugs of the two gangs, as on the pan pot sheets above.
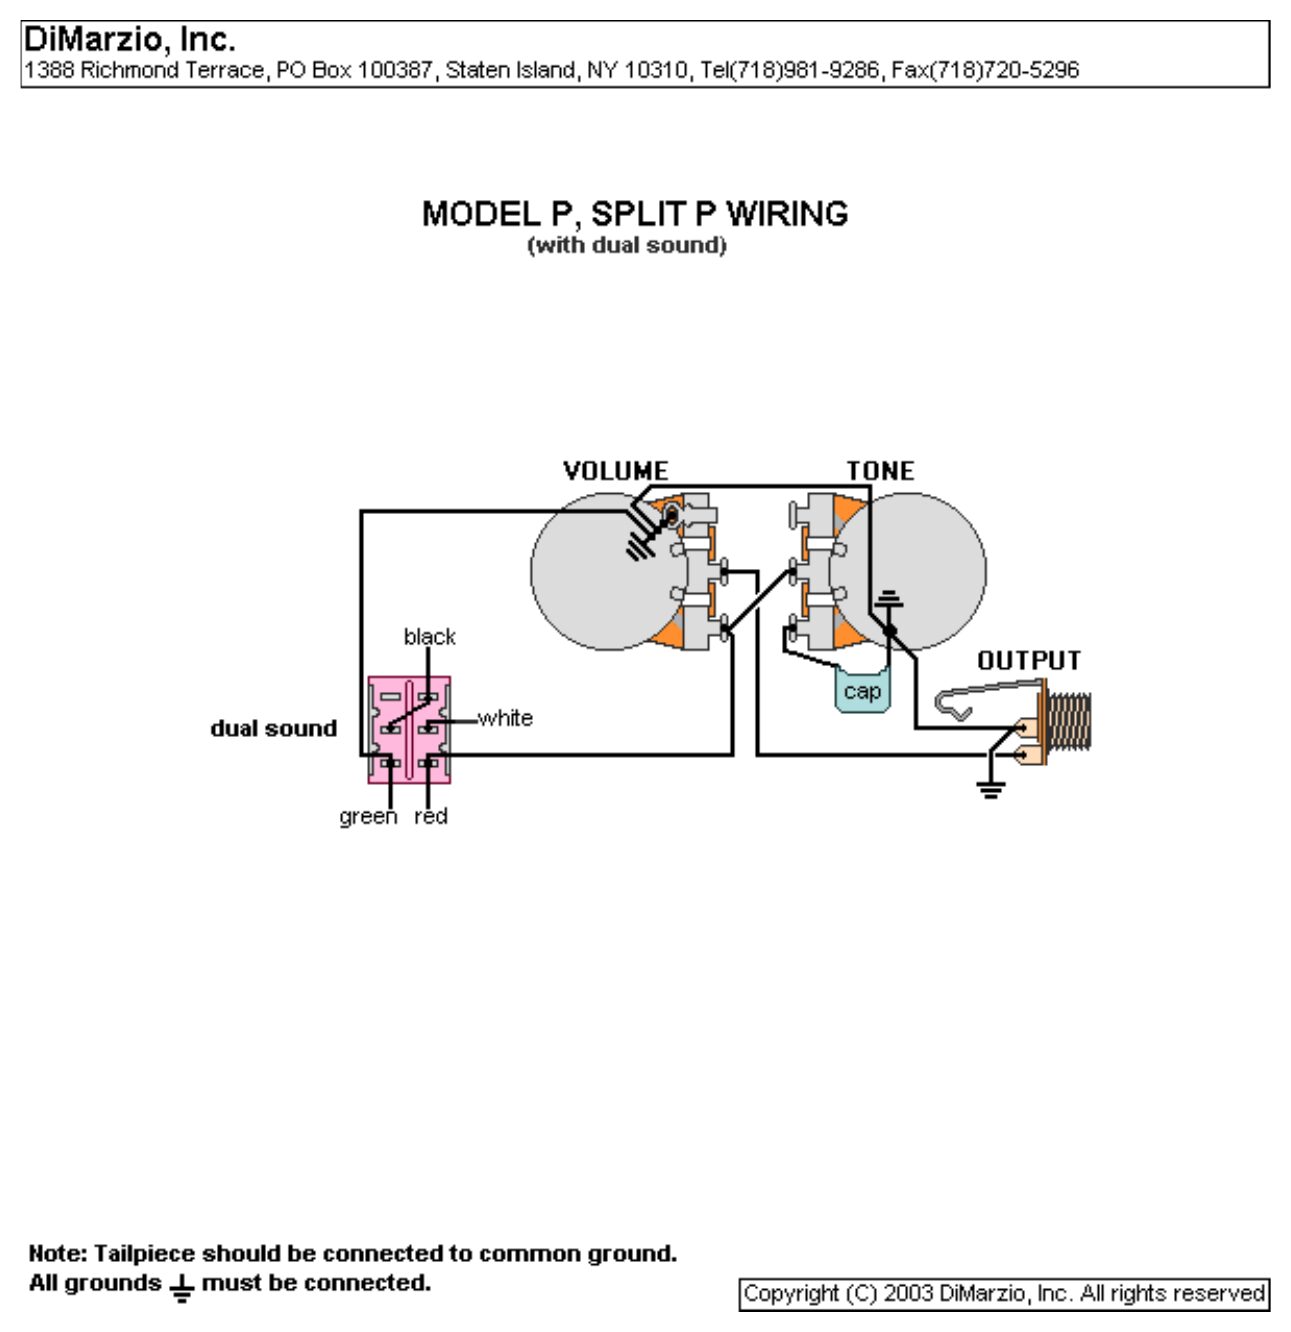
DiMarzio Model P / Split P with dual sound (series/parallel switch)
The Model P hookup with a mini DPDT on/on switch for series or parallel coils.
You need: 1 volume, 1 tone, capacitor, DPDT on/on mini switch, mono output jack.
| # | From | To | Notes |
|---|---|---|---|
| 1 | DPDT: bottom-right lug | Pickup red | Also the switch's hot output |
| 2 | DPDT: top-right lug | Pickup black | Jumper to the left middle lug |
| 3 | DPDT: right middle lug | Pickup white | |
| 4 | DPDT: bottom-left lug | Pickup green | And to ground |
| 5 | DPDT: top-left lug | No connection | |
| 6 | DPDT: bottom-right lug | Volume: free outer lug | |
| 7 | DPDT: bottom-left lug | Volume casing (ground) | |
| 8 | Volume: free outer lug | Tone: middle lug | |
| 9 | Tone: outer lug | Capacitor, other leg to ground | |
| 10 | Volume: middle lug | Output jack: tip | |
| 11 | Pot casings | Output jack: sleeve |
Step by step
- Solder the four pickup wires to the switch as in the table, with a jumper from the top-right lug to the left middle lug.
- Switch bottom-right (red) to the volume's free outer lug; switch bottom-left (green) to ground.
- Volume free outer lug to the tone's middle lug; tone outer lug to the capacitor, capacitor to ground.
- Volume middle lug to the jack tip.
- Test: plug in at low volume, tap each pickup and try every control and switch position before closing the cavity.
- Dual sound = series/parallel. DiMarzio humbucker colours: one coil is red and black, the other white and green. With the switch one way, black and white are joined (series, the full humbucker sound). The other way, white goes to the hot and black to ground (both coils in parallel, a brighter, lower-output sound). Switch seen from the back, lugs as drawn.
- Lug names are described by role, as drawn by DiMarzio: on each pot, the ground lug is the outer lug soldered to the casing, the other outer lug is the free one, and the middle lug is the wiper.
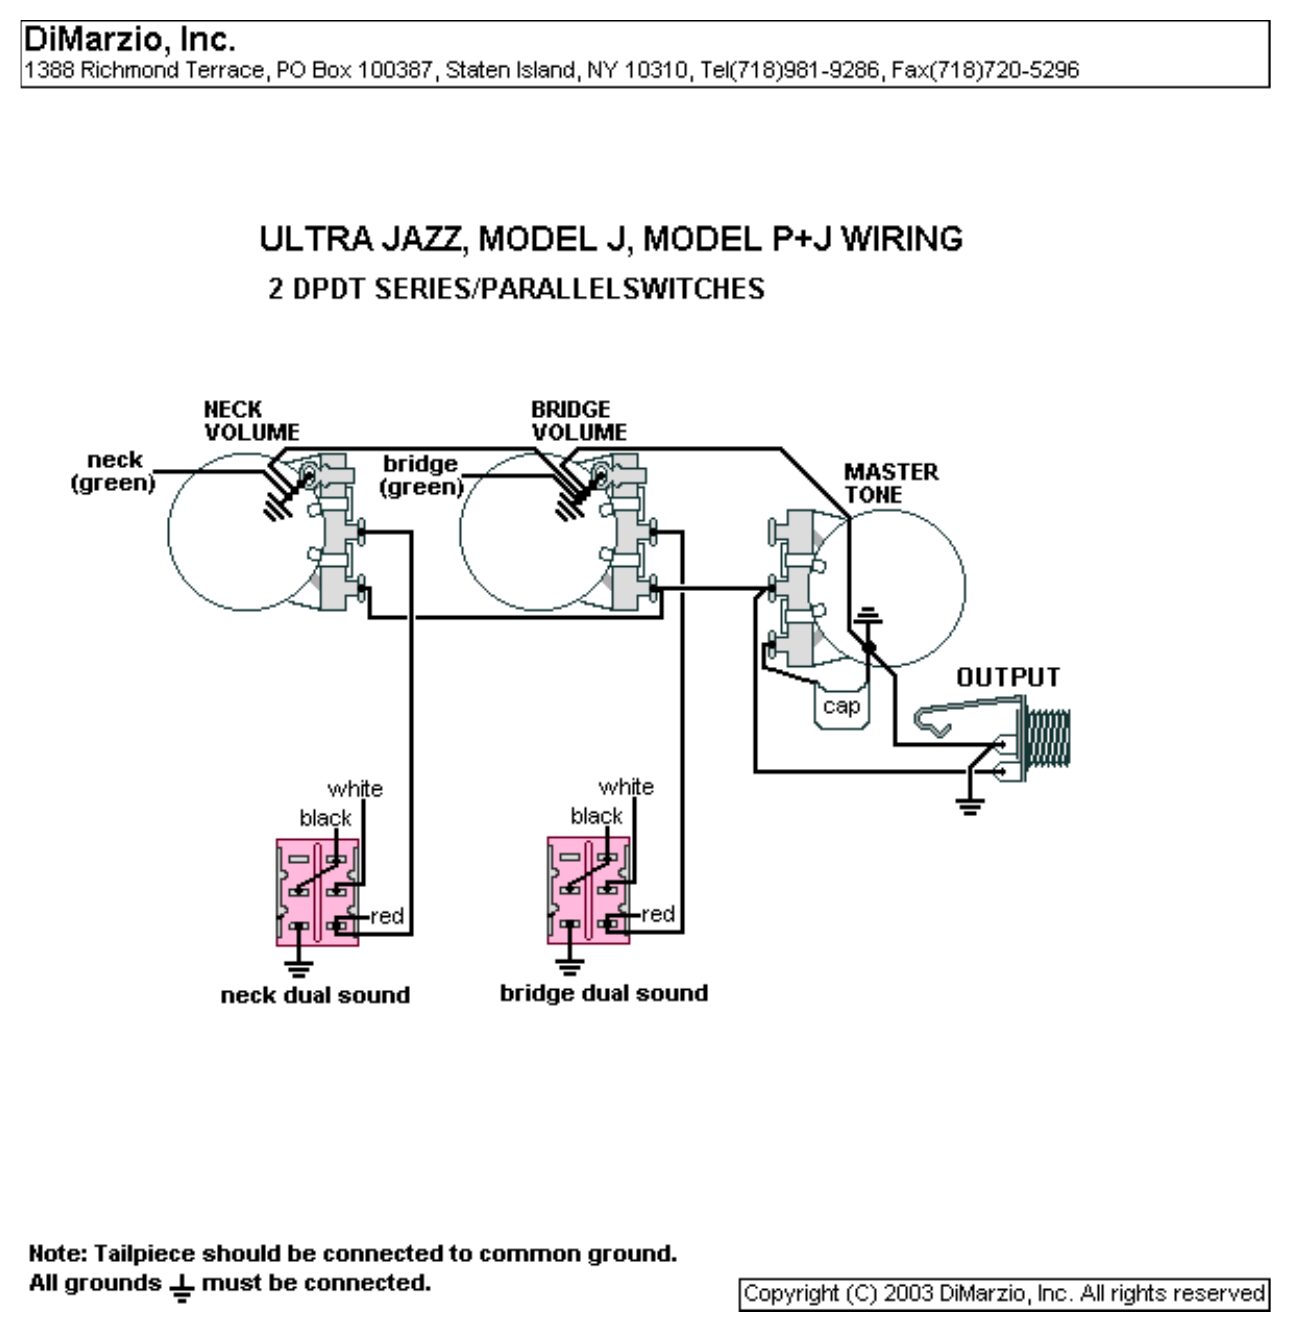
DiMarzio Ultra Jazz, Model J, Model P+J: 2 DPDT series/parallel switches
2 volumes and a master tone, with a mini DPDT series/parallel switch for each pickup.
You need: 2 volumes, 1 tone, capacitor, 2 DPDT on/on mini switches, mono output jack.
| # | From | To | Notes |
|---|---|---|---|
| 1 | DPDT: bottom-right lug | Pickup red | Also the switch's hot output |
| 2 | DPDT: top-right lug | Pickup black | Jumper to the left middle lug |
| 3 | DPDT: right middle lug | Pickup white | |
| 4 | DPDT: bottom-left lug | Pickup green | And to ground |
| 5 | DPDT: top-left lug | No connection | |
| 6 | Each switch: bottom-right lug (red) | That pickup's volume: middle lug | |
| 7 | Each switch: bottom-left lug | Ground | |
| 8 | Neck volume: free outer lug | Bridge volume: free outer lug | Output |
| 9 | Master tone: middle lug | Joined volume outputs | Tone sits across the output |
| 10 | Master tone: one outer lug | Capacitor, other leg to ground | Other outer lug left empty |
| 11 | Joined volume outputs | Output jack: tip | |
| 12 | All pot casings | Output jack: sleeve (ground) | Bridge ground wire to a pot casing |
Step by step
- Wire each pickup to its own switch exactly as the Model P dual-sound switch above.
- Each switch's red lug to its volume's middle lug; green lug to ground.
- Join the volumes' free outer lugs and run them to the tone's middle lug and the jack tip.
- Test: plug in at low volume, tap each pickup and try every control and switch position before closing the cavity.
- Dual sound = series/parallel. DiMarzio humbucker colours: one coil is red and black, the other white and green. With the switch one way, black and white are joined (series, the full humbucker sound). The other way, white goes to the hot and black to ground (both coils in parallel, a brighter, lower-output sound). Switch seen from the back, lugs as drawn.
- Lug names are described by role, as drawn by DiMarzio: on each pot, the ground lug is the outer lug soldered to the casing, the other outer lug is the free one, and the middle lug is the wiper.
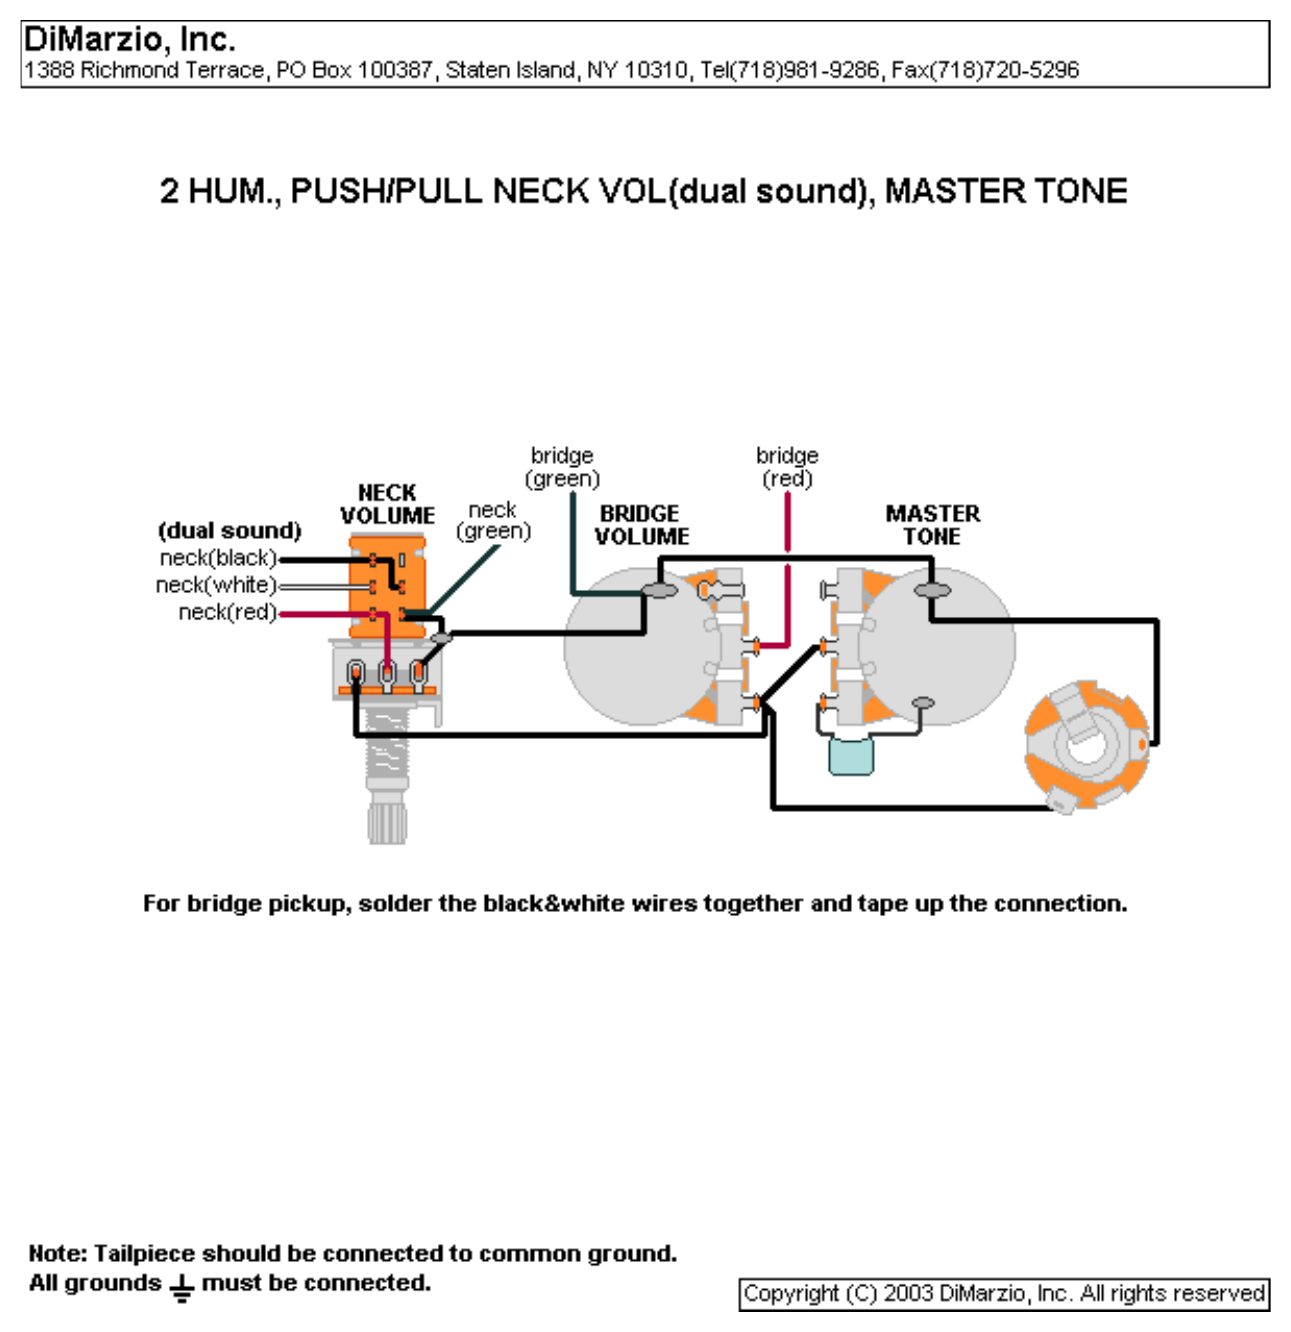
DiMarzio 2 humbuckers: push-pull neck volume (dual sound), bridge volume, master tone
The neck volume is a push-pull pot whose switch gives the neck pickup series or parallel coils.
You need: Push-pull volume, standard volume, tone pot, capacitor, mono output jack.
| # | From | To | Notes |
|---|---|---|---|
| 1 | Neck pickup: black, white, red, green | Push-pull switch on the neck volume | Series/parallel |
| 2 | Neck pickup: red | Neck volume: middle lug | As well as the switch |
| 3 | Neck pickup: green | Ground | Via the switch and the casing |
| 4 | Bridge pickup: black + white | Join and tape | |
| 5 | Bridge pickup: red | Bridge volume: middle lug | |
| 6 | Bridge pickup: green | Bridge volume casing | |
| 7 | Neck volume: free outer lug | Bridge volume: free outer lug | Output |
| 8 | Master tone: middle lug | Joined volume outputs | Tone sits across the output |
| 9 | Master tone: one outer lug | Capacitor, other leg to ground | Other outer lug left empty |
| 10 | Joined volume outputs | Output jack: tip | |
| 11 | All pot casings | Output jack: sleeve (ground) | Bridge ground wire to a pot casing |
Step by step
- Wire the neck pickup's four wires to the push-pull switch; red also to the neck volume's middle lug.
- Bridge pickup: black and white joined and taped, red to the bridge volume's middle lug, green to ground.
- Join the volumes' free outer lugs and run them to the tone's middle lug and the jack tip.
- Test: plug in at low volume, tap each pickup and try every control and switch position before closing the cavity.
- Each dual-sound switch joins black and white (series) one way and puts white to hot and black to ground (parallel) the other way, as on the Model P dual-sound sheet above.
- The switch is explained by what each position does rather than lug by lug: follow DiMarzio's drawing for the exact switch lugs.
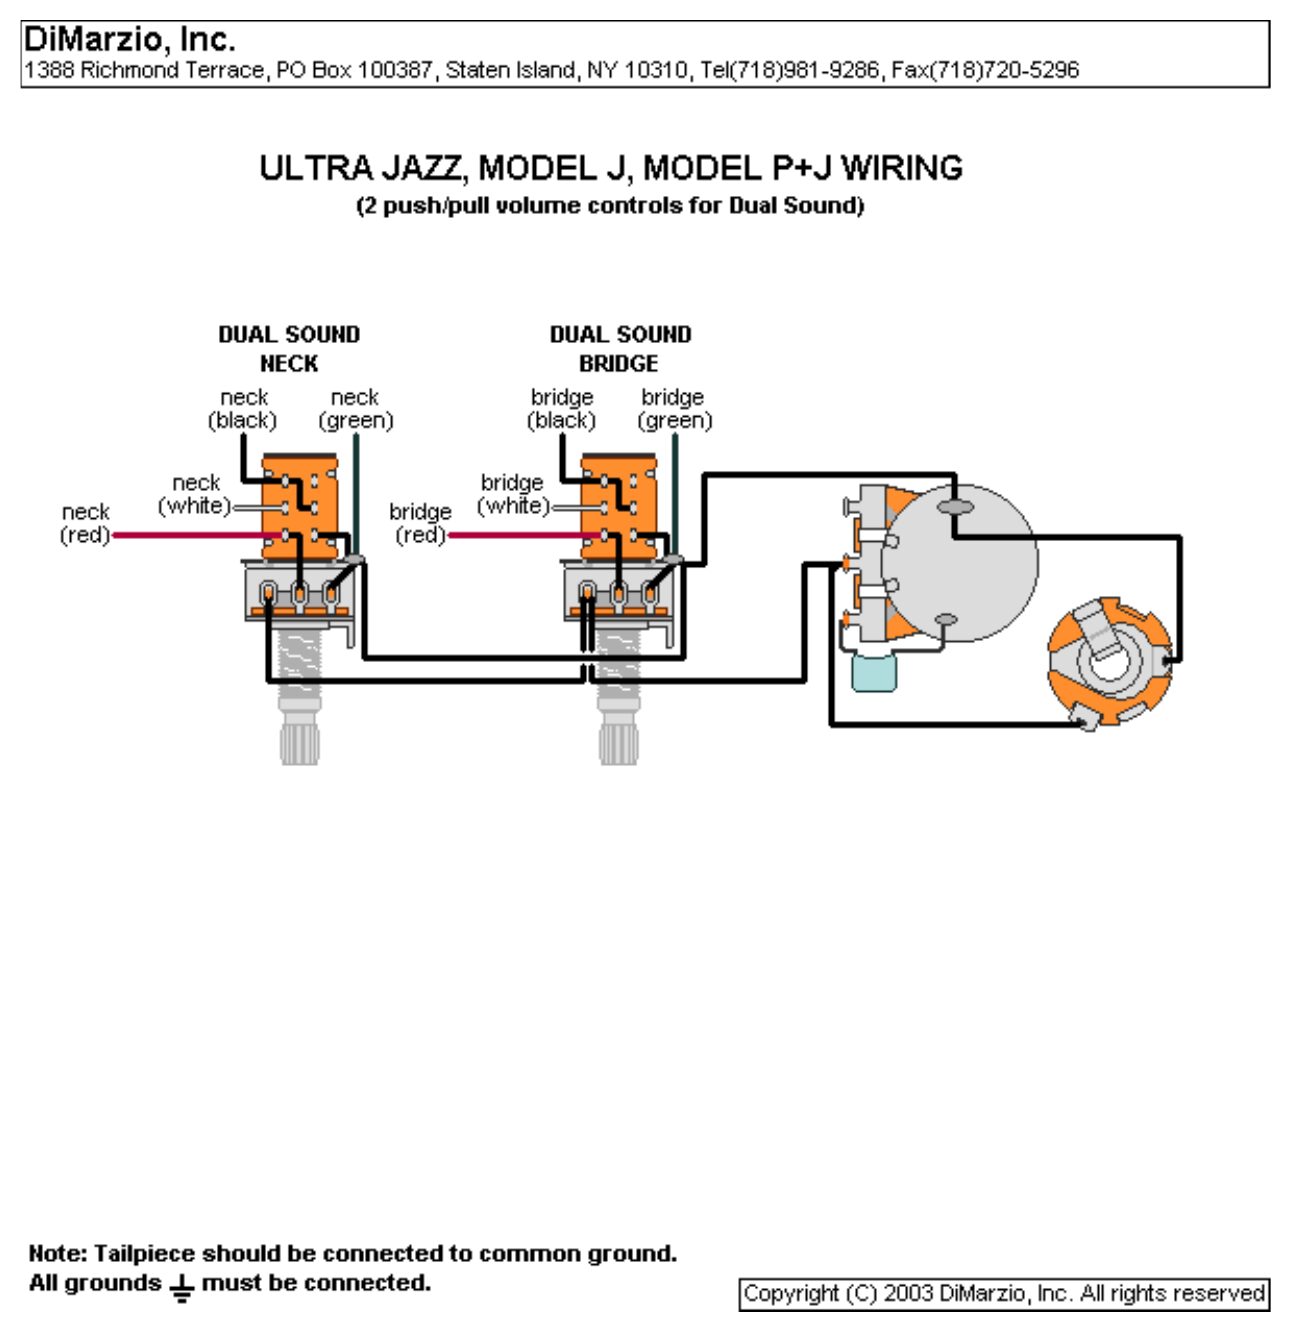
DiMarzio Ultra Jazz, Model J, Model P+J: 2 push-pull volumes for dual sound
Both volumes are push-pull pots: each one switches its own pickup between series and parallel.
You need: 2 push-pull volumes, 1 tone, capacitor, mono output jack.
| # | From | To | Notes |
|---|---|---|---|
| 1 | Each pickup: black, white, green | Its volume's push-pull switch | Series/parallel |
| 2 | Each pickup: red | Its volume's switch and middle lug | |
| 3 | Neck volume: free outer lug | Bridge volume: free outer lug | Output |
| 4 | Master tone: middle lug | Joined volume outputs | Tone sits across the output |
| 5 | Master tone: one outer lug | Capacitor, other leg to ground | Other outer lug left empty |
| 6 | Joined volume outputs | Output jack: tip | |
| 7 | All pot casings | Output jack: sleeve (ground) | Bridge ground wire to a pot casing |
Step by step
- Wire each pickup to its own push-pull switch.
- Join the volumes' free outer lugs and run them to the tone's middle lug and the jack tip.
- Tone outer lug to the capacitor, capacitor to ground.
- Test: plug in at low volume, tap each pickup and try every control and switch position before closing the cavity.
- Each dual-sound switch joins black and white (series) one way and puts white to hot and black to ground (parallel) the other way, as on the Model P dual-sound sheet above.
- The switch is explained by what each position does rather than lug by lug: follow DiMarzio's drawing for the exact switch lugs.
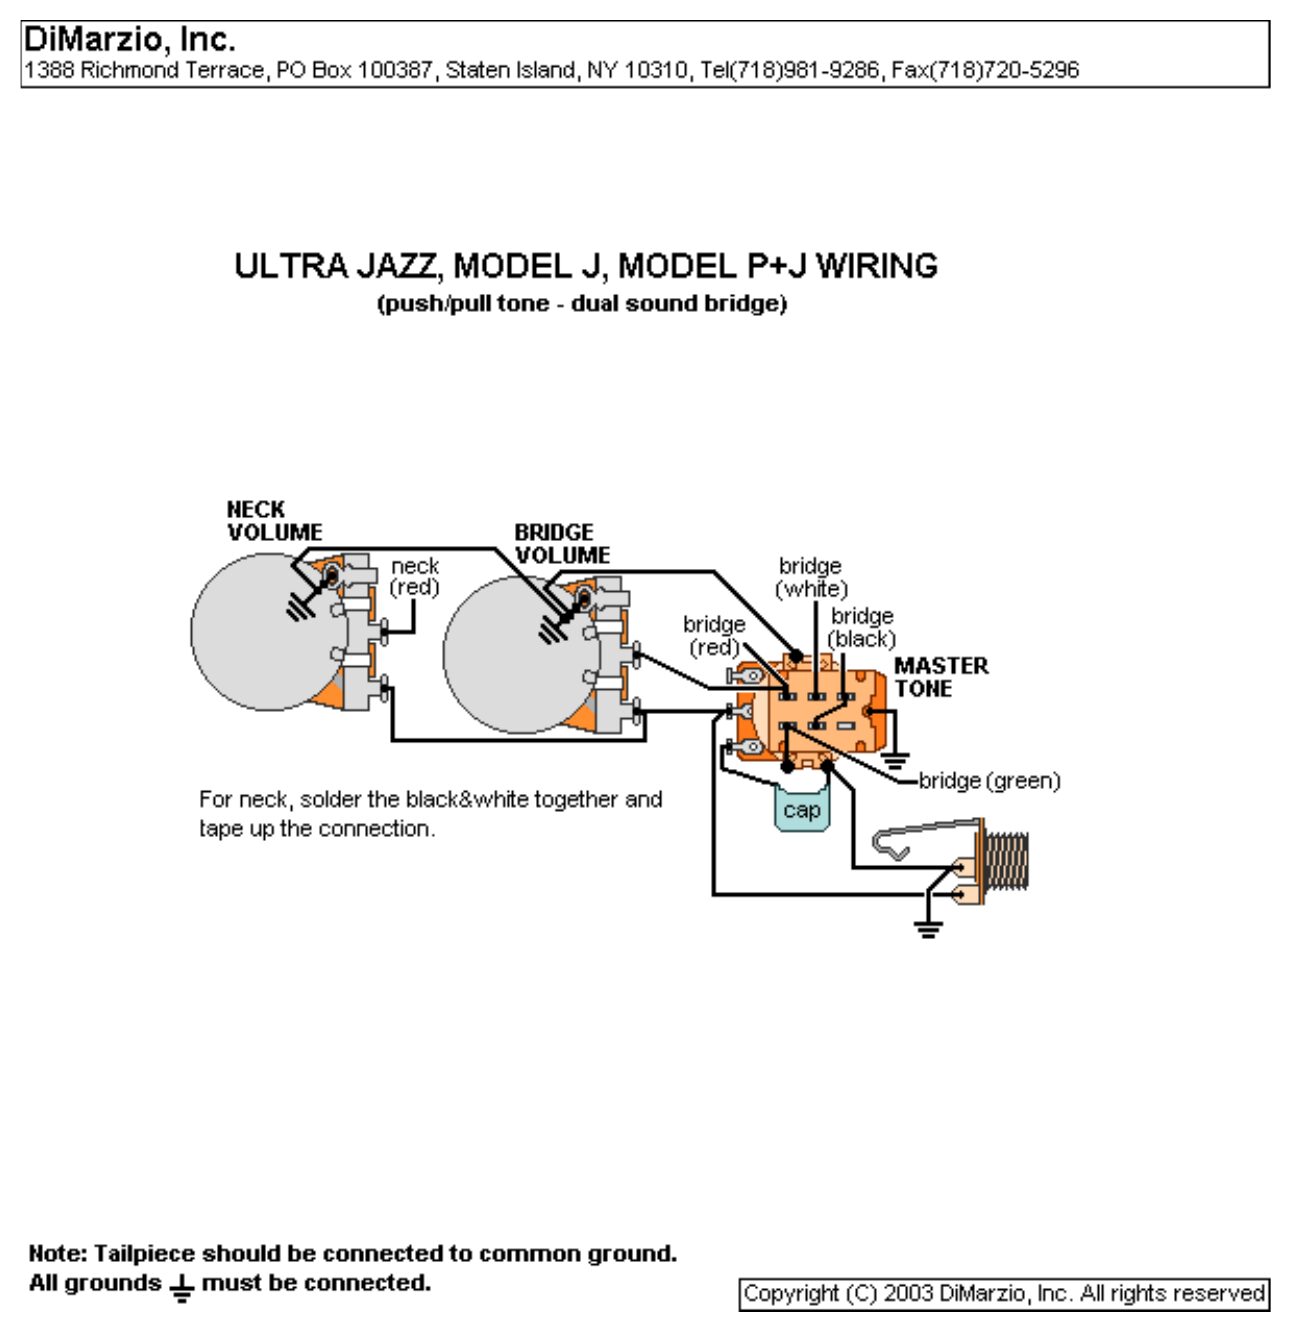
DiMarzio Ultra Jazz, Model J, Model P+J: push-pull tone for bridge dual sound
The master tone is a push-pull pot whose switch gives the bridge pickup series or parallel coils.
You need: 2 volumes, push-pull tone pot, capacitor, mono output jack.
| # | From | To | Notes |
|---|---|---|---|
| 1 | Bridge pickup: red, white, black, green | Push-pull switch on the tone pot | Series/parallel |
| 2 | Switch hot output | Bridge volume: middle lug | |
| 3 | Neck pickup: black + white | Join and tape | |
| 4 | Neck pickup: red | Neck volume: middle lug | |
| 5 | Neck pickup: green | Ground | |
| 6 | Neck volume: free outer lug | Bridge volume: free outer lug | Output |
| 7 | Master tone: middle lug | Joined volume outputs | Tone sits across the output |
| 8 | Master tone: one outer lug | Capacitor, other leg to ground | Other outer lug left empty |
| 9 | Joined volume outputs | Output jack: tip | |
| 10 | All pot casings | Output jack: sleeve (ground) | Bridge ground wire to a pot casing |
Step by step
- Neck pickup: black and white joined and taped, red to the neck volume's middle lug, green to ground.
- Bridge pickup's four wires to the tone pot's switch; its hot output to the bridge volume's middle lug.
- Join the volumes' free outer lugs; run them to the tone's middle lug and the jack tip.
- Test: plug in at low volume, tap each pickup and try every control and switch position before closing the cavity.
- Each dual-sound switch joins black and white (series) one way and puts white to hot and black to ground (parallel) the other way, as on the Model P dual-sound sheet above.
- The switch is explained by what each position does rather than lug by lug: follow DiMarzio's drawing for the exact switch lugs.
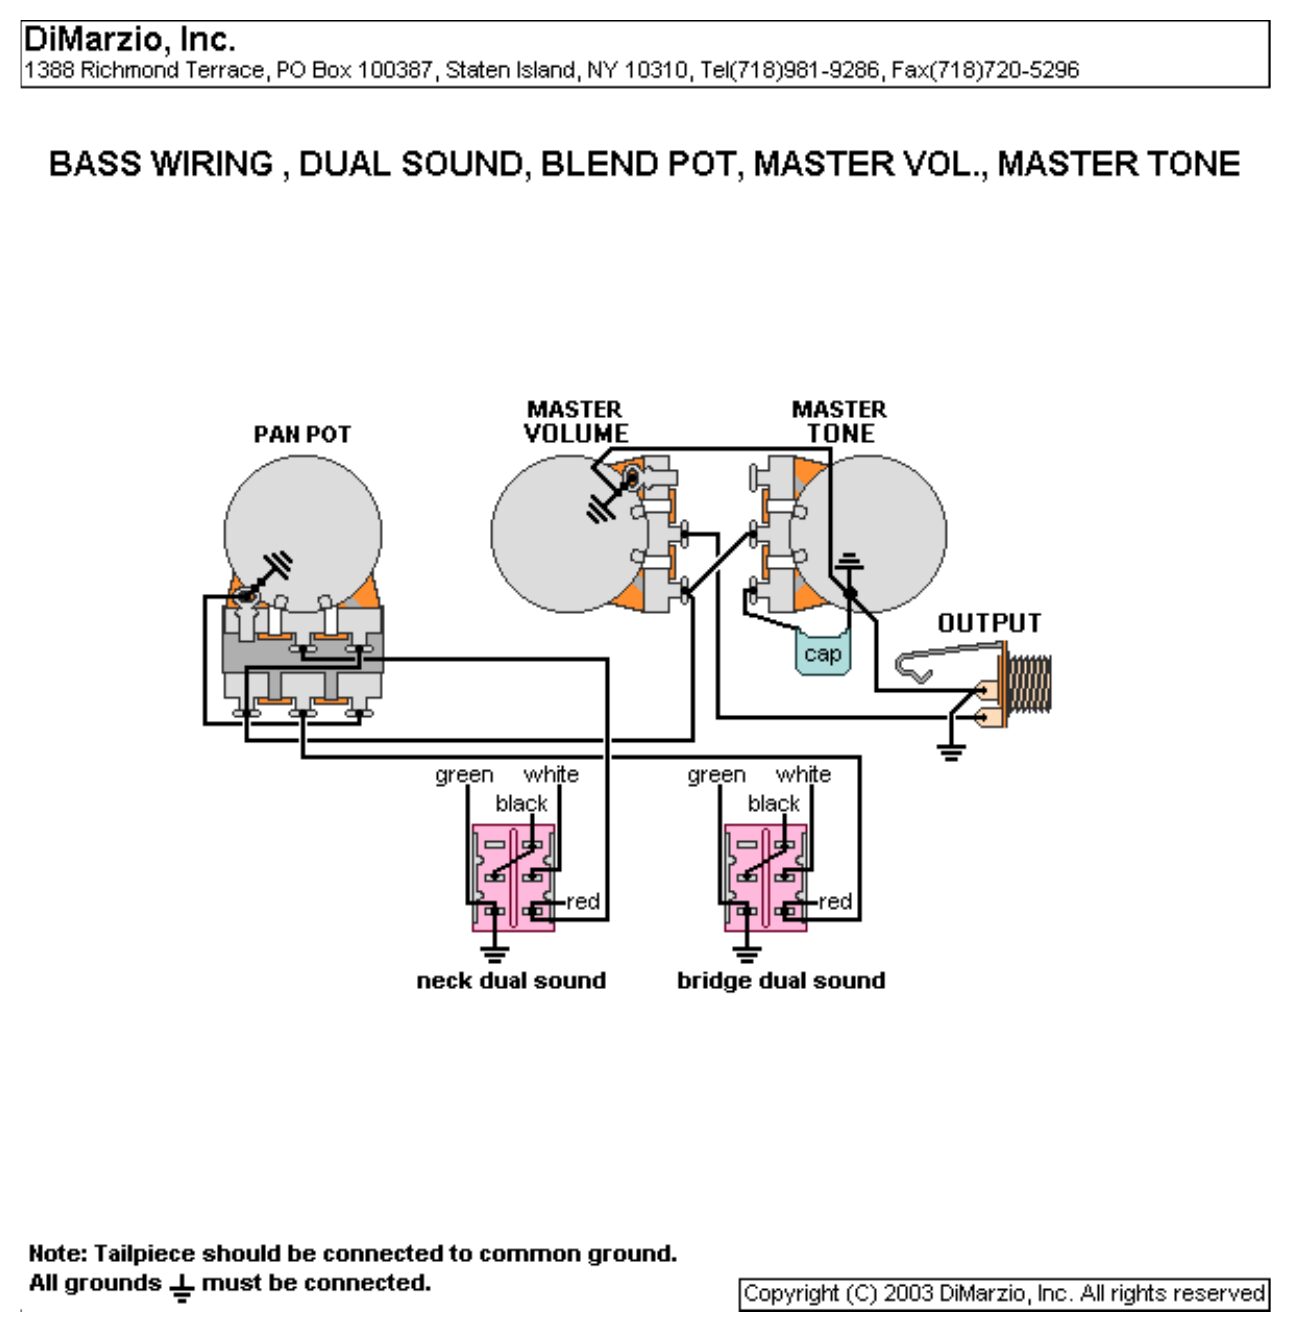
DiMarzio bass: dual sound, blend pot, master volume, master tone
Two humbuckers, each with a mini DPDT series/parallel switch, into a blend (pan) pot, master volume and master tone.
You need: Dual pan pot, master volume, tone pot, capacitor, 2 DPDT on/on mini switches, mono output jack.
| # | From | To | Notes |
|---|---|---|---|
| 1 | Each pickup: black, white, green, red | Its own DPDT on/on switch | Laid out as the Model P dual-sound switch |
| 2 | Neck switch: red (hot) lug | Pan pot, top gang: middle lug | |
| 3 | Bridge switch: red (hot) lug | Pan pot, bottom gang: middle lug | |
| 4 | Pan output | Master volume: free outer lug | |
| 5 | Pan output | Master tone: middle lug | |
| 6 | Master tone: outer lug | Capacitor, other leg to ground | |
| 7 | Master volume: middle lug | Output jack: tip |
Step by step
- Wire each pickup to its own switch as on the Model P dual-sound sheet.
- Each switch's hot lug to its pan gang's middle lug.
- Pan output to the master volume and the tone's middle lug.
- Master middle lug to the jack tip.
- Test: plug in at low volume, tap each pickup and try every control and switch position before closing the cavity.
- Dual sound = series/parallel. DiMarzio humbucker colours: one coil is red and black, the other white and green. With the switch one way, black and white are joined (series, the full humbucker sound). The other way, white goes to the hot and black to ground (both coils in parallel, a brighter, lower-output sound). Switch seen from the back, lugs as drawn.
- Pan pot lugs as DiMarzio draws them: a dual pot seen from the back with the lugs pointing down. Each gang takes one pickup on its middle lug; the output sits on opposite outer lugs of the two gangs, which is what makes it pan.
DiMarzio bass: dual sound, blend pot, master volume
The same with no tone control.
You need: Dual pan pot, master volume, 2 DPDT on/on mini switches, mono output jack.
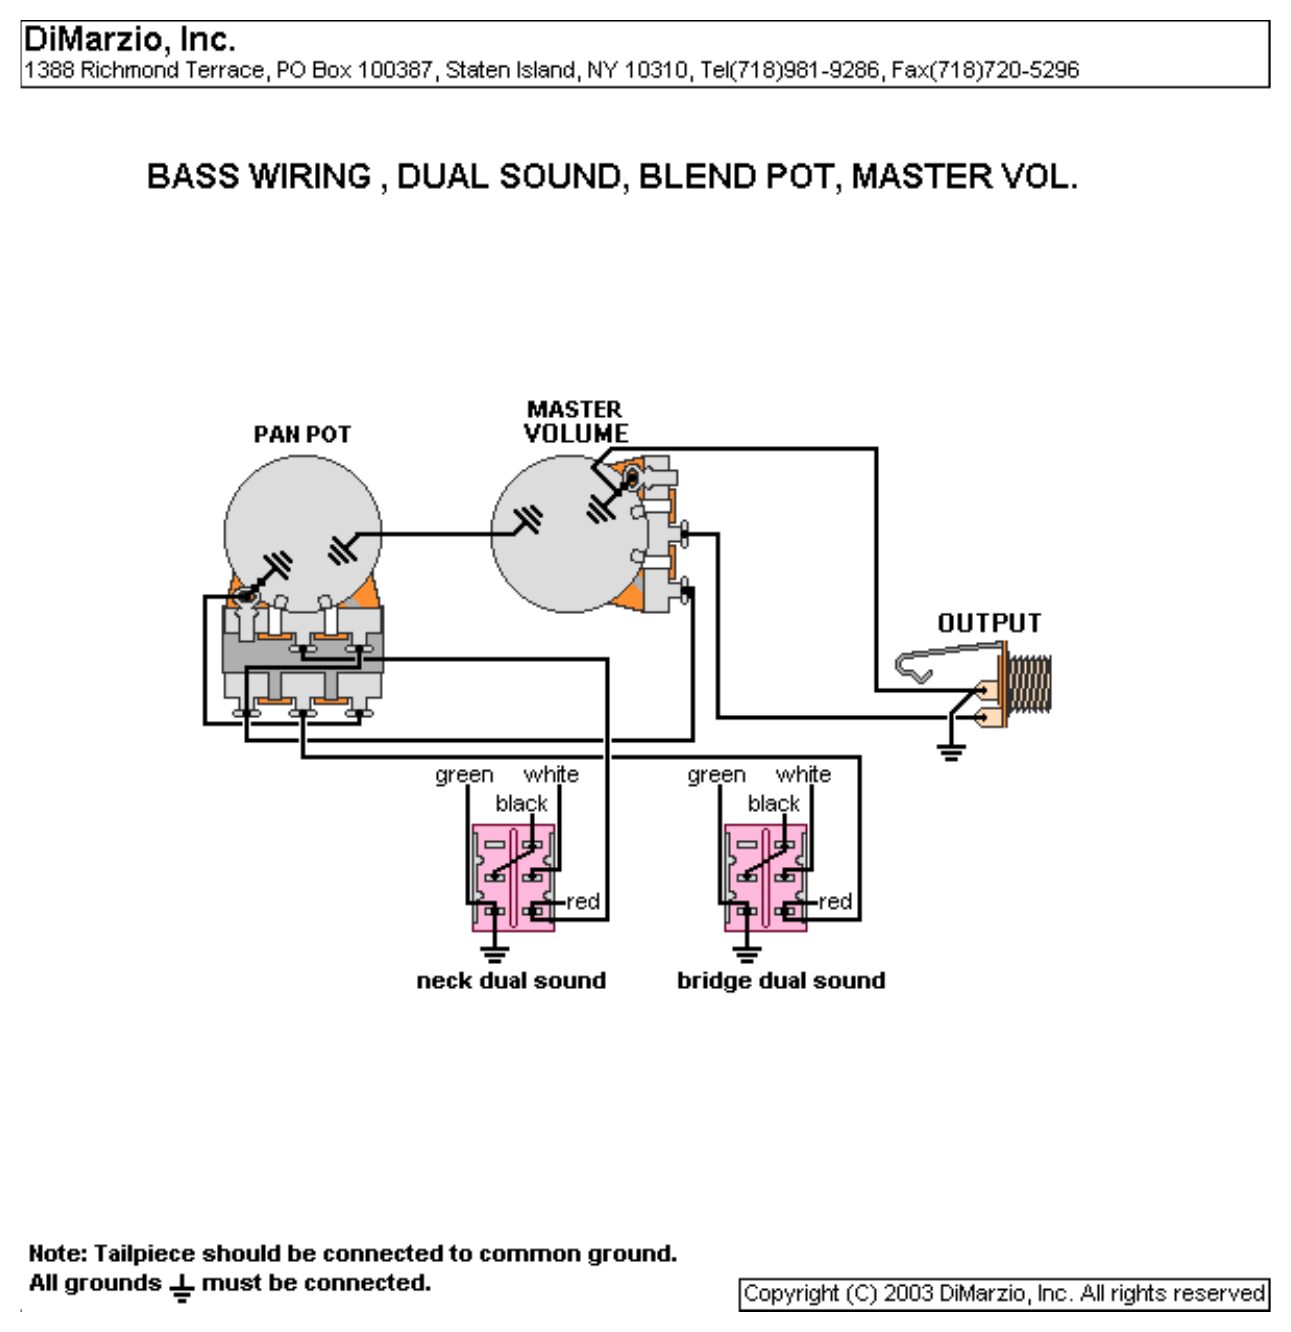
| # | From | To | Notes |
|---|---|---|---|
| 1 | Each pickup: black, white, green, red | Its own DPDT on/on switch | Laid out as the Model P dual-sound switch |
| 2 | Neck switch: red (hot) lug | Pan pot, top gang: middle lug | |
| 3 | Bridge switch: red (hot) lug | Pan pot, bottom gang: middle lug | |
| 4 | Pan output | Master volume: free outer lug | |
| 5 | Master volume: middle lug | Output jack: tip |
Step by step
- Wire each pickup to its own switch as on the Model P dual-sound sheet.
- Each switch's hot lug to its pan gang's middle lug.
- Pan output to the master volume.
- Master middle lug to the jack tip.
- Test: plug in at low volume, tap each pickup and try every control and switch position before closing the cavity.
- Dual sound = series/parallel. DiMarzio humbucker colours: one coil is red and black, the other white and green. With the switch one way, black and white are joined (series, the full humbucker sound). The other way, white goes to the hot and black to ground (both coils in parallel, a brighter, lower-output sound). Switch seen from the back, lugs as drawn.
- Pan pot lugs as DiMarzio draws them: a dual pot seen from the back with the lugs pointing down. Each gang takes one pickup on its middle lug; the output sits on opposite outer lugs of the two gangs, which is what makes it pan.
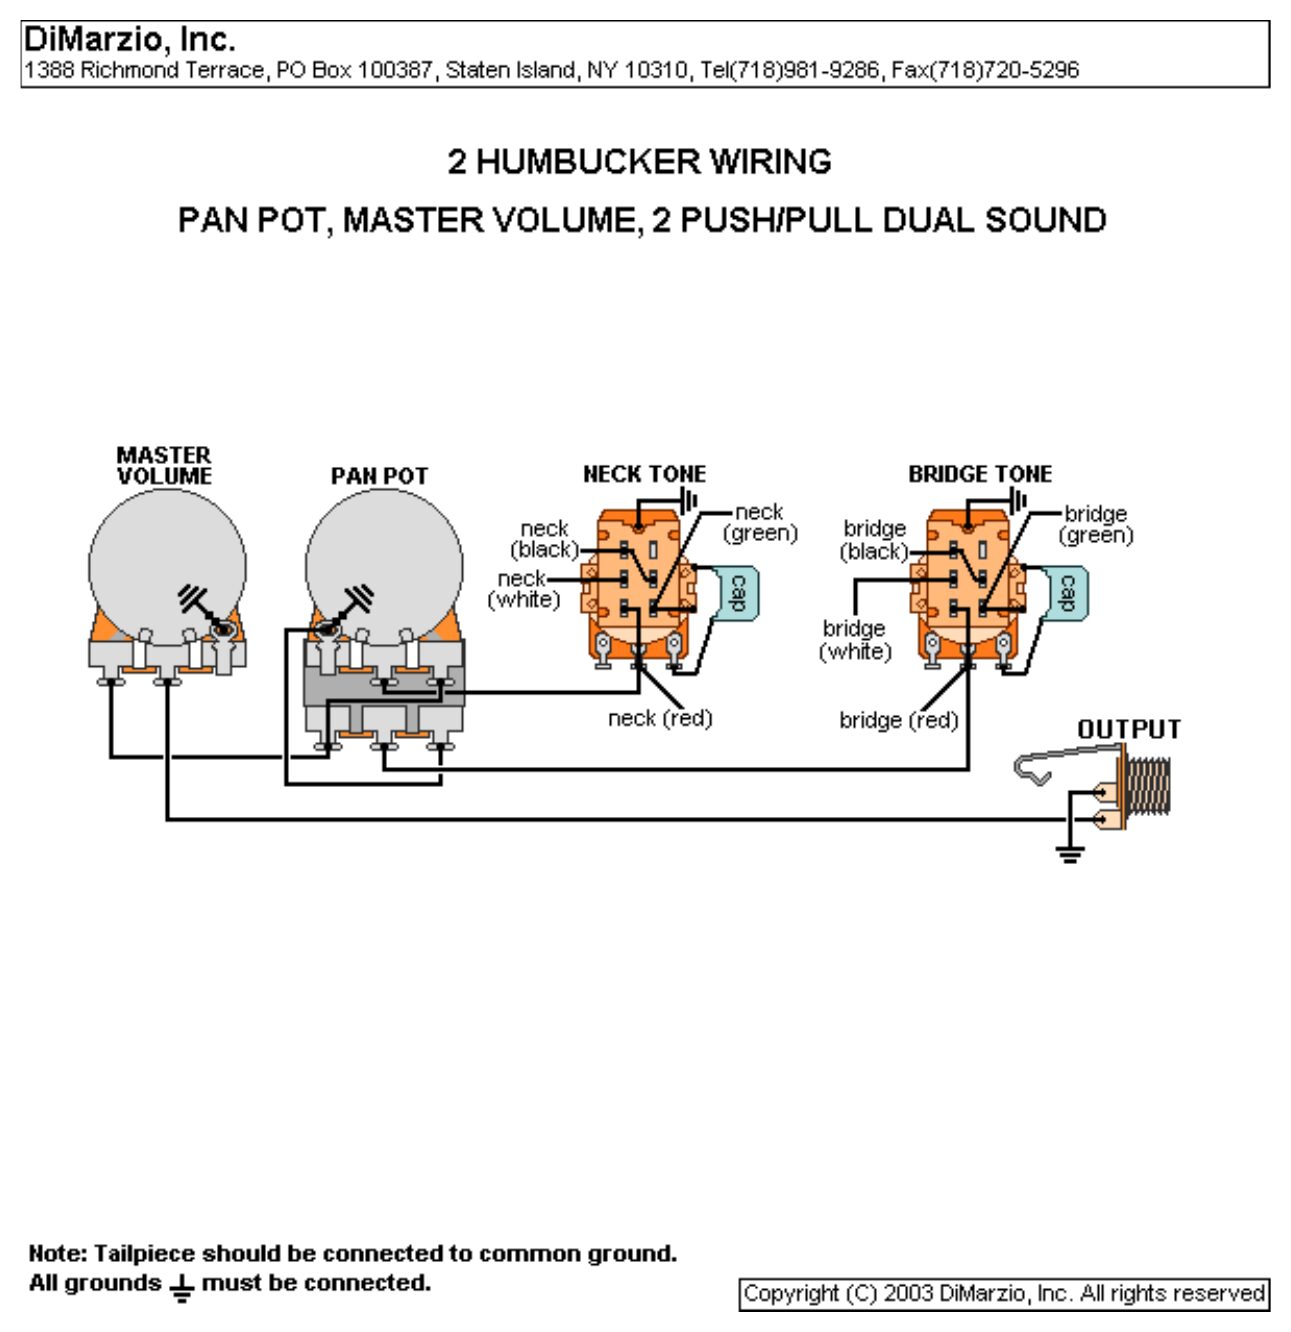
DiMarzio 2 humbuckers: pan pot, master volume, 2 push-pull tones (dual sound)
Pan pot and master volume, with a push-pull tone for each pickup that also switches it between series and parallel.
You need: Dual pan pot, master volume, 2 push-pull tone pots, 2 capacitors, mono output jack.
| # | From | To | Notes |
|---|---|---|---|
| 1 | Each pickup: black, white, green | Its push-pull tone's switch | Series/parallel |
| 2 | Each pickup: red | Its tone pot and its pan gang's middle lug | |
| 3 | Each tone pot | Capacitor, other leg to ground | |
| 4 | Pan output | Master volume: free outer lug | |
| 5 | Master volume: middle lug | Output jack: tip |
Step by step
- Wire each pickup to its own push-pull tone.
- Each red to its pan gang's middle lug.
- Pan output to the master volume; master middle lug to the jack tip.
- Test: plug in at low volume, tap each pickup and try every control and switch position before closing the cavity.
- Each dual-sound switch joins black and white (series) one way and puts white to hot and black to ground (parallel) the other way, as on the Model P dual-sound sheet above.
- Pan pot lugs as DiMarzio draws them: a dual pot seen from the back with the lugs pointing down. Each gang takes one pickup on its middle lug; the output sits on opposite outer lugs of the two gangs, which is what makes it pan.
- The switch is explained by what each position does rather than lug by lug: follow DiMarzio's drawing for the exact switch lugs.
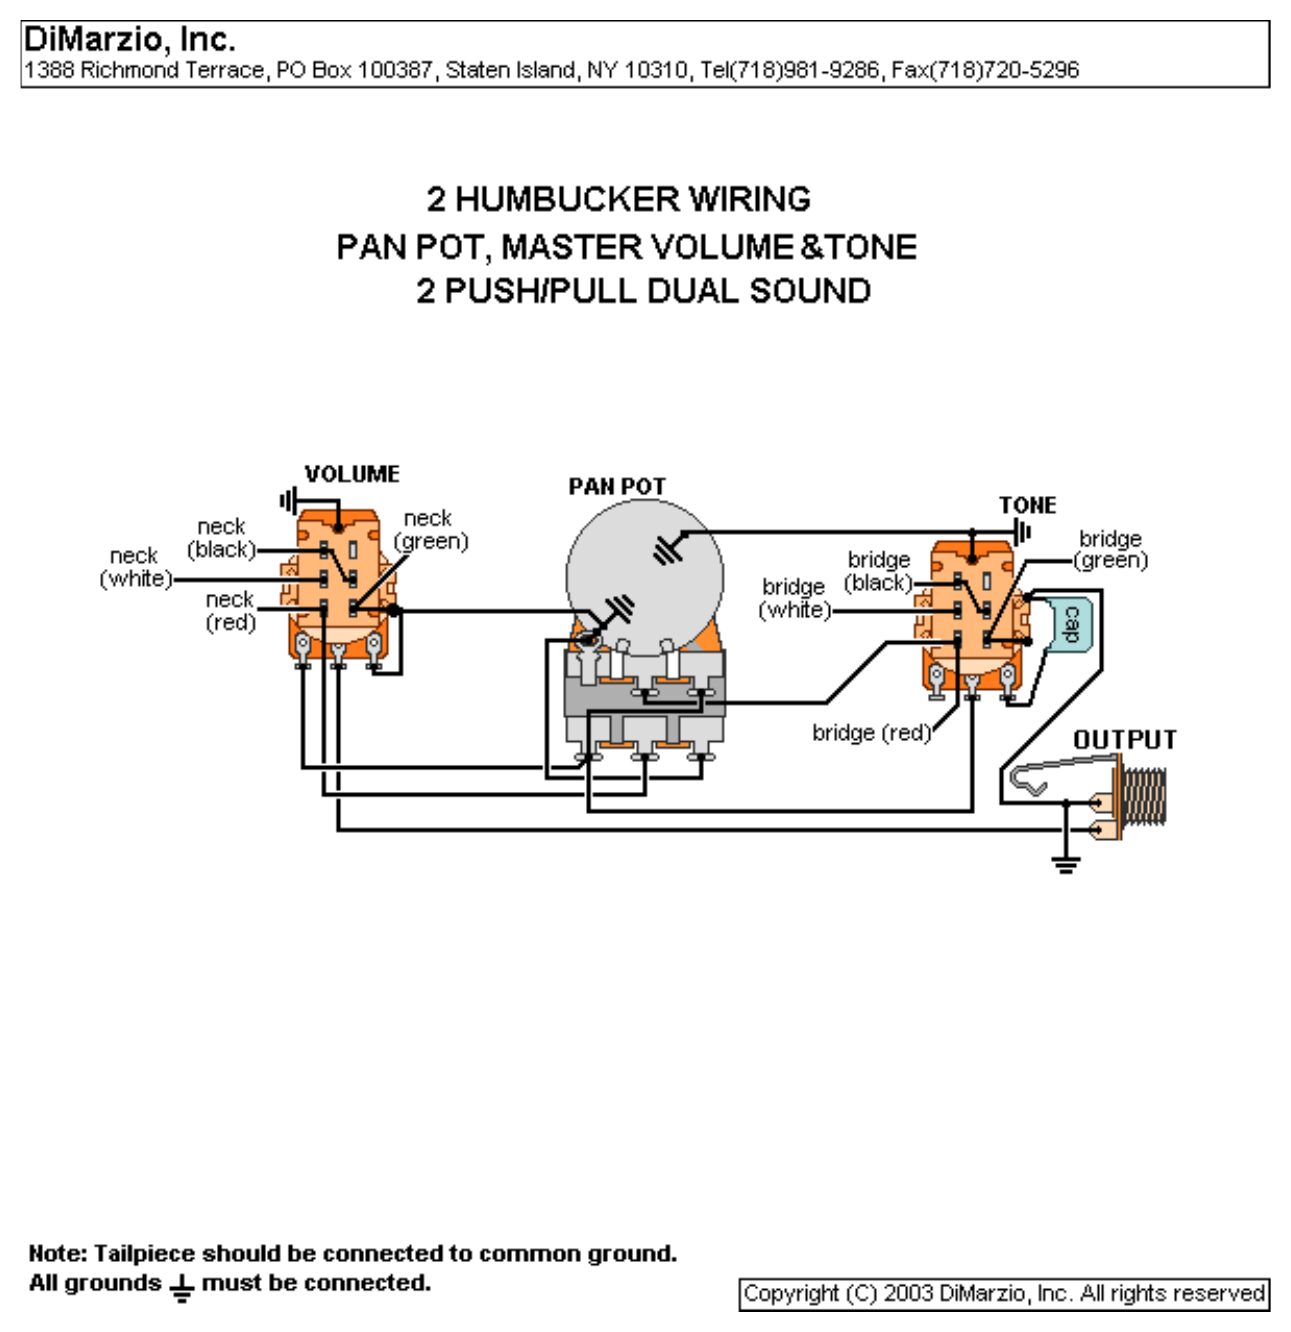
DiMarzio 2 humbuckers: pan pot, push-pull master volume and tone (dual sound)
Pan pot with a push-pull master volume (neck dual sound) and a push-pull master tone (bridge dual sound).
You need: Dual pan pot, push-pull volume, push-pull tone, capacitor, mono output jack.
| # | From | To | Notes |
|---|---|---|---|
| 1 | Neck pickup: black, white, green, red | Push-pull switch on the master volume | Neck series/parallel |
| 2 | Bridge pickup: black, white, green, red | Push-pull switch on the master tone | Bridge series/parallel |
| 3 | Neck hot | Pan pot, top gang: middle lug | |
| 4 | Bridge hot | Pan pot, bottom gang: middle lug | |
| 5 | Pan output | Master volume and tone | |
| 6 | Master volume: middle lug | Output jack: tip |
Step by step
- Neck pickup to the volume's push-pull switch, bridge pickup to the tone's.
- Each hot to its pan gang.
- Pan output to the master volume and tone; master middle lug to the jack tip.
- Test: plug in at low volume, tap each pickup and try every control and switch position before closing the cavity.
- Each dual-sound switch joins black and white (series) one way and puts white to hot and black to ground (parallel) the other way, as on the Model P dual-sound sheet above.
- Pan pot lugs as DiMarzio draws them: a dual pot seen from the back with the lugs pointing down. Each gang takes one pickup on its middle lug; the output sits on opposite outer lugs of the two gangs, which is what makes it pan.
- The switch is explained by what each position does rather than lug by lug: follow DiMarzio's drawing for the exact switch lugs.
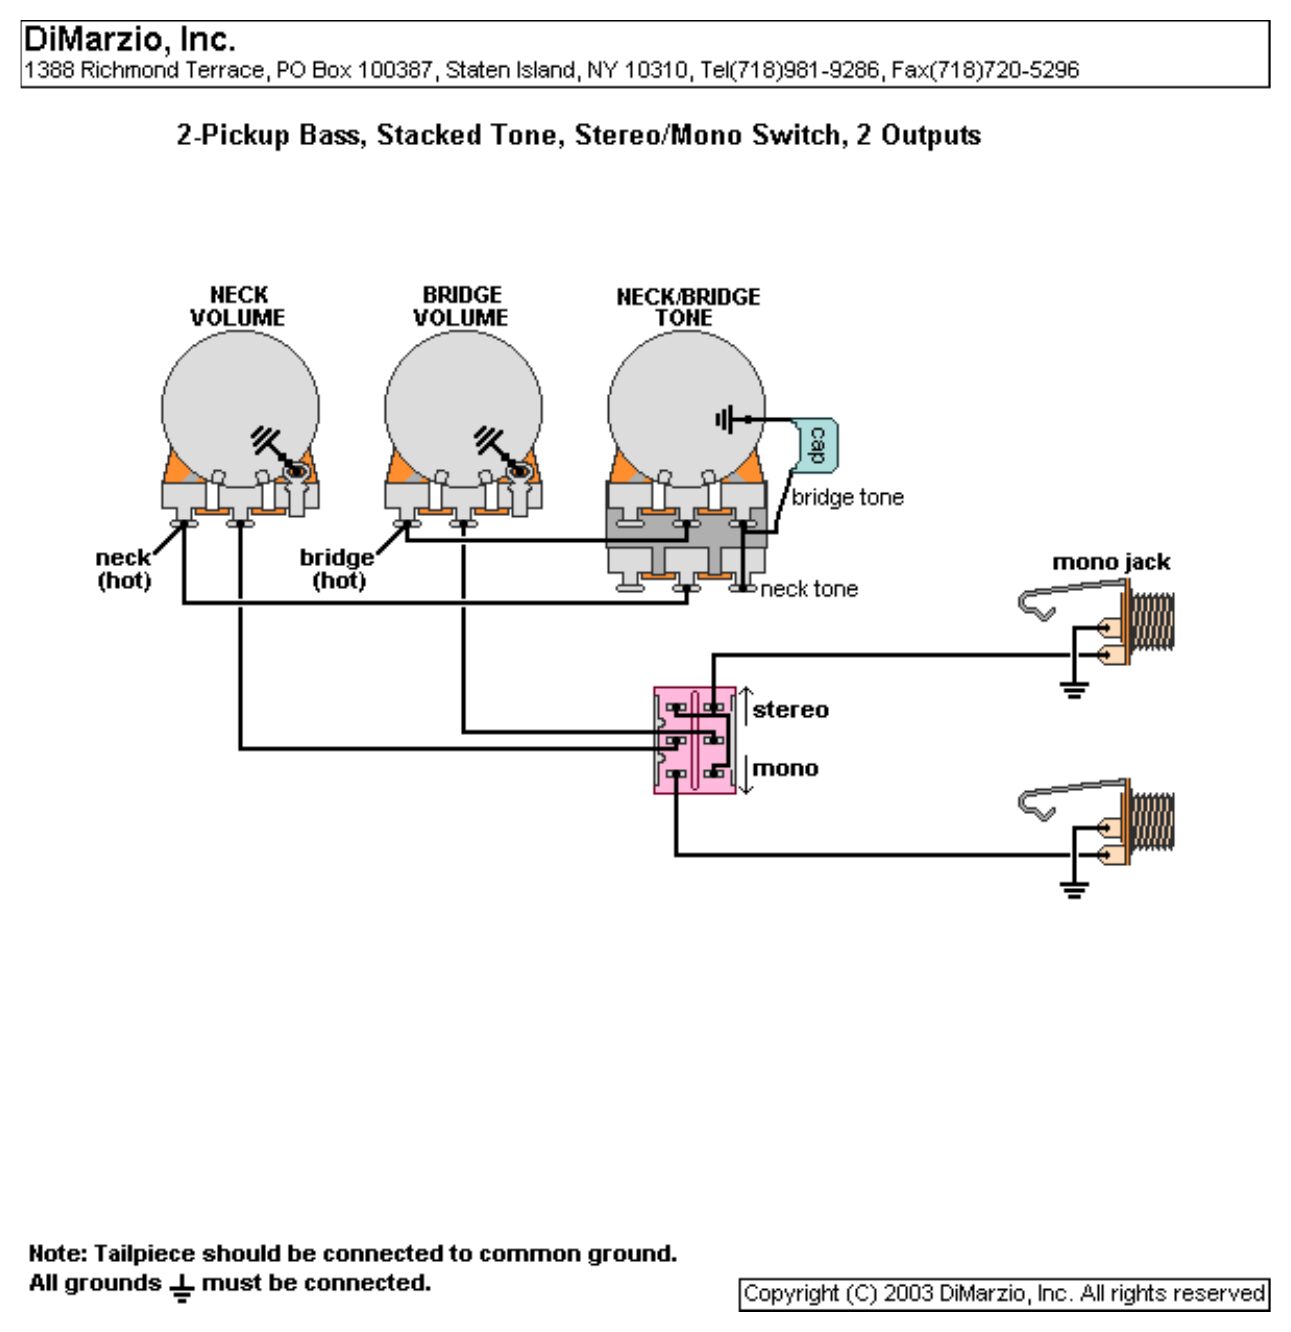
DiMarzio 2 singles: neck volume, bridge volume, stacked tone, stereo/mono switch, 2 jacks
Two single coils, each with its own volume and its own half of a stacked tone, and a DPDT that sends them to two jacks (stereo) or one (mono).
You need: 2 volume pots, stacked (dual) tone pot, capacitor, DPDT on/on switch, 2 mono jacks.
| # | From | To | Notes |
|---|---|---|---|
| 1 | Neck hot | Neck volume: free outer lug | and the neck gang of the stacked tone |
| 2 | Bridge hot | Bridge volume: free outer lug | and the bridge gang of the stacked tone |
| 3 | Stacked tone: outer lugs | Capacitor, other leg to ground | |
| 4 | Each volume: middle lug | DPDT | |
| 5 | DPDT, stereo | Neck to the mono jack, bridge to the second jack | |
| 6 | DPDT, mono | Both to the mono jack | |
| 7 | Jack sleeves | Ground |
Step by step
- Each hot to its volume's free outer lug and its stacked-tone gang.
- Each volume's middle lug to the switch.
- Switch outputs to the two jack tips; sleeves to ground.
- Test: plug in at low volume, tap each pickup and try every control and switch position before closing the cavity.
- The switch is explained by what each position does rather than lug by lug: follow DiMarzio's drawing for the exact switch lugs.
- Lug names are described by role, as drawn by DiMarzio: on each pot, the ground lug is the outer lug soldered to the casing, the other outer lug is the free one, and the middle lug is the wiper.
DiMarzio 3 humbuckers: volume, tone, 3-way toggle and on/on/on switch
Two J humbuckers on a 3-way toggle plus a P humbucker added by an on/on/on DPDT: J only, J and 3-way, or 3-way only.
You need: 1 volume, 1 tone, capacitor, 3-way toggle, DPDT on/on/on mini switch, mono output jack.
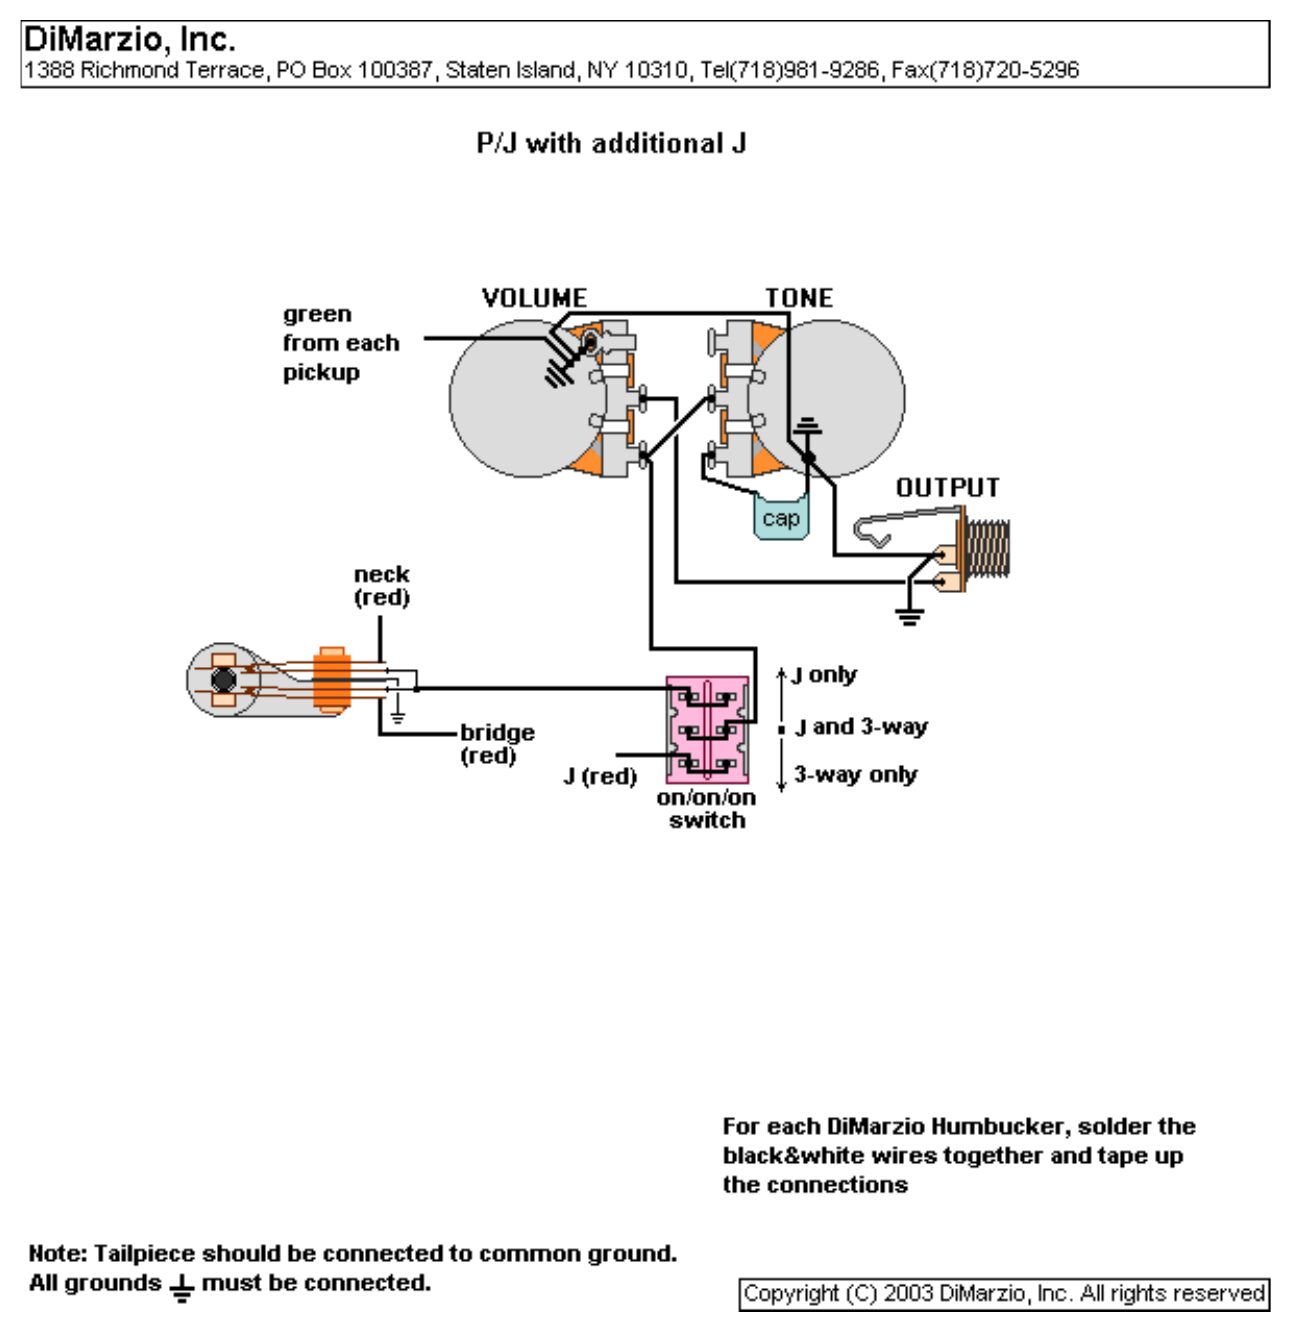
| # | From | To | Notes |
|---|---|---|---|
| 1 | Each humbucker: black + white | Join and tape | |
| 2 | Each pickup: green | Volume casing (ground) | |
| 3 | Neck and bridge: red | 3-way toggle | |
| 4 | Toggle output | On/on/on switch | |
| 5 | Third pickup ('J'): red | On/on/on switch | |
| 6 | Switch output | Volume: free outer lug | |
| 7 | Volume: free outer lug | Tone: middle lug | |
| 8 | Tone: outer lug | Capacitor, other leg to ground | |
| 9 | Volume: middle lug | Output jack: tip |
Step by step
- Join black and white on each humbucker and tape; greens to ground.
- Neck and bridge reds to the 3-way toggle; toggle output to the on/on/on switch.
- Third pickup's red to the on/on/on switch; switch output to the volume's free outer lug.
- Switch up = J only, centre = J and the 3-way, down = 3-way only.
- Test: plug in at low volume, tap each pickup and try every control and switch position before closing the cavity.
- The switch is explained by what each position does rather than lug by lug: follow DiMarzio's drawing for the exact switch lugs.
- Lug names are described by role, as drawn by DiMarzio: on each pot, the ground lug is the outer lug soldered to the casing, the other outer lug is the free one, and the middle lug is the wiper.
DiMarzio 2 humbuckers: neck/bridge in series switch (neck volume bypassed)
2 volumes and a master tone, plus an on/on DPDT that puts the neck and bridge pickups in series. In series mode the neck volume is bypassed.
You need: 2 volumes, 1 tone, capacitor, DPDT on/on mini switch, mono output jack.
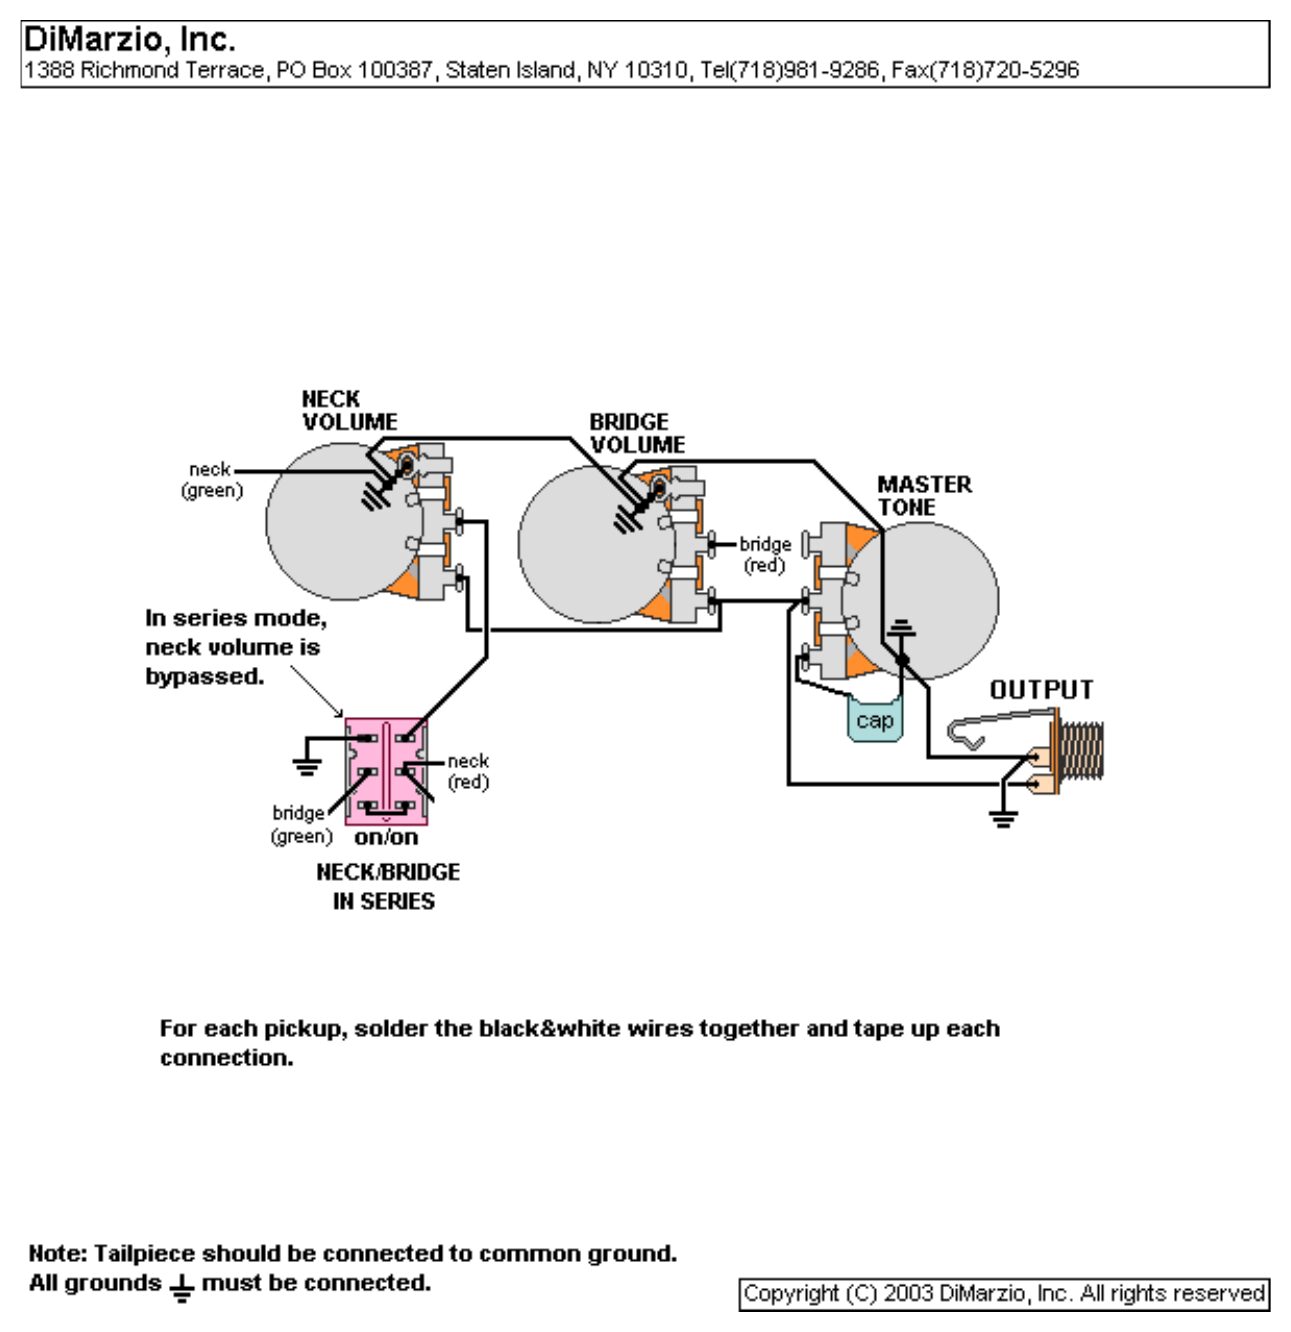
| # | From | To | Notes |
|---|---|---|---|
| 1 | Each pickup: black + white | Join and tape | |
| 2 | Neck pickup: green | Neck volume casing | |
| 3 | Neck pickup: red | DPDT | |
| 4 | Bridge pickup: green | DPDT | Not to ground |
| 5 | Bridge pickup: red | Bridge volume: middle lug | |
| 6 | DPDT | Neck volume: middle lug, and ground | |
| 7 | Neck volume: free outer lug | Bridge volume: free outer lug | Output |
| 8 | Master tone: middle lug | Joined volume outputs | Tone sits across the output |
| 9 | Master tone: one outer lug | Capacitor, other leg to ground | Other outer lug left empty |
| 10 | Joined volume outputs | Output jack: tip | |
| 11 | All pot casings | Output jack: sleeve (ground) | Bridge ground wire to a pot casing |
Step by step
- Join black and white on each pickup and tape.
- Neck red and bridge green to the switch; the switch to the neck volume's middle lug and to ground.
- Bridge red to the bridge volume's middle lug.
- Join the volumes' free outer lugs; run them to the tone's middle lug and the jack tip.
- Test: plug in at low volume, tap each pickup and try every control and switch position before closing the cavity.
- In series mode the two pickups are wired end to end (the neck's hot feeds the bridge pickup's green), which gives a fatter, louder sound.
- The switch is explained by what each position does rather than lug by lug: follow DiMarzio's drawing for the exact switch lugs.
DiMarzio 2 humbuckers: neck/bridge in series switch (bridge volume bypassed)
The mirror image of the sheet above: in series mode the bridge volume is bypassed.
You need: 2 volumes, 1 tone, capacitor, DPDT on/on mini switch, mono output jack.
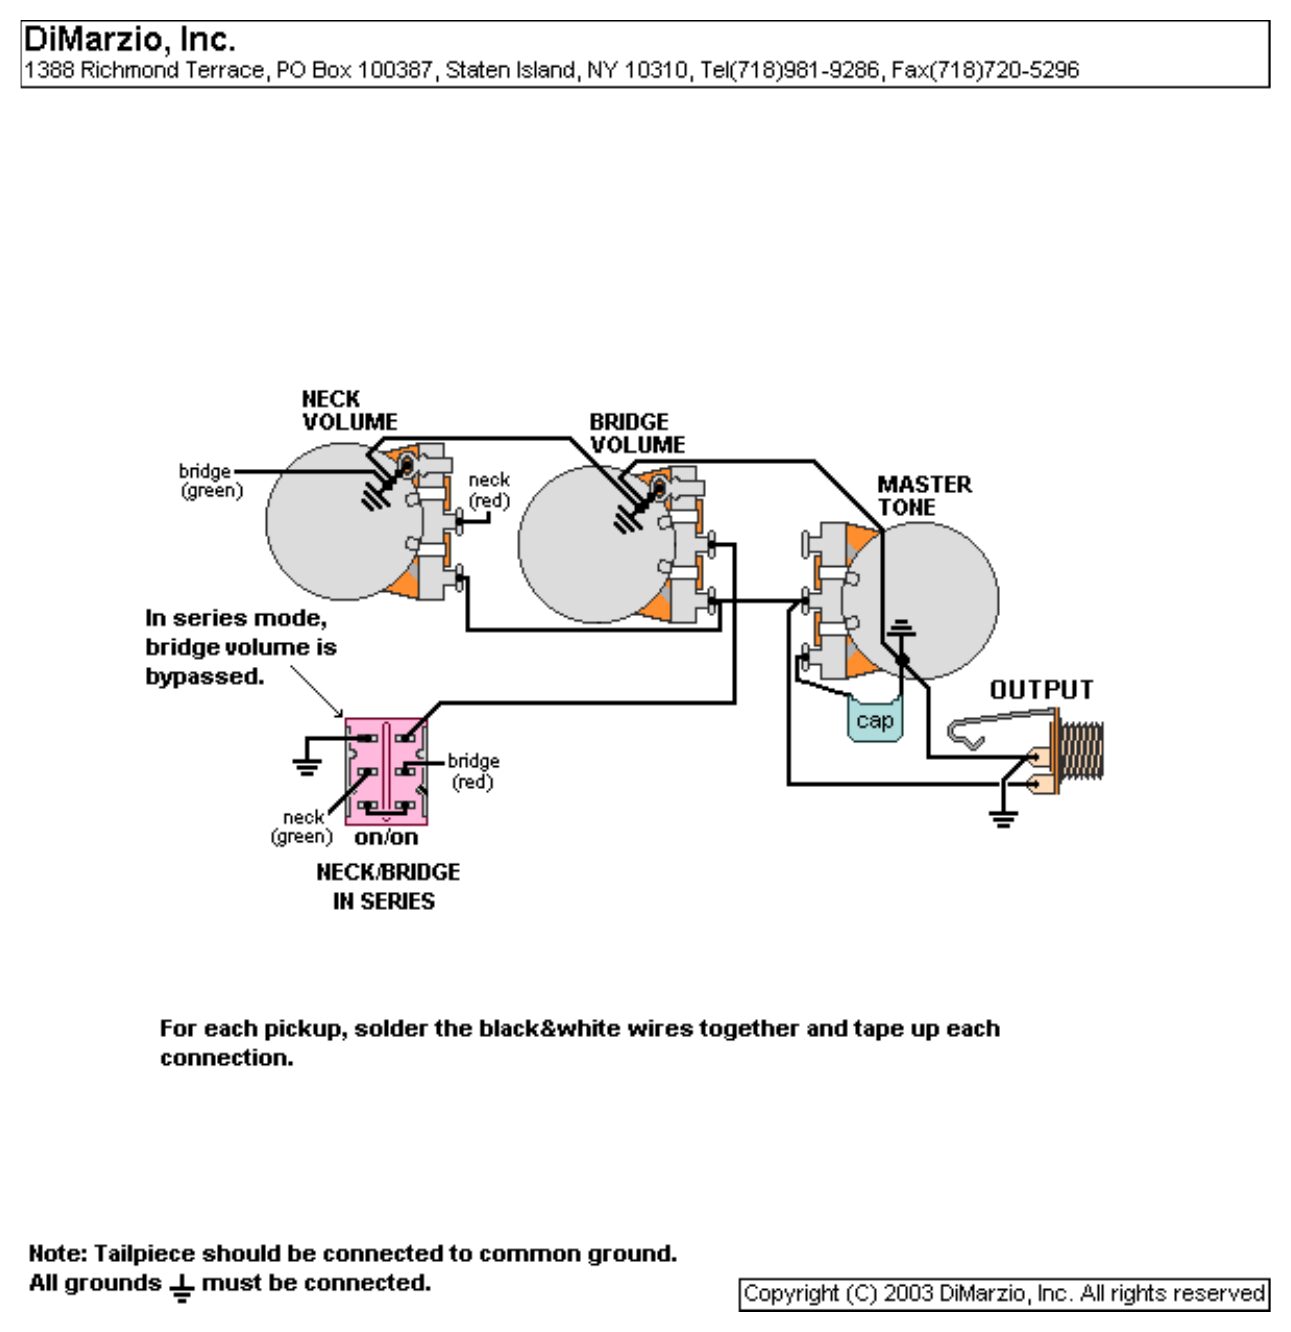
| # | From | To | Notes |
|---|---|---|---|
| 1 | Each pickup: black + white | Join and tape | |
| 2 | Bridge pickup: green | Volume casing | |
| 3 | Bridge pickup: red | DPDT | |
| 4 | Neck pickup: green | DPDT | Not to ground |
| 5 | Neck pickup: red | Neck volume: middle lug | |
| 6 | DPDT | Bridge volume: middle lug, and ground | |
| 7 | Neck volume: free outer lug | Bridge volume: free outer lug | Output |
| 8 | Master tone: middle lug | Joined volume outputs | Tone sits across the output |
| 9 | Master tone: one outer lug | Capacitor, other leg to ground | Other outer lug left empty |
| 10 | Joined volume outputs | Output jack: tip | |
| 11 | All pot casings | Output jack: sleeve (ground) | Bridge ground wire to a pot casing |
Step by step
- Join black and white on each pickup and tape.
- Bridge red and neck green to the switch; the switch to the bridge volume's middle lug and to ground.
- Neck red to the neck volume's middle lug.
- Join the volumes' free outer lugs; run them to the tone's middle lug and the jack tip.
- Test: plug in at low volume, tap each pickup and try every control and switch position before closing the cavity.
- In series mode the two pickups are wired end to end (the neck's hot feeds the bridge pickup's green), which gives a fatter, louder sound.
- The switch is explained by what each position does rather than lug by lug: follow DiMarzio's drawing for the exact switch lugs.
DiMarzio 2 humbuckers: push-pull tone for bridge/neck series (neck volume turns off)
The series switch lives on a push-pull master tone. Pulled, neck and bridge are in series and the neck volume no longer works.
You need: 2 volumes, push-pull tone pot, capacitor, mono output jack.
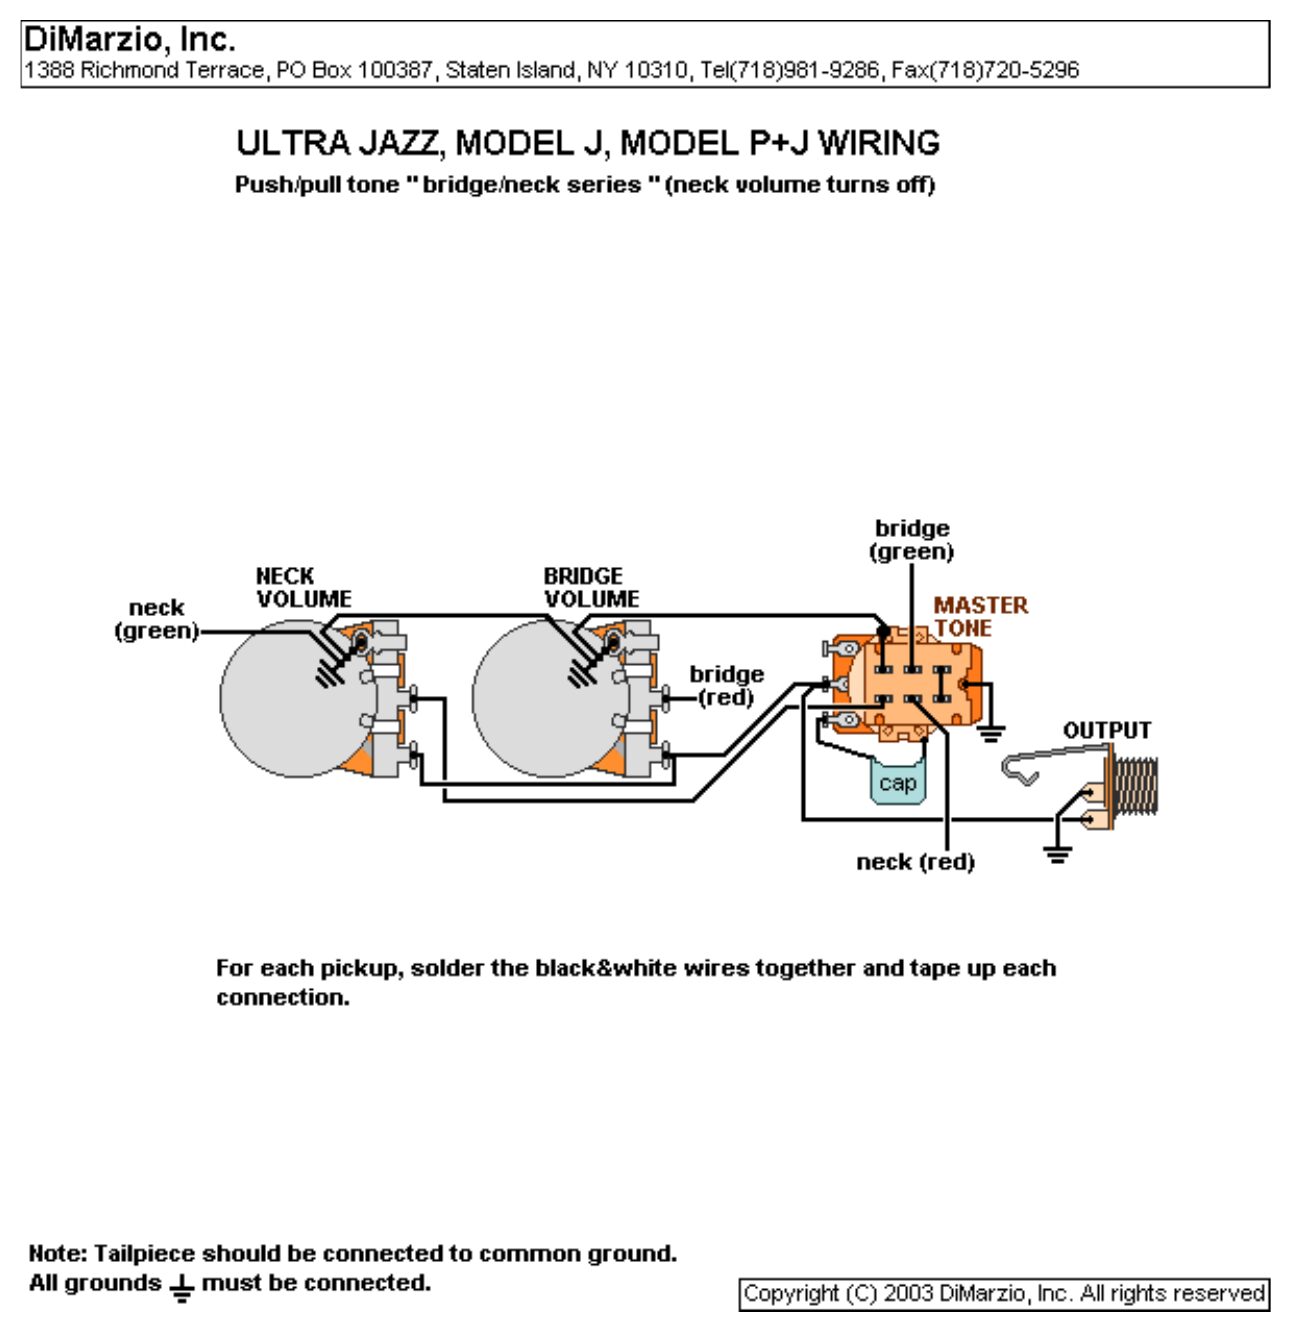
| # | From | To | Notes |
|---|---|---|---|
| 1 | Each pickup: black + white | Join and tape | |
| 2 | Neck pickup: green | Neck volume casing | |
| 3 | Bridge pickup: red | Bridge volume: middle lug | |
| 4 | Neck pickup: red | Push-pull switch on the tone | |
| 5 | Bridge pickup: green | Push-pull switch on the tone | Not to ground |
| 6 | Push-pull switch | Neck volume: middle lug, and ground | |
| 7 | Neck volume: free outer lug | Bridge volume: free outer lug | Output |
| 8 | Master tone: middle lug | Joined volume outputs | Tone sits across the output |
| 9 | Master tone: one outer lug | Capacitor, other leg to ground | Other outer lug left empty |
| 10 | Joined volume outputs | Output jack: tip | |
| 11 | All pot casings | Output jack: sleeve (ground) | Bridge ground wire to a pot casing |
Step by step
- Join black and white on each pickup and tape.
- Neck red and bridge green to the tone pot's switch; switch to the neck volume's middle lug and ground.
- Join the volumes' free outer lugs; run them to the tone's middle lug and the jack tip.
- Test: plug in at low volume, tap each pickup and try every control and switch position before closing the cavity.
- In series mode the two pickups are wired end to end (the neck's hot feeds the bridge pickup's green), which gives a fatter, louder sound.
- The switch is explained by what each position does rather than lug by lug: follow DiMarzio's drawing for the exact switch lugs.
DiMarzio Ultra Jazz 5: push-pull neck volume for neck/bridge series
Ultra Jazz 5 with the neck volume as a push-pull pot that puts the two pickups in series.
You need: Push-pull volume, standard volume, tone pot, capacitor, mono output jack.
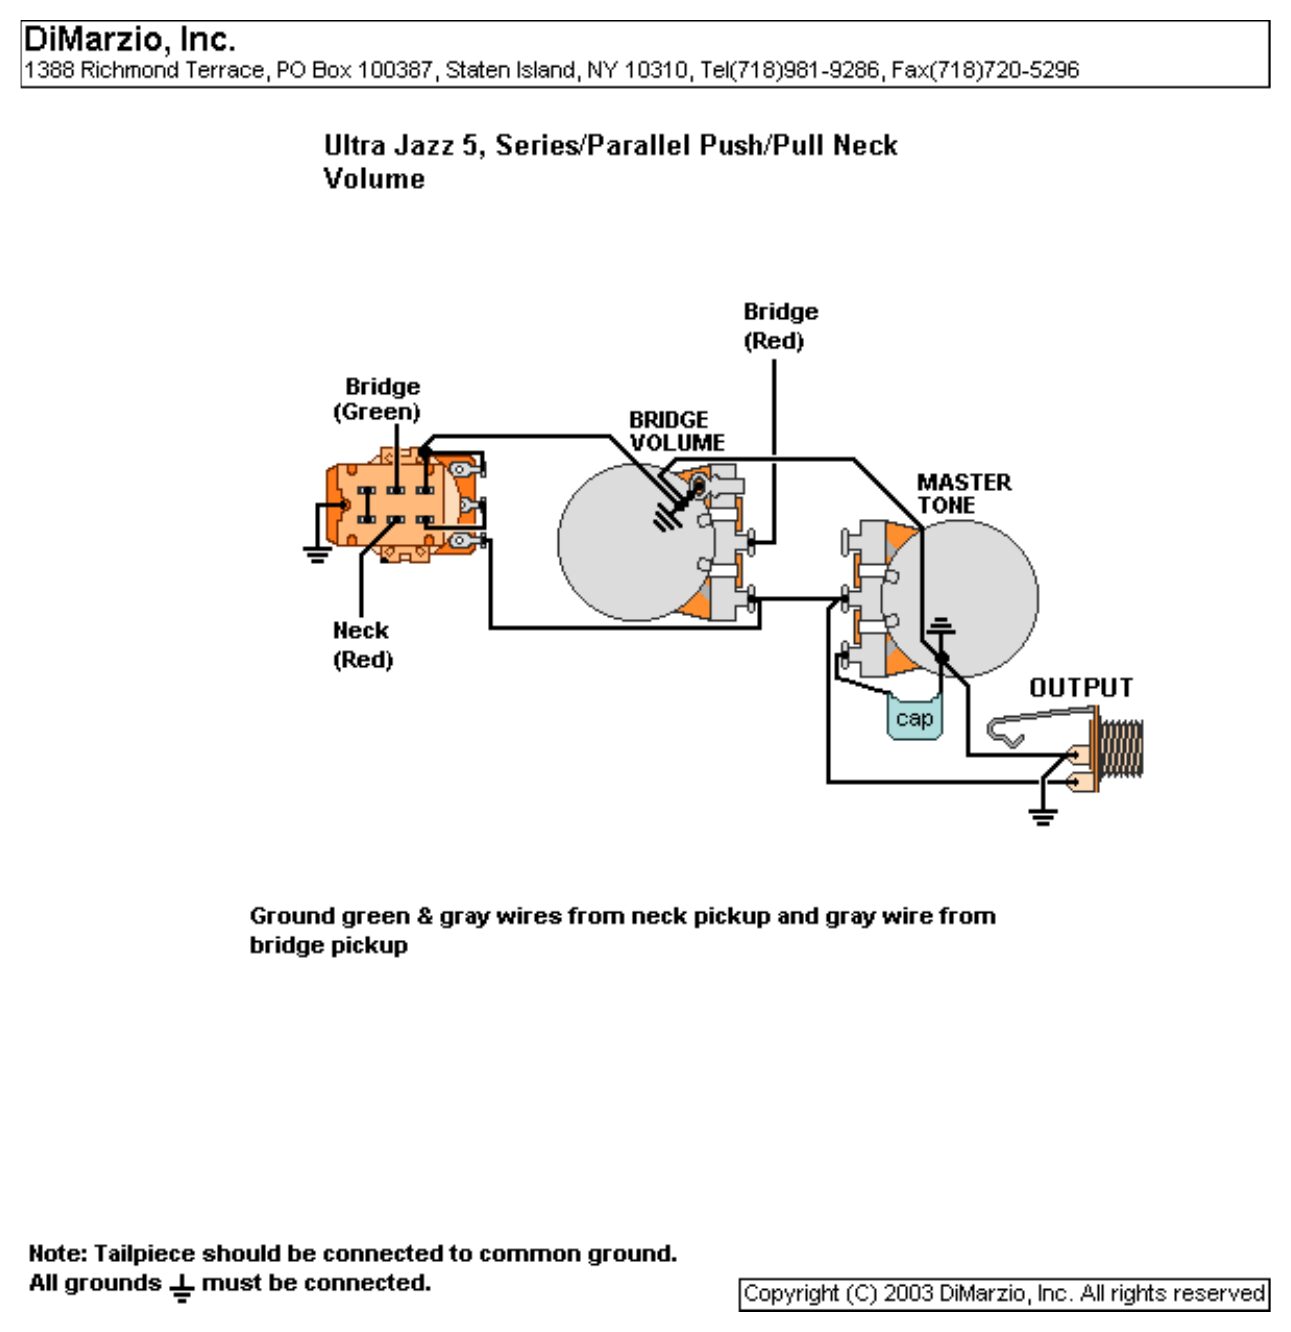
| # | From | To | Notes |
|---|---|---|---|
| 1 | Neck pickup: red | Push-pull switch on the neck volume | |
| 2 | Bridge pickup: green | Push-pull switch on the neck volume | Not to ground |
| 3 | Bridge pickup: red | Bridge volume: middle lug | |
| 4 | Neck pickup: green + gray; bridge pickup: gray | Ground | DiMarzio's text |
| 5 | Push-pull switch | Neck volume pot and ground | |
| 6 | Neck volume: free outer lug | Bridge volume: free outer lug | Output |
| 7 | Master tone: middle lug | Joined volume outputs | Tone sits across the output |
| 8 | Master tone: one outer lug | Capacitor, other leg to ground | Other outer lug left empty |
| 9 | Joined volume outputs | Output jack: tip | |
| 10 | All pot casings | Output jack: sleeve (ground) | Bridge ground wire to a pot casing |
Step by step
- Ground the neck pickup's green and gray and the bridge pickup's gray.
- Neck red and bridge green to the push-pull switch.
- Bridge red to the bridge volume's middle lug.
- Join the volumes' free outer lugs; run them to the tone's middle lug and the jack tip.
- Test: plug in at low volume, tap each pickup and try every control and switch position before closing the cavity.
- In series mode the two pickups are wired end to end (the neck's hot feeds the bridge pickup's green), which gives a fatter, louder sound.
- The switch is explained by what each position does rather than lug by lug: follow DiMarzio's drawing for the exact switch lugs.
DiMarzio Ultra Jazz 5: push-pull series neck volume and push-pull phase tone
As above, plus a push-pull tone that reverses the bridge pickup's phase.
You need: Push-pull volume, standard volume, push-pull tone pot, capacitor, mono output jack.
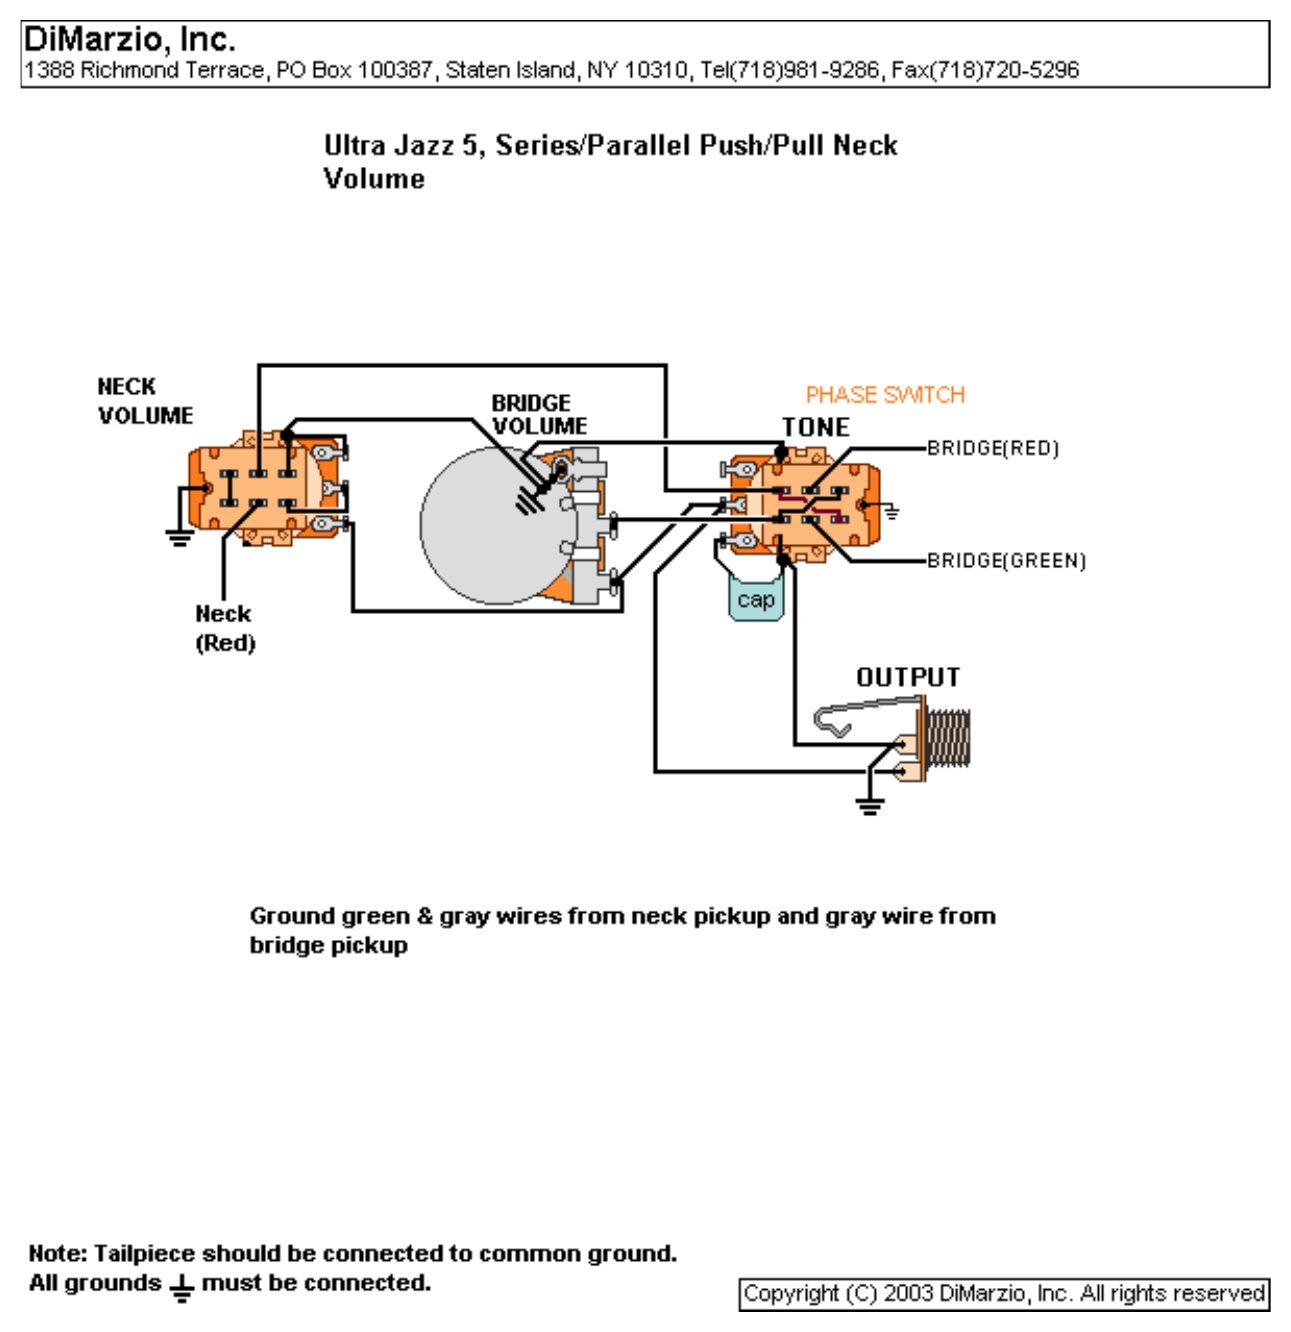
| # | From | To | Notes |
|---|---|---|---|
| 1 | Neck pickup: red | Push-pull switch on the neck volume | Series switch |
| 2 | Bridge pickup: red and green | Push-pull switch on the tone | Phase switch: swaps them |
| 3 | Phase switch outputs | Bridge volume and the series switch | |
| 4 | Neck pickup: green + gray; bridge pickup: gray | Ground | DiMarzio's text |
| 5 | Neck volume: free outer lug | Bridge volume: free outer lug | Output |
| 6 | Master tone: middle lug | Joined volume outputs | Tone sits across the output |
| 7 | Master tone: one outer lug | Capacitor, other leg to ground | Other outer lug left empty |
| 8 | Joined volume outputs | Output jack: tip | |
| 9 | All pot casings | Output jack: sleeve (ground) | Bridge ground wire to a pot casing |
Step by step
- Ground the neck pickup's green and gray and the bridge pickup's gray.
- Bridge red and green to the tone's push-pull switch, wired as a cross-over.
- Neck red to the volume's push-pull switch.
- Join the volumes' outputs; run them to the tone's middle lug and the jack tip.
- Test: plug in at low volume, tap each pickup and try every control and switch position before closing the cavity.
- Phase: pulling the tone swaps the bridge pickup's hot and ground wires, so it runs out of phase with the neck (thin, nasal sound with both on).
- In series mode the two pickups are wired end to end (the neck's hot feeds the bridge pickup's green), which gives a fatter, louder sound.
- The switch is explained by what each position does rather than lug by lug: follow DiMarzio's drawing for the exact switch lugs.
DiMarzio P+J / J set: push-pull dual sound volumes and push-pull series tone
DiMarzio's newer colour drawing: each volume pulls to put its pickup in parallel, and the tone pulls to put neck and bridge in series.
You need: 2 push-pull volumes, push-pull tone pot, capacitor, mono output jack.
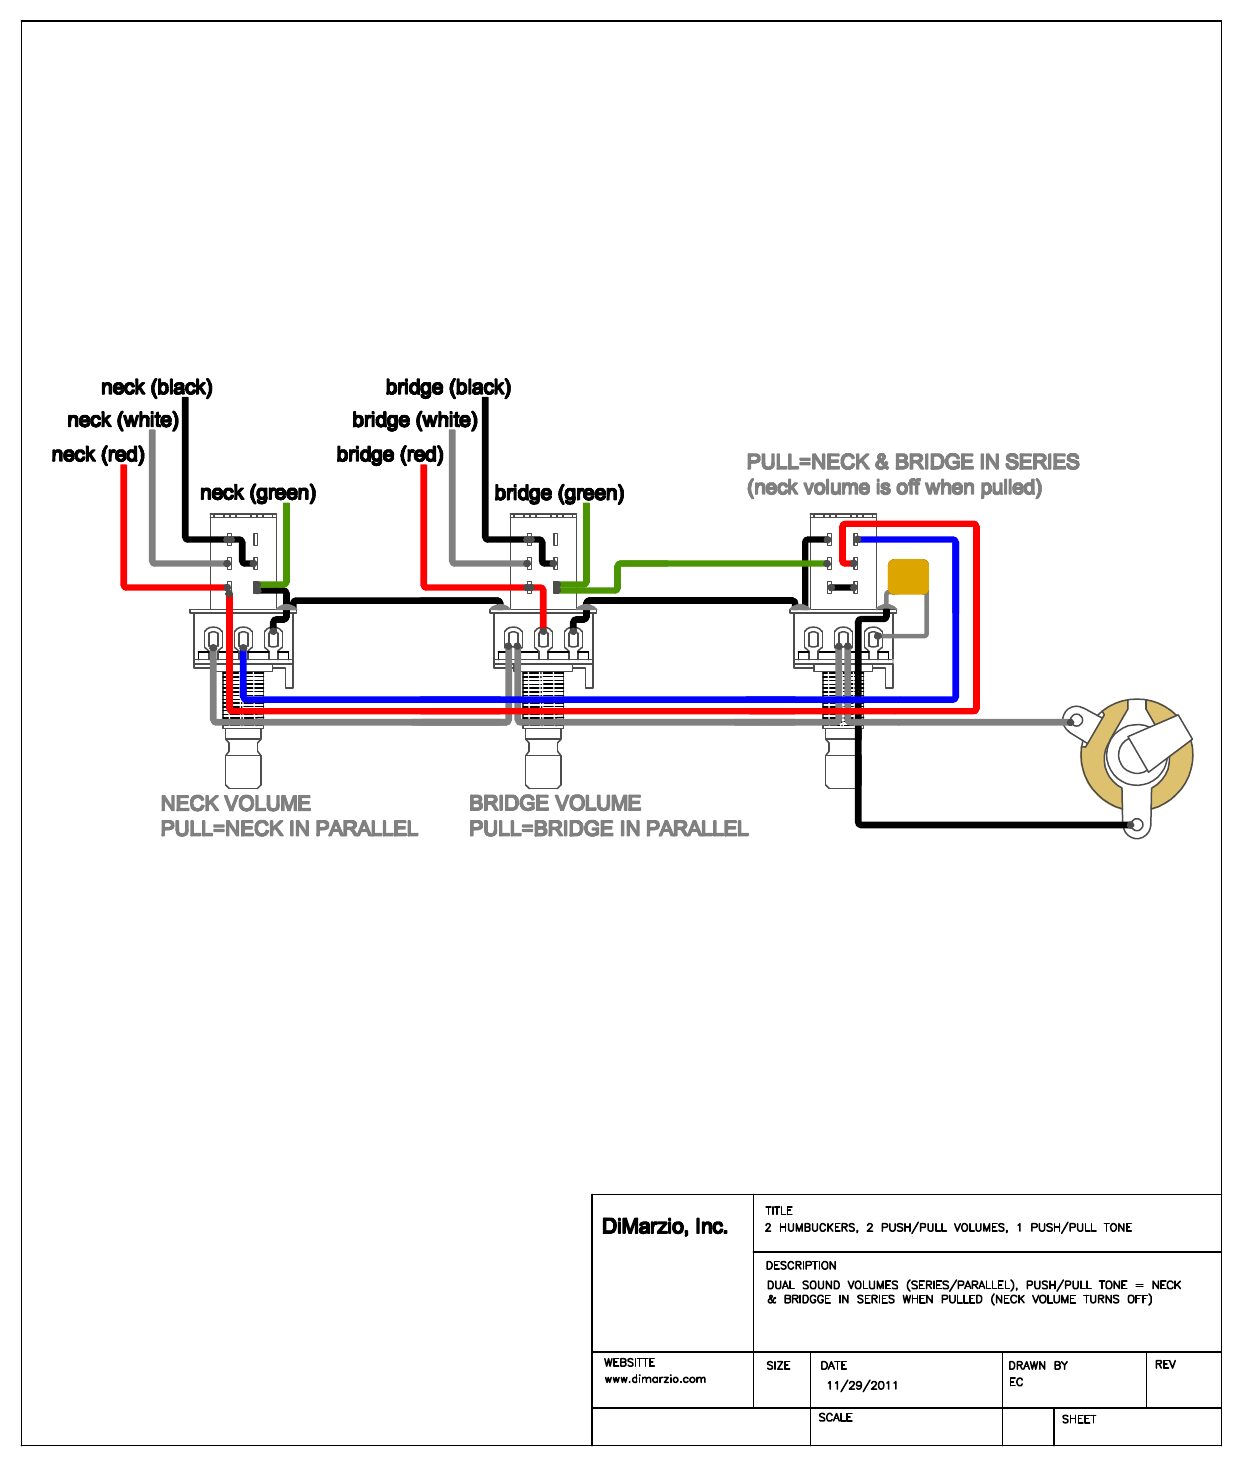
| # | From | To | Notes |
|---|---|---|---|
| 1 | Neck pickup: black, white, red, green | Neck volume's push-pull switch | Pull = neck in parallel |
| 2 | Bridge pickup: black, white, red, green | Bridge volume's push-pull switch | Pull = bridge in parallel |
| 3 | Neck and bridge leads | Tone's push-pull switch | Pull = neck and bridge in series |
| 4 | Tone switch | Capacitor | |
| 5 | Output | Output jack: tip |
Step by step
- Wire each pickup to its volume's push-pull switch.
- Wire the tone's push-pull switch for series, with the capacitor as drawn.
- Run the output to the jack tip.
- Test: plug in at low volume, tap each pickup and try every control and switch position before closing the cavity.
- When the tone is pulled (series), the neck volume is off.
- The switch is explained by what each position does rather than lug by lug: follow DiMarzio's drawing for the exact switch lugs.
DiMarzio 2 humbuckers: 2 volumes, master tone, 5-way EP1112 switch
A DiMarzio EP1112 5-way multi-pole switch gives five sounds: 1 neck series, 2 neck parallel, 3 neck and bridge, 4 bridge/neck out of phase, 5 bridge series.
You need: 2 volumes, 1 tone, capacitor, DiMarzio EP1112 5-way switch, mono output jack.
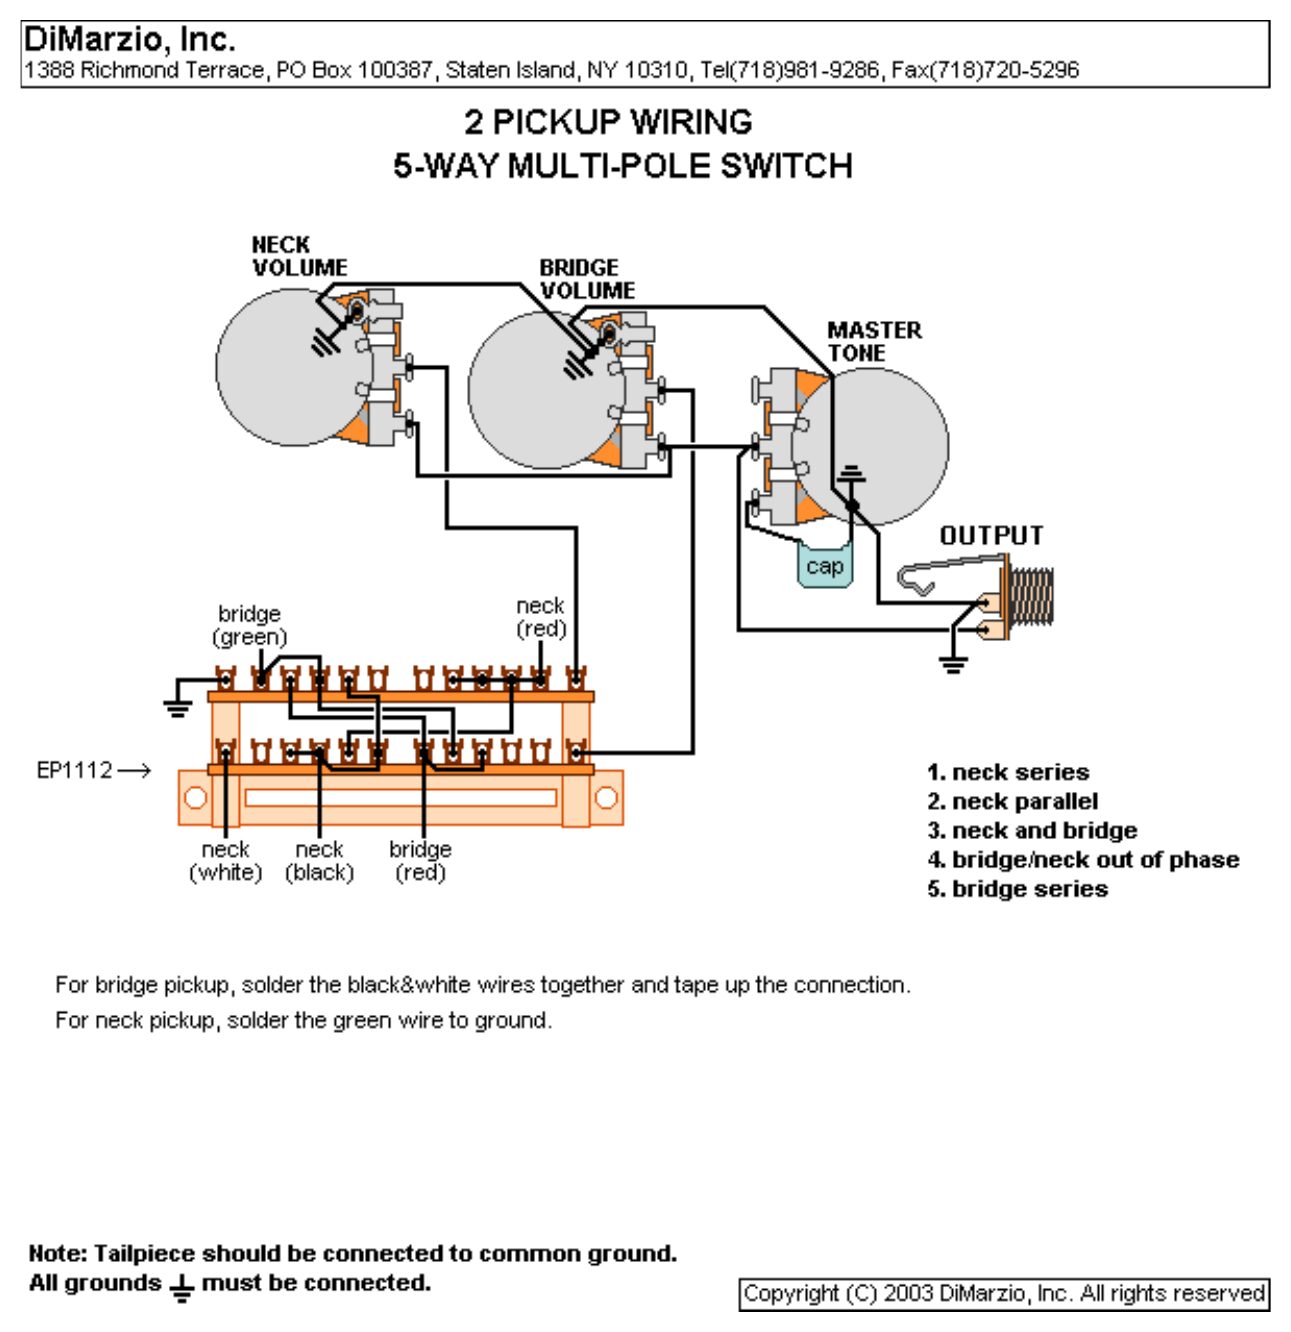
| # | From | To | Notes |
|---|---|---|---|
| 1 | Neck pickup: red, white, black | EP1112 | |
| 2 | Neck pickup: green | Ground | DiMarzio's text |
| 3 | Bridge pickup: black + white | Join and tape | |
| 4 | Bridge pickup: red and green | EP1112 | |
| 5 | EP1112 outputs | Neck volume and bridge volume | |
| 6 | Neck volume: free outer lug | Bridge volume: free outer lug | Output |
| 7 | Master tone: middle lug | Joined volume outputs | Tone sits across the output |
| 8 | Master tone: one outer lug | Capacitor, other leg to ground | Other outer lug left empty |
| 9 | Joined volume outputs | Output jack: tip | |
| 10 | All pot casings | Output jack: sleeve (ground) | Bridge ground wire to a pot casing |
Step by step
- Bridge pickup: black and white joined and taped. Neck pickup: green to ground.
- Remaining pickup wires to the EP1112 as drawn.
- Switch outputs to the volumes; joined volume outputs to the tone and the jack tip.
- Test: plug in at low volume, tap each pickup and try every control and switch position before closing the cavity.
- The switch is explained by what each position does rather than lug by lug: follow DiMarzio's drawing for the exact switch lugs.
DiMarzio 2 humbuckers: 2 volumes, master tone, DPDT neck phase switch
Standard 2 volume / master tone wiring with a mini DPDT that reverses the neck pickup's phase.
You need: 2 volumes, 1 tone, capacitor, DPDT on/on mini switch, mono output jack.
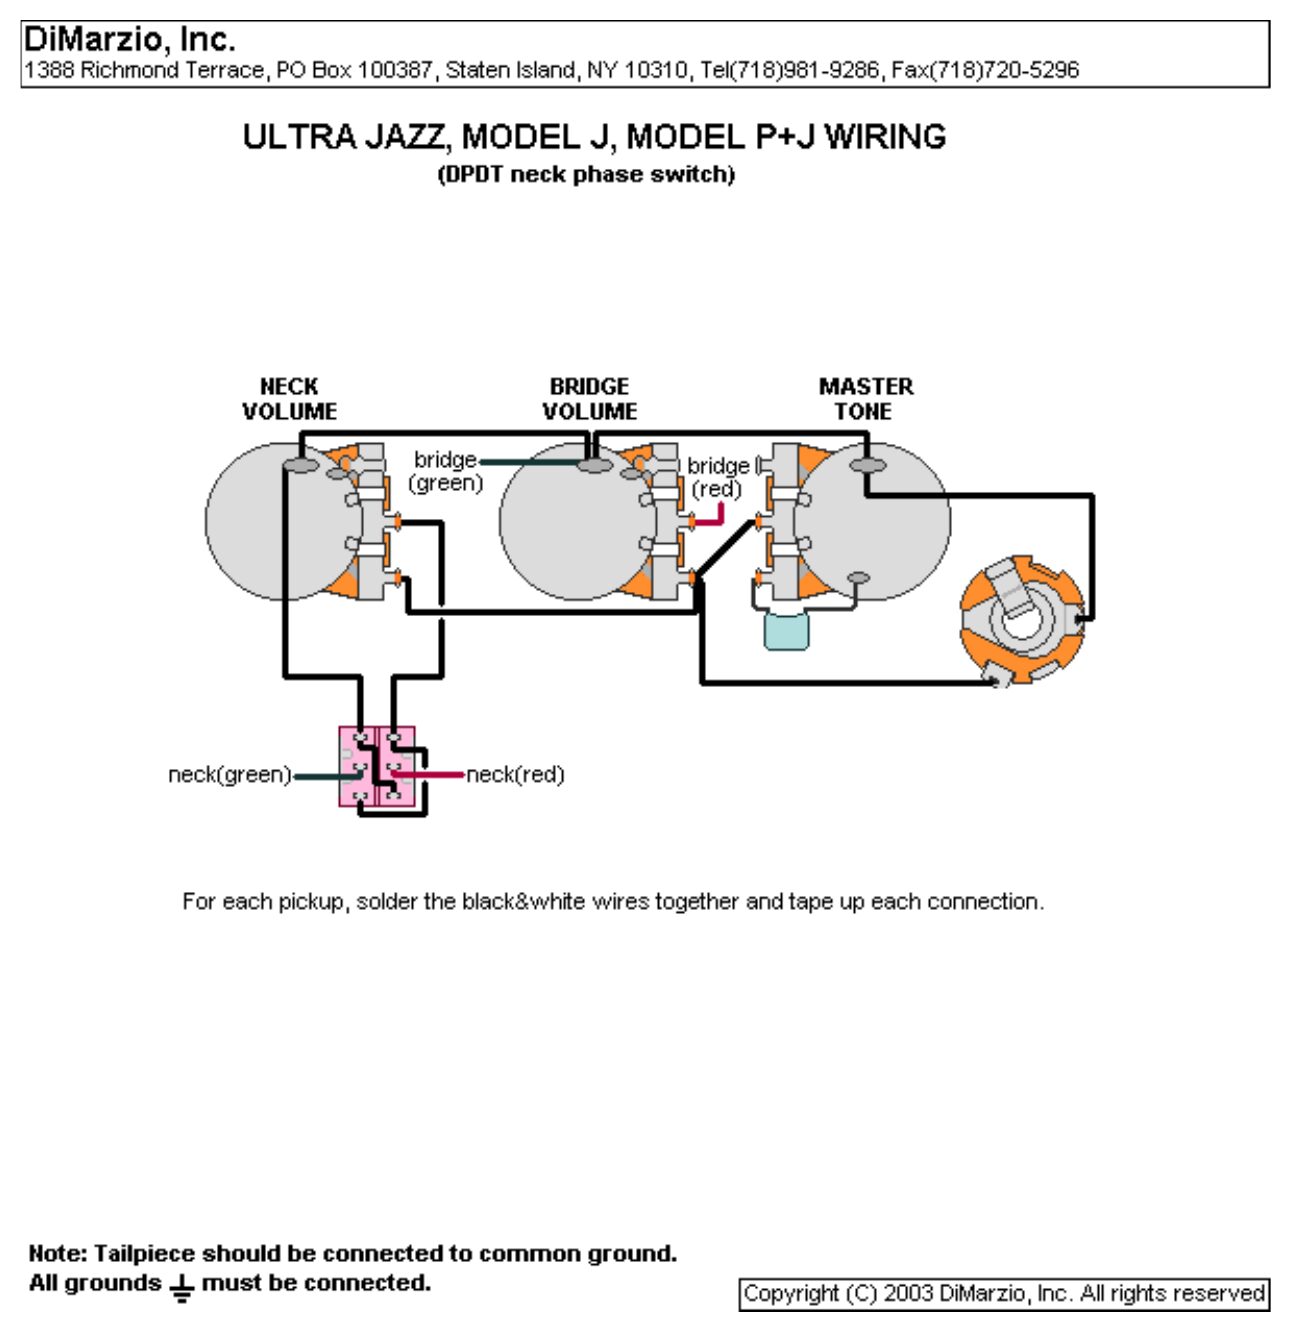
| # | From | To | Notes |
|---|---|---|---|
| 1 | Each pickup: black + white | Join and tape | |
| 2 | Neck pickup: red and green | DPDT, wired as a cross-over | |
| 3 | DPDT outputs | Neck volume: middle lug, and ground | |
| 4 | Bridge pickup: red | Bridge volume: middle lug | |
| 5 | Bridge pickup: green | Ground | |
| 6 | Neck volume: free outer lug | Bridge volume: free outer lug | Output |
| 7 | Master tone: middle lug | Joined volume outputs | Tone sits across the output |
| 8 | Master tone: one outer lug | Capacitor, other leg to ground | Other outer lug left empty |
| 9 | Joined volume outputs | Output jack: tip | |
| 10 | All pot casings | Output jack: sleeve (ground) | Bridge ground wire to a pot casing |
Step by step
- Join black and white on each pickup and tape.
- Neck red and green to the switch, with the two cross-over jumpers.
- Switch outputs to the neck volume's middle lug and ground.
- Join the volumes' outputs; run them to the tone and the jack tip.
- Test: plug in at low volume, tap each pickup and try every control and switch position before closing the cavity.
- Phase: the switch swaps the pickup's hot and ground wires. With both pickups on, out of phase gives a thin, nasal sound; on its own the pickup sounds the same either way.
- The switch is explained by what each position does rather than lug by lug: follow DiMarzio's drawing for the exact switch lugs.
DiMarzio Ultra Jazz, Model J, Model P+J: push-pull dual sound volumes and DPDT phase switch
Push-pull volumes for dual sound on each pickup, plus a mini DPDT phase switch on the neck.
You need: 2 push-pull volumes, 1 tone, capacitor, DPDT on/on mini switch, mono output jack.
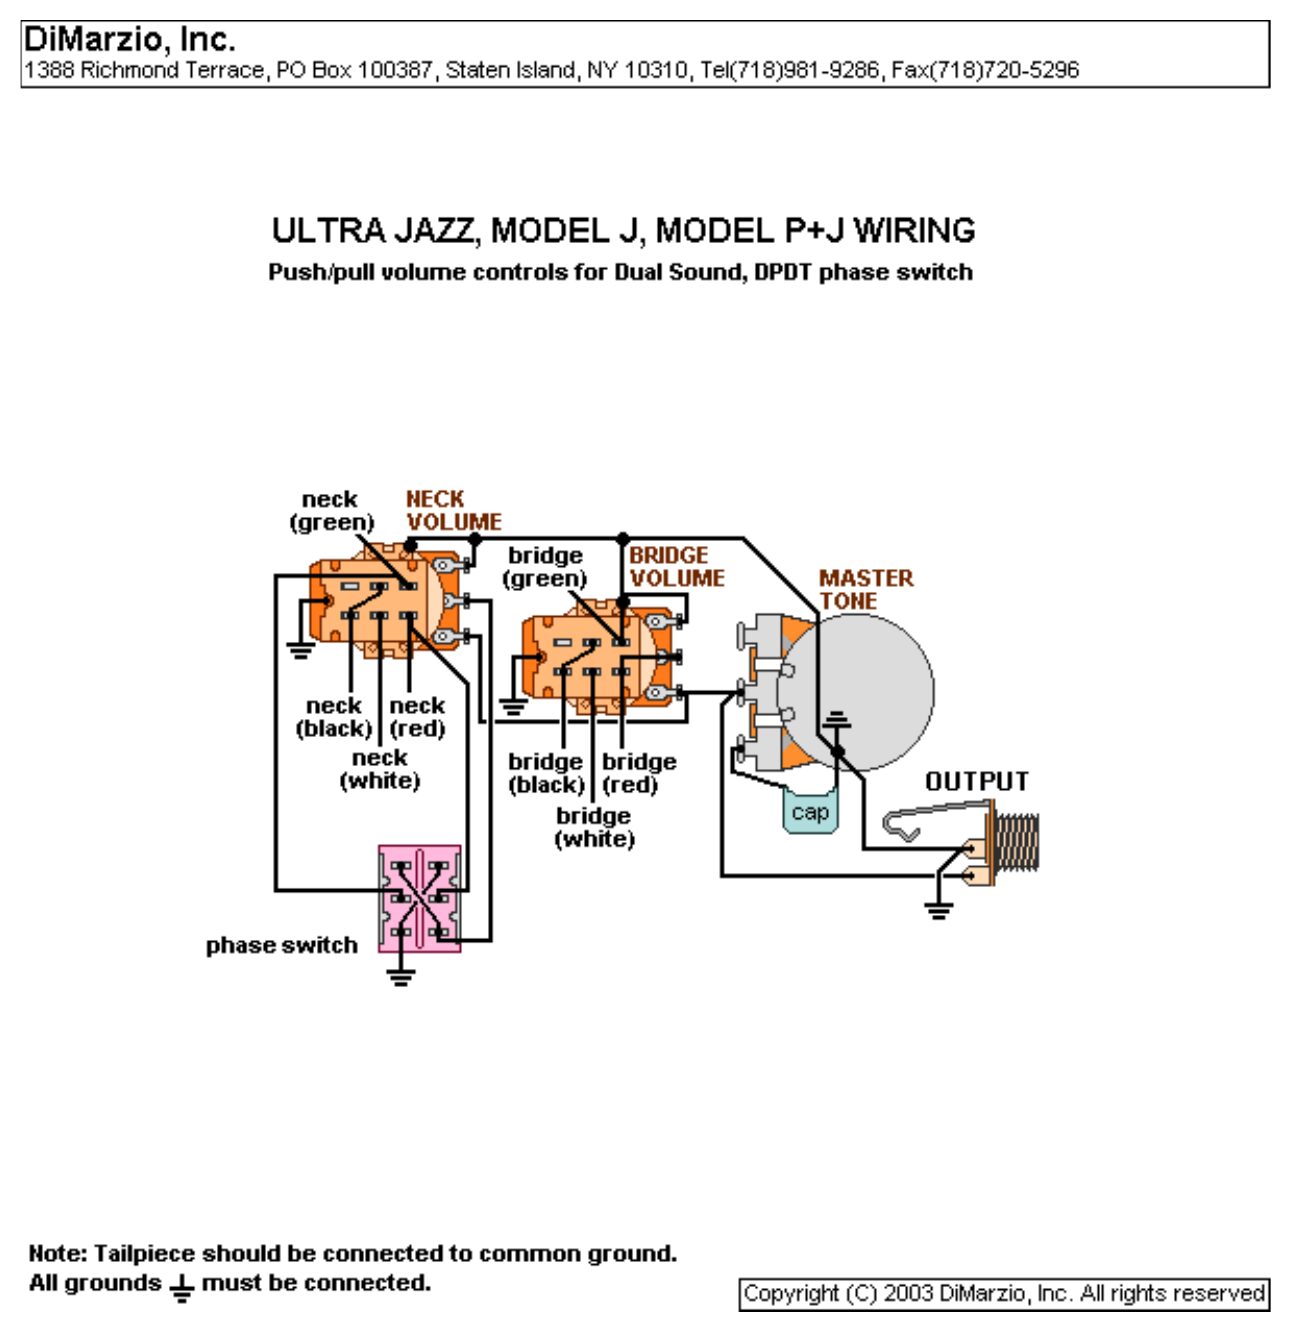
| # | From | To | Notes |
|---|---|---|---|
| 1 | Each pickup: black, white, red, green | Its volume's push-pull switch | Series/parallel |
| 2 | Neck pickup's hot and ground path | DPDT phase switch (cross-over) | |
| 3 | Neck volume: free outer lug | Bridge volume: free outer lug | Output |
| 4 | Master tone: middle lug | Joined volume outputs | Tone sits across the output |
| 5 | Master tone: one outer lug | Capacitor, other leg to ground | Other outer lug left empty |
| 6 | Joined volume outputs | Output jack: tip | |
| 7 | All pot casings | Output jack: sleeve (ground) | Bridge ground wire to a pot casing |
Step by step
- Wire each pickup to its volume's push-pull switch.
- Wire the phase switch between the neck pickup and its volume.
- Join the volumes' outputs; run them to the tone and the jack tip.
- Test: plug in at low volume, tap each pickup and try every control and switch position before closing the cavity.
- Each dual-sound switch joins black and white (series) one way and puts white to hot and black to ground (parallel) the other way, as on the Model P dual-sound sheet above.
- Phase: the switch swaps the pickup's hot and ground wires. With both pickups on, out of phase gives a thin, nasal sound; on its own the pickup sounds the same either way.
- The switch is explained by what each position does rather than lug by lug: follow DiMarzio's drawing for the exact switch lugs.
DiMarzio Ultra Jazz, Model J, Model P+J: push-pull dual sound volumes and push-pull phase tone
Push-pull volumes for dual sound, and a push-pull tone that reverses the bridge pickup's phase.
You need: 2 push-pull volumes, push-pull tone pot, capacitor, mono output jack.
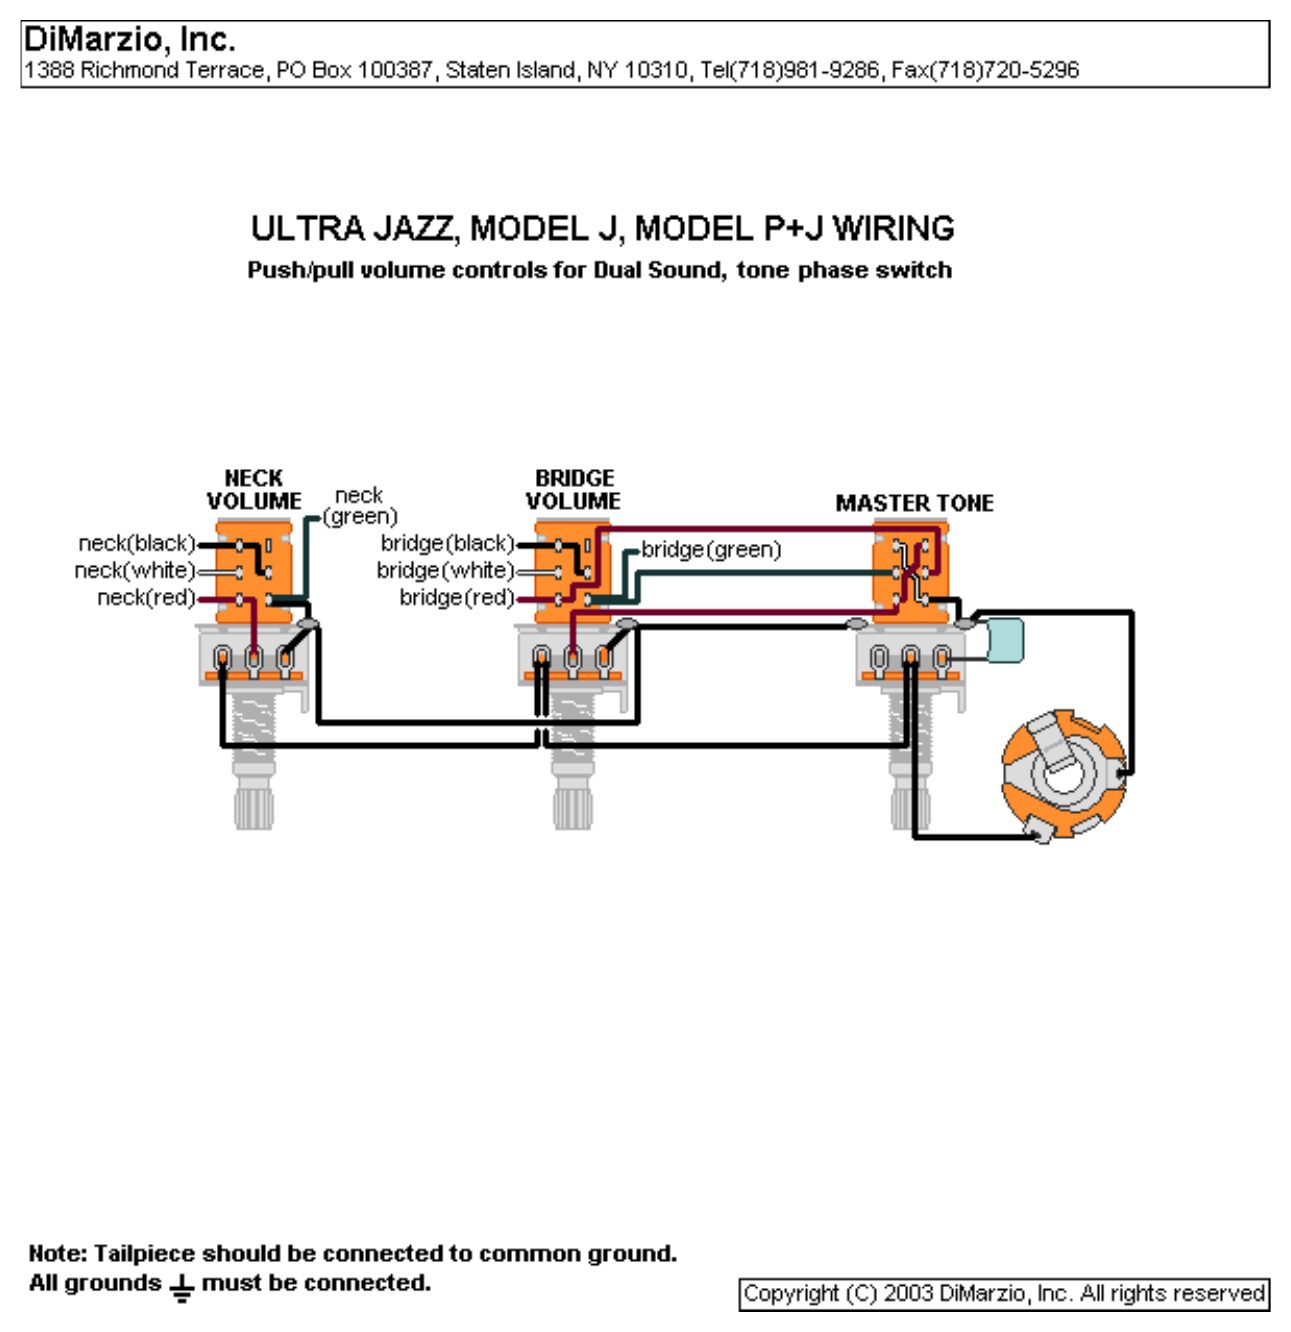
| # | From | To | Notes |
|---|---|---|---|
| 1 | Each pickup: black, white, red | Its volume's push-pull switch | Series/parallel |
| 2 | Bridge pickup: red and green | Tone's push-pull switch (cross-over) | Phase |
| 3 | Neck pickup: green | Neck volume casing | |
| 4 | Neck volume: free outer lug | Bridge volume: free outer lug | Output |
| 5 | Master tone: middle lug | Joined volume outputs | Tone sits across the output |
| 6 | Master tone: one outer lug | Capacitor, other leg to ground | Other outer lug left empty |
| 7 | Joined volume outputs | Output jack: tip | |
| 8 | All pot casings | Output jack: sleeve (ground) | Bridge ground wire to a pot casing |
Step by step
- Wire each pickup to its volume's push-pull switch.
- Route the bridge red and green through the tone's push-pull cross-over.
- Join the volumes' outputs; run them to the tone and the jack tip.
- Test: plug in at low volume, tap each pickup and try every control and switch position before closing the cavity.
- Each dual-sound switch joins black and white (series) one way and puts white to hot and black to ground (parallel) the other way, as on the Model P dual-sound sheet above.
- Phase: the switch swaps the pickup's hot and ground wires. With both pickups on, out of phase gives a thin, nasal sound; on its own the pickup sounds the same either way.
- The switch is explained by what each position does rather than lug by lug: follow DiMarzio's drawing for the exact switch lugs.
DiMarzio Ultra Jazz, Model J, Model P+J: neck pickup with dual sound and phase switching
Two mini DPDTs on the neck pickup: one for series/parallel, one for phase.
You need: 2 volumes, 1 tone, capacitor, 2 DPDT on/on mini switches, mono output jack.
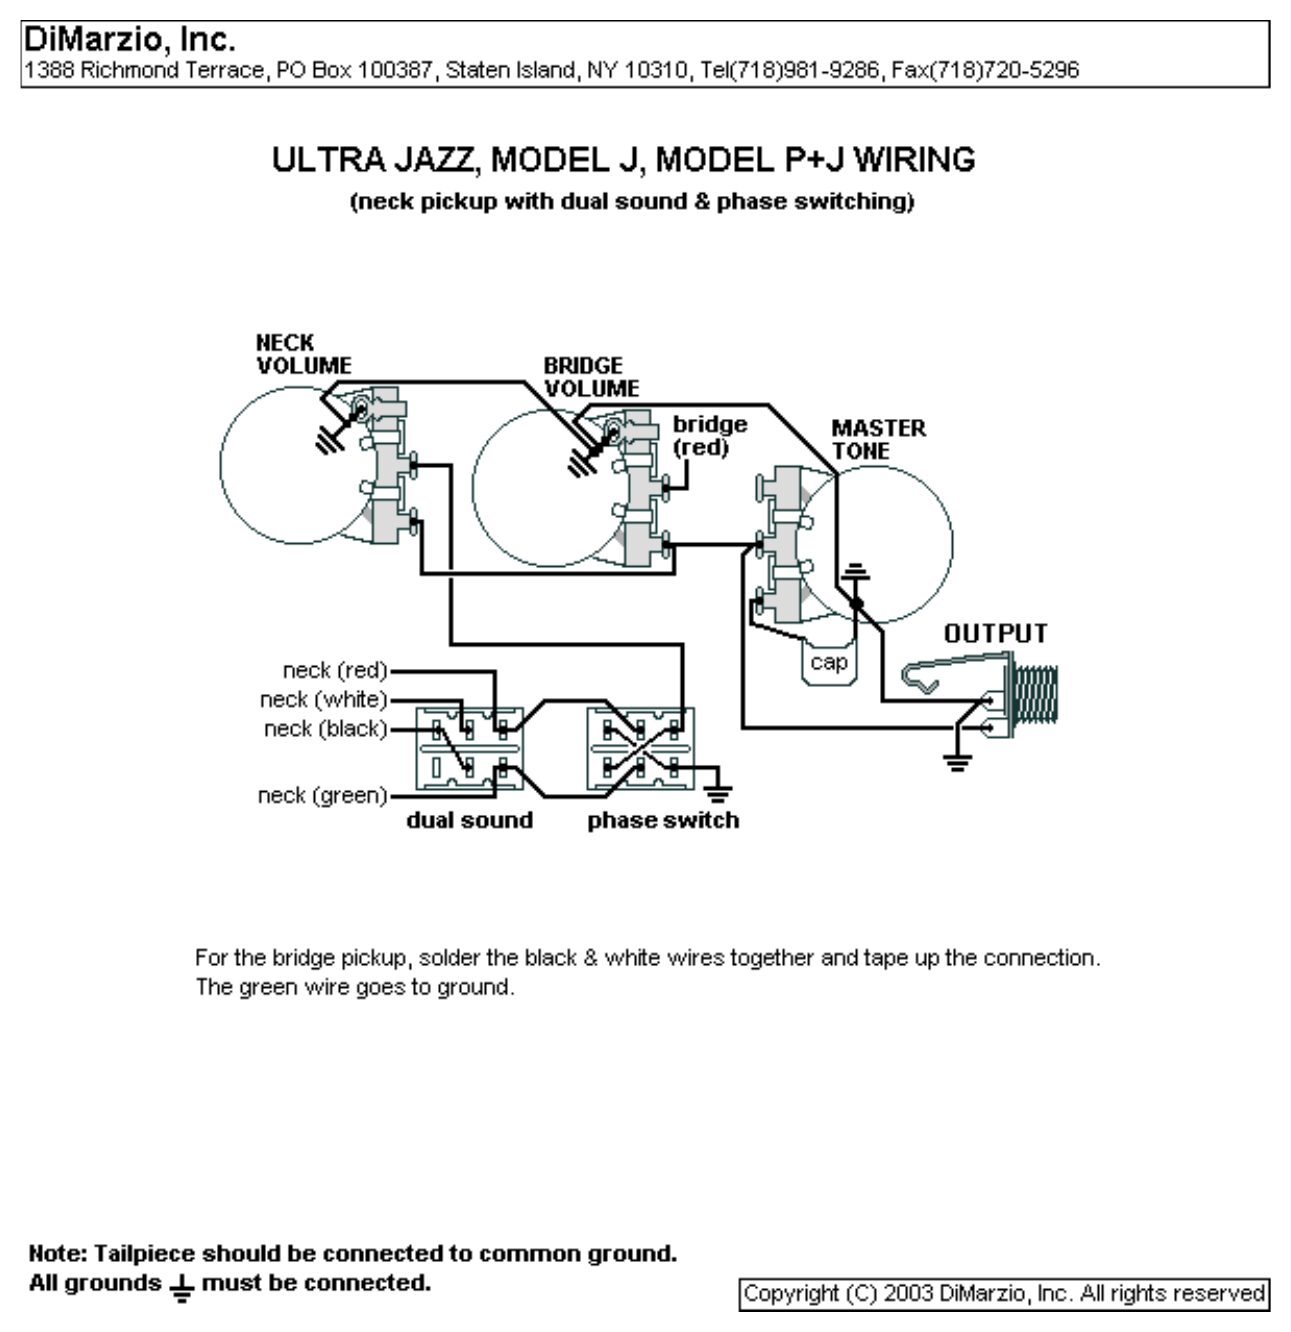
| # | From | To | Notes |
|---|---|---|---|
| 1 | Neck pickup: red, white, black, green | Dual-sound DPDT | |
| 2 | Dual-sound DPDT outputs | Phase DPDT (cross-over) | |
| 3 | Phase DPDT outputs | Neck volume: middle lug, and ground | |
| 4 | Bridge pickup: black + white | Join and tape | |
| 5 | Bridge pickup: green | Ground | |
| 6 | Bridge pickup: red | Bridge volume: middle lug | |
| 7 | Neck volume: free outer lug | Bridge volume: free outer lug | Output |
| 8 | Master tone: middle lug | Joined volume outputs | Tone sits across the output |
| 9 | Master tone: one outer lug | Capacitor, other leg to ground | Other outer lug left empty |
| 10 | Joined volume outputs | Output jack: tip | |
| 11 | All pot casings | Output jack: sleeve (ground) | Bridge ground wire to a pot casing |
Step by step
- Bridge pickup: black and white joined and taped, green to ground, red to the bridge volume.
- Neck pickup to the dual-sound switch, then through the phase switch to the neck volume.
- Join the volumes' outputs; run them to the tone and the jack tip.
- Test: plug in at low volume, tap each pickup and try every control and switch position before closing the cavity.
- Each dual-sound switch joins black and white (series) one way and puts white to hot and black to ground (parallel) the other way, as on the Model P dual-sound sheet above.
- Phase: the switch swaps the pickup's hot and ground wires. With both pickups on, out of phase gives a thin, nasal sound; on its own the pickup sounds the same either way.
- The switch is explained by what each position does rather than lug by lug: follow DiMarzio's drawing for the exact switch lugs.
FAQ
Which DiMarzio wire is hot on a bass humbucker?
On most DiMarzio bass humbuckers red is hot and green goes to ground, with black and white joined and taped for series. A few pickups are reverse-wound (Model One neck, Will Power middle): there the sheet tells you to ground the red and use green as hot.
What does DiMarzio dual sound mean?
Dual sound is a series/parallel switch. Series (black and white joined) is the full humbucker sound; parallel (white to hot, black to ground) is brighter and a little quieter, and both coils still cancel hum.
What pot values should I use with DiMarzio bass pickups?
DiMarzio's sheets don't give values. 250K pots are the usual choice for passive bass pickups and 500K for a brighter sound; tone caps are typically 0.047 µF. Use what the pickup's own spec sheet recommends.
Why is the pickup on the volume's middle lug?
DiMarzio draws the pickup on the middle lug and the output on the outer lug. Wired this way, turning one volume down doesn't mute the other pickup.
Related
- DiMarzio bass pickups
- DiMarzio Model J and Ultra Jazz wiring guide
- All bass wiring diagrams
- Aguilar OBP-3 wiring diagrams
Questions about a hookup? Call 877-839-3531 or email sales@bestbassgear.com.