2-Pickup Volume-Blend-Tone Wiring Diagram
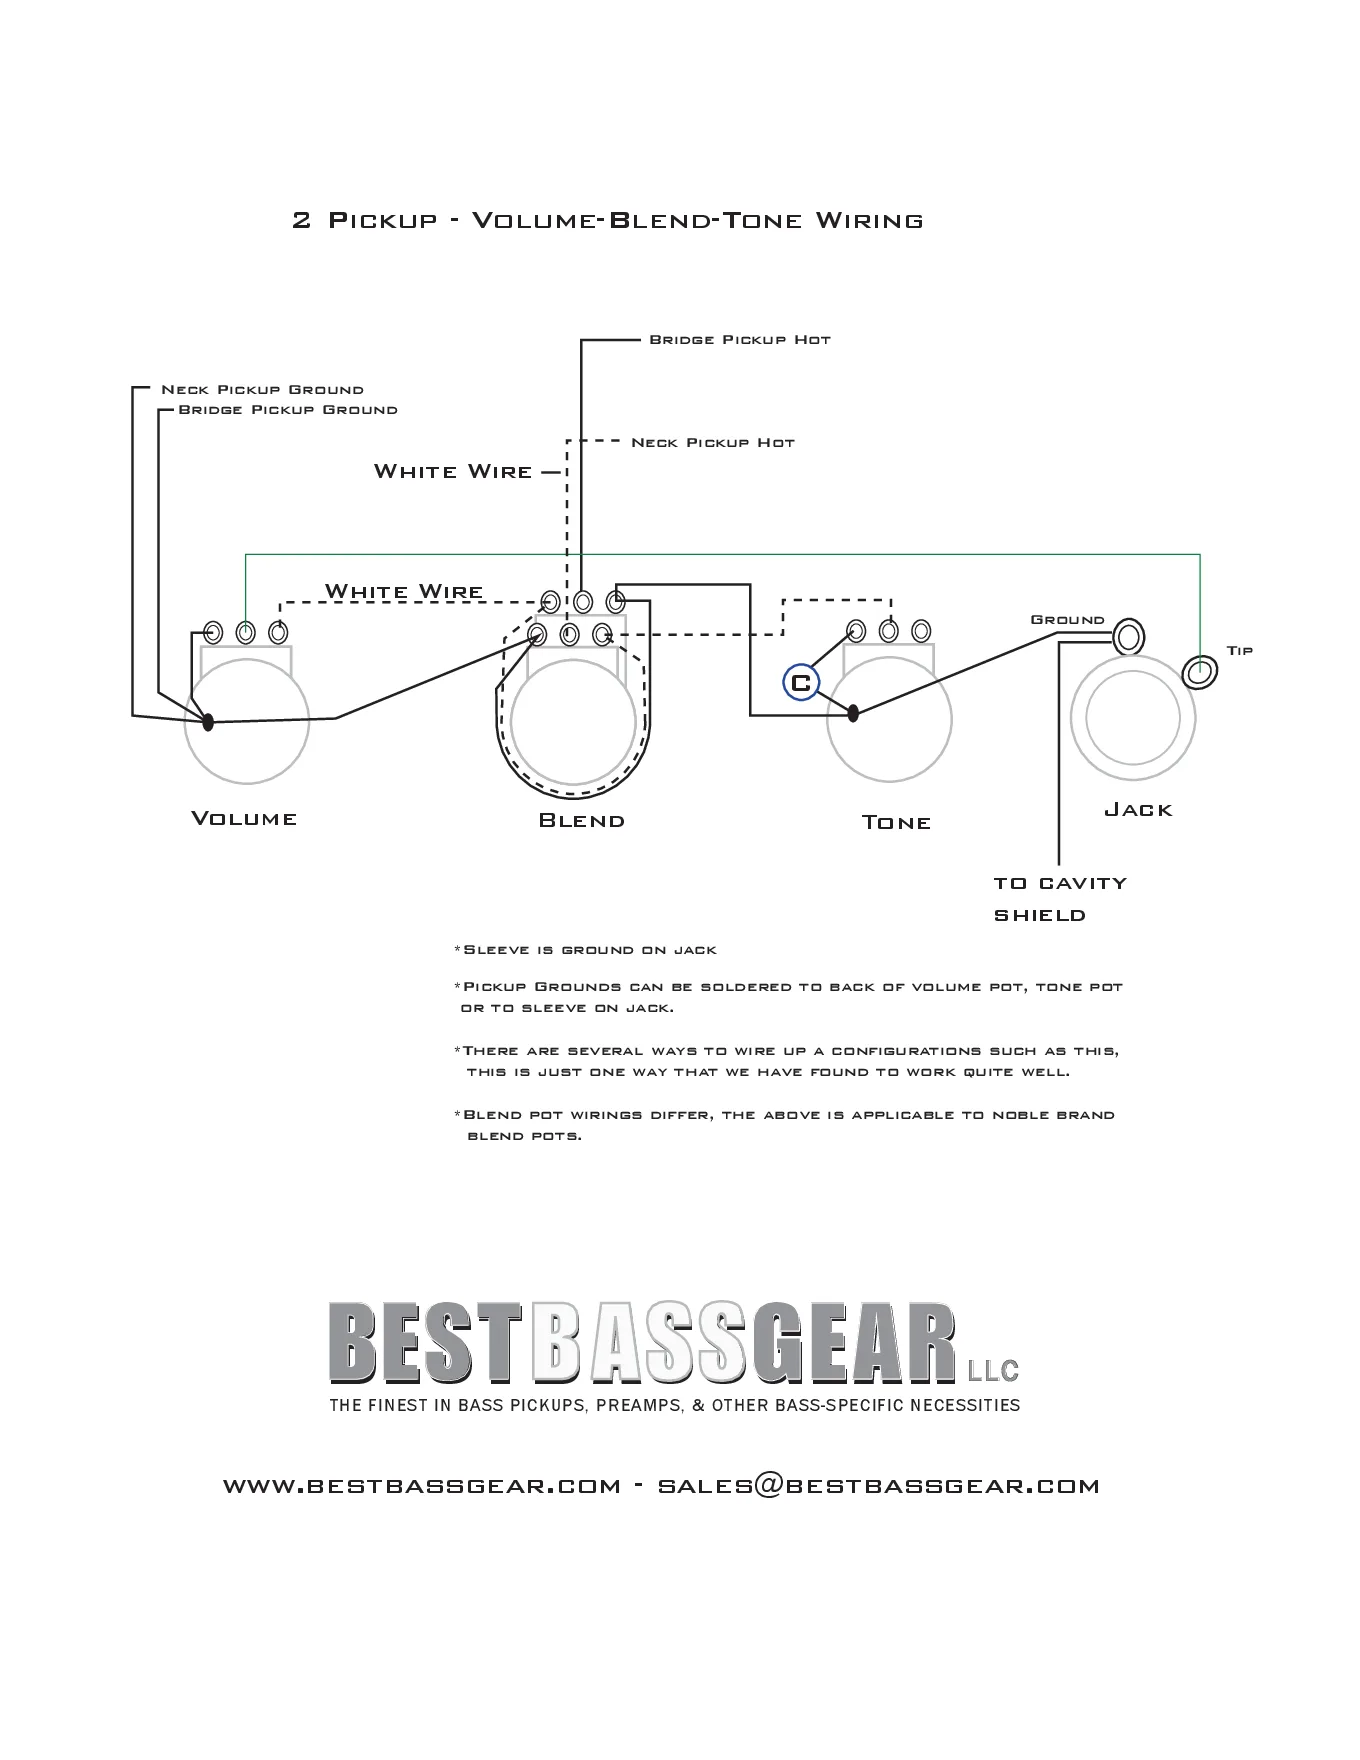
Our own diagram for the common passive 2-pickup layout: master volume, blend and master tone. There are several ways to wire this. This is one we've found works well. The blend wiring shown is for Noble brand blend pots. Other blend pots differ.
Before you solder
- Neck pickup hot and bridge pickup hot go to the blend pot. The two white wires run from the blend to the volume.
- Pickup grounds can go to the back of the volume pot, the tone pot, or the jack sleeve.
- Sleeve is ground on the jack. Run a ground to the cavity shield.
- The tone cap goes across the tone pot (marked C). The diagram doesn't give a value.
- The blend wiring is for Noble blend pots. Other brands are wired differently.
Every diagram, wire by wire
Our volume, blend, tone diagram as text: a connection diagram, a wire-by-wire table and the steps.
How to read these
- Pot lugs: lug 2 is the middle lug. Lug 1 is the outer lug that goes to ground, lug 3 is the other outer lug. If a knob works backwards, swap the wires on lugs 1 and 3.
- Blend lugs are named as drawn: two rows of three, seen with the lugs facing you. The upper row is one gang, the lower row the other.
- Ground means the back of a pot casing (or the jack sleeve). Join all pot casings with a bare wire so they share one ground.
2-pickup volume, blend, tone (Noble blend pot)
Both pickups go to a Noble dual-gang blend, the blend output feeds the master volume and the tone, and the volume's middle lug goes to the jack tip.
You need: Noble dual-gang blend pot, volume pot, tone pot, tone capacitor, mono output jack.
| # | From | To | Notes |
|---|---|---|---|
| 1 | Bridge pickup: Hot | Blend (Noble): Upper middle | |
| 2 | Neck pickup: Hot | Blend (Noble): Lower middle | |
| 3 | Bridge pickup: Ground | Ground (back of a pot casing) | Back of the volume pot |
| 4 | Neck pickup: Ground | Ground (back of a pot casing) | Back of the volume pot |
| 5 | Blend (Noble): Upper left | Blend (Noble): Lower right | Jumper: the two blend outputs |
| 6 | Blend (Noble): Upper right | Ground (back of a pot casing) | |
| 7 | Blend (Noble): Lower left | Ground (back of a pot casing) | |
| 8 | Blend (Noble): Upper left | Volume: Lug 3 (in) | White wire |
| 9 | Blend (Noble): Lower right | Tone: Lug 2 | White wire |
| 10 | Volume: Lug 2 (out) | Output jack: Tip | |
| 11 | Volume: Lug 1 | Ground (back of a pot casing) | |
| 12 | Tone: Outer lug | Tone cap: Lead A | |
| 13 | Tone cap: Lead A | Ground (back of a pot casing) | Other cap lead to the tone casing |
| 14 | Output jack: Sleeve | Ground (back of a pot casing) | Also run a ground to the cavity shield |
Step by step
- Mount the controls. Fit the volume, blend, tone and jack, and join the pot casings with a bare wire.
- Pickup hots. Bridge hot to the upper row's middle lug of the blend; neck hot to the lower row's middle lug.
- Pickup grounds. Both pickup grounds to the back of the volume pot (the tone pot back or jack sleeve also work).
- Blend jumpers. Jumper the upper-left lug to the lower-right lug: together they are the blend output. Upper-right and lower-left lugs go to ground.
- Blend to volume and tone. White wire from the blend output to volume lug 3, and another to the tone pot's middle lug.
- Volume. Volume middle lug (lug 2) to the jack tip; volume lug 1 to its casing.
- Tone. Tone cap from the tone pot's free outer lug to the tone casing.
- Jack. Sleeve to ground, with a wire to the cavity shielding.
- Test. Plug in at low volume and tap each pickup's pole pieces with a screwdriver. Turn each knob end to end before closing the cavity.
- This is drawn for Noble blend pots. Other blend pots have different lug layouts.
- The drawing doesn't give pot or cap values.
Parts in this diagram
FAQ
Will this work with any blend pot?
No. It's drawn for Noble blend pots. Other blend pots are wired differently.
Where do the pickup grounds go?
To the back of the volume pot, the tone pot, or the jack sleeve. Any of the three works.
Related diagrams
- Aguilar OBP-3 Wiring Diagram
- Jazz Bass Series/Parallel Wiring Diagram
- All bass wiring diagrams
- Manuals and dimension drawings
Questions about your install? Email sales@bestbassgear.com.